Setting up a Case Update Rule Triggered Email Distribution
Updated
Email distribution enables you to send customizable survey invitation emails to customers in real time. These distributions can be triggered immediately, scheduled for a specific time, or initiated by external events. This article focuses on how to send emails through triggered Email Survey Distribution whenever they are needed.
Business Use Cases
Post-Care Feedback Automation: Automate the delivery of post-interaction surveys by triggering feedback requests based on predefined workflow conditions, such as when a case is marked as resolved or closed. This ensures that customers receive timely survey invitations after every service interaction, helping you consistently capture feedback without requiring any manual effort from agents or support teams.
Service Performance and Experience Analytics: By automatically triggering surveys from case updates, Lena can capture customer feedback across different case types, regions, and support teams. The seamless flow from service interactions to survey responses and analytics helps her monitor customer satisfaction trends, identify service gaps, and make data-driven improvements to enhance the overall support experience.
By integrating Sprinklr Service with CFM, you can automate post-case feedback collection by triggering surveys directly through case update rules, eliminating the need for manual survey distribution. This seamless workflow helps improve operational efficiency, capture real-time customer insights immediately after case closure, and boost response rates through personalized emails with embedded feedback questions. Additionally, brand-aligned email templates ensure a consistent customer experience, while closed-loop analytics connect service performance with customer satisfaction outcomes, enabling continuous improvement across your support operations.
Prerequisites
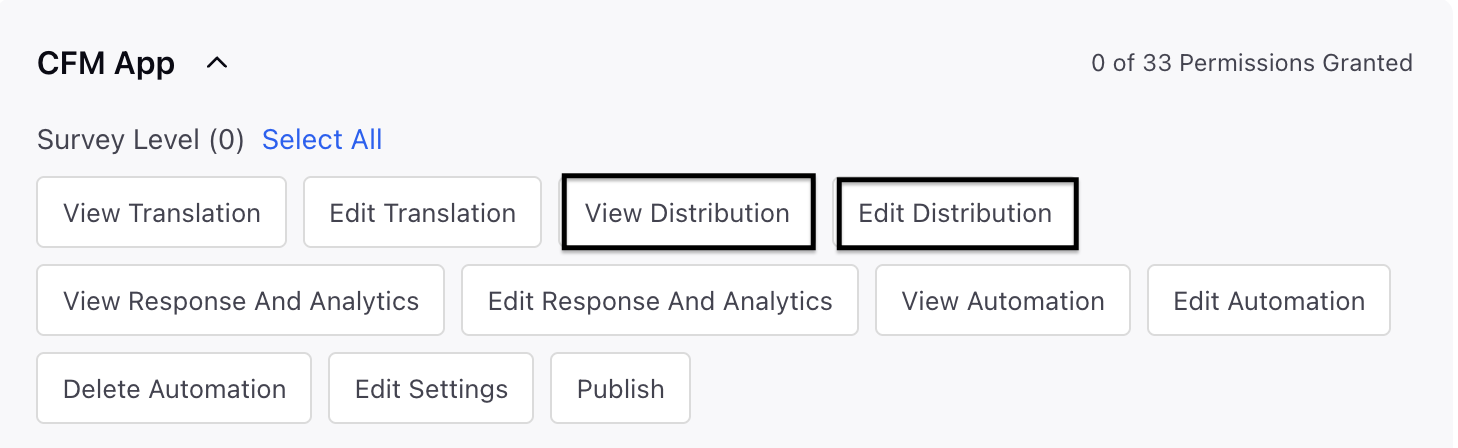
In order to access the Email Distribution, you must have the following View and Edit Distribution permissions at the Survey Level.
Setting Up Triggered Email Survey Distribution
Following are the steps to access Email Distribution:
Open a Survey and navigate to the Distribution tab.
Click + Create Distribution and select Email and click Create Now.
Go to Details section and and fill the email :
Distribution Name: Add name of the distribution.
Distribution Description: Add a description to the distribution.
Survey Type:You can choose either Standard or Conversational Surveys from the dropdown menu.

Click Next.
Distribution Email Setup:
Navigate to the "Body" section by clicking Save. A basic image and default content are automatically added. You have the ability to personalize every component, such as the Email Subject, Email Body text, Image, and Button text.

Subject : Add Subject manually or use AI to add subject line.
The is an option to reword, fix spelling and grammar, make it long, make it short, modify tone (capability to modify tone to professional, relaxed, empathetic, etc.), simple language, translate (capability to translate to 150 different languages).
Image: You can add an image to the Email Distribution. There is the capability to Download, Preview and Delete image.
Body: Include the body of the email, and you can personalize the text using a rich text editor that allows for full customization of text elements.
Button Text: You can add a by clicking on Button Text option.
Check Insert Survey Link box to add a survey link.
Thank You: You can add thank you text to the option. You can customize the text using a rich text editor that allows for full customization of text elements.
Footer Text: You can add footer text and also add Unsubscription option. You can customize the text using a rich text editor that allows for full customization of text elements.
Click Next.
Embedding a Survey Question in the Email
You can embed an NPS, CSAT, MCQ, or Rating Scale question directly within the email, making it easier for recipients to engage with the survey. These interactive questions allow recipients to select an option from the email itself and are then redirected to the survey with their response already pre-filled, creating a seamless and personalized survey experience.
Only NPS, CSAT, MCQ, and Rating Scale questions are supported to be embedded in the mail body.
Embedded questions are not supported for conversational survey type.
Embedded Question Eligibility: A question is eligible for embedding only if all the following conditions are met:
The question has no display logic (including at the statement/choice level)
The question does not contain text variants
For MCQ questions specifically: no default choices, and no choice randomisation
If an embedded question becomes ineligible (e.g., it is deleted, moved to another page, or display logic is added in the survey builder), it will be automatically removed from the email/reminder, and the survey button will be re-enabled if it was disabled.

 Preview and Test Options:
A live preview of the email’s appearance is available on the email builder screen to assist you during customization.

For additional assurance, you can send a test email to check the email’s look and feel on an actual email platform. This can be done by selecting a sender account and entering their own email address.
The test email will always be sent in the base language.
Placeholders will remain unresolved and will display as placeholder names instead of actual values.
Any response submitted through this survey will be recorded as a Test Response, with distribution channel set to Email
Test Responses will be excluded from distribution metrics and dashboard data by default. You can still view them from the custom dashboard.
Quarantine rules, un-subscription, and quotas will not apply to test emails.

Note: Placeholders are not resolved in Test Emails due to the absence of a profile. Expect "FIRST_NAME" instead of the actual name.Select the Sender Account and type in the email to which you want to send a test email to.

Thank You Email Setup:

Go to Thank you Template section to create a Thank You Email.
Toggle Enable or Disable Thank You Email. By default, the thank you email will be enabled.
Subject: You can add subject and also use Sprinklr AI to create the subject.
Image: You can add an image by that will suit your Thank You template.
There is capability to Download, Preview and Delete image.
Body: Include the body of the Thank You email, and you can personalize the text using a rich text editor that allows for full customization of text elements. For additional customizations, you can consult the Text Modifications included in the Distribution Email.
Thank You text : You can add thank you text. You can customize the text using a rich text editor that allows for full customization of text elements.
For additional customizations, you can consult the Text Modifications included in the Distribution Email.
Footer Text: You can add footer text and also add Unsubscription option. You can customize the text using a rich text editor that allows for full customization of text elements. For additional customizations, you can consult the Text Modifications included in the Distribution Email. You can easily add a survey link or an unsubscribe link to the email.
Click Send Text Email( In the preview section).
Sender: Select accounts.
Email: Enter email address.
Click Send.
Click Next.
Note: Please note that the “Survey Link” option or the button will not be included in this email.
Reminder Email Setup

Go to Reminder Template to customize the reminder email.
Toggle Enable to enable or disable reminder email.
Subject: You can add subject to the reminder template and also use Sprinklr AI to create the subject.
Image: You can add an image by that will suit your Reminder template.
There is capability to Download, Preview and Delete image.
Body: Include the body of the Reminder email, and you can personalize the text using a rich text editor that allows for full customization of text elements. For additional customizations, you can consult the Text Modifications included in the Distribution Email.
Reminder text : You can add reminder text. You can customize the text using a rich text editor that allows for full customization of text elements.
For additional customizations, you can consult the Text Modifications included in the Distribution Email.
Reminder Text: You can add footer text and also add Unsubscription option. You can customize the text using a rich text editor that allows for full customization of text elements. For additional customizations, you can consult the Text Modifications included in the Distribution Email. You can easily add a survey link or an unsubscribe link to the email.
Go to Reminder Frequency and configure how often the reminder emails will be sent to recipients who haven't responded yet.
You can set up multiple reminder emails for recipients who have not yet responded to the survey.
Repeats: You can select Daily, Weekly, Monthly(Mandatory).
Repeat Every: You can set the number of days between each reminder (Mandatory).
End After (Occurrences): You can define the maximum number of reminders to be sent (Mandatory).
You can set up the frequency with which the reminder emails would be sent.
Example: We have configured the system to send a reminder email every 3 days, with a maximum of 2 reminders per recipient.
 Note: You can change the frequency unit while setting up, they can also use the does not repeat option if they wish to send the reminder email only once.
Click Send Text Email( In the preview section).
Sender: Select accounts.
Email: Enter email address.
Click Send.
Click Next.

Transalation Setup:

Visit the section titled Translation Details to configure translated versions of the email, allowing you to tailor the language in which recipients receive the email according to specific profile criteria. By establishing translation conditions, you can guarantee that each recipient receives the appropriate version of the email based on their profile details, including location or custom fields.
This functionality is especially beneficial for campaigns in multiple languages, ensuring that recipients receive the most pertinent content in their chosen language. Follow the steps to set up translation:
Click + Translation.
Go to Add Transaltion page and select languages from the dropdown and click Add.
Click Add Language to add specific language.
Go to Language Condition Section( The profile level conditions will control the language in which the recipient receives the email.

These translation conditions can be setup for languages in which translations are added.
Language: Select the language you want to assign for the recipient.
Show this language if: Create and select controlling fields. These are profile-level custom fields that are analyzed for each recipient before sending the email. The email language will be determined by these fields.
Example: You can create a condition so that if the custom field "Location" has the value "Spain," the Spanish version of the email will be sent. If no match is found, the email will be sent in the base language of the survey.
Operator: Select the operator.
Value: Add a value.
Multiple conditions can be added. Click Configure Transalation to edit the template.
Editing the Translated Text: The Email Body, Reminder, and Thank You sections will be automatically included in the chosen language.
If Auto Translate was enabled, all email components will be auto translated into the chosen language.
For example, if French is selected, the main email, Thank You, and Reminder emails will be translated. Otherwise, they will remain in the base language.
You can review and modify translations for each text component of the email, including:
Email Subject
Email Body Text
Button Text
You can also replace images if necessary. For instance, you might include a French logo in place of an English logo.
Click Next.
Note: Fonts supported for your Email Body, Thank You message, Button text, and Footer text include Arial, Courier New, Georgia, Times New Roman, Trebuchet, and Verdana, and you can choose your preferred font size and color. When you select a font for your base‑language email, that same font will automatically be applied to any new translated version unless it isn’t supported in the target language, in that case, it will fall back to that language’s default font. You can still change the font type for each language independently.
Sending Trigger Based Emails:

After you have prepared your email content, thank you or reminder messages, settings, and survey, you can move on to the ‘Schedule’ page to dispatch emails to your customers.
Type: Select Trigger Based from the dropdown.
Sender Account: Select the email account through which you want to send the emails. To add an account:
Navigate to CFM Persona App → Global Settings → Accounts → Add Account → Choose ‘Email Marketing’.
Note: The "Email Marketing" account type is supported for Email Distribution. The "Email" account type is not supported.Link Expiry Details:
Start Date and Time: You can select a start date and time.
Expiration Type: Select the expiration type from the dropdown.
Static: Set a fixed expiration date and time, after which the survey link will no longer be accessible.
Dynamic: Set a fixed expiration date and time, after which the survey link will no longer be accessible.
Choose the value for Expires After and specify the hours or days.
Limit submissions per respondent: You can adjust the limit on submissions for each respondent. Choose the maximum number of submissions permitted and also toggle to reset the limit after a specified time period.
Example: Adjust the limit to "a value" on a daily, weekly, or monthly schedule.
Distribution Tagging: You have the ability to set up custom tags for reporting associated with this distribution. You can select the custom field and its value. Each custom field you create will result in a new column appearing in the Responses Tab and click Done.
Setting up Case update Rule
Navigate to Rule engine and create a new Case Update Rule by selecting content as “Case Update”.


CFM survey conditions

You can configure CFM survey conditions in the Rule Engine before triggering specific survey actions (such as sending reminders or thank-you emails) based on the invite status, response status, or time elapsed since a survey invite was sent. Steps to Configure a CFM Survey Condition:
Add a new condition to your rule.
Provide a name for the condition.
In the right-hand pane, go to Conditions Applies to CFM Survey.
Select one of the following condition types:
CFM Survey Action

Once you’ve set up your survey conditions, you can configure Rule Engine actions to automatically send survey invites, reminders, or thank-you messages based on case events and evaluation logic. Steps to Configure a CFM Survey Action:
1.)Add a new action to your rule.
2.)Provide a name for the action.
3.)In the right-hand pane, go to Actions to CFM Survey.
4.)Select one of the following action:
Key points to note
EMAIL Channel Support
Only profiles with "Social Network" set to "Email" will be eligible to receive email surveys. The email ID used for distribution will be pulled from the Profile’s User ID, not from any other standard or custom fields.
Limitation on Number of Emails per User
To prevent spamming, we limit sending more than one message of the same type to the same respondent within a 24-hour period. This includes the same distribution, subject, and message type (POST, THANK YOU, REMINDER). As a result, only one message can be sent per respondent in a 24-hour window per distribution.
Note: This restriction primarily affects Thank You messages. If a respondent completes the survey multiple times within 24 hours (depending on survey settings), the second Thank You message will not be sent due to the 24-hour rule.
Exclusions:
Survey Emails are unaffected by this issue, as they are sent only once.
Reminder Messages, based on a "days" format, are not affected by overlap scenarios.
Separate Rules Required for Each Action:
“Trigger Survey Invitation,” “Send Survey Reminder,” and “Send Thank You Message” actions must be configured in separate rules. Configuring multiple CFM survey actions within the same rule may lead to execution order issues, where a subsequent action (e.g., reminder or thank-you) could be triggered before the previous action (e.g., survey invite) has completed.
Reminder and Thank You Require Separate Configuration:
Reminder and thank-you messages are not triggered automatically after the survey invite. They require independent Rule Engine actions to be configured explicitly.
Conditions Must Be Defined to Control Reminder Delivery:
Appropriate Survey Status conditions (e.g., Failed, Quarantined, Suppressed, Unsubscribed, Completed) should be added to ensure that reminders and thank you messages are sent only to eligible recipients and not to users who have opted out or already completed the survey.
Best Practices
To ensure reliable execution of survey-related actions in Rule Engine, configure each survey flow (Invitation, Reminder, and Thank You) as separate rules, rather than combining multiple actions within the same rule.
Recommended setup:
Rule 1 – Trigger Survey Invitation: Configure the “Trigger Survey Invitation” action to send surveys on cases that meet defined conditions. Move the case to a specific queue after the invite is triggered.
Rule 2 – Send Survey Reminder: Create a separate rule that runs on the queue used for survey invites. Add a “Survey Status” condition (e.g., to exculde Failed, Quarantined, Suppressed, or Completed) and configure the “Send Survey Reminder” action for eligible cases.
Rule 3 – Send Thank You Message: Configure another rule that triggers based on survey completion status to send the “Thank You Message.”
This separation ensures that each action executes only after the previous one has been processed, avoiding timing or sequencing issues that can occur when multiple CFM survey actions are defined within the same rule.