Data Management Nodes
Updated
This article explains the nodes in the Data Management section, providing an overview of their functionalities and usage within guided workflows. These nodes allow for efficient handling of data within Sprinklr’s platform, enabling users to retrieve, update, create, count, and delete records, as well as integrate with external APIs for seamless data operations. Each node offers specific features, such as applying filters, specifying output variables, and automating API calls, to facilitate smooth data management processes in workflows.
Get Record Node
The Get Record node is used to retrieve data from Sprinklr’s database based on the specified filter during configuration. This functionality allows for fetching either a single record or multiple records, with a maximum limit of 100 records per retrieval. Sorting options are also provided. Users can specify the variable name to store the fetched records. When retrieving a single record, the returned variable is an object, whereas for multiple records, the variable is an array of objects. They are fetched as wrappers, which can be converted into normal maps using the function
and then
For example, if the output of this node is stored in a variable called getProfile, then you can access the values of the fetched record by clicking on the resource selector option in further nodes like the update properties screen, etc., and choosing the getProfile variable from the all resources section, and then further choosing the property of the fetched record to be displayed or used.
 Note: Records retrieved using the Get Records node are automatically refreshed at regular intervals to ensure that the latest data from the Elastic search database is returned. This enables Guided Workflows to use the most up-to-date record information during workflow execution.

Name: Give a unique name to your node.
Entity Type: Select the entity type of your choice from the dropdown.
Number of records to get: Set if you want to retrieve Single or Multiple records.
Note: You can fetch a maximum of 100 records at a time.
- Filter Records: Define filter conditions in this field. This helps you narrow down the data you want to fetch. You can also use AND & OR logic to define additional conditions.
- Output Variable: The variable where the fetched record(s) will be stored.
- Exception Variable: The variable that stores error details if the node fails to fetch records.
Note:
If you fetch one record, the variable will be an object. If you fetch multiple records, it will be an array of objects.
If the Get Records node does not return any results, the output variable is set to null instead of retaining values from a previous workflow execution.
Sort Records By: Add sorting roles from the dropdown.
Sort Order: You can choose if you want to sort the records in ascending or descending order.
Note:
The comment option will be visible in the Entity Type dropdown only if the COMMENT_ES_SYNC_ENABLED DP is enabled.
The filter values accept only String values and not numbers. The filter values should be entered within double quotes.
If you want to configure two execution paths (Success and Failure), you must define an exception variable within the node. This will enable the following two paths:
- Success Path is executed when the operation runs successfully.
- Failure Path is triggered when the operation encounters an error.
Update Record Node
The Update Records node enables the modification of field values within single or multiple records of a specified entity type. The updated object or list of objects can be stored in a user-defined variable, and these records can then be converted into regular maps using the functions JSON_UTILS.toJson(var) followed by JSON_UTILS.parseJson(var).
Various Fields in the Update Records Node

- Name: Give a unique name to your node.
- Entity Type: Select the entity type that you want to update the record for.
- Number of records to update: Select if you want to update Single or Multiple records.
Note: You can update a maximum of 100 records at a time.
- When the following conditions are met: Define the conditions that ensure that the records are updated only if the set criteria are met. You can also use AND & OR logic to apply the additional conditions.
- Update the fields as following: In this, you can set which field should be updated.
- Output Variable: Assign the variable to update the records for further use.
- Exception Variable: Define a variable to capture exceptions. If blank, all outcomes go to success. When set, it creates success/failure paths, where failure is only for technical errors, not null results.
Note:
The Update Record node now displays only the fields that support updates for the selected entity. Immutable fields are excluded from the field selection list, ensuring that only editable fields are available for configuration.
If you want to configure two execution paths (Success and Failure), you must define an exception variable within the node. This will enable the following two paths:
- Failure Path is triggered when the operation encounters an error.
- You can link cases directly within Guided Workflows using the Linked Case IDs field available in the case entity. By adding a case asset ID (not the case number) to this field, you can establish relationships between cases. This enables you to easily connect related cases based on criteria such as the same customer, email ID, or issue type while configuring your workflows.
- Once linked, these cases are visible in the Care Console as linked cases. You can also use the Linked Cases widget to view all linked cases for the current case, helping you gain better context and manage related cases more efficiently.
Create Record Node
The Create Records node enables you to create records for a selected entity type and store them in Sprinklr. You can populate entity fields using either static values configured during setup or dynamic values sourced from Guided Workflow variables.

Configure the Create Records Node
Name: Provide a unique name for the node.
Entity Type: Select the entity type for which you want to create a record.
Set Fields: Configure the fields and values required to create the record.
Note: In the example shown above, Case is selected as the entity type. When creating a case, the following fields are mandatory:
From Social Network User ID: Specifies the unique identifier for the selected channel.
Output Variable: Defines the variable that stores the newly created case record.
Additional Notes
- The Create Records node displays only fields that support record creation. Immutable fields are automatically excluded from the field selection list.
- Filter values must be provided as strings enclosed in double quotation marks ("). Numeric values are not supported.
To configure separate success and failure execution paths, define an
Exception Variable
within the node. This enables:
- Success Path: Executes when the record is created successfully.
- Failure Path: Executes when an error occurs during record creation.
- You can link related cases directly within Guided Workflows using the Linked Case IDs field available in the Case entity. Add one or more case asset IDs (not case numbers) to establish relationships between cases. Linked cases are displayed in the Care Console and can also be viewed through the Linked Cases widget, providing additional context for case management.
- The Create Records node supports associating an Account with newly created cases, ensuring that cases are automatically linked to the appropriate account during creation.
Count Record Node
Overview
The Count Records node enables users to retrieve the count of records associated with a particular entity. By specifying the Entity Type, applying Filters, and assigning an Output Variable, users can efficiently obtain the count of records that meet their criteria.
When to use the Count Record node
The Count Records node can be useful in the following scenarios:
Data Analysis: When you need to analyze the volume of records that meet certain conditions.
Performance Monitoring: To track the number of occurrences of specific actions.
Configure the Count Record node
Add the Count Record node into your workflow and set the node Name and the Entity Type.
Under Filter Records, define the conditions including the filtering variable and conditions. The records that match defined conditions will be used by the count record node.
Enter the output variable in Variable Name
Assign an Exception Variable to capture and handle errors during the execution. Enable the Exception Variable by assigning it a variable name. Exception Variable can be defined to handle unexpected situations or exceptions within a workflow. By setting exception variables, users can establish conditions to manage errors, alert agents, or take alternate actions, helping maintain workflow stability and enhance error-handling capabilities. Upon saving, the node will bifurcate into Success and Failure paths.
Success Path - Executed when the node runs successfully.
Failure Path - Triggered when the node encounters an error (For example, timeouts, server issues).
Click Save.

Use Case for Count Records
Consider the instance, you need to manage support tickets and want to prioritize them based on the number of open tickets for each customer. By using the Count Records node, you can select "Support Tickets" as the entity type, set the filter to status = 'open', and assign the output variable openTicketCount. You can then use this count to prioritize customers with more than 5 open tickets and notify the support team if the count exceeds a certain number.
Add API Node
Overview
The Add API node in guided workflows enables easy integration with external systems for data retrieval and action execution. This includes tasks such as integrating external CRM platforms or fetching customer data from client data sources.
Within Sprinklr, the integration team develops extensions to call APIs, which are then invoked within guided workflows. All available inputs for an extension are automatically retrieved within the node. The configuration of the value to be sent is done on the right-hand side of the input variable mapping. Output variable mapping involves associating values returned from the API with variables that can be used within guided workflows. During API configuration, an automatic check verifies the success or failure of the API call (with an HTTPS status code = 200 check). Two legs are automatically generated once the API is configured.
When to use the Add API node
The Add API node can be useful in the following scenarios:
External system integration-Fetching data from external systems, such as customer information from a CRM.
Enhanced guided workflow functionality - Enhancing the functionality of guided workflows by integrating third-party services.
Configure the Add API node
Add the Add API node into your workflow and set the node Name and the API.
Perform Input mapping under the Input section by selecting the API Input and Parameter to send to the API.
All available inputs for an extension are automatically retrieved within the node.
Configure the value to be sent on the right-hand side of the input variable mapping.
Select how the workflow should behave after triggering the API from the API Execution Mode.
Proceed Without Waiting - Submits the API request and immediately continues the workflow execution without waiting for the API response. Use this option when the API call is asynchronous and the workflow does not depend on the API response.
Wait for API Response - Pauses the workflow execution until the API returns a response. Use this option when subsequent workflow steps depend on the API response data.
Specify the maximum time (in seconds) the workflow should wait for the API response when Wait for API Response is selected in the Threshold for API Timeout field.
Perform Output Mapping under the Output section by associating values returned from the API (API Output) with variables that can be used within guided workflows (Parameter to store value).
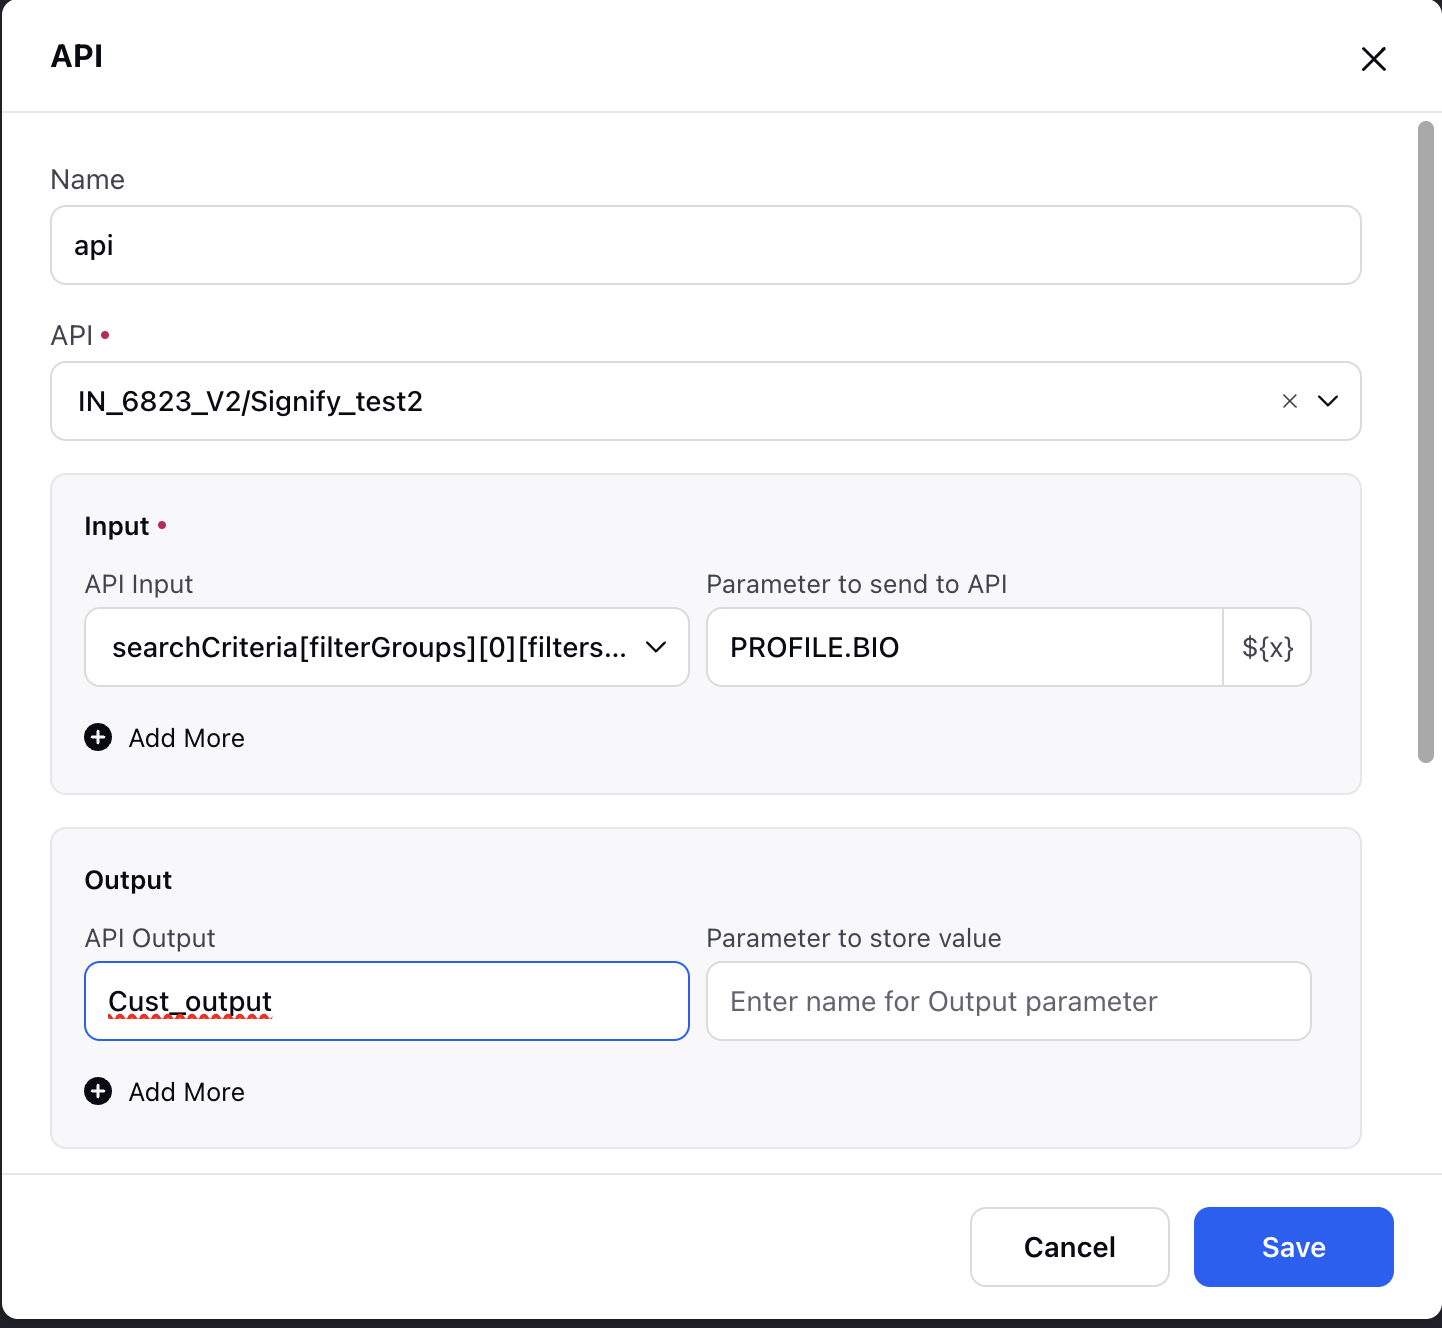

Consider an instance, you need to retrieve customer details from an external CRM system for personalized support. When you receive a call, the workflow triggers the Add API node to fetch customer data using the customer's phone number as the identifier. The API call retrieves the customer details, which are then presented to you. This enables you to provide informed and efficient support, accessing real-time customer data to enhance service quality and reduce call handling time.
Advanced Concepts
API Configuration
An automatic check verifies the success or failure of the API call (with an HTTPS status code = 200 check).
Two legs are automatically generated once the API is configured.
Handling Nested Request Structures
If the API request structure follows a nested format, enable the Data Point (DP) and set its value to true.
By default, the API node will keep this DP set to false if the request structure is not nested.
 Note: To enable this dynamic property (DP) in your environment, contact your Success Manager. Alternatively, you can submit a request at tickets@sprinklr.com.
Delete Record Node
The Delete Records node allows you to delete one or multiple records associated with a specified entity type. You need to define the Entity Type, apply Filters to identify the records for deletion, and specify the Output Variable to capture the response. Upon execution, the node will remove the filtered records from Sprinklr's database and store the status or outcome of the operation in the designated output variable.

Notes:
Deletion is supported in the Screen Recording Entity as well as Custom Entities.
The filter values accept only String values and not numbers. The filter values should be entered within double quotes.
You can assign an Exception Variable to capture and handle errors during the execution. Enable the Exception Variable by assigning it a variable name. Exception Variable can be defined to handle unexpected situations or exceptions within a workflow. By setting exception variables, users can establish conditions to manage errors, alert agents, or take alternate actions, helping maintain workflow stability and enhance error-handling capabilities. Upon saving, the node will bifurcate into Success and Failure paths.
Success Path - Executed when the node runs successfully.
Failure Path - Triggered when the node encounters an error (For example, timeouts, server issues).