Assignment Wait Reasons
Updated
There might be some scenarios where a case arrives in a work queue but the algorithm hasn’t yet been able to assign a suitable agent. In such scenarios, assignment wait reasons are generated, which show why a case is still waiting in the work queue for agent assignment.
The Assignment Wait Reasons feature enables administrators to view and understand the specific reasons for which a case remains unassigned in the work queue along with the various case attributes. Admins can also search for the case number to view the associated wait reasons for that case.
 Enablement Note: Access to this feature is controlled by DP (Dynamic Property). To enable this feature in your environment, reach out to your Success Manager. Alternatively, you can submit a request at tickets@sprinklr.com.
To view assignment wait reasons in a particular work queue, click on three dots beside any work queue name and click View Details. This will open a third pane on the right with different tabs. You can switch between these tabs by simply clicking on these tabs.
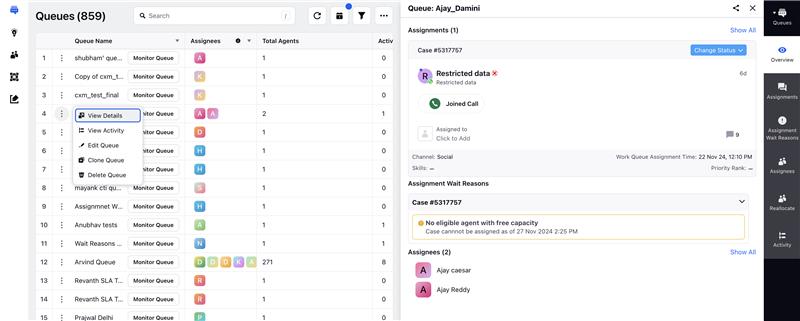
Click on Assignment Wait Reasons tab in the navigation pane on the right. Here, whenever the routing engine fails to assign a case to the agent, the reason is captured here with the time when it occured.
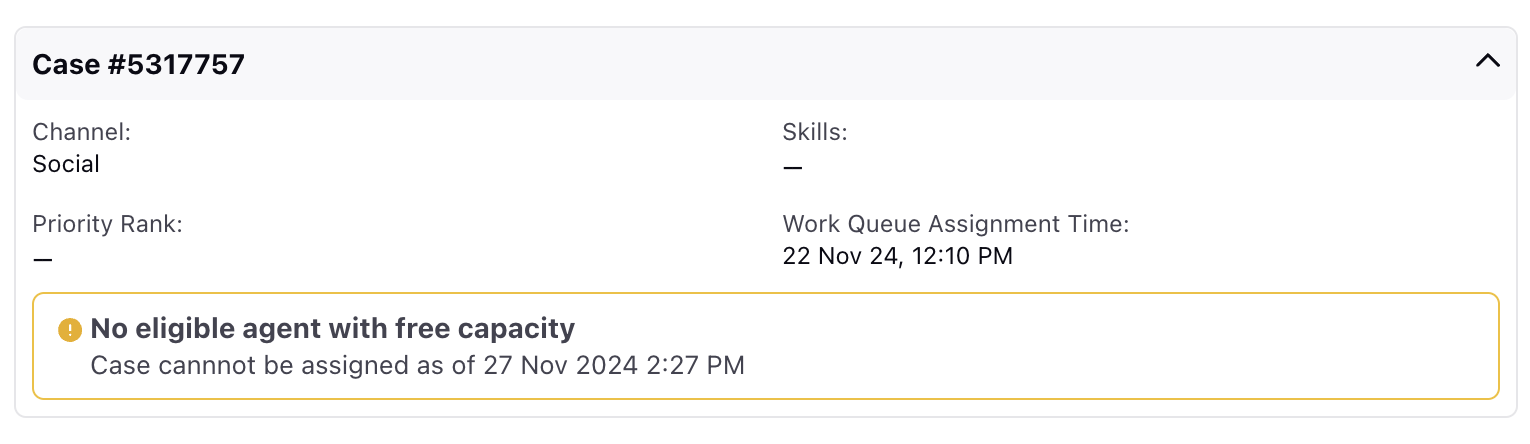
Click the down arrow on the case screen, the details of the case for which assignment wait reason occured is displayed. By double clicking on the case card, the case opens in the third pane. The case card has the Channel, Skills, Priority Rank and Work Queue Assignment Time as its field details.
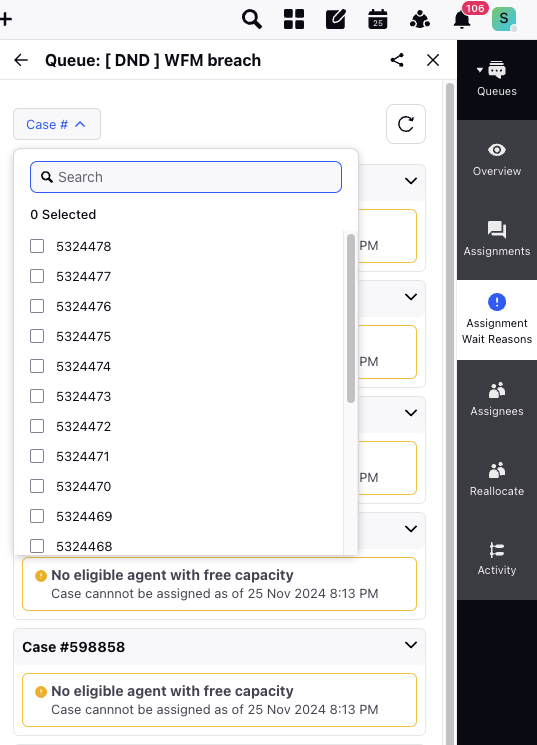
Also you can select the case for which you want to see the details by clicking on the Case#. You can also refresh the screen with the help of the refresh button.
The assignment wait reasons are as follows:
Work should be assigned soon: This wait reason appears when at least one agent satisfies all the requirements for case assignment and has free capacity to handle the case. However, when there is a high backlog of cases in the work queue or the Customer, the case might sometimes take a few seconds for agent assignment. During this brief waiting period, this reason is displayed.
No agent available: This wait reason appears when no agent is in the availability status, as configured in the work queue, to handle the case.
No agent with required skills: This wait reason appears when there are available agents in the work queue, but none of them have the specific skills required to handle the case.
No eligible agent with free capacity: This wait reason is displayed when agents with the required skills and availability status, as configured in the work queue, are present but don't have the required free capacity to handle this case.
No eligible agent is member of the queue - This wait reason is shown when there is only one available agent in the work queue, but the case cannot be assigned because the agent has either turned off work queue assignments (applicable only in Customers where work queue activation is enabled) or Unified Routing is not enabled for this agent (applicable only in customers where both Unified Routing and AE (Assignment Engine) are enabled).
Whenever a case is waiting for stickiness agent, the following stickiness wait reasons are displayed:
No agent available (Stickiness): This wait reason is displayed when the stickiness agent is in the "agent status for stickiness," as defined in the work queue, but is not in the availability status to handle the case.
No agent with required skill (Stickiness): This wait reason is displayed when the stickiness agent is in the availability status for case assignment, but lacks the required skills to handle the case.
No eligible agent with free capacity (Stickiness): This wait reason is displayed when the stickiness agent is in the availability status for case assignment, possesses the required skills, but does not have the free capacity to handle the case.
No eligible agent is member of the queue (Stickiness) - This wait reason occurs if the sticky agent was initially in the work queue, and the case is awaiting assignment with the sticky agent, but the agent is removed from the work queue.
ASSIGN_TO_HOLDING_QUEUE - Indicates that a case has been placed into an agent’s holding queue due to stickiness rules. This typically occurs when the system intends to route the case back to the same agent, but the agent is currently unavailable or at full capacity.
ACD_REMOVED_FROM_HOLDING_QUEUE - Indicates that a case has been taken out of the agent’s holding queue by the ACD system, usually because the agent has become available or has regained capacity, allowing the case to be assigned to them.
For details on Stickness agent, see Assigning interactions to same agent.
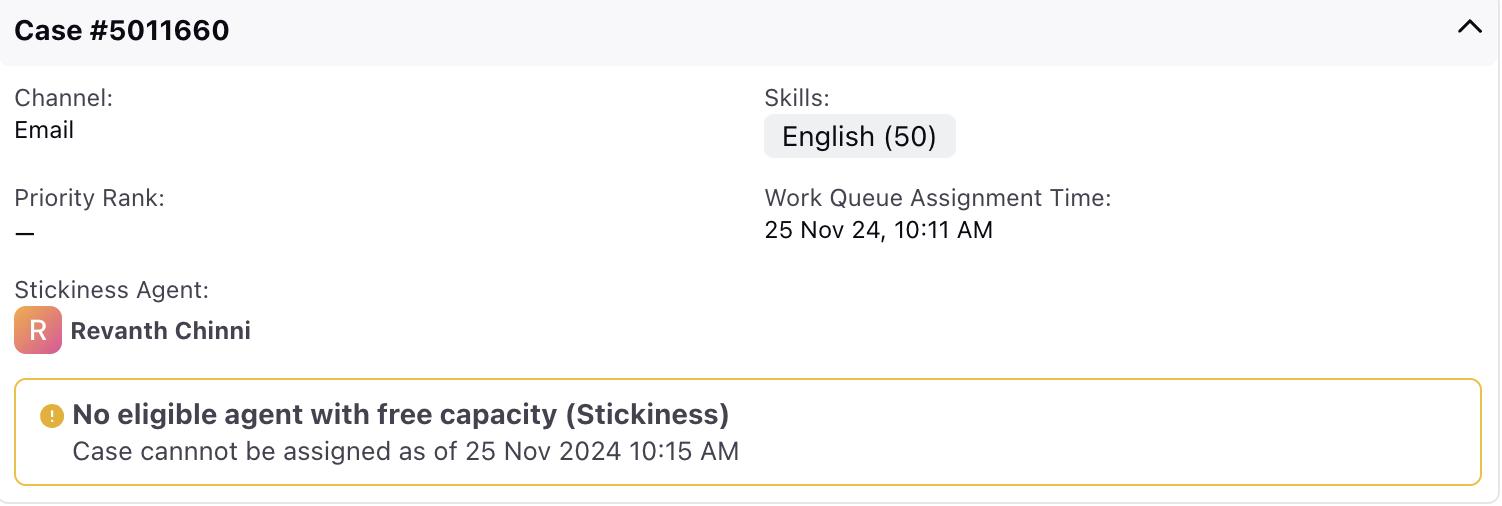
Whenever there is stickiness wait reason, there is an additional field, Stickiness Agent that appears on the same case card screen.
Engagement Dashboard
Supervisors use the Queue/Agent Monitoring screen and the Engagement Dashboard to monitor case assignment activity. However, when a case remains unassigned in the work queue, the Engagement Dashboard does not provide visibility into the reason for the delay. This can make it difficult to determine whether the behaviour is expected—such as due to agent unavailability, skill mismatch, or capacity constraints—and may create confusion about routing performance.
To improve visibility, the Engagement Dashboard now displays wait reasons on the case card for the cases currently waiting in the work queue and have not yet been assigned to an agent. The card includes a wait timer in the top-right corner that indicates how long the case has been waiting in the queue. Clicking on the wait timer displays the specific wait reason for that case, helping supervisors quickly understand why the assignment has not occurred. Additionally, supervisors can select Show Wait Reasons to view the wait reasons for all waiting cases in the work queue, enabling faster identification of routing constraints and more informed monitoring of queue health and assignment behaviour.For further details, see Create an Engagement Dashboard.
Viewing Wait Reasons from the Engagement Dashboard
Perform the following steps to view the wait reason for a case directly from the Engagement Dashboard:
Navigate to the Engagement Dashboard.
Locate the required case card.
.png "image (37).png")
Hover over the timer on the case card to view the tooltip Show Wait Reasons.
.png "image (38).png")
Click the Show Wait Reasons.
The system opens the third pane of the Assignment Wait Reasons tab, displaying the live wait reason for the selected case.
.png "image (39).png")