Suppression Lists
Updated
A suppression list is a list of phone numbers that should not be contacted for various reasons. This list could include numbers of individuals who have requested to be placed on the "do not call" list, those who have previously asked to be removed from the calling list, or those who are considered ineligible for certain types of calls (e.g., for regulatory or compliance reasons).
WHY ARE THEY IMPORTANT?
Maintaining a suppression list is crucial for complying with regulations and avoiding any legal or ethical issues related to unsolicited calls. It is the responsibility of the contact center to ensure that the suppression list is regularly updated and that the agents are aware of the numbers that should not be contacted. In addition, automated dialing systems used in the contact center should be programmed to skip the numbers on the suppression list to avoid any accidental calls.
Suppression Lists in Sprinklr
To set up Suppression lists in Sprinklr, Campaign managers can click on Voice Care in the Launchpad. Clicking on Suppression list under Voice settings you will see a list of all available suppression lists and their associated details

Metric Name | Description |
Suppression list name | Name of the Suppression list |
Status | Indicates if the suppression list is active or inactive. (Lead status can change based on client interactions or campaign changes.) |
Contact Type | Indicates the channel (voice, SMS, or Email) that the suppression lists applies to. |
Number of users | Number of phone numbers in the list and it is only supported for custom suppression list and is not supported for API-based suppression list. |
List Type | It can be Custom and API-based.
|
Description | Additional info for the list. |
Expiry time | Indicates the length of time that the suppression list remains active. |
Created time | Time at which the list was created. |
Modified time | Time at which the list was last modified. |
Creating a Suppression List
Perform the following steps to create a suppression list:
Click the New Tab icon. Under the Sprinklr Service tab, click Voice Care within Listen.
From the left panel under Voice Settings, click Suppression List on the Voice Applications window.
Click + Create Suppression List in the top-right corner.
The Create Suppression List screen is displayed.

Under the Create Suppression List section,
Enter the Name and Description.
Select the Suppression Criteria from the drop down menu.
Under the Configuration screen, select the Suppression List Type from Custom or API-Based from the drop down menu.
If Custom as Suppression List Type is selected:


Select the Channel Type from the drop down menu.
Select the Expiry Time from the drop down menu. Suppression list without an expiry time is created for an endless time period. Suppression List with expiry time would expire on the expiry date.
Enter Retention Period.
Select the Time Zone from the drop down menu.
Select the Workspace (Suppression list will be auto-populated in campaigns) from the drop down menu.
The list of leads opting out of communication can be acquired from agent interactions and compiled & uploaded in the form of a CSV/excel file, or lead details (contact number, name, expiration date) can be added manually to the list. There is no limit for adding leads to a suppression list.
 Note: Selecting a workspace automatically adds the suppression list everytime you create a campaign in that workspace.
Click on "Save” once the file has been uploaded or contacts are added manually.
If API-Based as Suppression List Type is selected:
The API-Based approach is useful when suppression decisions are maintained in an external system, such as a government registry, regulatory database, CRM system, or another third-party repository that is updated frequently. For further details, see Add External REST API in Sprinklr.

Select Channel Type from the drop down menu.
Select API from the drop down menu.
Select the API Input from the drop down menu.
Select the Parameter to send to API from the drop down menu.
.png "image (44).png")
The Response Adapter gets an auto generated value.
If the API cannot provide a valid result, Sprinklr applies the fallback settings configured in the suppression list.

Select the On Unmapped / Unexpected Response from the drop down menu.
Used when the API responds with a value that cannot be interpreted.
Available options: Allow Call and Suppress Call.
Select the On API Timeout from the drop down menu.
Used when the API fails to respond within the expected time limit.
Available options: Allow Call and Suppress Call.
Select the On API Failure from the drop down menu.
Used when the API returns an error or cannot process the request.
Available options: Allow Call and Suppress Call.
Note: The suppression decision is evaluated in real time during outbound dialing.The process works as follows:
An outbound call is initiated.
Sprinklr sends the configured phone number format to the external API.
The API evaluates the phone number.
The Response Adapter converts the API response into a true or false outcome.
Sprinklr applies the suppression decision.
True → Suppress the call.
False → Allow the call.
If the API response cannot be evaluated, the configured fallback behavior is applied.
Refer to the following table for parameter description of API-Based Suppression List screen:
Parameter | Description |
API | An external API used for suppression evaluation. |
API Input | The API input field is defined in the external API configuration. |
Parameter to Send to API | Map the selected API input to a Sprinklr parameter. Default mapping is set to the dialed phone number. The following are the three options that you can select:
|
Response Adapter | Processes and transforms the API response before it is consumed within the platform. If the response evaluates to True, the call will be suppressed. If false, the call will be dialed. If the response evaluates to some other option than True or False, then you can select the action to either suppress or dial the call, depending on your requirement. |
On Unmapped / Unexpected Response | Action to take when the API response cannot be mapped to a suppression decision. |
On API Timeout | Action to take when the suppression API call times out. |
On API Failure | Action to take when the suppression API call fails. |
There are a few iterations that can be performed when it comes to the expiration dates of the suppression list and the individual lead/contact.
Suppression List Expiry permutations:
Suppression list never expires, Individual contact can expire on its own time: In this case once all contact expires, suppression list will be empty (suppression list has no expiry time but contacts have an expiration date)
Suppression list expires, but there is no expiry on individual contact: In this case on suppression list expiry, all contacts are deleted (suppression list has a expiry time but contacts have no expiration date)
Suppression list expires along with contact can also expire: Contact will be removed on its expiry. When suppression list expires even unexpired contact are deleted(suppression list and contacts both have expiration date)
Permanent List: Neither suppression list nor contact is expiring(both suppression list expiry time and contacts expirate date are blank), nothing is deleted.
Editing a Suppression List
To edit a Suppression list, go back to the list view of all Suppression lists, hover the mouse over the 3 vertical dots on the left of the suppression list to be updated and click on Edit.

The window that opens is same as the create suppression list window. Campaign managers can use this feature to change expiry dates, add new leads to the list manually or upload a new file.
Viewing Audit Trail of a Suppression List
The activity pane of a suppression list will show a record of any changes made to the fields, including the file name, total number of records, created records, updated records, successful file URL, failed records, and failed file URL.
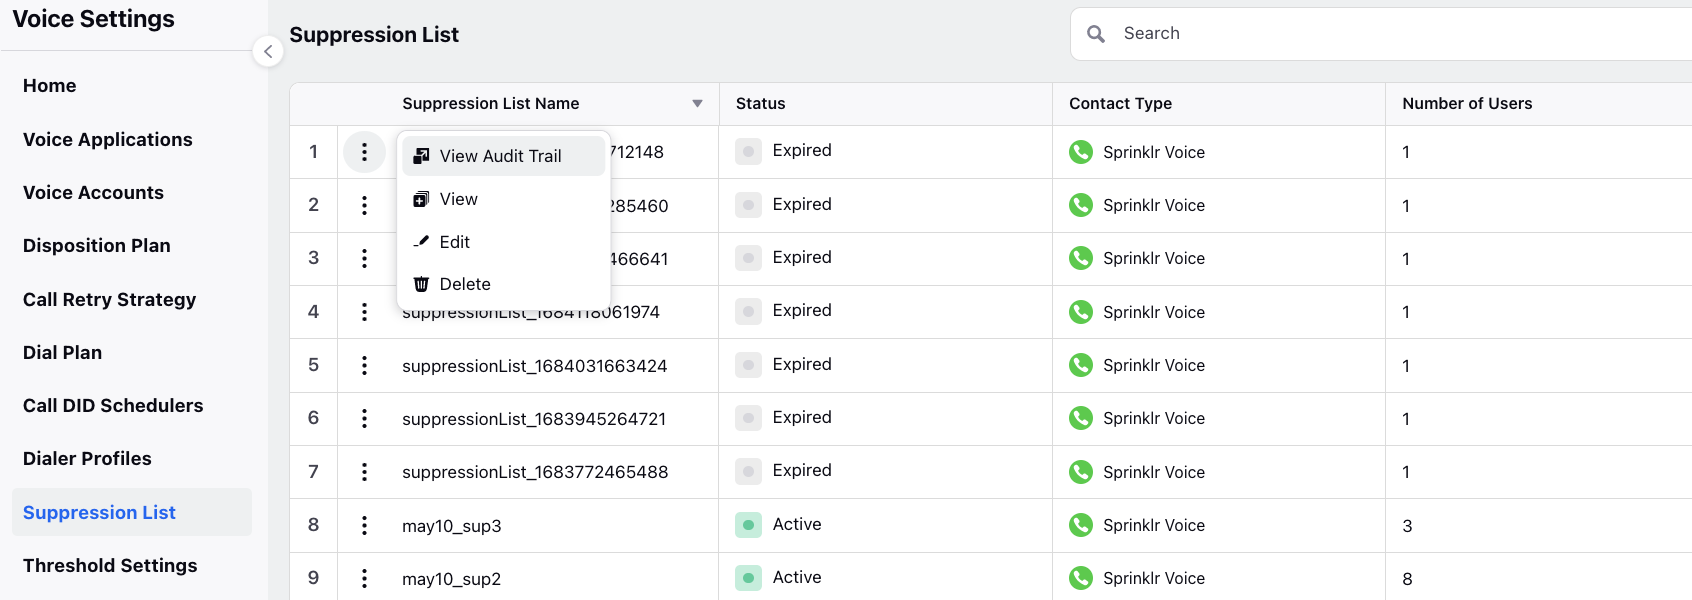
Viewing a Suppression List

Clicking on the View button in the same pop up as Edit, Campaign managers can view the leads inside these lists and make changes by hovering the mouse over the three vertical dots next to the leads and perform activities like:
Deleting leads from the list,
Changing expiry dates,
Changing contact numbers.

New contacts can be added to the list by clicking on the “Add Contact” button. This can be done manually or uploading an Excel/CSV file.

Deleting a Suppression List
To delete a suppression list, hover on the three vertical dots next to the list desired to be delete and click on the last option I.e., “Delete.” The list will leave the Suppression list view and the leads in that list would leave the DND status, and back into the calling lists of agents.

Adding Suppression List To a Campaign
Campaign managers can add a suppression list to a campaign by editing/creating a new campaign and adding the Suppression list name from all lists created on the platform. Multiple suppression lists can be added to a single campaign.

This Suppression List already contains all the automatic additions that were earlier configured at the time of creating suppression list by selecting the workspace and you can also inline create it.