Add External REST API in Sprinklr
Updated
Sprinklr enables you to configure External REST APIs directly within its platform, removing the need for custom development. The External API module provides the flexibility to switch between SOAP and REST API protocols.
This guide will walk you through the process of connecting a REST External API in Sprinklr, along with detailed instructions on how to test, edit, and delete a REST API connection.
Once configured, you can call third-party (external) APIs during workflow execution across various capabilities such as Bots, Guided Workflows, Agent Consoles, Care Consoles, Automation, and more. This new feature enhances automation and eliminates manual processes, boosting productivity.
![]() Note: Additional Configuration is required. Please contact the Managed Services team for further assistance.
Note: Additional Configuration is required. Please contact the Managed Services team for further assistance.
Prerequisites
You need to add an External Authentication Credential in Sprinklr. For more information, refer to Connections Manager.
![]() Note:
Note:
For static APIs, external authentication credentials are not required.
You can register an External API in Sprinklr only if you are a Global Admin or Global User.
If you are an administrator and want to grant other users permission to add an External API, create a custom role with the required permissions and assign it to the appropriate user or user group.

Add an External REST API
Follow these steps to configure external REST API in Sprinklr:
Step 1: Access External API Module
The steps to access the External API depend on whether your environment uses the old All Settings UI or the new All Settings UI.
Access External API in Old All Settings UI
Follow the steps below to access External API in Old All Settings UI:

Navigate to All Settings from Sprinklr Launchpad.
In the Platform Settings window, select Manage Customer from left toolbar.
From the list of options, choose External API. You can also use the search bar at the top to quicky find it.
The External API Record Manager opens.
Access External API in New All Settings UI
Follow the steps below to access External API in new All Settings UI:

Navigate to All Settings from Sprinklr Launchpad.
Select APIs and Integrations from left navigation bar to open detailed record manager.
Click the External API option from left menu to access External API Record Manager.
Step 2: Add a New REST API
Click the "+ Add External API" button located at the top right corner of the page to create a new REST API custom configuration.

Select the "Custom Configuration" card to add an External API from scratch and click the 'Next' button to go configuration page.

![]() Note: To add an External API using pre-built templates, refer to Extensions Library.
Note: To add an External API using pre-built templates, refer to Extensions Library.
Step 3: Configure REST API Details
On the configuration screen, configure the following API details:

API Type: Select the REST from the dropdown to add external REST API. Once the API type is configured, enter the input fields as decribed in the section below.

Below is the breakdown of required fields for REST API:
Name | Description |
External Service Name | Enter the name of the external service. |
Description (optional) | Provide a description for the external service. |
Authentication Credential | Select the required authentication credential. |
Endpoint URL | Enter the URL of the REST API endpoint. This URL will override the URL configured in OpenAPI Spec document. |
PCI (Checkbox) | Select this checkbox to indicate that the API handles PCI-sensitive data. |
PII (Checkbox) | Select this checkbox to indicate that the API handles PII-sensitive data. |
OpenAPI Specification | Enter the service schema in JSON format. Use the Generate OpenAPI Spec button to generate OpenAPI Specs using GenAI.
|
Click the "Validate" button after entering all the necessary information. This will validate the REST API specification to ensure everything is correctly configured.
Step 5: Add Additional Information of REST API
After successfully validating the REST API, the API name will appear in the left-hand menu. Click on the API connection name to open a detailed configuration screen where you can define additional elements for the REST API.
These fields provide flexibility, enabling you to tailor how you interact with the REST API, from sending requests to processing responses.

Name | Description |
Headers | Define custom headers to be sent with the API request.
|
Endpoint URL | Enter the base URL of the REST API endpoint. |
Path Parameter | Used to define dynamic segments of the URL path (e.g., /users/{userId}).
|
Query Parameter | Key-value pairs appended to the endpoint URL (e.g., ?contactId=123).
|
Request Body | Defines the structure of the payload sent in the request body (typically for POST/PUT methods).
|
Timeout Settings | You can configure custom timeout and retry parameters for External API extensions in the Timeout Settings input pane. These settings allow you to control the behavior of API calls based on your system’s reliability and performance requirements. Available Configuration Parameters
These configurable parameters offer improved control and fault tolerance—particularly useful in environments with high latency or intermittent connectivity. |
| |
Request Adapter | A transformation layer that allows you to format or modify the request payload before it's sent to the API. |
Response Adapter | Processes and transforms the API response before it is consumed within the platform. |
Parameter Adapter | Dynamically transforms or maps query/path parameters before the request is executed. |
Header Adapter | Enables dynamic generation or transformation of request headers. |
Request via Proxy (Checkbox) | Enable this option to route the API request through a proxy server. Ensure that the Sprinklr Static IP Addresses for Receiving API Calls are whitelisted. |
Proxy Host | Enter the hostname or IP address of the proxy server. Required only if Request via Proxy is enabled. |
Proxy Port | Enter the port number used by the proxy server to route the request. |


Click ‘Save’ after configuring all the elements with the required data. Your SOAP API connection has been successfully created.
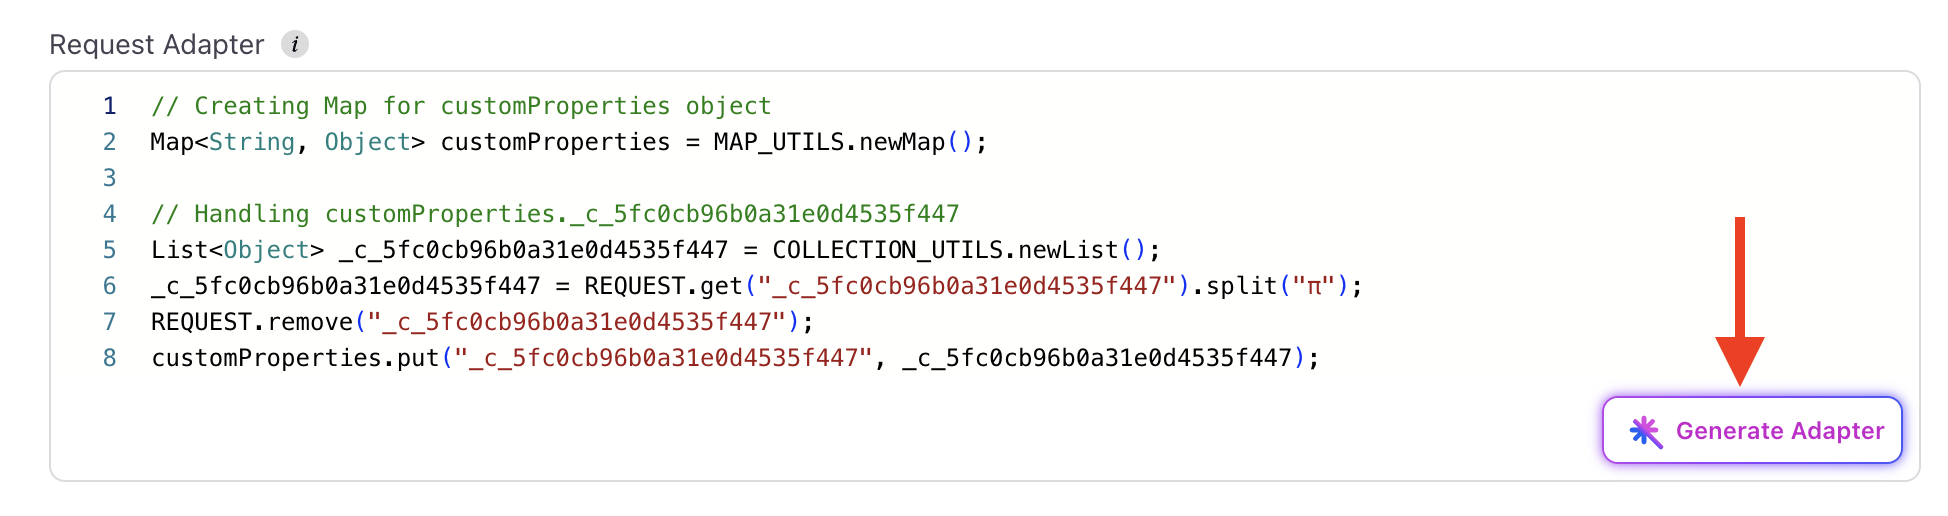
Automated Groovy Generator for REST API
In 19.8 release, we have introduced an Automated Groovy Generator that streamlines the process of configuring REST-based external APIs by automatically generating the necessary Groovy script for request adapters.
How it Works?
When configuring a REST API, you can use the Generate Adapter button. Upon clicking this button, the system will automatically generate the Groovy script tailored to your specific API configuration. This script will then be directly pasted into the request adapter text box, eliminating the need for manual coding.
This feature enhances the overall user experience by making REST API configuration more efficient and less prone to manual errors.
Bulk Import REST API Endpoints
To import REST API endpoints in bulk, follow these steps:
In the record manager, click the + Import button at the top.

In the pop-up window, either drag and drop your file or click Browse to upload it from your local machine.
Supported file formats: .json, .jsonl

After uploading the file, click Submit.
A confirmation message will appear once the endpoints are successfully imported.
Bulk Export REST API Endpoints
To export REST API endpoints in bulk, follow these steps:
In the record manager, select the API endpoints you want to export by checking the box next to each API name.
To select all endpoints, use the checkbox at the top of the list.
Click the Export button located on the black action bar at the bottom of the screen.
A notification will confirm that your export request has been received.

4. Once the export is complete, you will receive a download link in your Sprinklr Notification Center.

View API Usage
The View Usage feature allows you to view where a specific External API is referenced across various components, such as Guided Workflow, Voice IVR, Dialouge Tree, and After Call Workflow. It provides visibility into dependencies, helping you assess the potential impact of changes and enabling efficient navigation to related workflows.

Click the vertical ellipses button (⋮) next to the record.
Select View Usages from the dropdown menu.
The Usages screen opens in the third pane, displaying all entities where the API is used.
To edit the workflow of a referenced entity:
Click View Workflow next to the entity.
The corresponding workflow opens for editing.