Manage Split Profiles in Forecast Scenarios
Updated
Split Profiles help you break down a Forecast Scenario into smaller parts to share it across different locations or contact centers. They are created using Child Work Types and are part of a larger Forecast Scenario. Split Profiles are helpful when you want each area to have its forecast based on specific needs, while still being part of the overall plan.
When you create a Split Profile, you're basically telling the system how to divide the total forecasted volume among different teams or sites. This makes it easier to plan and manage work more accurately, particularly if your organization operates in multiple locations.
This section outlines the essential steps for managing Split Profiles in Forecast Scenarios, including:
Creating Split Profiles
Run Split Profiles
Editing Split Profiles
Delete Split Profiles.
Navigate to Split Profiles Record Manager
Navigate to the Forecast Scenario record manager.

Click the View Forecast (Eye icon) button corresponding to the Forecast Scenario. This will open a detailed view of the Forecast Scenario.

Select Split Profiles from the navigation tree on the left to open the Split Profiles record manager.
 Note: The Split Profiles record manager is available only for Forecast Scenarios that utilize Work Types configured to include Child Work Types.
This record manager only shows details on Split Profiles of the selected Forecast Scenario.
Create Split Profiles
Navigate to the Split Profiles record manager of the required Forecast Scenario.

Click the Create Split Profile button at the top right to open the Split Profile creation page.
Fill in the required fields on the Split Profile Details page. Fields marked with a red dot are mandatory. Below are the descriptions of the fields on this page:

Split Name: Enter the name of the Split Profile. (Required)
Description: Enter a brief description of the Split Profile.
Click the Next button at the bottom right to open the Parameters page.
Fill in the required fields on the Parameters page. Fields marked with a red star are mandatory. Below are the descriptions of the fields on this page:

Volume
This section defines how volume is distributed across Child Work Types for the specified date range in the Split Forecast Scenario.
Split Profile Preset: Select the Split Preset to be used. Only Split Presets configured for the Parent Work Types in the selected Forecast Scenario are available for selection. (Required)
Date Range: Specify the date range for applying the selected Split Preset. The selected date range must cover the entire date range of the original Forecast Scenario. If you apply multiple Split Presets, their combined date ranges must cover the entire date range of the original Forecast Scenario. (Required)
Note: Select Add Value to apply different Split Presets to different date ranges.AHT
This section defines how Average Handling Time (AHT) is distributed across Child Work Types for the specified date range in the Split Forecast Scenario. The section becomes available after you specify a Split Profile Preset and Date Range in the Volume section.
AHT Distribution Type: Select if the AHT distribution is to be done inline with the Parent Work Type or the selected Staffing Preset. (Required)
Date Range: Specify the date range for applying the selected AHT Distribution Type. The selected date range must cover the entire date range of the original Forecast Scenario. If you apply multiple AHT Distribution Type, their combined date ranges must cover the entire date range of the original Forecast Scenario. (Required)
Note: Select Add Value to apply different AHT Distribution Type to different date ranges.
Select the Create button to create the Split Profile for the selected Forecast Scenario.
Run Split Profiles
Follow these steps to trigger a Split Profile:
Navigate to the Split Profiles record manager.

Click the vertical ellipsis (⋮) icon corresponding to the Split Profile you want to trigger. This will show a list of options.
Select Run from the list of options.
This action will initiate the creation of Forecast Scenario(s) using the details from the Split Profile.

These scenarios will appear in the Forecast Scenario record manager and will be labeled as Split Forecast Scenario type. They will first be in the Processing state. Once processing is complete, they will move to the Draft state, after which they can be published.
 Note: The Split Forecast Scenario will be named using the following format: “[Original Forecast Scenario Name]” Split for “[Child Work Type Name]” using “[Split Profile Name]”.
For example, suppose the original Forecast Scenario is named "Q3 Support Forecast", the Child Work Type is "Email Support (APAC)", and the Split Profile is "Regional Distribution". In this case, the resulting name of the Split Forecast Scenario will be: “Q3 Support Forecast Split for Email Support (APAC) using Regional Distribution".
Review Workflow for Split Forecast Scenarios
Once Split Forecast Scenarios are created, they can be shared with users across different locations or contact centers as proposals to manage a portion of the forecasted data from the parent Forecast Scenario. Managers or administrators of these contact centers can review and moderate the details of the Split Forecast Scenario assigned to them and provide comments or feedback as needed.
Send Split Forecast Scenarios for Moderation
Follow these steps to send a Split Forecast Scenario for moderation:
Navigate to the Split Profiles record manager of the required Forecast Scenario.

Click the Activate button at the top right of the page to open the Activate Split Profile dialog box.
Select the Split Profile to be activated from the list in the Split Profile field. Only one can be selected.
Click Activate to set the selected Split Profile as active.

This will move the Split Forecast Scenario(s) associated with the selected Split Profile into the In Review state.
Note: Split Forecast Scenario(s) associated with the already active Split Profile, if any, will be moved to the Draft state after this action.
Moderate Split Forecast Scenarios
Once the Split Forecast Scenarios transition to the In Review state, authorized users can moderate them.
Follow these steps to moderate a Split Forecast Scenario:
Navigate to the Forecast Scenarios record manager.
View the required Split Forecast Scenario.

Click the Review button at the top right of the page to open the Review Forecast Scenario confirmation box.
Note: The Review button is disabled if the Split Profile associated with the Split Forecast Scenario is not active.
Select either Approve or Reject, and leave a note for the reason for your decision. Please review carefully before proceeding, as this action cannot be undone.

Depending on your selection, the Split Forecast Scenario will transition either to the Approved or Rejected state.
This completes the review workflow of Split Forecast Scenarios.
Note: Split Forecast Scenarios can be published only when the associated Parent Forecast Scenario is published.
Note: A Parent Forecast Scenario can only be published after all Split Forecast Scenarios linked to the active Split Profile have been approved.
Note: If you modify the Parent Forecast Scenario after generating the Split Forecast Scenarios, you can publish the Parent Forecast Scenario only if its interval-level forecasted volume matches the aggregated forecasted volume of the associated Split Forecast Scenarios. If the volumes don't match, the Publish button remains disabled. To resolve the mismatch, generate the Split Forecast Scenarios again, and then review and approve the updated scenarios. After all associated Split Forecast Scenarios are approved, you can publish the Parent Forecast Scenario, followed by the Split Forecast Scenarios.
Edit Split Profiles
Follow these steps to edit an existing Split Profile:
Navigate to the Split Profiles record manager.

Hover over the vertical ellipsis (⋮) icon corresponding to the Split Profile you want to edit. This will show a list of options.
Select Edit from the list of options to open the Split Profile updating page.
Update the desired details for the selected Split Profile. The fields are identical to those used when creating a Split Profile.
Click the Save button at the bottom right of the page.
This completes the process of editing Split Profiles.
Delete Split Profiles
Follow these steps to delete a Split Profile:
Navigate to the Split Profiles record manager.

Hover over the vertical ellipsis (⋮) icon corresponding to the Split Profile you want to delete. This will show a list of options.
Select Delete from the list of options to open the Delete Split Profile dialog box.
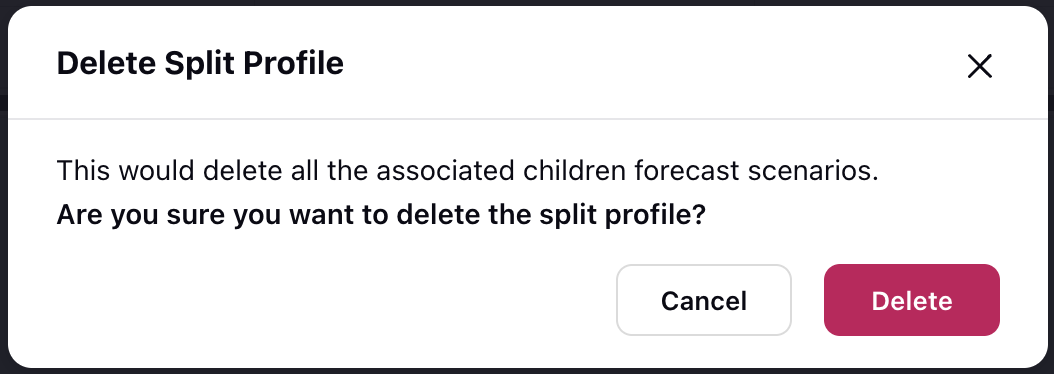
Click the Submit button at the bottom right of the dialog box. This action cannot be undone.
This will delete the Split Profile and all the associated Child Forecast Scenarios generated using the Split Profile.
View Activity Log of Split Profiles
Follow these steps to view the activity log of Split Profiles:
Navigate to the Split Profiles record manager.

Hover over the vertical ellipsis (⋮) icon corresponding to the Split Profile whose audit log you want to view. This will show a list of options.
Select View Audit from the list of options to open the Activity window from the Third Pane.
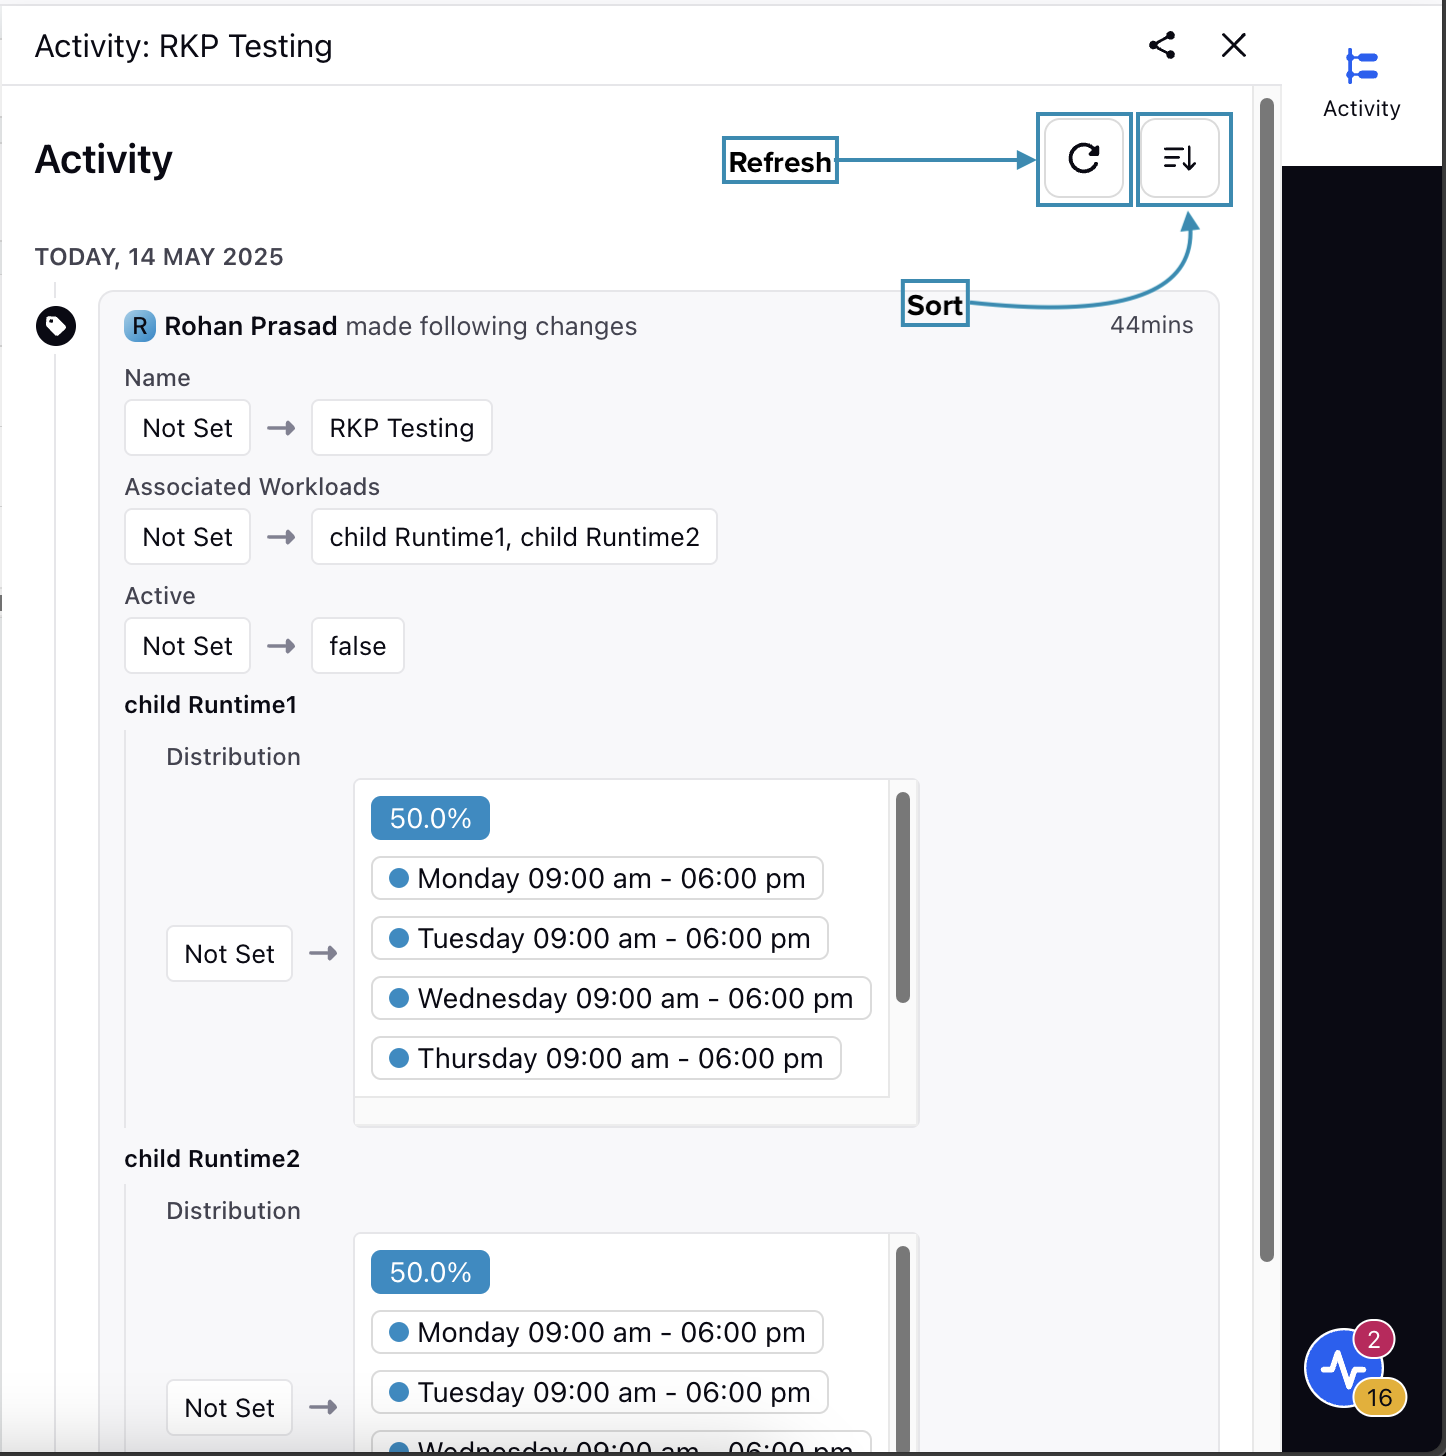
This will show all the changes made to the Split Profile, including who made them and when. You can refresh the data and sort it by the date of updates in ascending or descending order.
This completes the process of viewing the audit log of Split Profiles.