Flutter - v16.0.0
Updated
This article walks you through the step-by-step process of integrating Sprinklr Messenger (Live Chat) with your mobile app.
Compatibility Requirements
Ensure that your setup meets the requirements listed below:
Category | Requirement | Supported Version |
Framework & Core | Flutter SDK Version | 3.16.0 and above |
| Dart SDK Version | 3.2.0 and above |
| Flutter Channel Compatibility (Stable/Beta/Dev) | Stable |
| Supported Rendering Engine (Skia/Impeller) | Not relevant |
| Plugin API Version Compatibility | NA |
|
|
|
Platform SDKs | Android Minimum SDK Version | 24 |
| iOS Minimum Version | 15.1 |
|
|
|
Build Tools | Gradle Version | 8.11.1 and above |
| Android Gradle Plugin Version | 8.9.x and above |
| Xcode Version | 16.x – 26.4 |
| CocoaPods Version | 1.15.2 and above |
| Android Studio Version | Based on AGP |
Language & Runtime | Kotlin Version | 2.0.x and above |
| Java/JDK Version | JDK 17 JDK 21 |
|
|
|
Device & Architecture | ABI/Architecture Support | Android: armeabi‑v7a, arm64‑v8a, x86_64, x86 iOS: arm64, x86_64 |
Step 1: Getting Started
1) Install Sprinklr Messenger
Start by downloading the Sprinklr Messenger plugin and saving it to your preferred location. For example, you can place the plugin outside the main directory of your project.
Add the plugin's dependency to your project's pubspec.yaml file under the dependencies section:
dependencies:sprinklr_plugin:path: PATH_HERE
Replace PATH_HERE with the actual path where the Sprinklr Messenger plugin is located.
Run the following command:
flutter pub get
Note: Please raise a support ticket(tickets@sprinklr.com) or reach out to SM for Sprinklr Messenger Plugin
Additional Installation Steps for Android
In the root project’s build.gradle file, add the nexus repository to the repositories block inside allProjects to resolve Sprinklr dependencies.
allprojects {repositories {// other reposmaven {url "https://prod-nexus-external.sprinklr.com/nexus/repository/maven-clients/"credentials {username = <MAVEN_USERNAME>password = <MAVEN_PASSWORD>}}}}
In the app module's build.gradle, apply the spr-react-gradle-plugin to configure the native code:
plugins {id "com.spr.messengerclient.spr-gradle-plugin.spr-react-gradle-plugin"}
Also, add the following configure block to run the native build properly:
sprConfig {configureNdk = true}
(Optional) If your project already uses CMake for native builds, additional changes will be required. To make sure you are using CMake already, look for the following snippet in your app/build.gradle:
 Note: The minimum required CMake version is 3.13.
externalNativeBuild {cmake {path "path/to/CMakeLists.txt"}}
Once it is confirmed that your project uses native builds with CMake, add the following code in the CMakeLists.txt file specified above:
# Define the library name here if not already definedproject(appmodules)# PATH_TO_APP_BUILD_DIR should point to the build directory inside app.include(${PATH_TO_APP_BUILD_DIR}/spr-react-gradle-plugin/resources/modules/react-native/ReactAndroid/cmake-utils/ReactNative-application.cmake)
Parallel to the CMakeLists.txt file, create a file OnLoad.cpp, and add the following code in it:
Note: Managing Native Libraries During Minification
If you are using DexGuard or any similar protection tool that minifies or processes native Shared Object (.so) libraries, ensure that all SDK-required libraries are handled correctly. For guidelines and list of libraries, see Handling Shared Object (SO) Files.
2) Setup for Android
You can skip this step if your app does not support Android.
Note: Sprinklr Messenger for Android supports API 24 and above
Prerequisites
Before you begin, ensure the following prerequisites are met:
Contact Sprinklr Support at tickets@sprinklr.com to obtain your Maven credentials.
Additionally, this username and password would be same for both Android and iOS
In your Android project folder, create a file named signing.properties and add the Maven credentials to this file as shown below:
Note: It is recommended to add signing.properties to your .gitignore file for better security.
MAVEN_USERNAME = <username>MAVEN_PASSWORD = <password>
Steps
1. In gradle.properties, add the following properties:
sprMessengerClientVersion = 16.0.0sprNexusRepositoryUrl = https://prod-nexus-external.sprinklr.com/nexus/repository/maven-clients/
2. In settings.gradle, modify the pluginManagement block to include the custom Nexus repository and plugin:
Note: The username and password must be the same as those added in signing.properties.
pluginManagement{maven {url sprNexusRepositoryUrlcredentials {username = $usernamepassword = $password}}}plugins {id "com.spr.messengerclient.spr-gradle-plugin" version "16.0.0"}}
3. In the root build.gradle, add the Nexus repository and apply the spr-gradle-plugin for enforcing React Native version:
plugins {id "com.spr.messengerclient.spr-gradle-plugin"}
Video Player Support
To add support for video player in android, add the following flag to the project’s root level build.gradle file:
buildscript {ext {use_spr_video_player = true}}
Add Permissions to your project:
We include the INTERNET permission by default as it's required to make network requests:
<uses-permission android:name="android.permission.INTERNET" /> Include the following permissions if you are supporting upload and download media functionality and location sharing in messenger:
<uses-permission android:name="android.permission.READ_EXTERNAL_STORAGE" /><uses-permission android:name="android.permission.WRITE_EXTERNAL_STORAGE" /><uses-permission android:name="android.permission.CAMERA" /><uses-permission android:name="android.permission.RECORD_AUDIO" /><uses-permission android:name="android.permission.POST_NOTIFICATIONS"/><uses-permission android:name="android.permission.ACCESS_FINE_LOCATION" /><uses-permission android:name="android.permission.ACCESS_COARSE_LOCATION" />
 Note: The ACCESS_FINE_LOCATION and ACCESS_COARSE_LOCATION permissions are optional. Include these permissions only if you want to support location sharing feature in Live Chat.
ProGuard Configuration (Code Minification):
If you're using code minification in your Android release build, ensure you update your project's proguard-rules.pro file to include the following rule:
-keep class com.facebook.react.devsupport.** { *; }
Confirm your ProGuard file is referenced correctly in the app/build.gradle file:
buildTypes {release {minifyEnabled trueproguardFiles getDefaultProguardFile('proguard-android-optimize.txt'), 'proguard-rules.pro'}}
3) Setup for iOS
You can skip this step if your app does not support iOS.
You can integrate the Live Chat SDK package in your iOS project using CocoaPods.
Prerequisites
Before you begin with the set up, ensure the following prerequisites are met:
To access the Sprinklr Messenger framework, you need a username and password. Reach out to Sprinklr Support at tickets@sprinklr.com to get the username and password created for your account.
Additionally, this username and password would be same for both Android and iOS
You can use the same credentials that you used for clients-cocoapods.sprinklr.com.
Once you have the username and password, in the root .netrc file, add the following lines:
machine clients-external-cocoapods.sprinklr.comlogin userNamepassword password
Install Messenger iOS Dependency
STEP A: Add SPRMessengerClient to your Podfile and run pod install:
target :YourTargetName dopod 'SPRMessengerClient', :podspec => 'https://clients-external-cocoapods.sprinklr.com/SPRMessengerClient/16.0.0/SPRMessengerClient.podspec'end
STEP B: If your app has enabled bitcode, add this pod installer script in your Podfile:
post_install do |installer|installer.pods_project.targets.each do |target|target.build_configurations.each do |config|config.build_settings['ENABLE_BITCODE'] = 'YES'endendend
Add Permissions
Include the following permissions in info.plist if you are supporting upload and download media functionality in messenger:
<key>NSCameraUsageDescription</key><string>Messenger app requires access to the camera to capture the photos.</string><key>NSMicrophoneUsageDescription</key><string>Messenger app requires access to the microphone to record video.</string><key>NSPhotoLibraryUsageDescription</key><string>Messenger app requires access to the photos library.</string><key>NSLocationWhenInUseUsageDescription</key><string>We need your location to display it on the map.</string>
Note: The NSCameraUsageDescription, NSMicrophoneUsageDescription, and NSPhotoLibraryUsageDescription permissions are required by Apple for all apps that access the photo library or use the camera/microphone.
The NSLocationWhenInUseUsageDescription permission is optional. Include this permission only if you want to support location sharing feature in Live Chat.
Step 2: Initialize the Messenger
STEP A: Create a SPRMessengerConfig object with the parameters provided by Sprinklr.
STEP B: Call the SPRMessenger().takeOff() function with SPRMessengerConfig object as an argument.
For Anonymous Users
For anonymous users (unauthenticated users), you can initialize the messenger using the takeOff method without specifying any user details. Behind the scenes, an anonymous user is automatically created for the messenger and the flow for anonymous user is initialized.
Syntax
SPRMessengerConfig messengerConfig = SPRMessengerConfig(appId: "SPR_APP_ID", // This will be provided by Sprinklrenvironment: "SPR_ENVIRONMENT", // This will be provided by Sprinklr (e.g., PROD)skin: "MODERN", // This can be either "CLASSIC" or "MODERN"locale: "en", // default value is endeviceId: "UNIQUE_DEVICE_ID",pushAppId: "SPR_PUSH_ID", // Should be Unique id, if not sure pass same as device IDthemeMode: "DEFAULT", // default value is DEFAULT, options: DEFAULT | DARKdisableNetworkHandling: false, // default value is false);SPRMessenger().takeOff(config: messengerConfig);
Parameters
Parameter | Required/Optional | Description |
appId | Required | Unique identifier of the Live Chat app. This will be provided by Sprinklr. |
environment | Required | Environment identifier. This will be provided by Sprinklr (for example, PROD2). |
locale | Required | Sets the language/locale for the messenger. Default Value: en |
pushAppId | Optional | Unique identifier for push notifications. If unsure, use the same value as deviceId. |
deviceId | Optional | Unique identifier for the device. |
skin | Optional | Defines the messenger UI skin. Supported Values: CLASSIC, MODERN Default Value: MODERN |
themeMode | Optional | Defines the theme mode. Supported Values: DEFAULT, DARK Default Value: DEFAULT |
disableNetworkHandling | Optional | Controls network connectivity check before handshake. Supported Values: true, false Default Value: false |
For Authenticated Users
This step is done after the user logs in successfully and completes the authentication process within the application and after the authentication process, it should be passed in Sprinklr including the app id. In case, a user is not logged in case (s)he has never used the application then an anonymous user can be created for the same.
After the authentication process, the client should pass the user bean, the application ID, the messenger activity including the information so that Sprinklr can begin the initial setup process in the background.
Syntax
SPRMessengerUser messengerUser = SPRMessengerUser(userId: "12345",firstName: "John",lastName: "Doe",phoneNumber: "999999999",email: "xyz@example.com",profileImageUrl: "https://images.com.1.png",hashCreationTime: hashCreationTime, // EPOCH and should be the same one that is used for generating the hashhash: HmacHashCalculation.generateHash(data: "12345_John_Doe_https//images.com.1.png_999999999_xyz@example.com_hashCreationTime",key: "API_KEY", // This will be provided by Sprinklr),);SPRMessengerConfig messengerConfig = SPRMessengerConfig(appId: "SPR_APP_ID", // This will be provided by Sprinklrenvironment: "SPR_ENVIRONMENT", // This will be provided by Sprinklr (e.g., PROD)skin: "MODERN", // This can be either "CLASSIC" or "MODERN"locale: "en", // default value is endeviceId: "UNIQUE_DEVICE_ID",pushAppId: "SPR_PUSH_ID", // Should be Unique id, if not sure pass same as device IDthemeMode: "DEFAULT", // default value is DEFAULT, options: DEFAULT | DARKdisableNetworkHandling: false, // default value is falseuser: messengerUser,);SPRMessenger().takeOff(config: messengerConfig);
Parameters
Parameter | Required/Optional | Description |
appId | Required | Unique identifier of the Live Chat app. This will be provided by Sprinklr. |
environment | Required | Environment identifier. This will be provided by Sprinklr (for example, PROD2). |
locale | Required | Sets the language/locale for the messenger. Default Value: en |
user | Required (for authenticated chats) | Specifies user details. For more information, see the User Object table below. |
pushAppId | Optional | Unique identifier for push notifications. If unsure, use the same value as deviceId. |
deviceId | Optional | Unique identifier for the device. |
skin | Optional | Defines the messenger UI skin. Supported Values: CLASSIC, MODERN Default Value: MODERN |
themeMode | Optional | Defines the theme mode. Supported Values: DEFAULT, DARK Default Value: DEFAULT |
disableNetworkHandling | Optional | Controls network connectivity check before handshake. Supported Values: true, false Default Value: false |
User Object
Parameter | Required/Optional | Description |
userId | Required | Unique identifier of the user. |
hash | Required | To know the steps to generate a hash, see How to Generate Hash. |
hashCreationTime | Required | Timestamp of hash generation. Ensure the following: It must match the time used when generating the hash. It must be in milliseconds. For example, 1734156789. |
firstName | Optional | First name of the user. |
lastName | Optional | Last name of the user. |
phoneNo | Optional | Phone number of the user. |
Optional | Email ID of the user. | |
profileImageUrl | Optional | URL to the profile image of the user. |
Note: UserID and Hash are mandatory parameters and hash should be generated for every change in user object. To know the procedure of how to generate Hash, check Step - 6 Generate User Hash.
For Authenticated Custom Users
This step is done to create a custom user account using custom or specific attributes. In other words, it involves creating user accounts with personalized details or characteristics.
Below is the example to initiate the process with custom attributes and Hash, where you can pass the attributes values:
Custom Attribute 1
Custom Attribute 2
hashCreationTime
Hash
Syntax
Map<String, Object> customUser = {"customAttribute1": "value1", // Add your own attribute"customAttribute2": "value2", // Add your own attribute"hashCreationTime": hashCreationTime, // EPOCH and should be the same one that is used for generating the hash"hash": HmacHashCalculation.generateHash(data: "value1_value2_hashCreationTime", // Stringkey: "API_KEY", // This will be provided by Sprinklr),};SPRMessengerConfig messengerConfig = SPRMessengerConfig(appId: "SPR_APP_ID", // This will be provided by Sprinklrenvironment: "SPR_ENVIRONMENT", // This will be provided by Sprinklr (e.g., PROD)skin: "MODERN", // This can be either "CLASSIC" or "MODERN"locale: "en", // default value is endeviceId: "UNIQUE_DEVICE_ID",pushAppId: "SPR_PUSH_ID", // Should be Unique id, if not sure pass same as device IDthemeMode: "DEFAULT", // default value is DEFAULT, options: DEFAULT | DARKdisableNetworkHandling: false, // default value is falsecustomUser: customUser,);SPRMessenger().takeOff(config: messengerConfig);
Parameters
Parameter | Required/Optional | Description |
appId | Required | Unique identifier of the Live Chat app. This will be provided by Sprinklr. |
environment | Required | Environment identifier. This will be provided by Sprinklr (for example, PROD2). |
locale | Required | Sets the language/locale for the messenger. Default Value: en |
customUser | Required (for custom users) | User details containing custom parameters and hash. For more information, see the Custom User Object table below. |
pushAppId | Optional | Unique identifier for push notifications. If unsure, use the same value as deviceId. |
deviceId | Optional | Unique identifier for the device. |
skin | Optional | Defines the messenger UI skin. Supported Values: CLASSIC, MODERN Default Value: MODERN |
themeMode | Optional | Defines the theme mode. Supported Values: DEFAULT, DARK Default Value: DEFAULT |
disableNetworkHandling | Optional | Controls network connectivity check before handshake. Supported Values: true, false Default Value: false |
Custom User Object
Parameter | Required/Optional | Description |
hash | Required | To know the steps to generate a hash, see How to Generate Hash. |
hashCreationTime | Required | Timestamp of hash generation. Ensure the following: It must match the time used when generating the hash. It must be in milliseconds. For example, 1734156789. |
Custom Attribute | Required | This is a custom attribute that can be defined by you. You may define multiple custom attributes. |
Note: If you wish to implement a Custom User Authentication Flow, kindly get in touch with the Sprinklr Team to initiate discussions about the implementation process.
Step 3: Show Messenger
Add the following code with the button present inside your application-
SPRMessenger().startApplication(); |
Step 4: Messenger Configurations
1) Update User
To update user information, create a new SPRMessengerUser object and pass it to the SPRMessenger().updateUser() function as shown below:
SPRMessengerUser messengerUser = SPRMessengerUser( hashCreationTime: hashCreationTime", //EPOCH and should be the same one that is used for generating the hash |
Note: UserID and Hash are mandatory parameters and hash should be generated for every change in user object.
2) Update Custom User
To update user information, create a new customUser object and pass it to the SPRMessenger().updateCustomUser() function as shown below:
Map<String, Object> customUser = { "customAttribute2": "value2", "hashCreationTime": "hashCreationTime", //EPOCH and should be the same one that is used for generating the hash |
3) Update Language
To update the user's language preference, you can use the SPRMessenger().updateLocale() function like this:
SPRMessenger().updateLocale(locale: "LOCALE_VALUE"); |
Sprinklr messenger supports the following languages: Arabic, Bokmal, Chinese, English, Thai, Turkish, Vietnamese, Portuguese, Spanish, Indonesian, Japanese, Korean, French.
Few languages with limited availability are: Albanian, Norwegian, Bosnian, Chinese (traditional), Chinese (honk-kong), Croatian, Czech, Danish, Dutch, Estonian, Finnish, German, Hebrew, Hungarian, Italian, Latvian, Lithuanian, Macedonian, Malayalam, Polish, Romanian, Serbian, Slovak, Slovanian, Swedish.
Note: Handle Language Direction Change:
When a user updates the locale, the language direction might change for certain languages. For example, when the language is changed from English to Arabic, the language direction changes from left-to-right to right-to-left.
If Live Chat is open when this change occurs, an alert will notify the user that the language direction has been updated. After they click the OK button, they will be redirected to the brand app and will need to reopen the Live Chat app.
If Live Chat is not running in the foreground and the brand app is open when the change occurs, no alert is shown, and the update is applied automatically.
4) Cleanup
You can log out the user and perform data cleanup by calling as shown below:
SPRMessenger().logout(); |
5) Customize Messenger Landing Screen
By default, the messenger view opens with a home page displaying all conversations. However, you can customize this behavior and launch MessengerView with a single conversation view.
The following section lists the customization you can do with the defaul view and single conversation view:
Default View
Sprinklr Live Chat comprises of two screens: the home screen and the conversation screen. By default, both screens are accessible when Live Chat opens.
The following are the ways you can customize the default view according to your use case:
Single Conversation View
You can choose to display only the conversation screen, and hide the home screen completely.
The following are the ways you can customize the single conversation view according to your use case:
6) Capture Customer Context When Starting a New Conversation from Custom View
When chat is being opened from a custom view, sometimes you might want to capture additional context on the conversation/case.
Example: A button called “Know More about this laptop” near a laptop product which opens a chat with a predefined contextual welcome message - “Hi there! It looks like you are interested in buying a laptop”. At the same time, you might want to set the case custom fields indicating the “product category: laptop”, “case type: inquiry”.
To do this,
Create the case custom fields and note down their field name: (Right now it’s not possible to get the field name of custom fields from UI, you can work with support to get the relevant field name of the custom fields).
Create a Map<String, List<String>> called conversationContext to represent the context you want to capture.
For example: In this example, "5ea7fa9e87651f356209878f" and "5eb7fa9e87651f356219348e" are the two custom field names with corresponding values.
Pass conversationContext to chatInitialisationContext* when opening a new conversation directly (5ea7fa9e87651f356209878f and 5eb7fa9e87651f356219348e are the two custom field names). All the field values should be passed as an array of strings.
Map<String, List<String>> conversationContext = {
"5ea7fa9e87651f356209878f": ["laptop"],
"5eb7fa9e87651f356219348e": ["inquiry"]
};
*Note: chatInitialisationContext is explained in previous section
7) Capture Customer Context from the Application on All Cases of the User
There may be times when you want to pass contextual information in case custom fields for all conversations initiated by a user.
To achieve this, follow these steps:
Create the Case Custom Fields: Note down the field names for your case custom fields. Currently, it is not possible to obtain the field names of custom fields from the user interface. You can work with Sprinklr support to get the relevant field names for your custom fields.
Pass Customer Context in the Initial Configuration: You can pass clientContext during the initialization phase by including it in the takeOff method. Here's an example:
Map<String, List<String>> clientContext = {
"5ea7fa9e87651f356209878f": ["laptop"],
"5eb7fa9e87651f356219348e": ["inquiry"]
};SPRMessengerConfig messengerConfig = SPRMessengerConfig(
// rest config,
clientContext: clientContext,
);
You can also update the client context on run time by calling the following method:
Map<String, List<String>> clientContext = {
"5ea7fa9e87651f356209878f": ["laptop"],
"5eb7fa9e87651f356219348e": ["inquiry"]
};
SPRMessenger().updateClientContext(clientContext: clientContext)
8) Update Conversation Context (Case Custom Field) on Demand
At times you might want to update the value of conversation context/case custom field during or after a conversation.
Example: After a purchase is made on the website you might want to set the transaction amount or id on the case for reporting. After doing this, you can attribute sales to each conversation/case.
To do this,
Create the case custom fields and note down their field name1.
Whenever you want to update the case custom field, call the following:
Map<String, List<String>> context = {
"5ea7fa9e87651f356209878f": ["laptop"],
"5eb7fa9e87651f356219348e": ["inquiry"]
};
SPRMessenger().updateConversationContext(conversationContext: {"context": context},
);
9) Update the profile context within Profile Custom Fields
When chat is being opened from a custom button or hyperlink, sometimes you might want to capture some context on the profile/user during the conversation or after the conversation. To do this,
Create the profile custom fields and note down their field name.
Whenever you want to update the profile custom field, call the following:
Map<String, List<String>> userContext = {
"5ea7fa9e87651f356209878f": ["laptop"],
"5eb7fa9e87651f356219348e": ["inquiry"]
};SPRMessenger().updateUserContext(userContext: userContext);
10) Close Messenger
You can close messenger from the main application by calling:
SPRMessenger().closeMessenger(); |
11) Add Delegate to Listen to External Events from Messenger
void handleExternalAction(Map payload) {
SPRMessengerDelegate messengerDelegate = SPRMessengerDelegate(
SPRMessenger().setMessengerDelegate( |
12) Get number of Open Conversations
Sometimes you might want to hide the live chat widget based on the number of open conversation. To do this,
Call the the below function to get the number of open conversations
SPRMessenger().getNumberOfOpenConversations();
Add Delegate to listen to the output of above function
void onUpdateNumberOfOpenConversations(int numOfOpenConversations) {
// Your function body
}
SPRMessengerDelegate messengerDelegate = SPRMessengerDelegate(
onUpdateNumberOfOpenConversations: onUpdateNumberOfOpenConversations,
);SPRMessenger().setMessengerDelegate(
messengerDelegate: messengerDelegate,
);
13) Get number of unread messages
You can keep track of changes in the total number of unread messages in conversations by using a delegate that accepts responses of type SPRMessagesCountResponse. This way, you'll get notified whenever there's a change in the unread message count. It's a convenient way to stay updated on unread message counts in real-time.
Call the the below function to get the number of unread messages
SPRMessenger().getUnreadMessagesCount();
Add Delegate to listen to the output of above function
void onUpdateUnreadMessagesCount(Map response) {
// Your function body
}SPRMessengerDelegate messengerDelegate = SPRMessengerDelegate(
onUpdateUnreadMessagesCount: onUpdateUnreadMessagesCount,
);SPRMessenger().setMessengerDelegate(
messengerDelegate: messengerDelegate,
);
Note: Please define and use MessengerDelegate function together to fetch number of open conversations count, external events and number of unread messages count.
14) Add Messenger Analytics Handler to Listen to tracking events and screen
void trackEvent(String eventType, String payload) { void trackScreen(String screenName) { SPRMessenger().setMessengerAnalyticsHandler( |
15) Add Messenger Events Listener to sdk events
The following events can be listened:
void onEvent(String eventGroup, String eventType, String payload) {
SPRMessengerEventsListener eventsListener = SPRMessengerEventsListener(
SPRMessenger().setMessengerEventsListener( ); |
16) Add Events Logger to SDK Events
The provided code snippet establishes a custom logging system which can handle logging events at different levels. This setup enables us to efficiently track and manage various events within the app.
void _write(SPRLogLevel level, List<String> logs) { |
The following log levels are maintained:
SPR_OFF, SPR_FATAL, SPR_ERROR, SPR_WARN, SPR_INFO, SPR_DEBUG, SPR_TRACE, SPR_ALL
17) Update Theme Mode for User on demand
You can update the theme mode on demand:
SPRMessenger().updateThemeMode(themeMode:'DARK'); // options: DEFAULT | DARK
Note: Handle Theme Mode Change:
When a user switches between the default and dark theme while Live Chat is open, an alert will notify the user that the theme has been changed. After they click the OK button, they will be redirected to the brand app and will need to reopen the Live Chat app.
If Live Chat is not running in the foreground and brand app is open when the change occurs, no alert is shown, and the update is applied automatically.
18) Configure your Status Card
Note: To get this capability enabled, please reach out to our support team at tickets@sprinklr.com, providing the live chat application ID. Status Card can be enabled only if you are using the modern skin version of live chat widget.
Using Status Cards, you can update your customers about the health of a key resource. This key resource could be a tool or service that they interact with frequently. By showing the status of this resource directly, customers don’t have to reach to agents repeatedly. Hence, this improves the customer experience while reducing agent workload
Once status card is enabled for your Livechat widget, you can update the status card by using the following:
SPRMessenger().updateWidget( id: “WIDGET_ID”, //Same ID configured in the Live Chat builder must also be utilized here details: SPRMessengerWidgetDetailsConfig( title: “Your title, %%[status]”, description: “Your description, %%[updatedAt]”, status: SPRStatus.ALL_SYSTEMS_OPERATIONAL, updatedAt: DateTime.now().millisecondsSinceEpoch, ), ); |
You can use the following placeholders for title and description:
%%[updatedAt] --> Placeholder for formatted time
%%[status] --> Placeholder for Status, mentioned below in the table as SPRStatus
19) Disable Attachments for Customer
You can prevent customers from adding attachments in the chat by hiding the attachment icon from the chat widget.
To do this, you can pass disableAttachment:true in the takeOff method
SPRMessengerConfig messengerConfig = SPRMessengerConfig( // rest config, disableAttachment: true, // by default, attachments are enabled ); |
20) Integrate Your Brand's Custom Header in Live Chat
Enhance your live chat experience by incorporating your own custom header. This allows you to replace Live Chat default header with one that aligns with your brand identity, creating a consistent and seamless experience for your users.
SPRMessenger().startApplication(chatInitialisationContext: { “disableHeader”: false, // Default: false. To disable Sprinklr's header, set to true “isRenderedAsFullView”: true, // Default: true. If set to false, the brand must manage device top insets }); |
21) Implement Back Button Handling to Control Hardware Back Button
Utilize the below method to handle the back action within your chat application. This function allows users to seamlessly navigate back to the previous screen, enhancing the overall user experience by providing intuitive and efficient navigation
SPRMessenger().goBack(); // Handles the back action |
22) Close Conversation
Use the method below to close a conversation on live chat. This feature allows brands to efficiently handle conversation endings, providing control over when and how interactions are closed. Apply this method only on the conversation screen when the case is open to ensure a seamless transition for users as conversations end.
SPRMessenger().closeConversation(); |
23) Close All Conversations
Use the method below to close all conversation on live chat. This option is visible to users with open cases, if there are no cases or all existing cases are already closed then user will not be able to see this option.
SPRMessenger().closeAllConversations(); |
24) Delete Conversation
Use this method to delete a conversation in live chat. This feature allows brands to efficiently remove interactions as needed, providing control over conversation deletions. Apply this method only on the conversation screen to manage deletions effectively.
SPRMessenger().deleteConversation(); |
25) Delete All Conversations
Use this method to delete all the conversations in live chat. This feature allows brands to efficiently remove interactions as needed, providing control over conversation deletions. Apply this method only on the home screen to manage deletions effectively.
SPRMessenger().deleteAllConversations(); |
26) Clear User Session
You can now enable users to clear their session details. When a user clears their session, any new conversations will be treated as if they are from a completely new user. This feature is especially useful for users interacting with your brand in public spaces or over a public network.
SPRMessenger().clearSession(); |
27) Use a Custom Font
You can use a custom font in your Live Chat app to ensure consistent branding across your applications.
To use a custom font in Live Chat, follow these steps:
Link your custom font files in your iOS and Android projects natively, such that the fonts are available throughout the project. For steps, see iOS and Android documentation.
Open a Sprinklr support ticket at tickets@sprinklr.com. In the support ticket, mention the font file names and the supported font weights for the texts. Refer to the following table for the supported font weights.
Note: Ensure you provide at least one of the supported font weights in the support ticket. If you provide a single font weight, it will be applied throughout the app, overriding all the other font weights.
Similarly, if any of the font weights are not mentioned in the support ticket, the font weight closest to the non-mentioned font weight will be applied in the app.
Supported font weights
The following table lists the supported font weights:
Font weight | Description |
Light | The light font weight is for subtle accents, secondary text, and areas where minimal emphasis is required. |
Regular | The standard font weight for most text elements. |
Medium | Medium is used for subheadings, labels, or emphasis on certain text sections without the bold impact. |
Semibold | Works well for headings, button labels, or any text that needs more attention but doesn’t require bold styling. |
Bold | Bold is designed for titles, primary headings, and call-to-action elements. |
Regular Italics | This font is used to subtly emphasize specific words or phrases within a message. |
Bold Italics | This font combines both bold and italic styles to strongly emphasize words or phrases. Ideal for highlighting key points or important actions within a chat conversation. |
28) Enabling Sentry for Crash Monitoring
You can enable Sentry in your application to monitor crash logs in mobile apps.
Note: To enable Sentry, raise a support ticket at tickets@sprinklr.com with the following information
Live Chat App ID: ID of the Live Chat app. You can get this from the Sprinklr UI. For more information, see Manage your Live Chat application.
Partner ID
Environment: Sprinklr environment (for example, prod1, prod2)
29) Configure Font Scale Settings
Sprinklr Live Chat supports font scaling, which adjusts the font size of Sprinklr Live Chat according to the end user's device settings.
Note:
By default, font scaling is enabled. To enable or disable font scaling again for Sprinklr Live Chat, contact Sprinklr Support at tickets@sprinklr.com.
Handle Font Scale Change:
When a user changes the font scale while Live Chat is open, an alert will notify the user that the font scale has changed. After they click the OK button, they will be redirected to the brand app and will need to reopen the Live Chat app.
If Live Chat is not running in the foreground and the brand app is open when the change occurs, no alert is shown, and the update is applied automatically.
30) Configure Keyboard Send/Enter Button Behavior
The behavior of the Send/Enter key on mobile keyboards can be configured to control how it functions.
This configuration is set at the app level, with the following two options:
Send on Enter: Pressing the Enter key sends the message directly.
Insert New Line: Pressing the Enter key inserts a new line within the message input field.
Note: To configure the Send/Enter button behavior for Sprinklr Live Chat, contact Sprinklr Support at tickets@sprinklr.com.
Step 5: Push Notifications
For more details on mobile push notifications, please refer here
Note: If you are using push notifications for Android, ensure that "app/res/drawable" should have "notification_icon.png" before the takeOff method is called.
Prerequisites
Android: Google service.json file
iOS: APNS certificate (P12) along with its credentials
Note:
Google service.json file can be different for staging/prod env
APNS certificate (P12) and its credentials must be different for staging/prod env
If you are testing the push notification setup on prod mobile application(iOS), plesae ensure to use test flight build
If the Google service.json file is different sandbox/prod env and you are testing the push notification setup on prod mobile application(Android), plesae ensure to use Android release build
Configuration
To enable push notifications, raise a support ticket to tickets@sprinklr.com with the following information:
Google service.json file
APNS certificate (P12) along with its credentials
Live Chat AppID
Partner ID
Env
Step 1: Register/Unregister for Push Notifications
Step 2: Handle Messenger Push Notifications
Step 3: Open Live Chat Messenger
Open Live Chat view with initial notification: Messenger view can be presented with initial notification as the result of opening from notifications or in-app notification banners:
Map<String, Object> launchOptions = {"type": "NOTIFICATION","data": notificationData};SPRMessenger().startApplication(launchOptions: launchOptions);
Step 4: Controlling Notification Permissions
Note: Below Step 1 and Step 2 should be done before takeOff()
Prior to initializing the Messenger, you have the option to handle push notifications based on the user's app settings and permission status, provided your app has already obtained permission from the user.
1) To deactivate the push notifications according to the user’s application setting or if the user has not granted notification permission to your application:
SPRMessenger().setPushEnabled(pushEnabled:false); // Disable if app settings are disabled 2) The Live Chat application will never request notification permission again if it has already been granted. When your application has not obtained notification permissions and if you also wish to prevent the live chat application from requesting notification permission when 'takeOff' is called, you can set the 'autoRequestPermission' parameter to false.
SPRMessenger().setAutoRequestNotificationPermissions(autoRequestNotificationPermissions: false,); // App will not ask the permission for push notifications
3) Whenever the user has granted notification permission to your application, we need to ensure that the push notifications for live chat application are also enabled. To do this:
SPRMessenger().setPushEnabled(pushEnabled: true);Notification Grouping and Inline Reply
Users often receive multiple messages across different conversations in a short span of time. If each message is delivered as an independent push notification, it can quickly lead to clutter, reduced engagement, and difficulty distinguishing conversations.
Live Chat SDK supports creating a conversation-aware push notification system that:
Clubs multiple messages from the same conversation depending on use cases
Keeps different conversations separate
Enables message preview, inline reply, and quick actions directly from the notification bar
Allows easy navigation to the exact conversation/message
Android
Notification intents from MainActivity
When the user opens the app from a push notification, the incoming Intent must be passed to the plugin so that applications can start with the correct launch options.
Add the following to your application’s MainActivity, importing SPRNotificationIntentHandler from the plugin:
import com.sprinklr.sprinklr_plugin.SPRNotificationIntentHandlerclass MainActivity : FlutterActivity() {override fun onCreate(savedInstanceState: Bundle?) {super.onCreate(savedInstanceState)handleNotificationIntent(intent)}override fun onNewIntent(intent: Intent) {super.onNewIntent(intent)setIntent(intent)handleNotificationIntent(intent)}private fun handleNotificationIntent(intent: Intent?) {SPRNotificationIntentHandler.handleIntent(this, intent)}}
Notification preferences
Grouping and inline reply behavior can be adjusted from Flutter via SPRMessenger().setNotificationPreferences.
groupEnabled: Omit or leave default behavior to keep notification grouping enabled. Set groupEnabled: false to disable grouping.
actions: Use SPRNotificationAction.createInlineReplyAction(label: "...") to supply a custom inline reply label. If you omit inline reply actions or the label, the platform default label is used.
Example
SPRMessenger().setNotificationPreferences(preferences: SPRNotificationPreferences(// groupEnabled: false,actions: [SPRNotificationAction.createInlineReplyAction(label: 'Quick Reply Flutter',),],),);
iOS
Prerequisites (in your AppDelegate file):
Import UserNotifications:
Swift:
import UserNotificationsObjective‑C:
#import <UserNotifications/UserNotifications.h>
Import Sprinklr Messenger Client:
Swift:
import SPRMessengerClientObjective‑C:
#import <SPRMessengerClient/SPRNotificationReplyHandler.h>Alternatively, you can use this import line:
#import <SPRMessengerClient/SPRMessengerClient.h>
Declare conformance to UNUserNotificationCenterDelegate on your app delegate class.
Set notification center delegate:
Swift:
UNUserNotificationCenter.current().delegate = selfObjective‑C:
[UNUserNotificationCenter currentNotificationCenter].delegate = self
Reply text and notification category (AppDelegate)
Configure user-visible reply strings before registering the notification category, then register the category used for live-chat reply notifications.
When the user taps a notification or submits an inline reply, iOS delivers a UNNotificationResponse to your delegate. Forward that response to SPRNotificationReplyHandler and call the system completionHandler only after the handler finishes.
Step 6: Generate User Hash
The hash is a Hash-based Message Authentication Code (HMAC) generated using the SHA-256 algorithm. Live Chat supports a timestamp-based HMAC signature that:
Validates a user's identity securely
Expires after a defined period (default: 1 minutes)
Prevents signature reuse
Let’s take an example of the following user:
user: {userId: '12345',firstName: 'John',lastName: 'Doe',phoneNo: '9876543210',email: 'John.Doe@example.com',profileImageUrl: 'https://example.com/profilePic.jpg',hash: 'f30c3b0835ecd378a134c74bce8cea866df8c5b6e12a8c219c9bb288f7270e22',hashCreationTime: 1754565280133}
Steps to Generate a Hash
1. Concatenate specific user details in the following order, separating each with an underscore (_) to create a string:
userId_firstName_lastName_profileImageUrl_phoneNo_email_hashCreationTime
For example, the resulting string to generate the hash would be:
12345_John_Doe_https://example.com/profilePic.jpg_9876543210_John.Doe@example.com_1754565280133
Note: If some user details are missing, omit their values but retain the underscores to preserve the field order. For example, if profileImageUrl is unavailable, include consecutive underscores after lastName, as shown below:
userId_firstName_lastName__phoneNo_email_hashCreationTime2. Pass the string and API key provided by Sprinklr to the hash function.
Sample function to generate hash in Java:
import javax.crypto.Mac;import javax.crypto.spec.SecretKeySpec;import java.security.NoSuchAlgorithmException;import java.security.InvalidKeyException;import javax.xml.bind.DatatypeConverter;class Main {public static void main(String[] args) {try {String key = "acf32e61-14a6-291b-3a1b-cc8854134ea1";long hashCreationTime = System.currentTimeMillis();String message = "12345_John_Doe_https://example.com/profilePic.jpg_9876543210_John.Doe@example_hashCreationTime";Mac hasher = Mac.getInstance("HmacSHA256");hasher.init(new SecretKeySpec(key.getBytes(), "HmacSHA256"));byte[] hash = hasher.doFinal(message.getBytes());System.out.println((DatatypeConverter.printHexBinary(hash)).toLowerCase());}catch (NoSuchAlgorithmException e) {}catch (InvalidKeyException e) {}}}
Note: The UserID, Hash and hashCreationTime parameters are mandatory parameters and hash should be generated for every change in user object. The hashCreationTime must be included at the end of the string in epoch timestamp format.
The secret key which is used in HMAC for your application can be found in the Dev Tools section of the Live Chat Builder.
Hash Expiry and Storage Considerations
In our system, each hash is associated with a creation timestamp (hashCreationTime). A hash is considered valid only for a limited duration from the time it is created. Once this time period passes, the hash automatically expires and cannot be used for authentication or authorization purposes.
Note: Consider the following points:
Expiry Duration: The system uses the hashCreationTime to calculate the validity of a hash. Any operation that relies on a hash beyond this expiry period will fail.
Local Storage/Caching: If your application stores hashes in storage medium like local storage, or any persistent cache, you must remove or invalidate them after they expire. Continuing to use an expired hash may lead to failed requests or security issues.
Step 7: Enable Co-Browsing
Mobile co-browsing is a feature that enables customers to securely share their mobile app screens with service agents through the Sprinklr console. This allows agents to guide users in real time through product purchases, complex form submissions, or any confusing areas within the mobile application interface. For more details, see Co-browsing on Mobile App.
Prerequisites
Before you begin, ensure the following prerequisites are met:
Support Request:
To enable co-browsing, raise a support ticket at tickets@sprinklr.com with the following details:
Partner Name
Partner ID
Concurrent co-browsing sessions expected
Number of agents who will be using co-browsing (Concurrent sessions)
Add Co-browse Dependency
Add the co-browse dependency in your project.
a. Android
To add support for co-browsing in Android, add the following flag to the project’s root-level build.gradle file:
buildscript {
ext {
is_cobrowsing_enabled = true
}
}
b. iOS
To add support for co-browsing in iOS, add the following pod in the project’s ios/Podfile:
pod 'SPRMessengerClientCobrowseSDK', :podspec => 'https://clients-external-cocoapods.sprinklr.com/SPRMessengerClientCobrowseSDK/14.0.0/SPRMessengerClientCobrowseSDK.podspec'
Then run:
pod install
Enable Co-browse
To enable co-browsing, set isCobrowsingEnabled: true in the takeOff method:
SPRMessengerConfig messengerConfig = SPRMessengerConfig(
// rest config,
isCobrowsingEnabled: true,
);
SPRMessenger().takeOff(config: messengerConfig);
Full Device Screen Sharing Support
Full device screen sharing lets support agents view the entire device screen, including apps outside your own. This helps them check system settings or guide users as they switch between different applications.
To enable this feature, refer to Full device screen sharing | Cobrowse.io documentation.
Redaction Support
Redaction ensures that sensitive information is hidden or masked during co-browsing or screen-sharing sessions. This prevents private data, such as personal details, payment information, or confidential text, from being visible to support agents while still allowing the rest of the application to be shared seamlessly.
To redact sensitive information, wrap your widget with the SPRRedacted widget:
import 'package:sprinklr_plugin/widgets/SPRRedacted.dart';
SPRRedacted(
child: Text("Sensitive Text"),
),
Step 8: Taking Video Calls on Messenger
The video calling feature enables brands to connect with customers through video calls directly within the mobile application. These calls can be initiated by agents, providing a more personalized support experience. Sprinklr Live Chat integrates with the AWS Chime service to provide video calling functionality.
Prerequisites
To integrate AWS Chime, ensure the following prerequisites are met:
AWS account with the Chime SDK enabled
If you want to enable video recording, you need an S3 bucket associated with your AWS account to store Chime-side recordings.
AWS account number to process video call recordings
Permission to access Care Console in the Sprinklr platform
Note: You can enable AWS Chime account to make and receive video calls by reaching out to Sprinklr support at tickets@sprinklr.com
Pricing
The following are the pricing details:
AWS has a usage-based pricing, with costs calculated per minute per participant costs. For example, a call between an agent and a customer counts as 2 participants.
AWS charges $0.0017 per minute per attendee (one attendee is an agent and the other is a customer).
If you choose to enable video call recording, then AWS will add separate pricing for recording using the media capture pipeline which is around $0.0034 per minute (irrespective of number of attendees).
For more details, you can refer to Amazon Chime SDK pricing.
Video Call Recording
You can choose whether or not to record video calls. If you decide to enable video call recording, note the following clarifications:
Video call recordings are stored on your AWS chime account S3 bucket.
Video call recordings are also stored on Sprinklr AWS S3, which allows you to view the them in the Sprinklr platform.
Note: For the integration, Step 6 is mandatory.
Integration Steps (iOS)
Follow these steps to enable Chime video calling on iOS.
Install Chime-related dependencies
Note: If you installed the Live Chat SDK using Swift Package Manager, all Chime-related dependencies are automatically installed. You can therefore skip this step and proceed directly to the next steps.
Add SPRMessengerClientChimeVideoSDK to your Podfile. Then, run the following code:
pod installtarget :YourTargetName dopod 'SPRMessengerClientChimeVideoSDK', :podspec => 'https://clients-external-cocoapods.sprinklr.com/SPRMessengerClientChimeVideoSDK/16.0.0/SPRMessengerClientChimeVideoSDK.podspec'
Setup VoIP Push Notifications
To display incoming video calls, Sprinklr relies on the call kit infrastructure provided by iOS that offers an experience of a real call. This also gives users access to control actions such as end call, mute call and other call kit actions from both the video call UI as well as the call kit UI. To leverage this, Sprinklr uses VoIP push notifications which helps users to receive calls on their devices.
To setup VoIP push notifications, follow these steps:
Add PushKit into your app
Implement Apple's PushKit API directly into your app to obtain a VoIP token. For more detailed guidance on setting this up, see Apple's VoIP Best Practices.
Generate VoIP Certificate
The certificate generated must be a VoIP Services Certificate.
You must use the same bundle id for the VoIP cert as you do for your main app. For more information, see Creating voip certificates.

Share generated VoIP Certificate in p12 format with Sprinklr along with its password.
Register/Unregister for VoIP push notifications
Register VoIP Token
Inside didUpdatePushCredentials, add the following code:
Swift
func pushRegistry(_ registry: PKPushRegistry, didUpdate pushCredentials: PKPushCredentials, for type: PKPushType) {SPRMessenger.voipPushManager().didUpdate(pushCredentials, forType: type.rawValue)}Objective C
- (void)pushRegistry:(PKPushRegistry *)registry didUpdatePushCredentials:(PKPushCredentials *)pushCredentials forType:(PKPushType)type {[[SPRMessenger voipPushManager] didUpdatePushCredentials:pushCredentials forType:(NSString *)type];}
Unregister voip token
Inside didInvalidatePushTokenForType, add the following code:
Swift
func pushRegistry(_ registry: PKPushRegistry, didInvalidatePushTokenFor type: PKPushType) {SPRMessenger.voipPushManager().didInvalidatePushToken(forType: type.rawValue)}Objective C
- (void)pushRegistry:(PKPushRegistry *)registry didInvalidatePushTokenForType:(PKPushType)type {[[SPRMessenger voipPushManager] didInvalidatePushTokenForType:(NSString *)type];}
Handle VoIP Notifications
Send VoIP Notification to Messenger SDK if its type belongs to messenger.
Inside didReceiveIncomingPushWithPayload, add following code
Swift
func pushRegistry(_ registry: PKPushRegistry, didReceiveIncomingPushWith payload: PKPushPayload, for type: PKPushType, completion: @escaping () -> Void) {if (SPRMessenger.voipPushManager().canHandleVoipPushEvent(payload)) { SPRMessenger.voipPushManager().handleVoipPushEvent(payload, forType: type,completion: completion)}}
Objective C
- (void)pushRegistry:(PKPushRegistry *)registry didReceiveIncomingPushWithPayload:(PKPushPayload *)payload forType:(PKPushType)type withCompletionHandler:(void (^)(void))completion {if ([[SPRMessenger voipPushManager] canHandleVoipPushEvent: payload]) { [[SPRMessenger voipPushManager] handleVoipPushEvent:payload forType:typecompletion:completion]; return;}// Add your custom code}
Implementing Custom Video Call Icons
The Sprinklr Messenger Chime Video SDK allows host apps to override the default icons shown on the video call footer toolbar (camera, microphone, flip camera, and end call). If no custom icon is provided, the SDK continues to use its default icons.
Note: This customization is available only if Picture‑in‑Picture (PIP) mode is enabled in your Messenger configuration.
To customize icons, implement the SPRAmazonChimeIconsDelegate. This delegate offers three optional customization methods:
getCustomIconName: This method returns the updated iconName to be used. By default, the iconName will be looked in the default symbol icon set provided by UIKit.
iconForName: This method returns the UIImage * instance which will be directly used as the icon for the given iconName.
assetBundleName: This property should be set if the application has a custom asset bundle which contains the customizable icons.
Note: All the three methods are optional.
Icon Resolution Order
If multiple methods are implemented, this is how the icon will be resolved:
Defalt Icon Name: The default iconName will be passed to the getCustomIconName method if implemented. If not implemented, the iconName will remain unchanged.
Use updatedIconName from Step 1: The updated iconName from step 1 will be used to resolve the asset further. Let’s call it updatedIconName.
Check assetBundleName: If the assetBundleName property is specified, the updatedIconName will be resolved from the bundle specified. If the asset is not found, the resolution will move to the next step.
Call iconForName: If the iconForName method is implemented, the updatedIconName will be passed to this method to get the resolved UIImage * instance.
Fallback to default asset: If the image could not be resolved from any of the above steps, or no delegate method was implemented, the default asset will be used.
Implementation
Customizable Icons
Icon | iconName | When Used |
Flip Camera | camera.rotate.fill | Switch Front/Rear camera |
Camera On | video.fill | Local video enabled |
Camera Off | video.slash.fill | Local video disabled |
Microphone On | mic.fill | Microphone unmuted |
Microphone Muted | mic.slash.fill | Microphone muted |
End Call | phone.down.fill | Hang up |
Integration Steps (Android)
Follow these steps to enable Chime video calling in your Android project.
Enable Chime Video Calling
Add the following flag to your project’s root‑level build.gradle file:
buildscript {ext {chime_video_call_enabled = true}}
Pass Video Call provider to SPRMessengerConfig
Configure the Messenger with the Chime provider:
import 'package:sprinklr_plugin/enums/SPRVideoCallProviders.dart';SPRMessengerConfig messengerConfig = SPRMessengerConfig(// other config,videoCallProvider: SPRVideoCallProviders.AMAZON_CHIME,);SPRMessenger().takeOff(config: messengerConfig);
Video call continuity outside Live Chat interface
Live Chat allows users to continue a video or audio call even after they navigate away from the Live Chat interface and return to the host brand application. Without continuity, the video call must be disconnected before leaving the Live Chat interface. With continuity enabled, the call seamlessly continues outside the Live Chat interface.
On Android, this functionality operates at the device level, meaning the call will continue even after the user leaves the parent application.
Note: To enable this feature, contact Sprinklr Support at tickets@sprinklr.com.
Integration steps
To enable video call continuity outside the Live Chat interface, pass the enablePiP flag as true in the startApplication method.
SPRMessenger().startApplication(enablePiP: true);Implementing Custom Video Call Icons
The Sprinklr Messenger Chime Video SDK allows host apps to override the default icons shown on the video call footer toolbar (camera, microphone, flip camera, and end call). If no custom icon is provided, the SDK continues to use its default icons.
Note: This customization is available only if Picture‑in‑Picture (PIP) mode is enabled in your Messenger configuration.
On Android, customization is done by registering an icons provider in Application.onCreate() before Messenger initialization:
import com.spr.messengerchimevideoclient.SPRAmazonChimeConfig;import com.spr.messengerchimevideoclient.VideoCallIcon;SPRAmazonChimeConfig.setIconsProvider(icon -> {if (icon == VideoCallIcon.END_CALL) {return R.drawable.my_hangup_icon;}if (icon == VideoCallIcon.CAMERA_OFF) {return R.drawable.my_camera_off_icon;}return null; // SDK default for unmapped slots});
API Methods
In the registration, the following methods are used:
setIconsProvider(provider): Register a provider. Pass null to clear it and revert to the SDK defaults.
getCustomIcon(icon): Return a non‑zero @DrawableRes ID, or null/0 to use the SDK default for that slot.
Customizable Icons
Icon | iconName | When Used |
Flip Camera | FLIP_CAMERA | Switch Front/Rear camera |
Camera On | CAMERA_ON | Local video enabled |
Camera Off | CAMERA_OFF | Local video disabled |
Microphone On | MIC_ON | Microphone unmuted |
Microphone Muted | MIC_MUTED | Microphone muted |
End Call | END_CALL | Hang up |
Pre-release Validation
Before submitting your app to the App Store or Play Store, ensure the following validation step is part of your internal release cycle:
Upload the build to:
TestFlight (iOS)
Play Store Internal Testing (Android)
Perform thorough testing to verify:
No SDK initialization failures
No crashes related to missing or altered native libraries
Boot Retry Handler
The boot retry handler is an optional callback that the host app can register with the Sprinklr Messenger SDK. It is invoked when Messenger fails to boot and the user taps Retry on the boot error screen.
By default, retry re‑runs takeOff with the last settings stored in memory. This works for temporary issues (such as network interruptions or server downtime), but it cannot resolve problems caused by stale data (for example, an expired user hash). The boot retry handler allows the host app to take control of the retry flow and refresh data when needed.
API
void registerBootRetryHandler({required SPRMessengerBootRetryHandler bootRetryHandler,});class SPRMessengerBootRetryHandler {final Future<bool> Function() onBootRetry;SPRMessengerBootRetryHandler({required this.onBootRetry});}
Handler Response
The handler must indicate whether it took responsibility for the retry:
Response | Meaning | SDK Behavior |
Handled (true / YES) | The host app has performed (or will perform) the recovery. For example, called updateUser with fresh credentials. | SDK does not call takeOff again. The host app is expected to have triggered boot through its own action (typically updateUser, which internally re-run takeOff). |
Not handled (false / NO) | The host app cannot or does not want to intervene. | SDK falls back to takeOff with the last known settings, same as having no handler at all. |
Implementation
Register the handler from Dart. The plugin stores the Dart callback and wires it to the native SPRMessenger boot retry handler via a method channel.
import 'package:sprinklr_plugin/sprinklr_plugin.dart';class MessengerConfigController {Future<bool> _retryBootWithLastSettings() async {await _loadUserData();final user = UserUtils.createUserWithHash(userData: _userFormData,appKey: _appKey,);if (user != null) {SPRMessenger().updateUser(user: user);return true;}return false;}void registerBootRetryHandler() {SPRMessenger().registerBootRetryHandler(bootRetryHandler: SPRMessengerBootRetryHandler(onBootRetry: _retryBootWithLastSettings,),);}Future<void> initializeMessenger() async {SPRMessenger().takeOff(config: _buildMessengerConfig(user: user));registerBootRetryHandler();}}
Troubleshooting
1) LiveChat not showing up while passing authenticated user details
Check the expected hash for any authenticated user passed inside chat settings.
Hover over the Options icon alongside your Live Chat Application and select Validate User Hash.

On the Validate User Hash window, enter User ID, Profile Image URL, First Name, Last Name, Phone Number and Email. Click Copy Generated Hash and verify it with the hash generated by you.
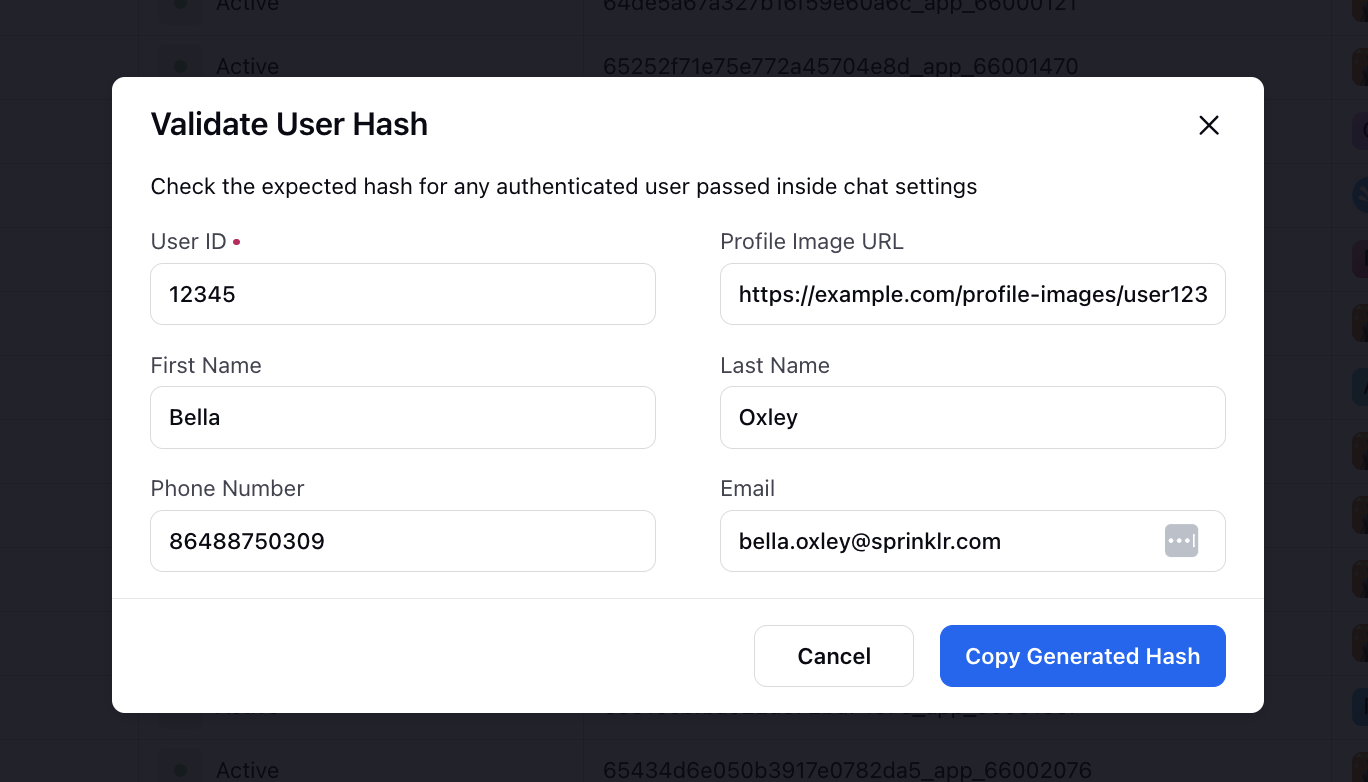
2) Check if correct FCM Server key is being used for push notifications using Open API of FCM
Please use the following curl with your FCM server key and registration device token, to check if the FCM Server key is correct or not:
|
3) More than one file was found with OS independent path
Add the following lines to your app's build.gradle files -
android { |
4) Gestures being registered on both LiveChat SDK and Flutter application
Note: This issue might happen on some older Flutter versions.
To override the gesture responder chain in MessengerViewController to skip FlutterViewController, preventing Flutter from becoming the touch responder when Live Chat is open. Please implement the following changes:
You can resolve this issue by configuring the SPRMessengerConfig to override the default behavior. To do this, set the overrideMessengerViewsResponderChain flag to true in the configuration sent to the takeOff method. Here's how you can specify this flag in takeOff:
SPRMessengerConfig messengerConfig = SPRMessengerConfig( // Other configuration options overrideMessengerViewsResponderChain: true, );
SPRMessenger().takeOff(config: messengerConfig); |
Alternatively, you can also set this flag directly when starting the Live Chat using the startApplication method:
SPRMessenger().startApplication(overrideMessengerViewsResponderChain: true); |
By setting the overrideMessengerViewsResponderChain flag to true, you ensure that gesture events are only registered on the intended screen, thus preventing conflicts between the Live Chat screen and the Flutter application screen.
6) Android Build Failure When minifyEnabled is Set to True
You are encountering an Android build failure when minifyEnabled is set to true.
Solution:
Add the following rule to your proguard-rules.pro file.
-keep class com.facebook.react.devsupport.** { *; }
If co-browsing is enabled:
-keep class io.cobrowse.** { *; }
7) Gradle 9 Minification Support
If your app has minification enabled, upgrading to Gradle 9 requires an additional configuration.
Add the following rule in your android/app/proguard-rules.pro file:
-keep class androidx.work.** { *; }8) Android Backup Configuration
If Android backup is enabled (android:allowBackup="true"), you must exclude the Live Chat SDK’s secure storage file from backup and device transfer flows. This ensures encrypted keychain data is not restored across reinstalls or device migrations, preventing invalid or unrecoverable secure storage states.