Case Monitoring Actions
Updated
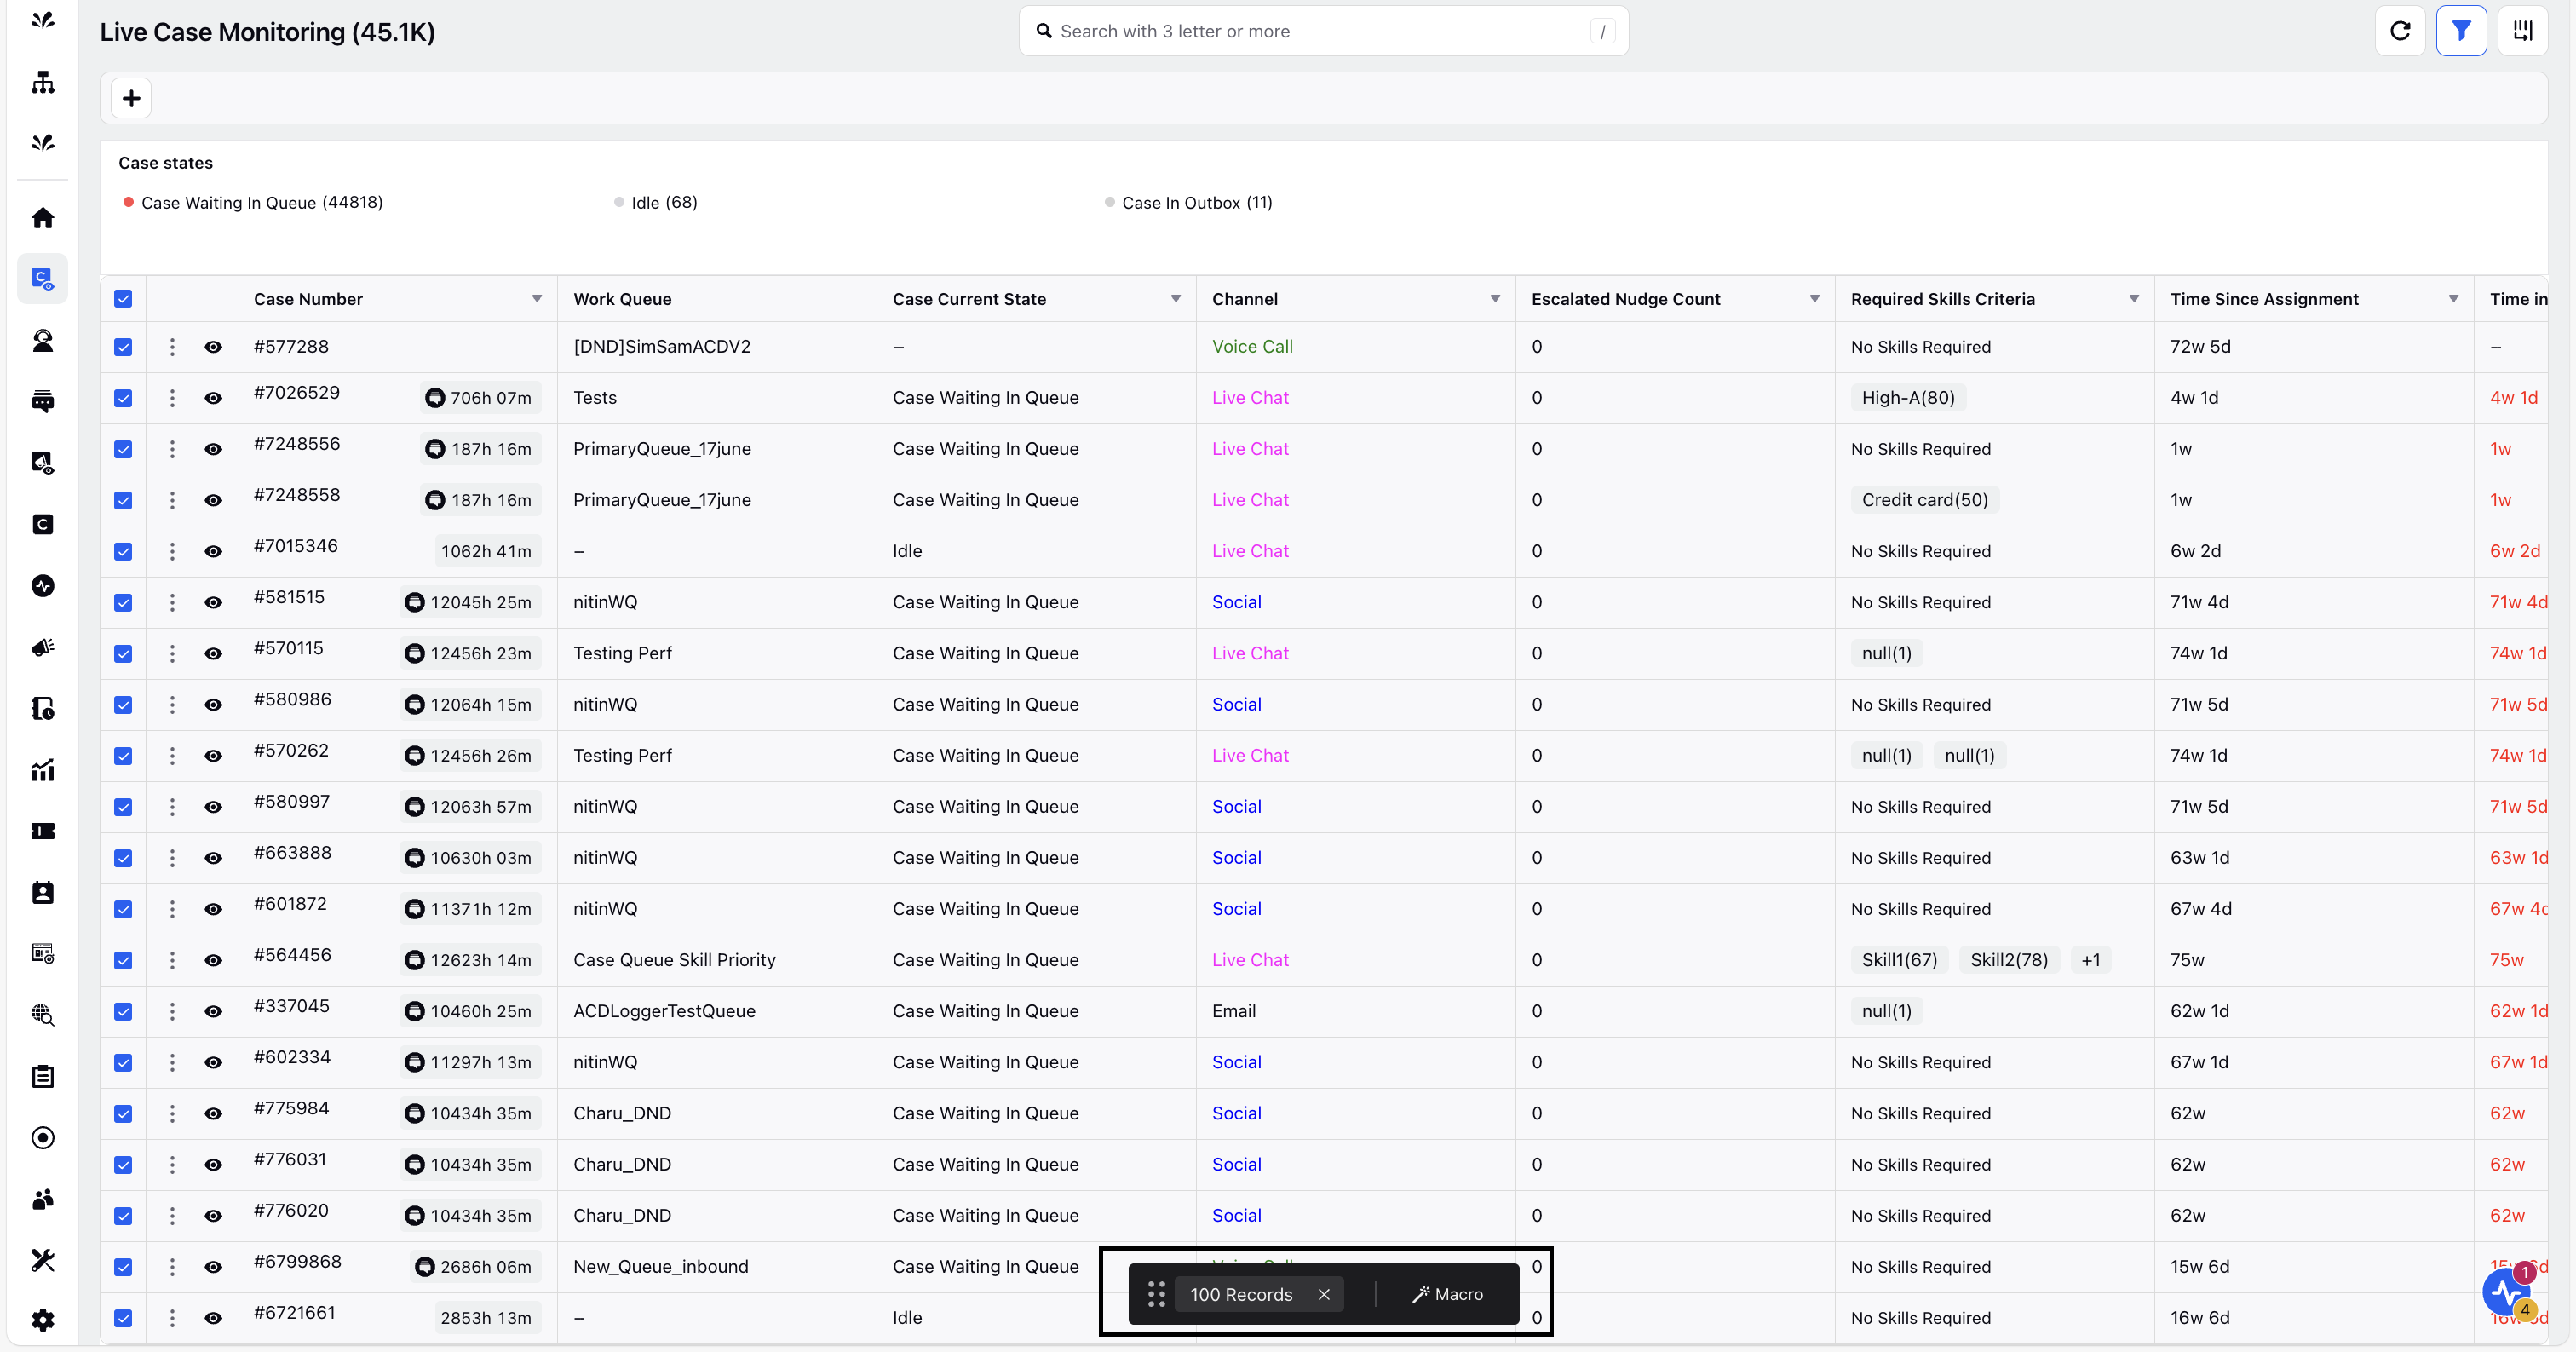
Live Case Monitoring includes several features that enable supervisors to monitor cases more effectively and take timely, targeted actions. In addition to monitoring the real-time data displayed upfront, supervisors can filter the Case Monitoring screen to focus on the information most relevant to them. They can also take direct actions on cases to ensure timely responses and maintain operational efficiency.
Dashboard Actions
At the top-right corner of the Live Case Monitoring screen, supervisors can access key controls that apply to the entire dashboard:
Refresh (
 ): Click this icon to reload the dashboard and see the latest updates across all case data.
Show/Hide Filters (
 ): Click this icon to show or hide the Add Filter option at the top of the Detailed View. This option allows you to filter the dashboard based on specific criteria for more focused monitoring.
Manage Columns (
 ): Click this icon to toggle columns on or off in the Detailed View. It helps you customize the table to show only the information you need.

Add Filter
Supervisors can use the Add Filter option to refine the case list based on specific criteria such as assigned user, work queue, priority, status, or pending count. This enables them to focus on the most relevant cases and streamline case management.
To create a filter, follow these steps:
1. In the top-right corner, click the Show Filters icon.
2. At the top of the dashboard, click the Add Filter (+) icon and choose the filtering parameters you want to apply.
3. Once you've defined the filter, click Apply.
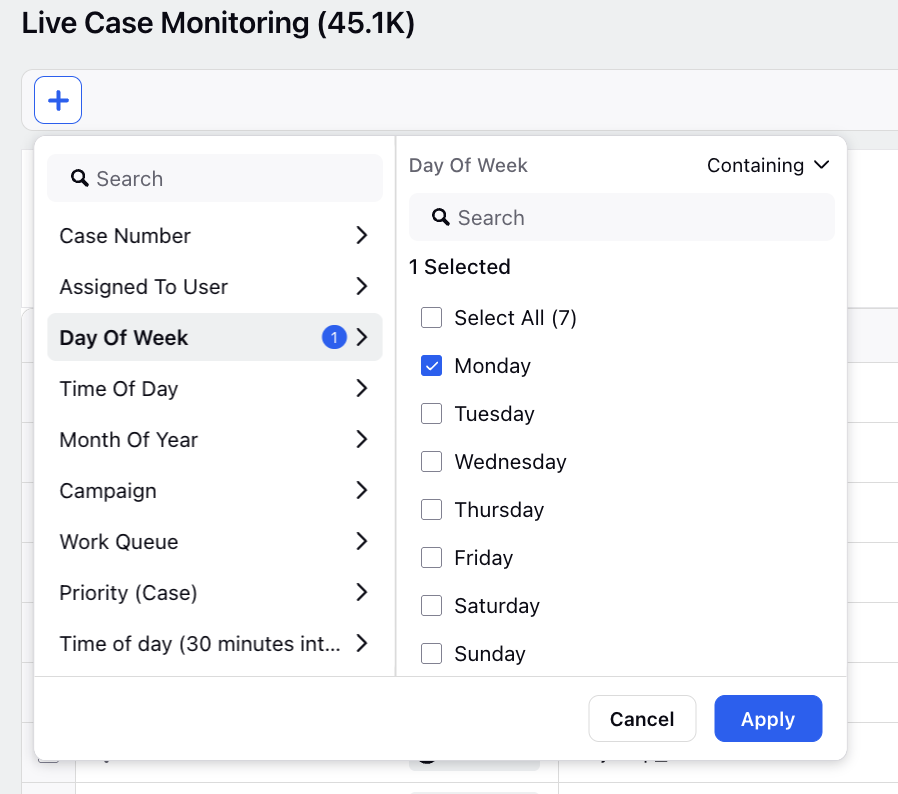
The Case Monitoring screen will then update to show only the cases that match your selected criteria.
Quick Filters
Quick Filters let supervisors create and save filter configurations for easy reuse. They can be defined for frequently used properties, allowing supervisors to quickly narrow down the case list with a single click. By reducing repetitive manual filtering, Quick Filters streamline case monitoring and help supervisors focus on cases that require immediate attention.
Create a Quick Filter
To create a quick filter, follow these steps:
1. In the top‑right corner, click the Show Filters icon.
2. At the top of the dashboard, click the Add Filter (+) icon and choose the filtering parameters you want to apply.
3. Once the filter is defined, click Apply.

4. In the top‑right corner, click Save.

5. On the New Quick Filter screen, enter a name for the filter and click Submit.

6. Access saved filters from the Quick Filters drop‑down under the Created by Me section.

7. Select a filter from the drop‑down to apply it.
In the Quick Filters > Created by Me section, click the three‑dot icon next to a filter to rename, share, or delete it. Filters can be shared with All workspaces, selected workspaces, specific users or user groups.

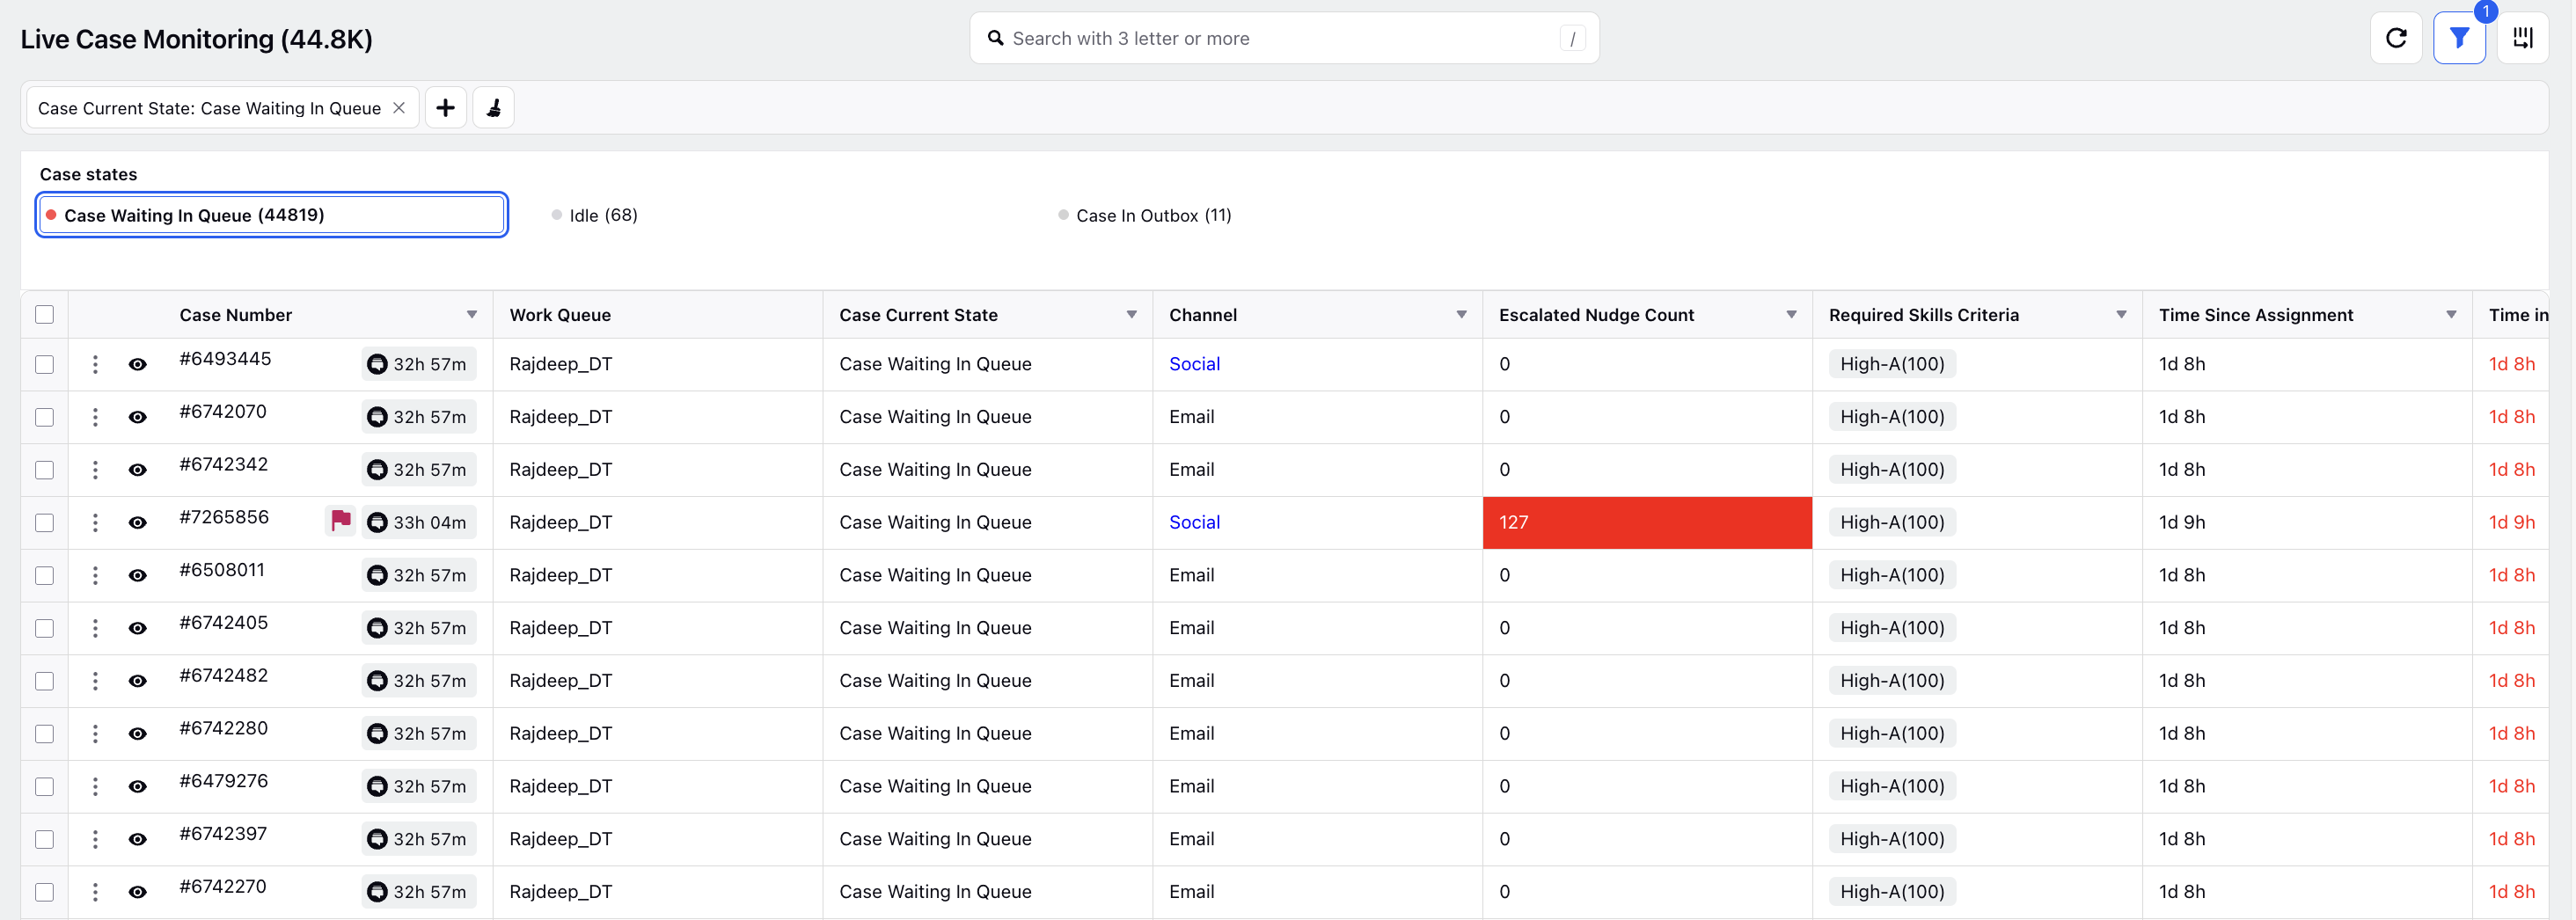
Filter Using Case Aggregate Summary View
You can also filter cases directly from the Case Aggregate Summary View by clicking on a specific case state (for example, Escalated, In Progress) to filter the Detailed View. The screen will automatically update to show only the cases in the selected state.
Sorting Support
The Live Case Monitoring screen provides supervisors with the ability to sort case data on key dimensions. To reorder the case list, supervisors can use the drop‑down arrow icon located in the column headers. Sorting is available on columns such as Work Queue, Channel, and Case Current State, and can be applied in ascending or descending order.

Case Actions
In the Detailed View, supervisors can take direct actions on individual cases to manage workflows more efficiently. They can access case details and perform key tasks such as taking the call themselves or transferring it to another agent or queue. These actions help reduce customer wait times and improve overall team performance.
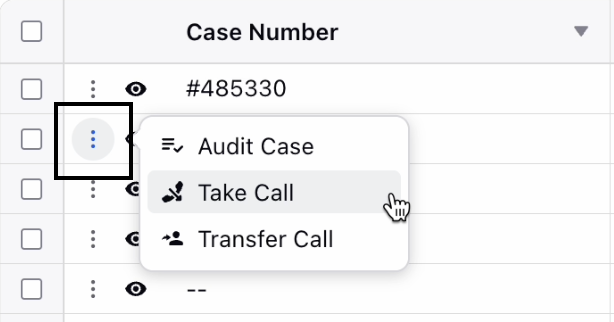
Take or Transfer a Call
To take action on an individual case:
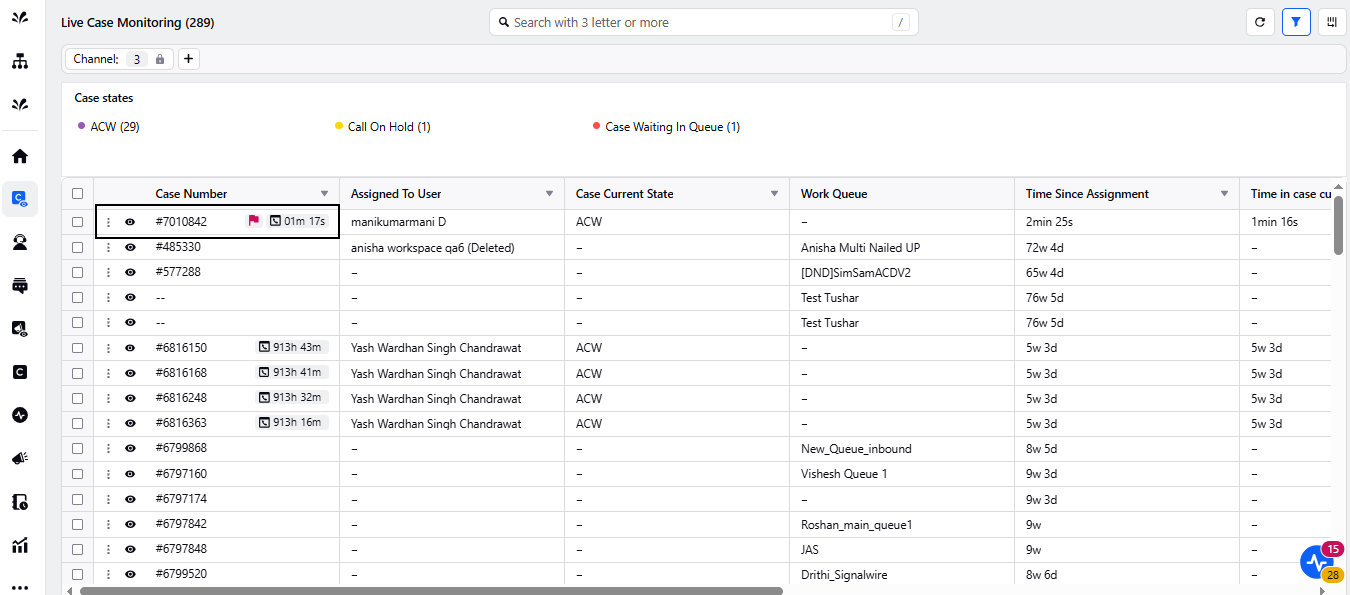
In the table view, click the three-dot icon (⋮) at the beginning of the case row.
A menu will appear, displaying available case actions such as Take Call or Transfer Call.
![]() Note: The Take Call and Transfer Call options are available only for inbound calls that are waiting in the queue and have not yet been assigned to an agent.
Note: The Take Call and Transfer Call options are available only for inbound calls that are waiting in the queue and have not yet been assigned to an agent.
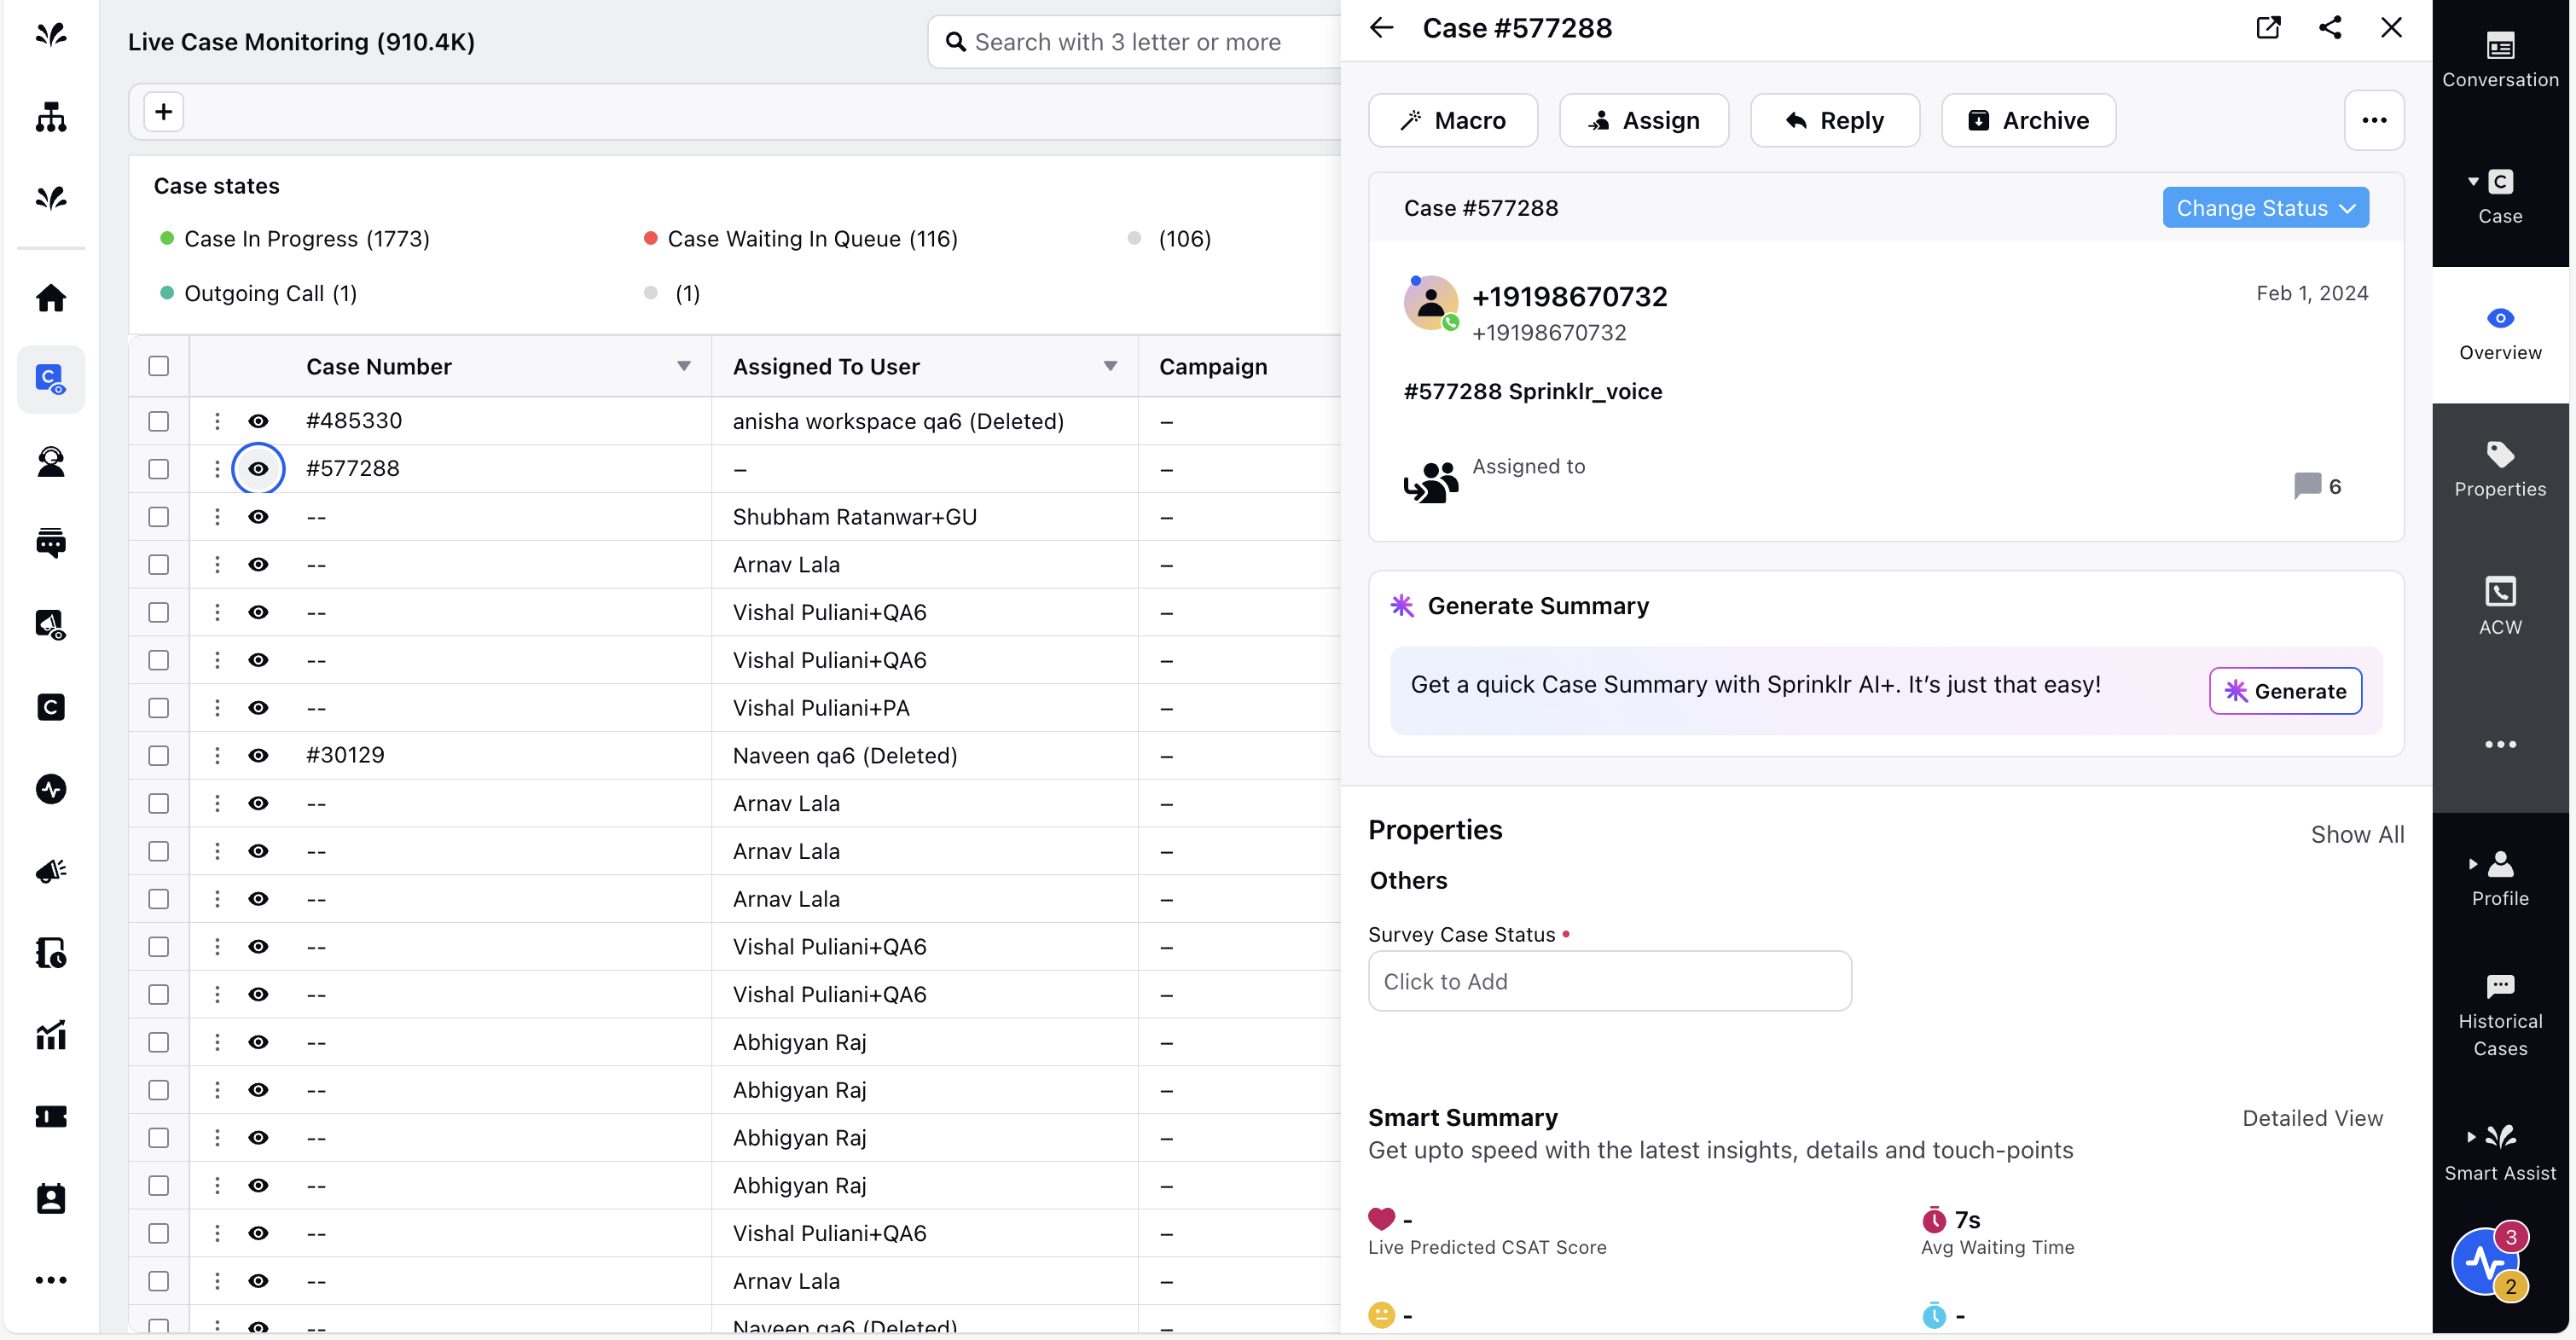
View Case Details
Use the View icon (![]() ) to view the case details in the third pane. On the case third-pane view, supervisors can view comprehensive case information and take direct actions. Available controls include reassigning the case, updating its status, archiving it, reviewing After Call Work (ACW), exploring related historical interactions and case properties, and more.
) to view the case details in the third pane. On the case third-pane view, supervisors can view comprehensive case information and take direct actions. Available controls include reassigning the case, updating its status, archiving it, reviewing After Call Work (ACW), exploring related historical interactions and case properties, and more.
View Escalated Cases
In the Supervisor Console, escalated cases are the cases that have an active supervisor nudge. These nudges can be configured to trigger based on certain criteria using an intent model or specific keywords. For example, a nudge can be created to escalate a case when the agent is on mute for more than 10 seconds.
![]() Note: To learn more about creating a nudge, Creating Agent Nudges. In the Post Nudge Actions screen, make sure to toggle Notify Supervisor.
Note: To learn more about creating a nudge, Creating Agent Nudges. In the Post Nudge Actions screen, make sure to toggle Notify Supervisor.
To help supervisors easily identify an escalated case, a red flag (![]() ) icon is displayed next to the case number in the Case Monitoring screen.
) icon is displayed next to the case number in the Case Monitoring screen.
Supervisors can hover over the icon to view key case details, including the case number. This prompt alert enables supervisors to quickly review the escalated case and take timely actions, without having to switch screens.
In the Detail View, supervisors can refer to the Escalated Nudge Count column, which indicates how many nudges were triggered for each case. A case can have multiple active nudges. For example, a case might be escalated due to the agent being on mute for over 10 seconds and also because the call involved a critical customer. This information can help you make informed prioritization decisions.
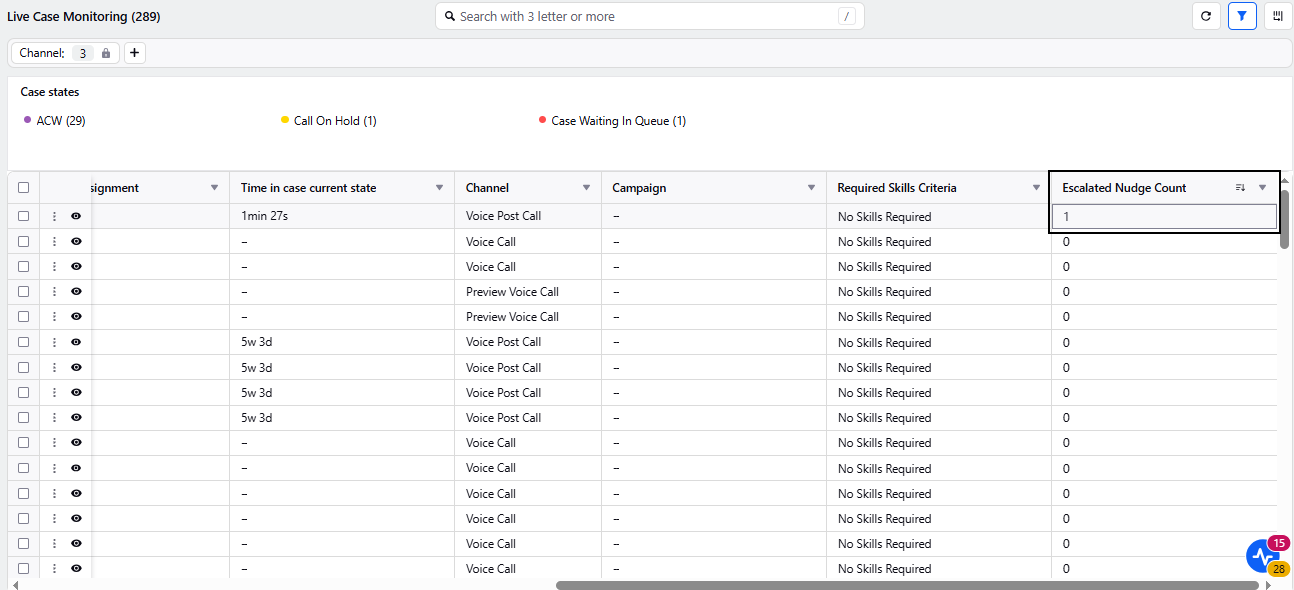
Supervisors can click the number in the Escalated Nudge Count column to view details of the triggered nudges.

Bulk Actions
In the Detailed View, supervisors can streamline case management by performing bulk actions on multiple cases. They can select individual cases using the checkbox at the start of each case row, or select multiple cases using the checkbox at the top of the table. Once cases are selected, a menu appears at the bottom of the screen with the Macros option, allowing supervisors to apply macros to the selected cases.