Configure Shift Change Policies
Updated
Shift Change Policies set the rules for agents to request Shift Changes. Agents can submit a Shift Change request to modify their schedule for a specific date by updating the Shift start time or adding, removing, or rearranging Activities within their existing Shift. This helps maintain accurate agent Adherence and allows Supervisors to manage such requests efficiently without manually updating each Shift.
Scenarios
As an agent, I was scheduled to take a 30-minute lunch break starting at 12:30 PM. However, a call came in just before my break, and I remained on the call until 12:50 PM. As a result, the system marked me as Non-Adherent, which negatively impacted my Adherence.
To correct this, I will now take my 30-minute lunch break starting at 12:50 PM and submit a request to update the break start time accordingly. This ensures that my Adherence tracking accurately reflects my actual break time.
As an agent, I was scheduled to start my shift at 8:00 AM. However, due to a contact center issue, I was unable to log in and change my status to 'Available' for the first 15 minutes. The system marked me as Non-Adherent, affecting my Adherence.
To address this, I will raise a request to add an Activity from 8:00 AM to 8:15 AM to reflect the delay caused by the technical issue. This will help ensure my Adherence record is accurate.
Navigate to Shift Change Policy Record Manager
Prerequisites for navigating to the Shift Change Policy record manager:
Workforce Management should be enabled for the environment.
You must have access to the Workforce Manager Persona App.
View permission under the Shift Change Policy section in the Workforce Management module.
Follow these steps to navigate to the Shift Change Policy record manager:

Go to the Workforce Manager Persona App on the Launchpad.
Select Settings from the Left Pane to open the Governance page.

Go to Shift Change Policy to open the Shift Change Policy record manager.
Create Shift Change Policy
Prerequisites for navigating to the Shift Change Policy record manager:
Workforce Management should be enabled for the environment.
You must have access to the Workforce Manager Persona App.
View and Create permissions under the Shift Change Policy section in the Workforce Management module.
Follow these steps to create a Shift Change Policy:
Navigate to the Shift Change Policy record manager.
Fill in the required fields on the Create Policy page. Fields marked with a red dot are mandatory. Below are the descriptions of the fields on this page:
Shift Change Policy Name: Enter the name of the Shift Change Policy. (Required)
Description: Provide a brief description of the Shift Change Policy.
Click the Next button to open the Policy Details page.
Fill in the required fields on the Policy Details page. Fields marked with a red dot are mandatory. Below are the descriptions of the fields on this page:
Shift Change Request Window
Look Back Period: Specify the maximum number of past days, starting today, that agents can request a Shift change. It must be a whole number. (Required)
Look Ahead Period: Specify the maximum number of future days, starting today, that agents can request a Shift change. It must be a whole number. (Required)
Shift Adjustment Rules
Start Time Tolerance: Specify the maximum duration, in hours, by which agents can request to change the Shift start time. For example, if a Shift is scheduled to start at 10 AM and this field is set to 1 hour, then the agent can raise a request to change the start time between 9 AM and 11 AM. It must be a whole number. (Required)
Duration Tolerance: Specify the maximum gap, in hours, between the duration of the current Shift and the shift change that the agent can request. It must be a whole number. (Required)
Activity Adjustment Rules
Addable Activities: Select the Activities that agents can add to their Shifts while requesting a Shift Change.
Non Reschedulable Activities: Select the Activities agents cannot reschedule when requesting a Shift Change.
Removable Activities: Select the Activities that agents can remove from their Shifts while requesting a Shift Change.
Approval Rules
Approval Workflow: Select how Shift Change requests will be approved once they are created by agents. (Required)
Requires approval by the Supervisor: Select this option if the agent’s supervisor or manager must approve the Shift Change request. It is selected by default.
Tiered Approval (multiple approvals): Select this option if multiple people must approve the Shift Change request. Refer to this article on how to create Tiered Approvals.
Select Tiered Approval Path: Select the Tiered Approval to be followed for the Shift Change requests.
Click Next to open the Share Settings page.
Fill in the required fields on the Share Settings page. Below are the descriptions of the fields on this page:
Visible in all workspaces: Enable this toggle to share the Shift Change Policy with all available Workspaces.
Workspaces: Select the Workspaces that you want to share the Shift Change Policy with. This field will be accessible only if the Visible to all workspaces toggle is disabled.
User/User Groups: Select the User(s)/User Group(s) you want to share the Shift Change Policy with. This field will be accessible only if the Visible to all workspaces toggle is disabled.
Click the Update button to create the Shift Change Policy with the provided details.
This completes the process of creating Shift Change Policies. Once the Shift Change Policy is created, you need to assign it to agents before agents can raise Shift Change requests.
Assign Shift Change Policies
Follow these steps to assign Shift Change Policy to agents:
Go to the Workforce Manager Persona App on the Launchpad.
Select Agents from the Left Pane to open the Agent Performance dashboard.
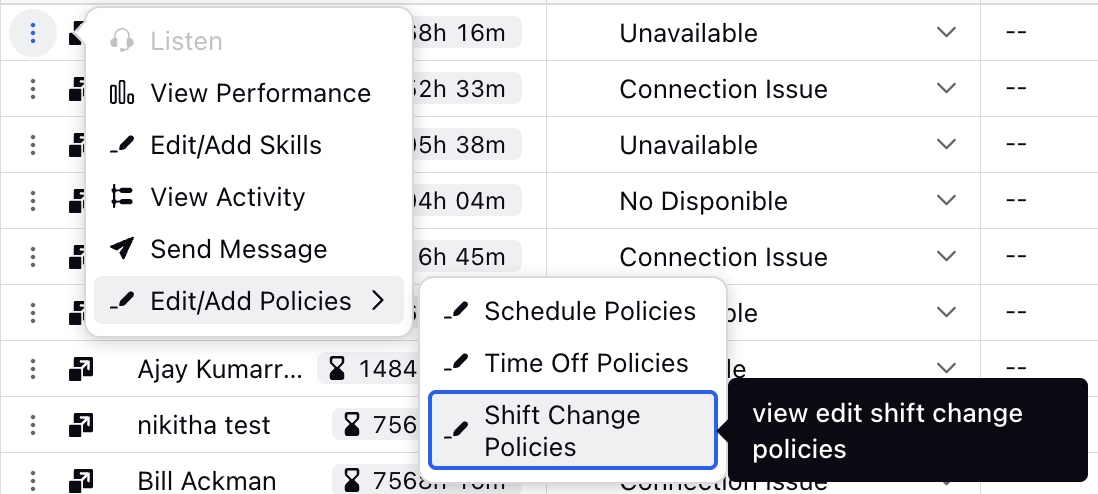
Hover over the vertical ellipsis (⋮) icon corresponding to the agent you want to assign the Shift Change Policies to. This will show a list of options.

Hover over the Edit/Add Policies option and then select Shift Change Policies to open the Modify Shift Change Policies dialog box.

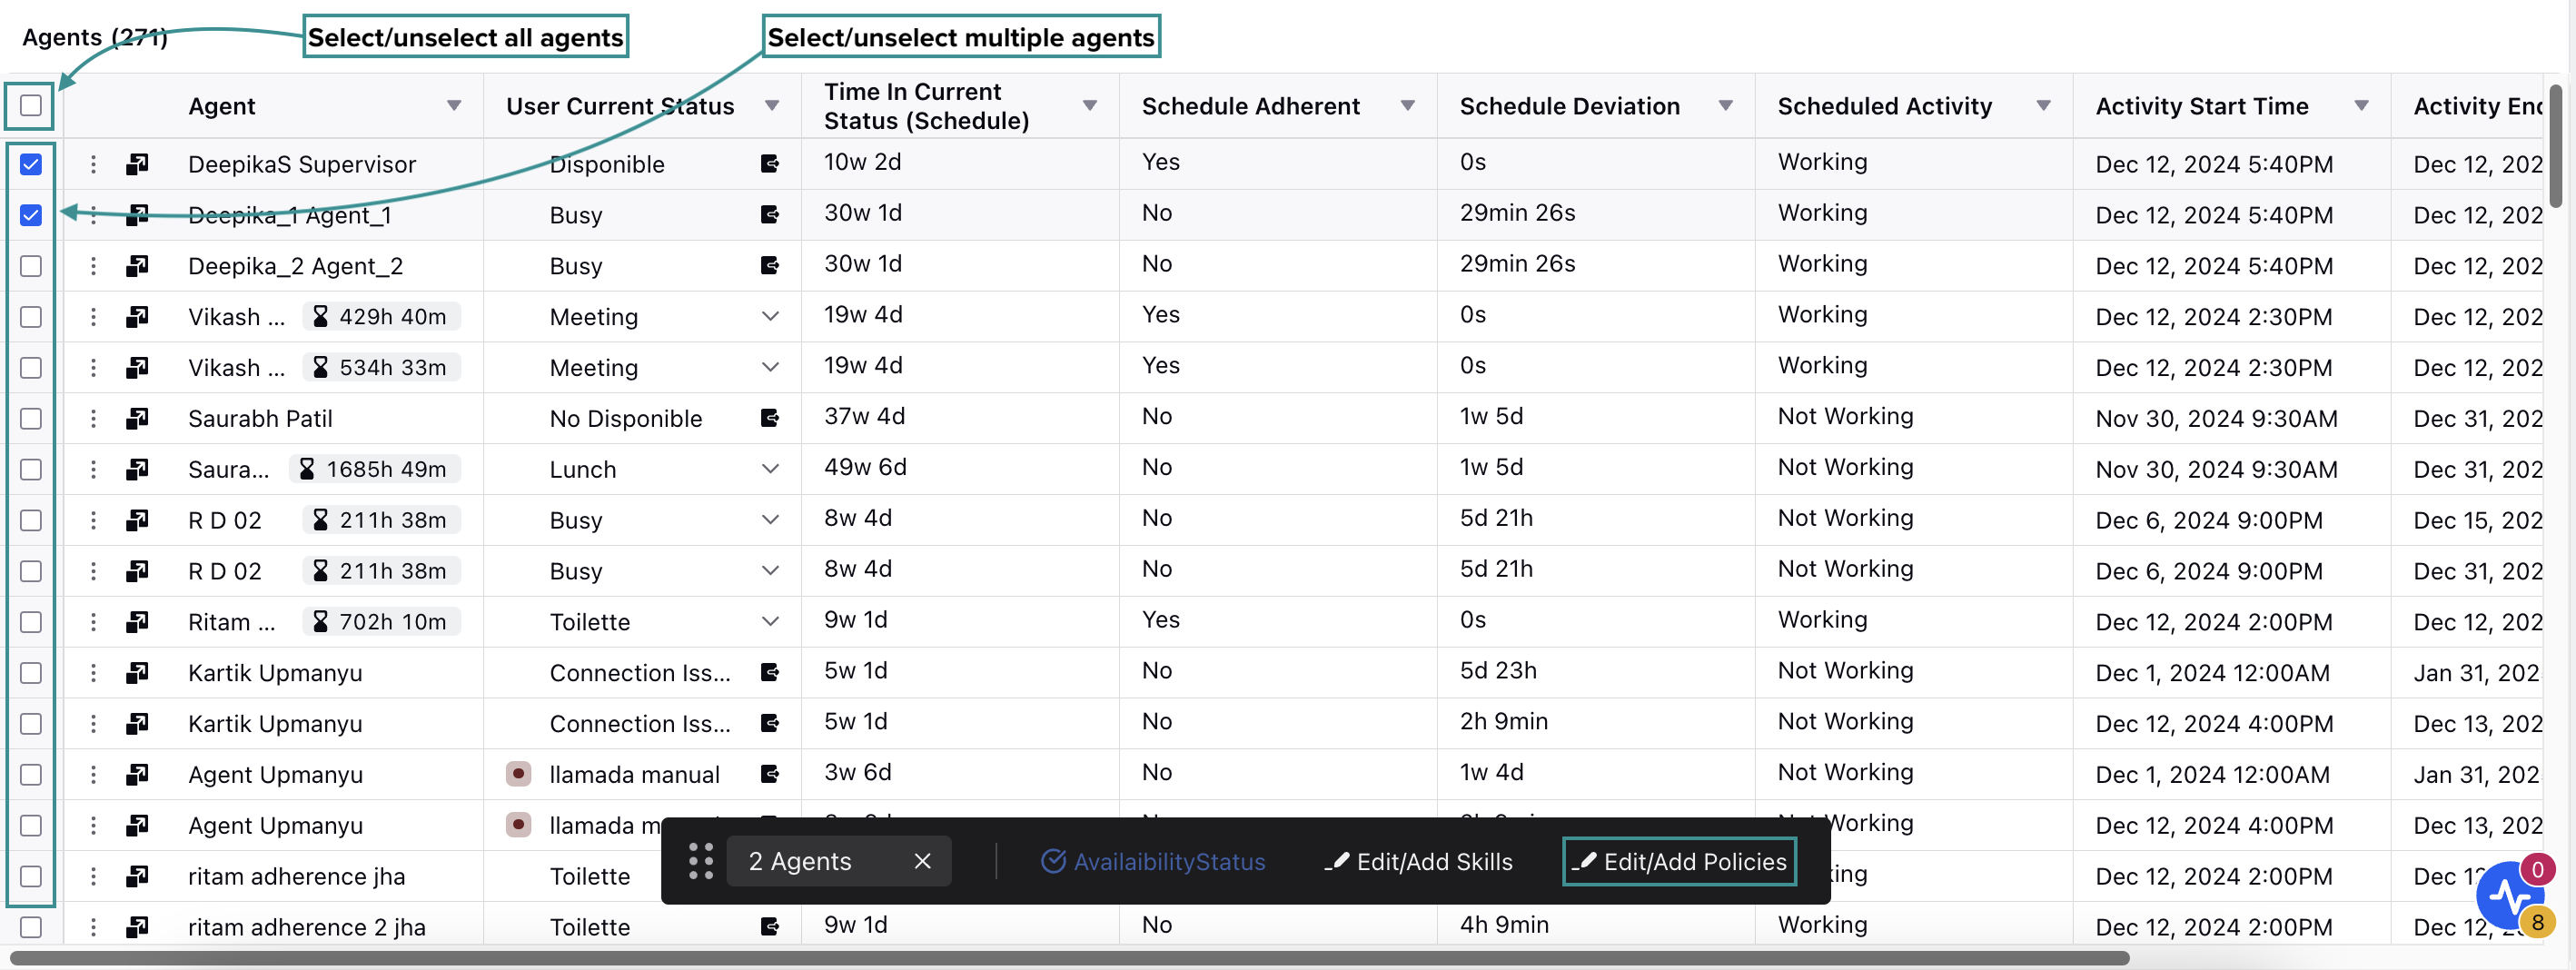
Alternatively, select the agent(s) to whom you want to assign the Shift Change Policies by clicking the checkbox next to their names. To select all agents on the dashboard, click the top checkbox. Selecting the checkbox will display a toolbar at the bottom of the page.
Select Edit/Add Policies from the toolbar to open the Modify Shift Change Policies dialog box.
Fill in the required fields on the Modify Shift Change Policies dialog box. Below are the descriptions of the fields in this dialog box:
Policy Name: Select the existing Shift Change Policy from the list. Only one option can be selected at a time.
Agents: This field shows the agents to whom the selected Shift Change Policy will be assigned. If multiple agents are selected, you can add or remove agents from the list as needed.
After selecting the required Shift Change Policies, click the Save button.
This completes the process of assigning Shift Change Policies to agents. Now the assigned agents can raise Shift Change requests based on the policy configuration.
Edit Shift Change Policies
Prerequisites for editing Shift Change Policies:
Workforce Management should be enabled for the environment.
You must have access to the Workforce Manager Persona App.
View and Edit permissions under the Shift Change Policy section in the Workforce Management module.
Follow these steps to edit a Shift Change Policy:
Navigate to the Shift Change Policy record manager.
Hover over the vertical ellipsis (⋮) icon corresponding to the Shift Change Policy you want to edit. This will show a list of options.
Select Edit from the list of options.
Update the necessary details for the selected Shift Change Policy. The fields are the same as those when creating a Shift Change Policy.
After entering the updated details, click the Save button at the bottom right of the page to save the Shift Change Policy with new details.
This completes the process of editing Shift Change Policies.
Delete Shift Change Policies
Prerequisites for editing Shift Change Policies:
Workforce Management should be enabled for the environment.
You must have access to the Workforce Manager Persona App.
View and Delete permissions under the Shift Change Policy section in the Workforce Management module.
Follow these steps to delete a Shift Change Policy:
Navigate to the Shift Change Policy record manager.
Hover over the vertical ellipsis (⋮) icon corresponding to the Shift Change Policy you want to delete. This will show a list of options.
Select Delete from the list of options to open the Delete Shift Change Policy confirmation box.
Select Delete in the confirmation box. This action cannot be undone.
This completes the process of deleting Shift Change Policies.
Review Shift Change Requests
Reviewing Shift Change requests ensures smooth workforce operations. This process enables managers to check the details of each request submitted by agents and approve or reject changes as needed. You can access and review these requests from the Request Dashboard. This article explains the steps involved in reviewing Shift Change requests.
Prerequisites for reviewing Shift Change requests:
Workforce Management should be enabled for the environment.
You must have access to the Workforce Manager Persona App.
View and Manage permissions under the Shift Change Request section in the Workforce Management module.
Shift Change Request column must be configured in the Request Dashboard.
Follow these steps to review Shift Change requests:

Go to the Workforce Manager Persona App on the Launchpad.
Select Request Dashboard from the Left Pane.
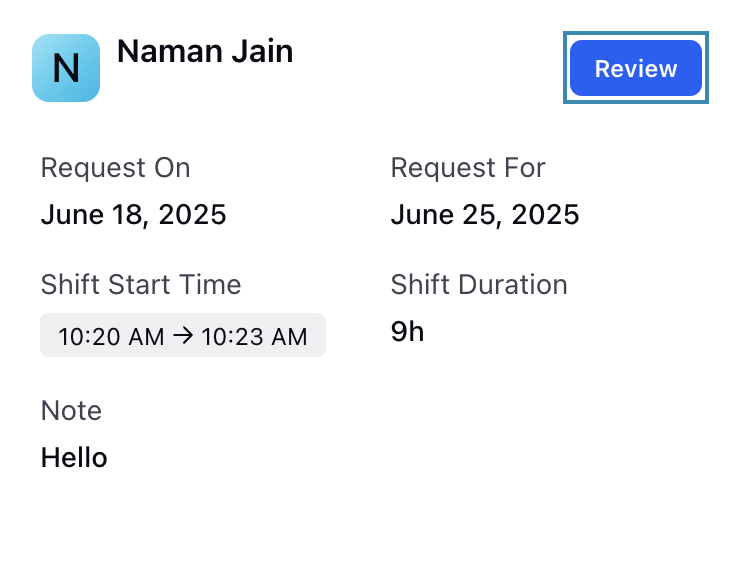
Scroll to the Shift Change Request column on the Request Dashboard. This column will show the existing Shift Change requests and their details.

Click the Review button corresponding to the Shift Change request to be reviewed. This will open the Approve Shift Change Request dialog box.

Click the Approve button to accept or the Reject button to decline the Shift Change request. You can also leave a note.
This completes the process of reviewing Shift Change requests.
Bulk Review Shift Change Requests
Bulk reviewing Shift Change requests allows managers to efficiently process multiple pending requests at once. Instead of reviewing each request individually, you can select several requests and approve or reject them in a single action.
Prerequisites for bulk reviewing Shift Change requests:
Workforce Management should be enabled for the environment.
You must have access to the Workforce Manager Persona App.
View and Manage permissions under the Shift Change Request section in the Workforce Management module.
Shift Change Request column must be configured in the Request Dashboard.
Follow these steps to bulk review Shift Change requests:

Go to the Workforce Manager Persona App on the Launchpad.
Select Request Dashboard from the Left Pane.
Scroll to the Shift Change Request column on the Request Dashboard. This column will show the existing Shift Change requests and their details.

Select the requests by holding Cmd and clicking with the Left Mouse Button (on Mac) or Ctrl and clicking with the Left Mouse Button (on Windows). The select requests will be highlighted in blue.
Once you select more than one request, a floating toolbar will appear.
Note: Alternatively, you can select all pending Shift Change requests by clicking the checkbox at the top of the column. This action selects the first 20 pending requests in the column, based on the filters and sorting currently applied.

Click Review on the floating toolbar to open the Bulk Request Review window.
This window displays the total number of selected requests along with the request type, which in this case is Shift Change.

Click the Approve button to accept or the Reject button to decline the selected Shift Change requests. You can also leave a note.
This completes the process of bulk reviewing Shift Change requests.