Manage Slots in Sprinklr Workforce Management
Updated
Slots in Sprinklr Workforce Management are specific time periods within a schedule that an agent is assigned. You can create Time Off and Overtime slots with either hourly or daily granularity, depending on the level of detail required.
Daily Slots: Daily Slots are scheduling intervals grouped by full days. They are typically used for long-term planning and schedule optimization at a daily granularity, such as determining staffing needs per day or assigning day-level activities.
Hourly Slots: Hourly Slots are finer-grained scheduling intervals, broken into 15 or 30-minute segments, depending on system configuration. They are commonly used for intraday management, allowing managers to monitor and adjust staffing levels with greater precision.
The Slots record manager allows you to manage Slots and also view the Slot Calendar. From here, you can perform the following Slots-related actions:
Create Slots
Enable/disable Slots
Edit Slots.
Navigate to Slots Record Manager
Follow these steps to navigate to the Slots record manager:

Go to the Workforce Manager Persona App on the Launchpad.
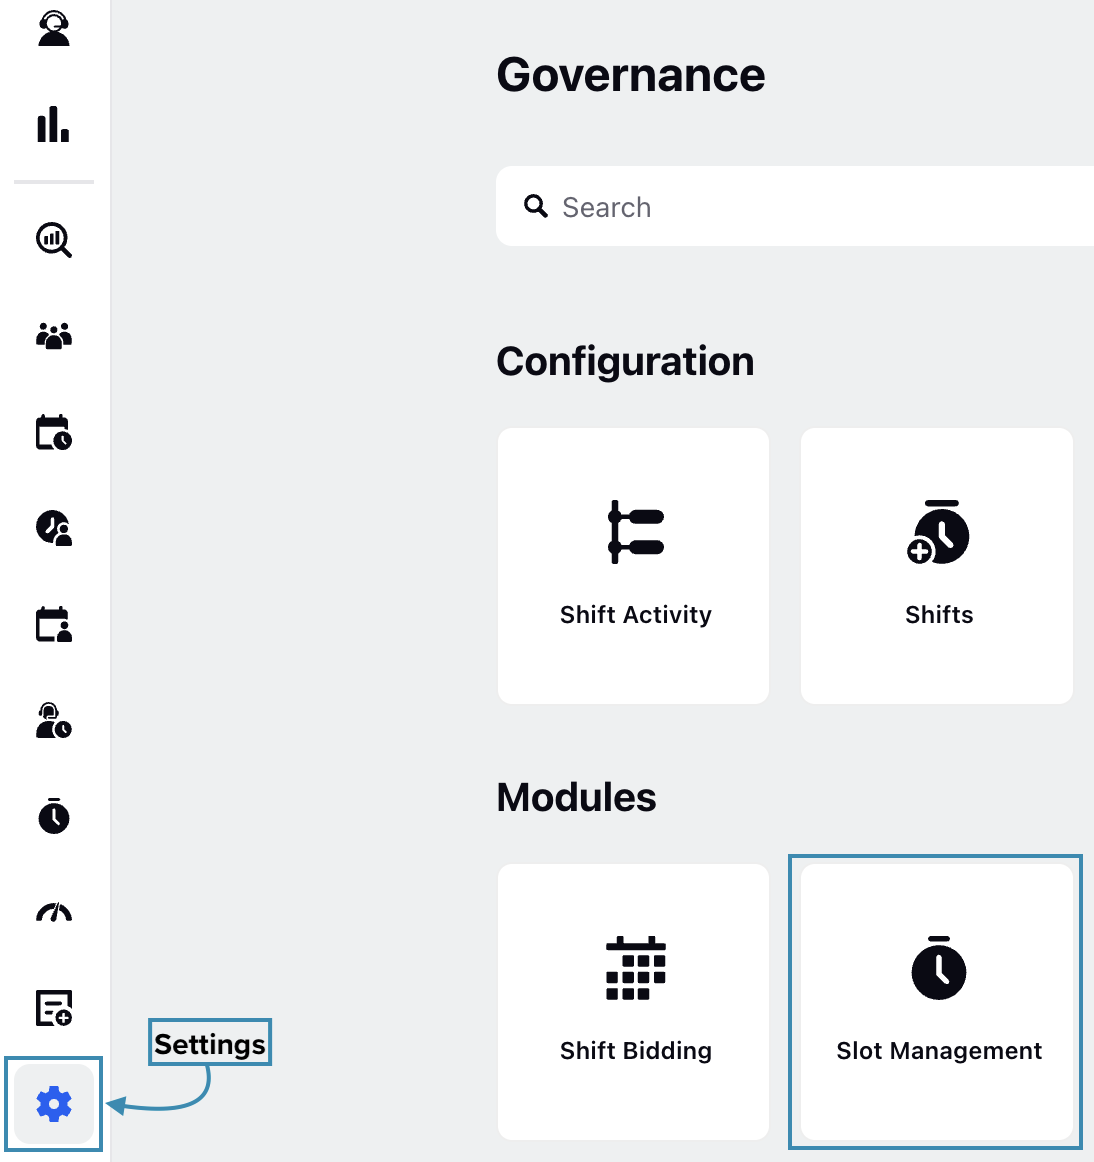
Select Settings from the Left Pane to open the Governance page.
Go to Slot Management to open the Slots record manager.
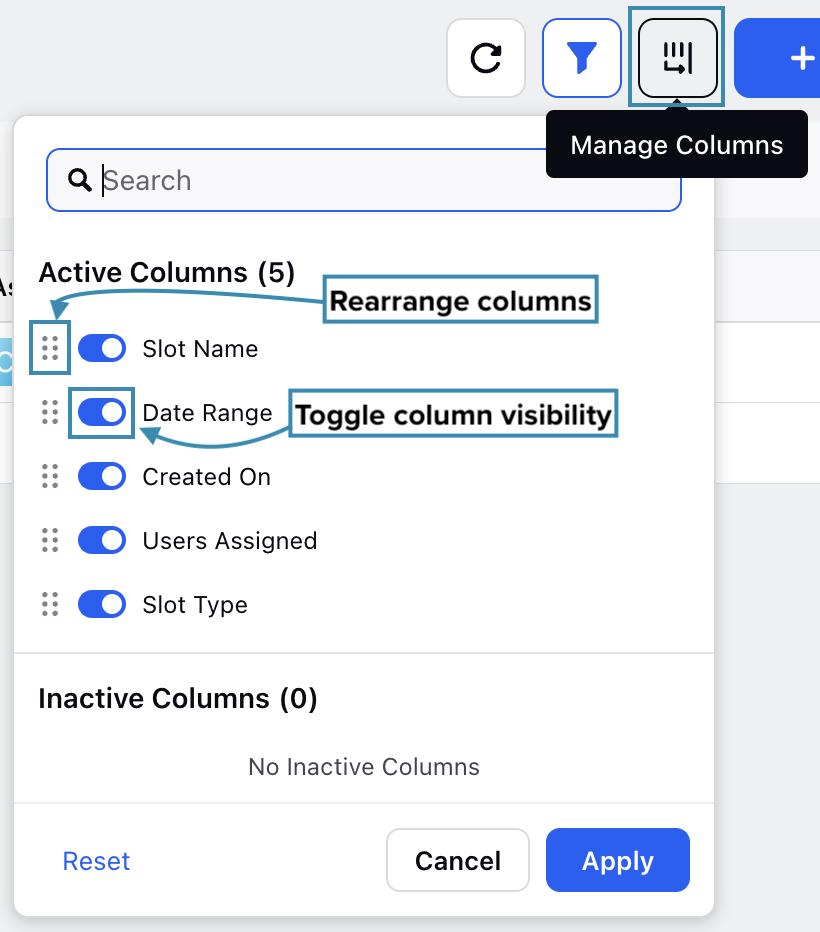
The Slots record manager displays various columns detailing information such as the list of all Slots, their date range, creation date, assigned users, and slot types. To control the visibility and rearrange the columns, click the Manage Columns button at the top right of the record manager.

Click the toggle filter button at the top right of the record manager to control the visibility of the Slot Type quick filter. This filter allows you to sort Slots based on their type (Time Off Slots and Overtime Slots).
Create Slots in Sprinklr WFM
Sprinklr's Workforce Management supports Time Off and Overtime Slots.
Time Off Slots: Time Off Slots are blocks of time in an agent’s schedule where they are assigned a Time Off activity, such as vacation or sick leave. During this time, the agent will not be scheduled for any work.
Overtime Slots: Overtime slots are extra working hours added on top of an agent’s normal schedule. They can include options for extra pay or additional time off as rewards. These slots are used when extra staffing is needed, for example, during busy periods or to fill gaps in the schedule.
Create Time Off Slots
Prerequisites for creating Time Off Slots:
Sprinklr WFM should be enabled for the environment.
You must have access to the Workforce Manager Persona App.
Create permission under the Slot Management section in the Workforce Management module.
Follow these steps to create a Time Off Slot:
Navigate to the Slots record manager.

Click the “+Slot” button at the top-right of the page to open the slot creation form.
Fill in the required fields on the Overview page. Fields marked with a red dot are mandatory. Below are the descriptions of all the fields on this page:
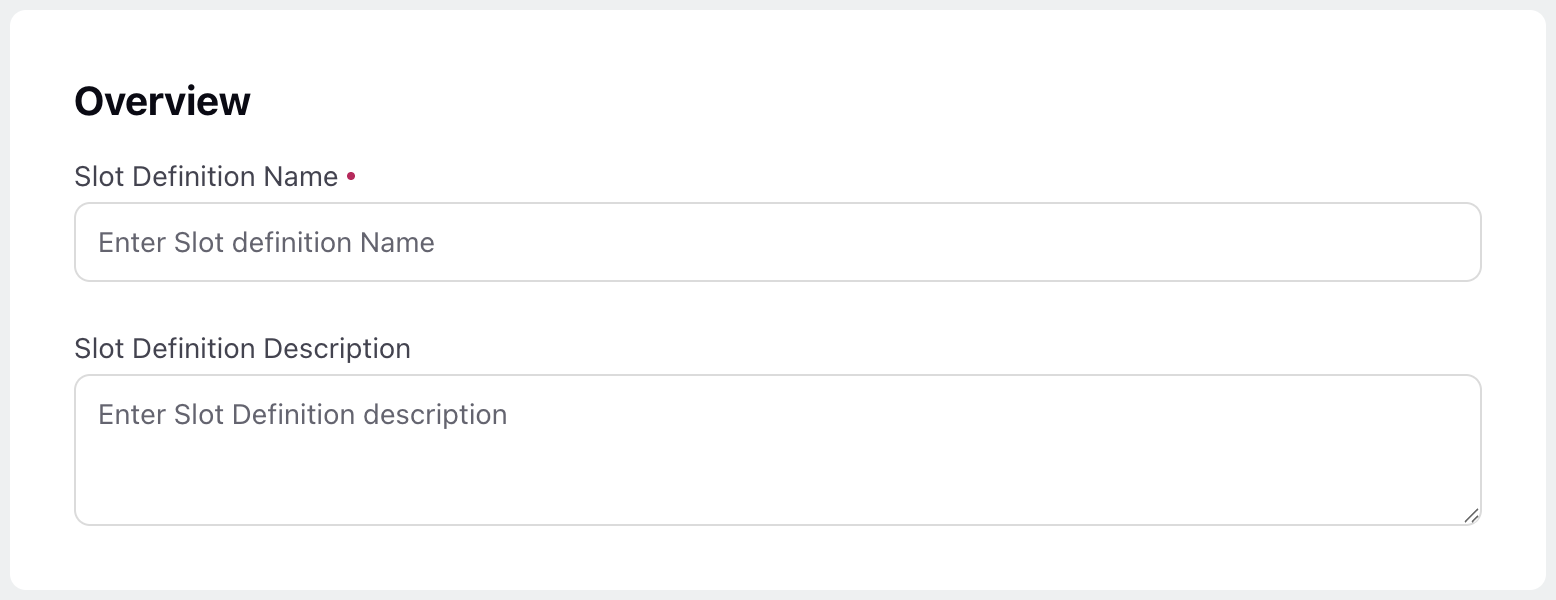
Slot Definition Name: Enter the name of the Slot. (Required)
Slot Definition Description: Briefly describe the Slot.
Click the Next button at the bottom right of the page to open the Slot Details page.
Fill in the required fields on the Slot Details page. Fields marked with a red dot are mandatory. Below are the descriptions of all the fields on this page:
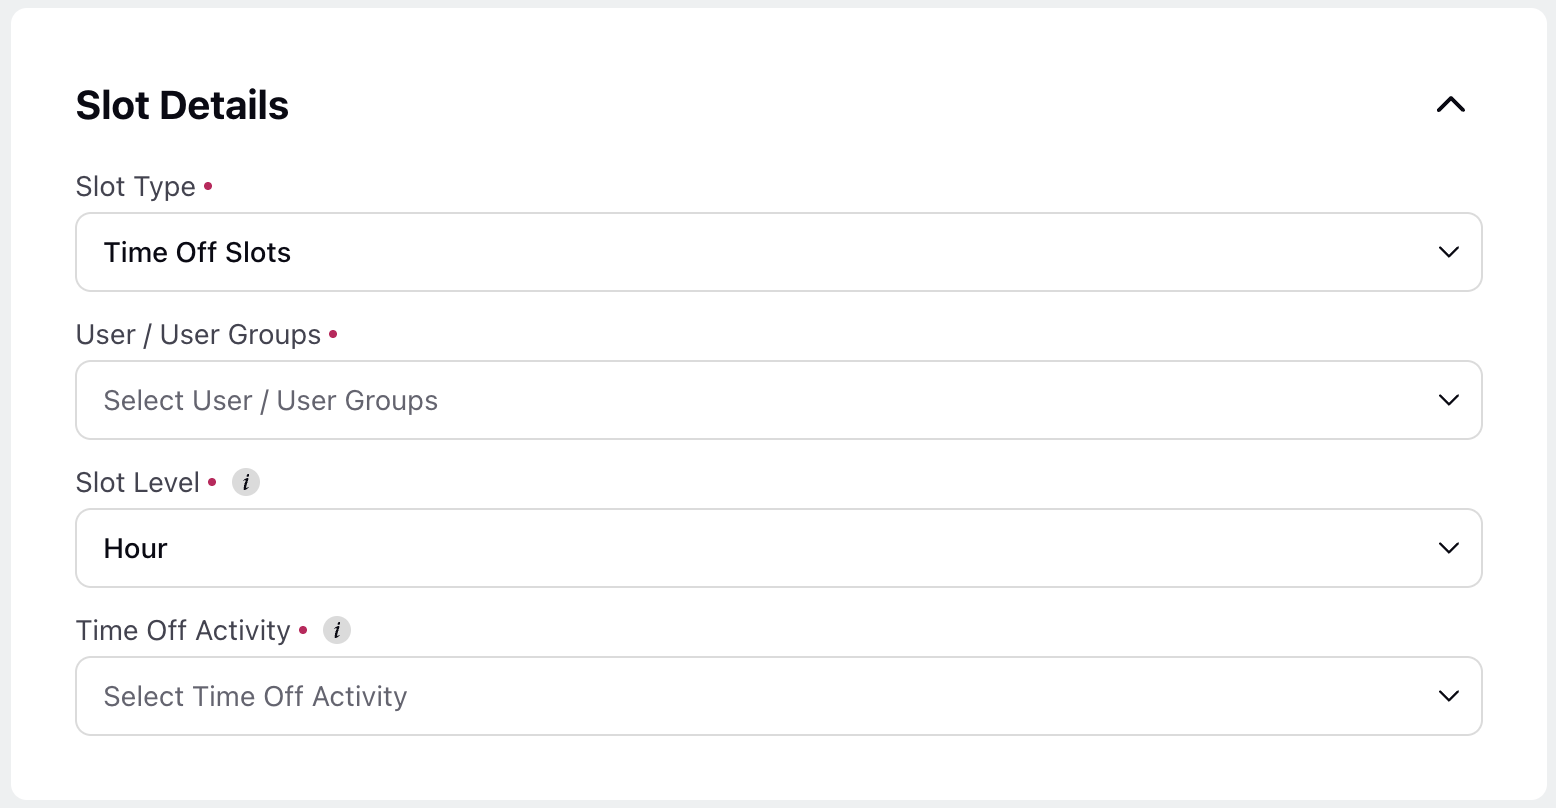
Slot Type: Select Time Off Slots. (Required)
User/User Groups: Select the user(s) and/or user group(s) to whom the time off Slots should be assigned. (Required)
Slot Level: Choose if you want to create Slots on an hourly or daily basis. (Required)
Time Off Activity: Select the Time Off Activity that would be assigned with the Slots. Only one Time Off Activity can be selected. (Required)
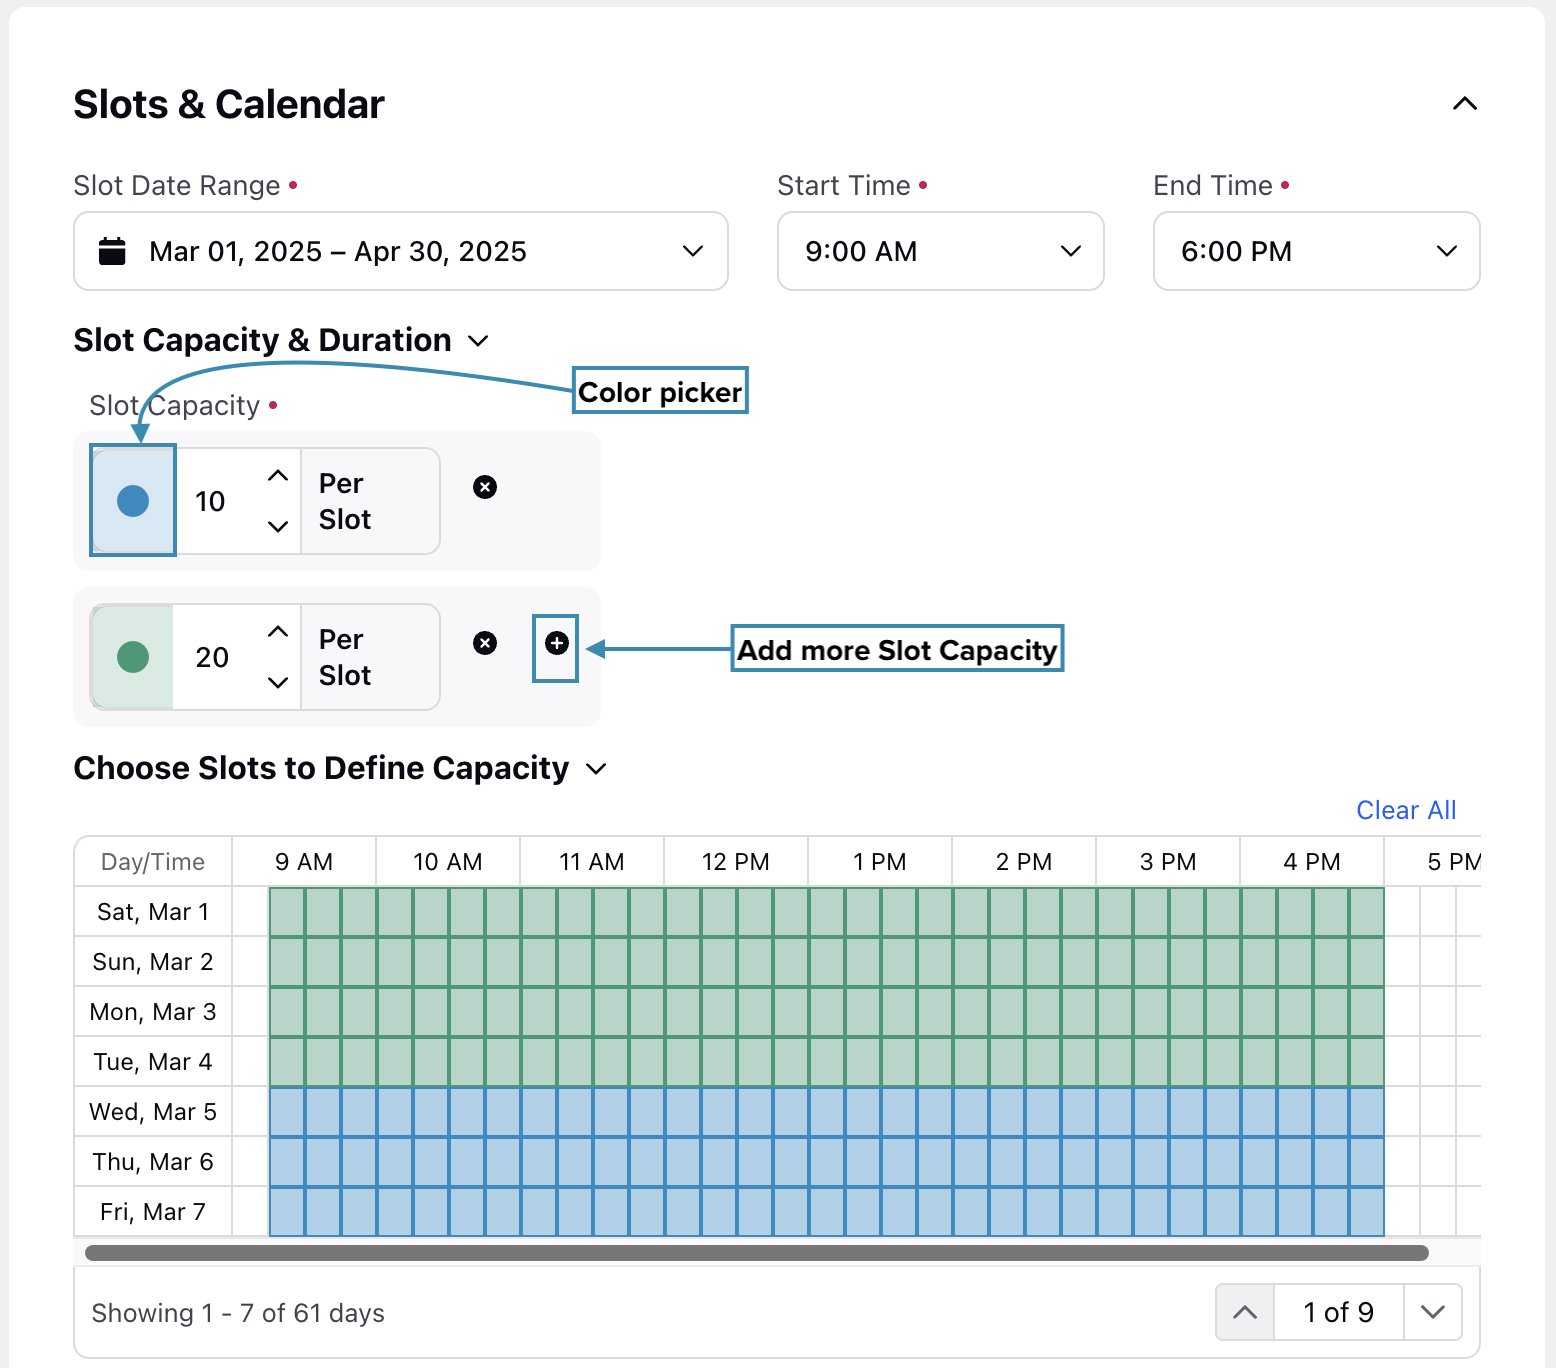
Slot Date Range: Specify the date range for the canvas plotting the Slots. (Required)
Start Time: Specify when the start time for the canvas plotting the Slots. (Required)
End Time: Specify when the end time for the canvas plotting the Slots. (Required)
Note: The Start Time and End Time fields are visible only when Hour is selected in the Slot Level field.
Note: Slot Date Range, Start Time, and End Time fields define the canvas, after which you can use the canvas to create Slot(s).
Slot Capacity: Enter the capacity per Slot. You can customize the color of the Slot by clicking on the Color Picker. Click the Add Value button to add more Slot Capacities. (Required)
Choose Slots to Define Capacity: Plot the Slot Capacities based on the canvas. Refer to the Plot Hourly Time Off Slots section for more details on plotting hourly Time Off Slots. Refer to the Plot Daily Time Off Slots section for more details on plotting daily Time Off Slots.
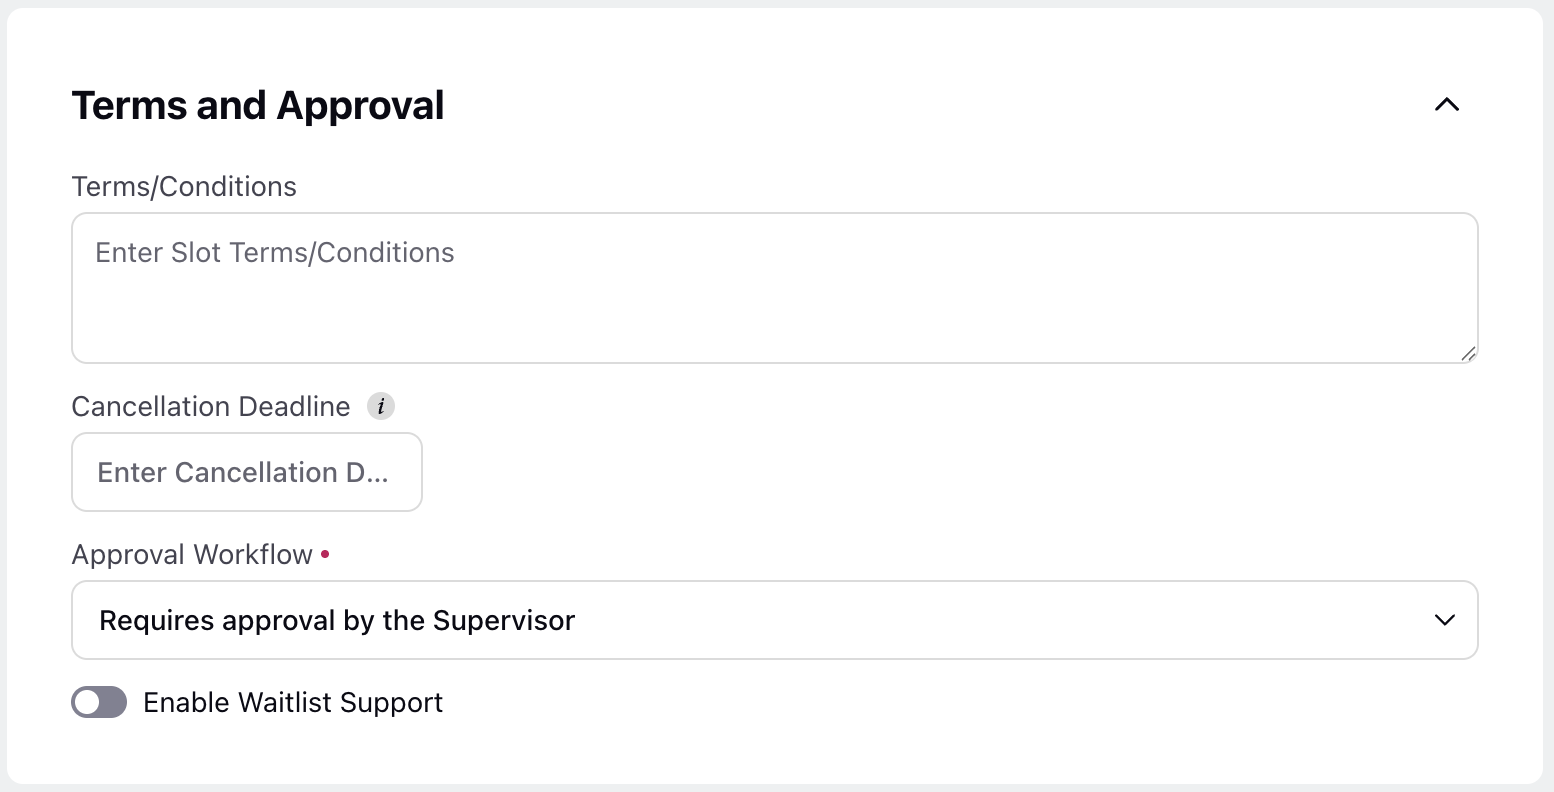
Terms/Conditions: Define the terms and conditions for the Slots.
Cancellation Deadline: Specify the deadline by which the Slot request can be cancelled. It can be specified in days and hours, for example, 2 days and 12 hours.
Approval Workflow: Select how Slots will be approved once they are created. (Required)
Requires approval by the Supervisor: Select this option if the supervisor or manager must approve the Slots. This option is selected by default.
Auto Approval: Select this option to approve the Slots automatically without the need for manual intervention.
Enable Waitlist Support: Enable this toggle to activate the waiting pool mechanism. When enabled, Slot requests that exceed the maximum capacity will be placed on a waitlist and automatically approved as Slots become available.
Click the Create button at the bottom right of the page to create the Slots.
After creating a Slot, you need to enable it. The following section explains how to enable/disable Slots.
Plot Hourly Time Off Slots
You can configure a Slot hourly by selecting Hour in the Slot Level field. This will make the Start Time and End Time fields visible in the Slots & Calendar section.

Each row of the canvas represents a day based on the date range configured in the Slot Date Range field. The columns represent the time of day, divided into intervals specified in the Start Time and End Time fields. Each hour is divided into 15-minute quarters.
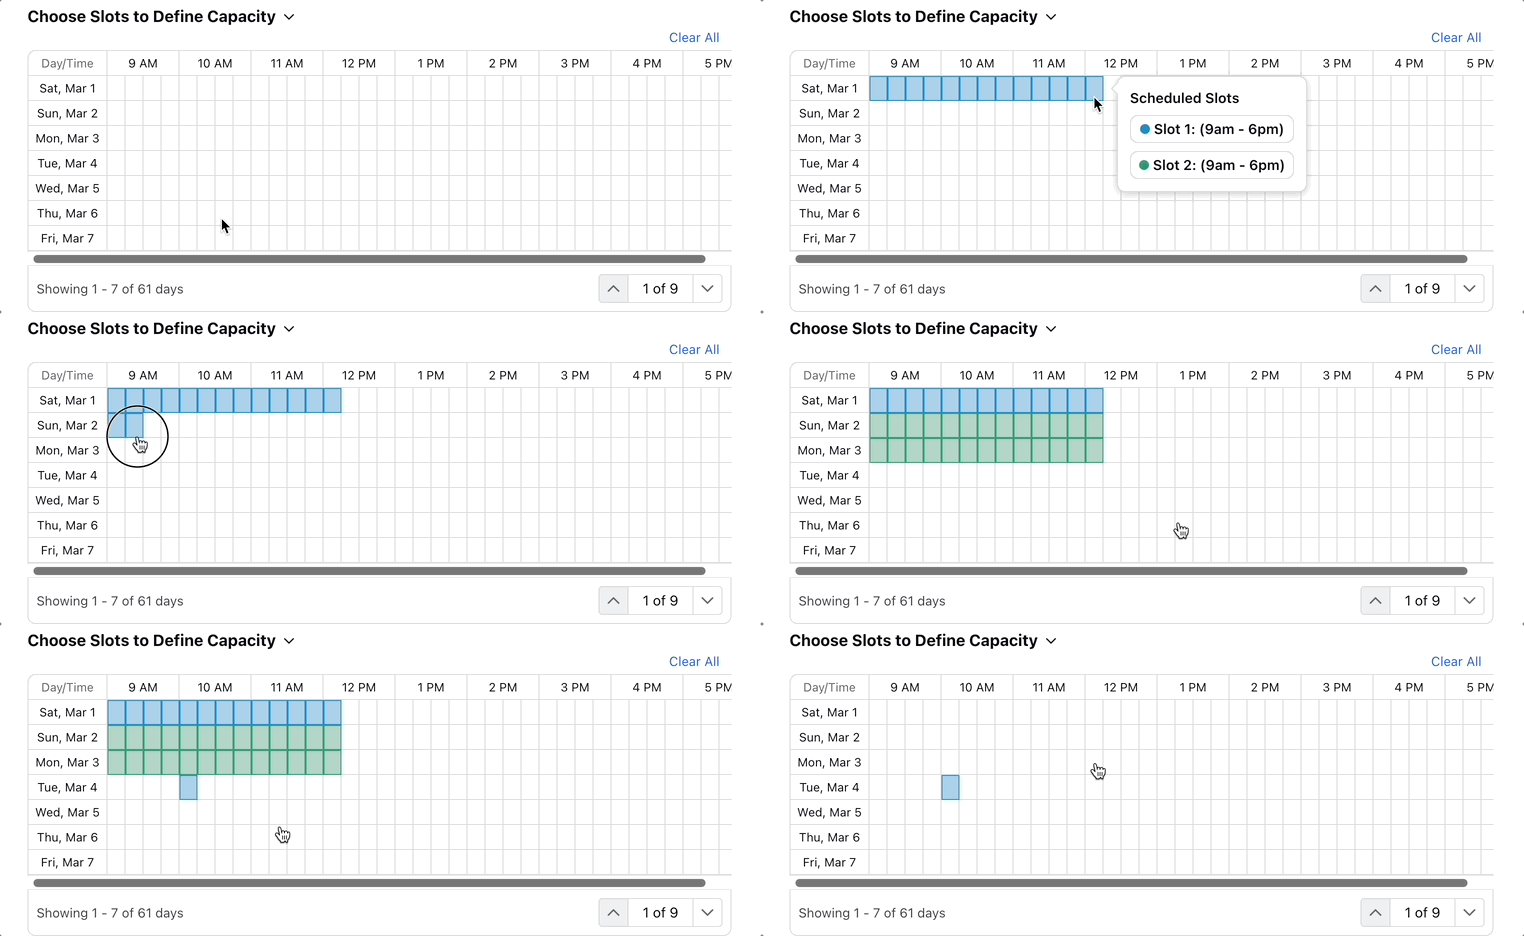
Click on the corresponding cells to assign or unassign the Slot Capacity for that cell. To assign or unassign Slot Capacity for multiple cells, click and drag the cursor across the desired cells. If multiple Slot Capacities have been created, a sub-menu will appear during assignment, allowing you to select which Slot Capacity should be assigned to the selected cell(s).
Plot Daily Time Off Slots
You can configure a slot on a daily basis by selecting Day in the Slot Level field. The canvas will display cells representing each day, and only the dates within the interval specified in the Slot Date Range will be accessible.
Specify the total number of work hours to be allocated for the day in the Work Hours field. This value determines how many agents will be selected for the slot.
Example: If you set Work Hours to 80, and the agents' Work Contract Schedule Policy defines a daily work duration of 8 hours, then 10 agents will be selected for the Slot. If the waitlist option is enabled, agents can still apply for the Slot even after the daily capacity is filled, and they will be added to the waitlist.

Click on the corresponding cells to assign or unassign the Work Hour for that cell. To assign or unassign Work Hour for multiple cells, click and drag the cursor across the desired cells.
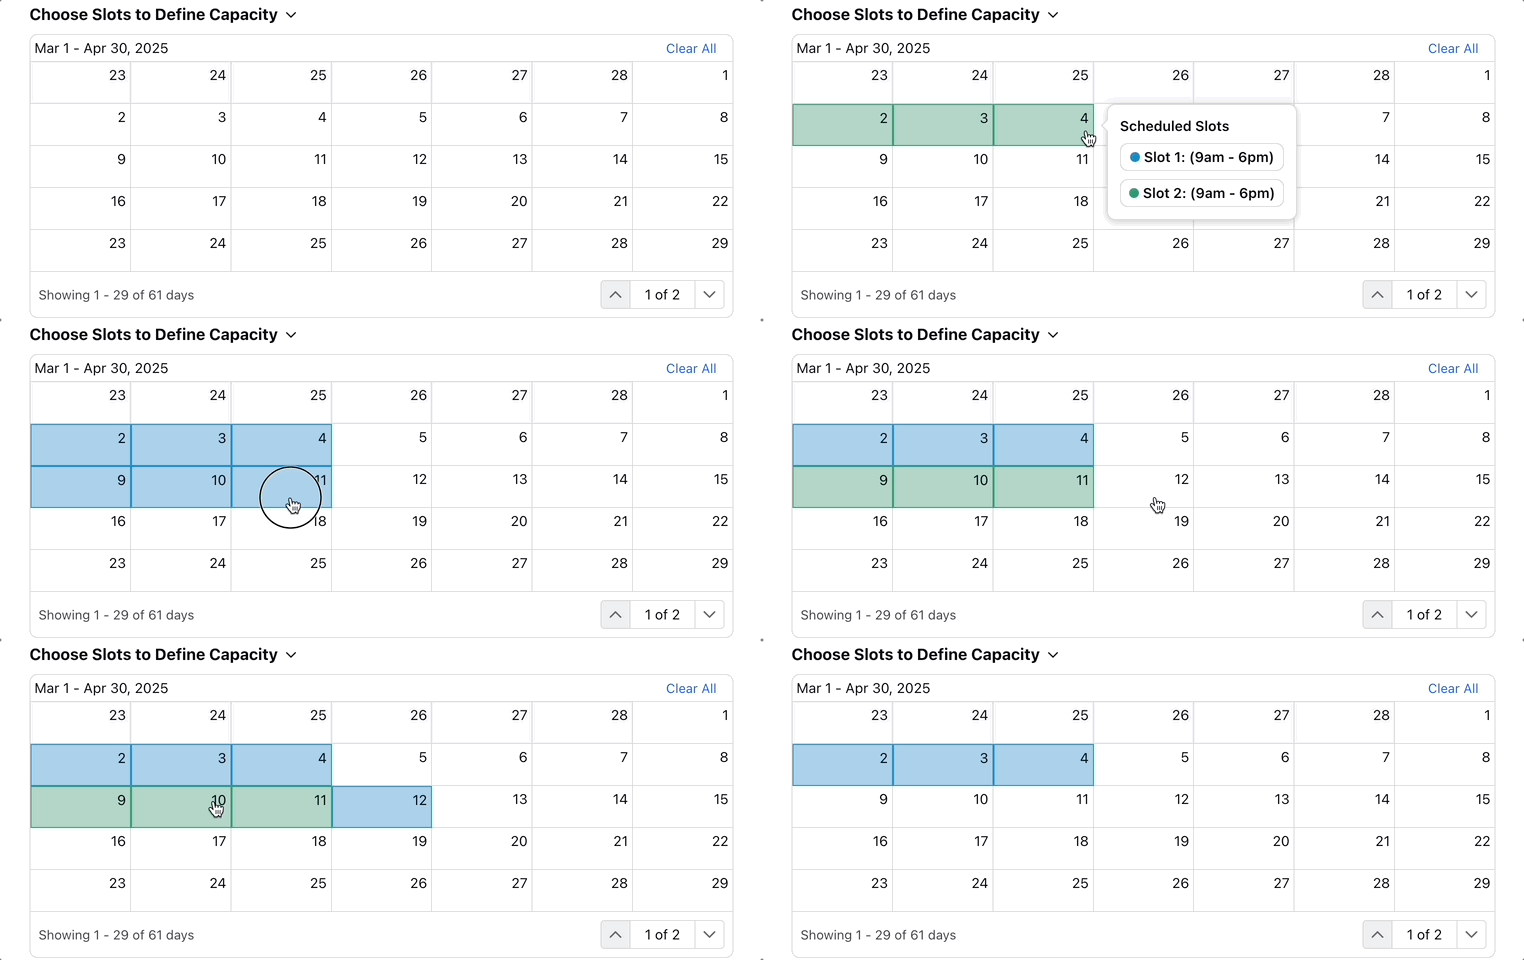
If multiple Work Hours have been created, a sub-menu will appear during assignment, allowing you to select which Work Hour should be assigned to the selected cell(s).
After creating a Slot, you need to enable it. The following section explains how to enable/disable Slots.
Create Overtime Slots
Prerequisites for creating Time Off Slots:
Sprinklr WFM should be enabled for the environment.
You must have access to the Workforce Manager Persona App.
Create permission under the Slot Management section in the Workforce Management module.
Follow these steps to create an Overtime Slot:
Navigate to the Slots record manager.

Click the “+Slot” button at the top-right of the page to open the slot creation form.
Fill in the required fields on the Overview page. Fields marked with a red dot are mandatory. Below are the descriptions of all the fields on this page:

Slot Definition Name: Enter the name of the Slot. (Required)
Slot Definition Description: Briefly describe the Slot.
Click the Next button at the bottom right of the page to open the Slot Details page.
Fill in the required fields on the Slot Details page. Fields marked with a red dot are mandatory. Below are the descriptions of all the fields on this page:
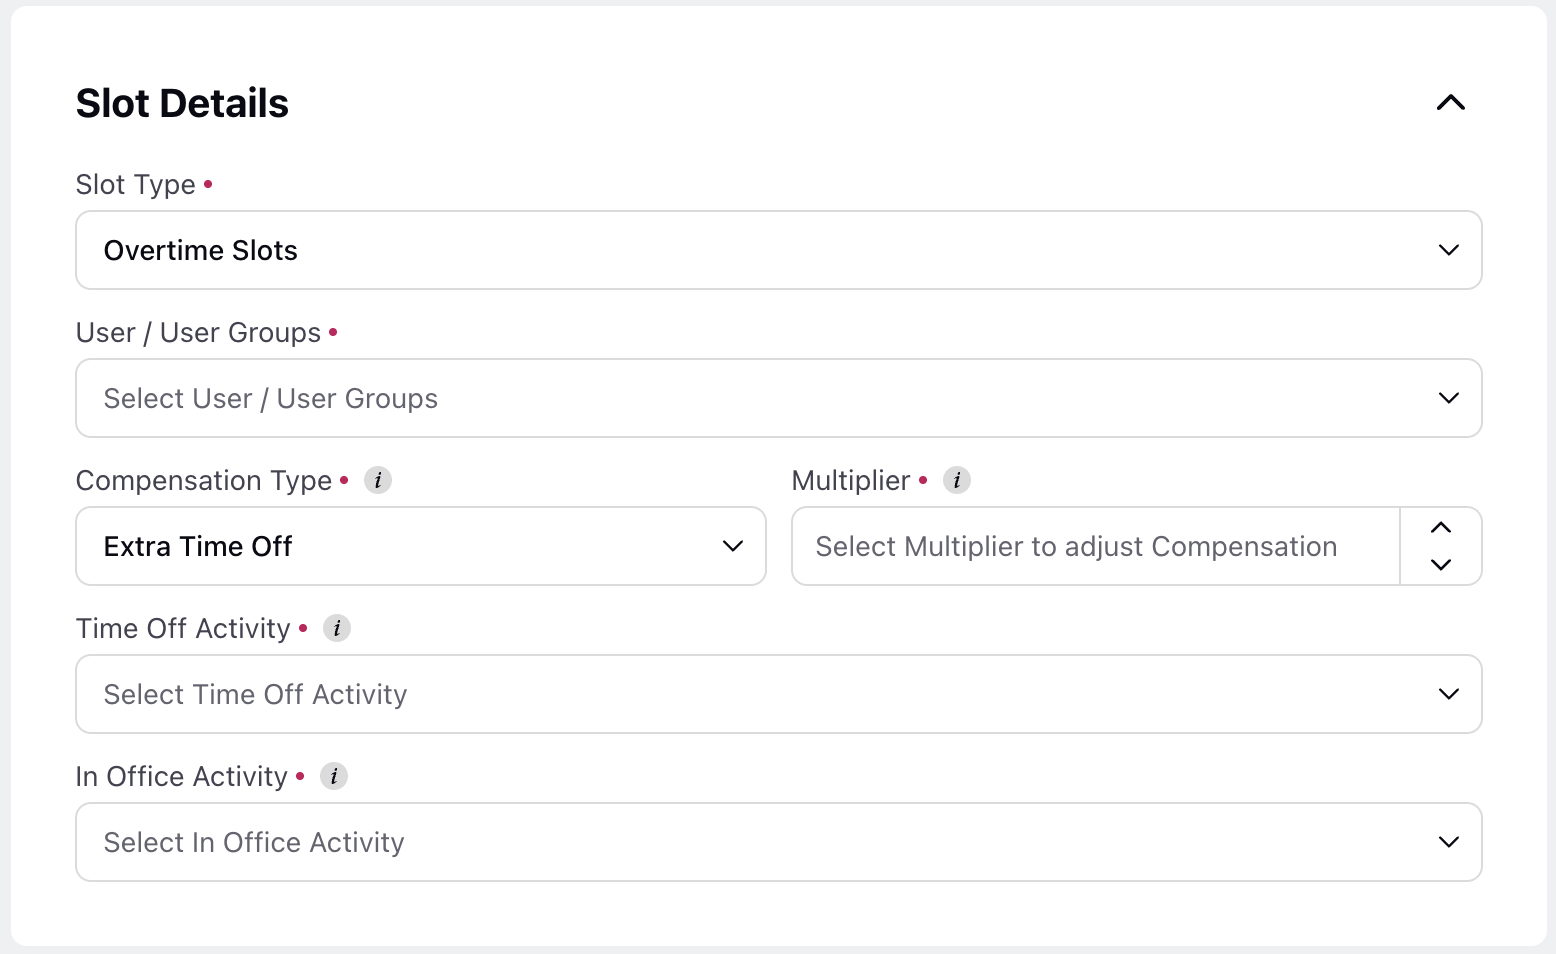
Slot Type: Select Overtime Slots. (Required)
User/User Groups: Select the user(s) and/or user group(s) to whom the time off Slot should be assigned. (Required)
Compensation Type: Choose how to compensate the agents for the Slot. Available options are Extra Pay and Extra Time Off. (Required)
Extra Pay: Agents will receive additional compensation for the Overtime Slot.
Extra Time Off: Agents will be compensated with extra Time Off for the Overtime Slot.
Multiplier: Specify the compensation multiplier for the Overtime Slot. For instance, if the multiplier is 1.5x, agents will receive 1.5 times their hourly rate for the Overtime Slot. (Required)
Note: The Multiplier value must be an integer between 1 and 3.
Time Off Activity: Select the Time Off Activity the agents will be compensated with for the Overtime Slot. This field is visible only when Extra Time Off is selected in the Compensation Type field. Only one Time Off Activity can be selected. (Required)
In Office Activity: Select the In Office Activity that will be shown on the agent’s schedule during the Overtime Slot. It is recommended to use a distinct In-Office Activity, such as Overtime or 2x Pay Overtime, to clearly indicate the intended purpose of the Slot. (Required)

Slot Date Range: Specify the date range for the canvas plotting the Slots. (Required)
Start Time: Specify when the start time for the canvas plotting the Slots. (Required)
End Time: Specify when the end time for the canvas plotting the Slots. (Required)
Slot Capacity: Enter the capacity per Slot. You can customize the color of the Slot by clicking on the Color Picker. Click the Add Value button to add more Slot Capacities. (Required)
Min. Request Duration: Enter the minimum request duration for the Slot in hours or minutes. (Required)

Terms/Conditions: Define the terms and conditions for the Slots.
Cancellation Deadline: Specify how far in advance, before the Slot day, agents are allowed to cancel their Slot Requests. (Required)
Approval Workflow: Select how Slots will be approved once they are created. (Required)
Requires approval by the Supervisor: Select this option if the supervisor or manager must approve the Slots.
Tiered Approval (multiple approvals): Select this option if multiple people must approve the Slots request. Refer to this article on how to create Tiered Approvals.
Auto Approval: Select this option to approve the Slots automatically without manual intervention.
Overtime Compensation Approval Workflow: Choose how compensation for Overtime Slots will be approved. (Required)
Requires approval by the Supervisor: Select this option if the supervisor or manager must approve the overtime compensation.
Tiered Approval (multiple approvals): Select this option if multiple people must approve the overtime compensation. Refer to this article on how to create Tiered Approvals.
Enable Waitlist Support: Enable this toggle to activate the waiting pool mechanism. When enabled, Slot requests that exceed the maximum capacity will be placed on a waitlist and automatically approved as Slots become available.
Click the Create button at the bottom right of the page to create the Overtime Slot.
After creating a Slot, you need to enable it. The following section explains how to enable/disable Slots.
Approval Workflow of Overtime Slot Compensation
Once the Overtime Slots are created and enabled, they will enter the Pending state. After agents submit their Slot Requests, the requests will be either Approved or Rejected, depending on the configured Approval Workflow. If a Slot Request is approved and the scheduled date has passed, it will move to the To Be Verified state. In this state, based on the selected Overtime Compensation Approval Workflow, either the supervisor or designated personnel must verify the Overtime Slot compensation. This will move the compensation status to Verified.
Pending: Overtime Slots have been created and enabled.
Approved: Agents’ Overtime Slot requests have been approved.
To be Verified: The scheduled date for the Overtime Slot has passed, and verification of the overtime compensation is pending.
Verified: The overtime compensation has been reviewed and successfully verified from the Overtime Slot column in the Request Dashboard.
Review Overtime Slot Compensation
Follow these steps to review Overtime Slot comensation requests:
Navigate to the Overtime Slot column in the Request Dashboard.
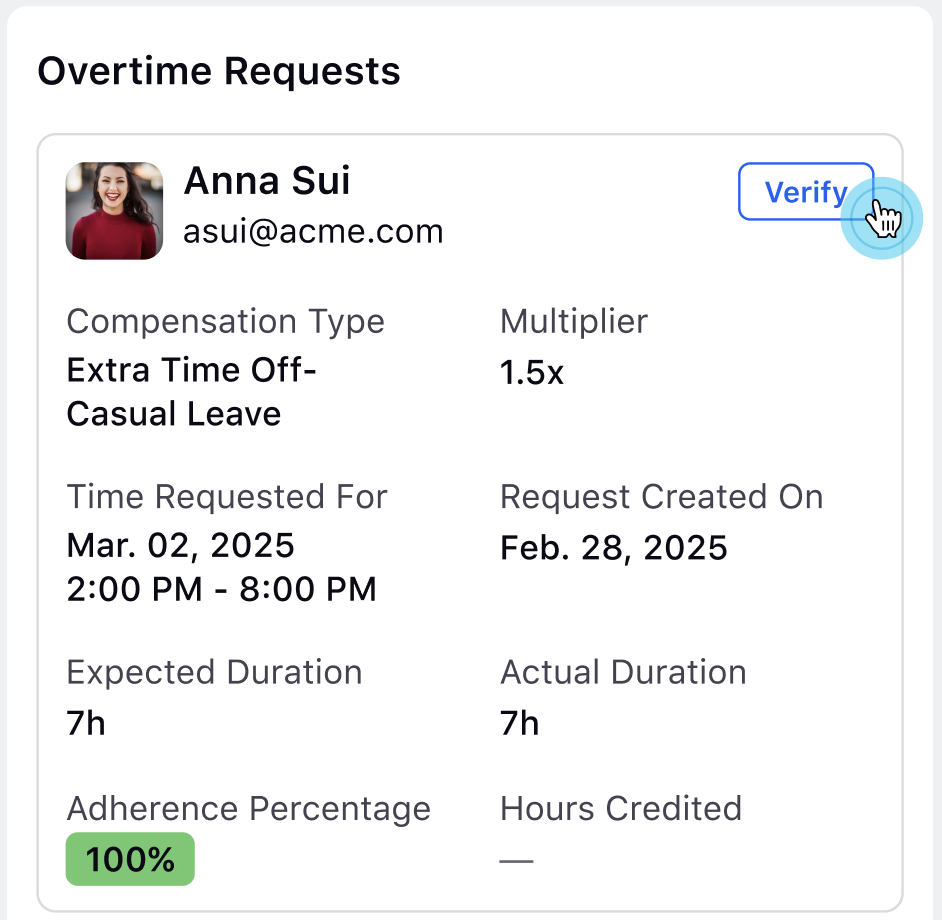
Click the Verify button corresponding to the Overtime Slot compensation request. This will open the Overtime Request Verification dialog box.
The dialog box contains details on the Overtime Slot. Below are the available fields and their descriptions (These details are based on the Overtime Slot configuration and cannot be modified):

Request By: The agent who requested the Overtime Slot and is eligible to receive the corresponding compensation.
Compensation Type: Details of the compensation for the Overtime Slot (Extra Time Off or Extra Pay). If the compensation type is Extra Time Off, the corresponding Time Off Activity allocated to the agent will also be specified.
Example: If Compensation Type is Extra Time Off - Casual Leave, then the compensation type is Extra Time Off, and Casual Leave Time Off Activity will be allocated to the agent.
Multiplier: The compensation multiplier for the Overtime Slot, which governs the final compensation amount.
Time Requested For: The date and time of the Overtime Slot.
Request Created On: The date on which the agent created the Overtime Slot request.
Expected Duration: Number of hours the agent was supposed to work overtime based on the Slot configuration.
Actual Duration: Number of hours the agent worked overtime for the Slot.
Adherence Percentage: Agent’s Adherence for the overtime duration.
Compensated Overtime
Specify the duration in Hours and Minutes for which the agent must be compensated. The value in the Hours Credited field will show the final duration for which the agent will be compensated. This is calculated based on the overtime duration and the Multiplier.
Note: If the agent is specified to be compensated for 4 Hours and 30 Minutes and the Multiplier for the Overtime Slot is 2x, the Hours Credited field will show a value of 9 Hours.
Click Save to verify the Overtime Slot compensation with the specified details.
This will update the Overtime Slot compensation request on the Request Dashboard to the Verified status.
Import Slots
Bulk importing Slots allows you to add multiple Slots to the system using a template file. By following the provided template, users can ensure all necessary information is correctly formatted and easily uploaded through the UI, saving time and reducing potential errors.
Note: Only Day-level Time Off Slots can be imported.
Follow these steps to bulk import Day-level Time Off Slots:
Follow steps 1 through 5 as specified in the "Create Time Off Slots" section.
Fill in the required fields on the Slot Details page. Fields marked with a red dot are mandatory. Below are the descriptions of all the fields on this page:

Slot Details Section
Slot Type: Select Time Off Slots. (Required)
User/User Groups: Select the user(s) and/or user group(s) to whom the time off Slots should be assigned. (Required)
Slot Level: Select Day. (Required)
Time Off Activity: Select the Time Off Activity that would be assigned with the Slots. Only one Time Off Activity can be selected. (Required)
Note: Only the Day-level Time Off Activities will be available for selection.
Slots & Calendar Section
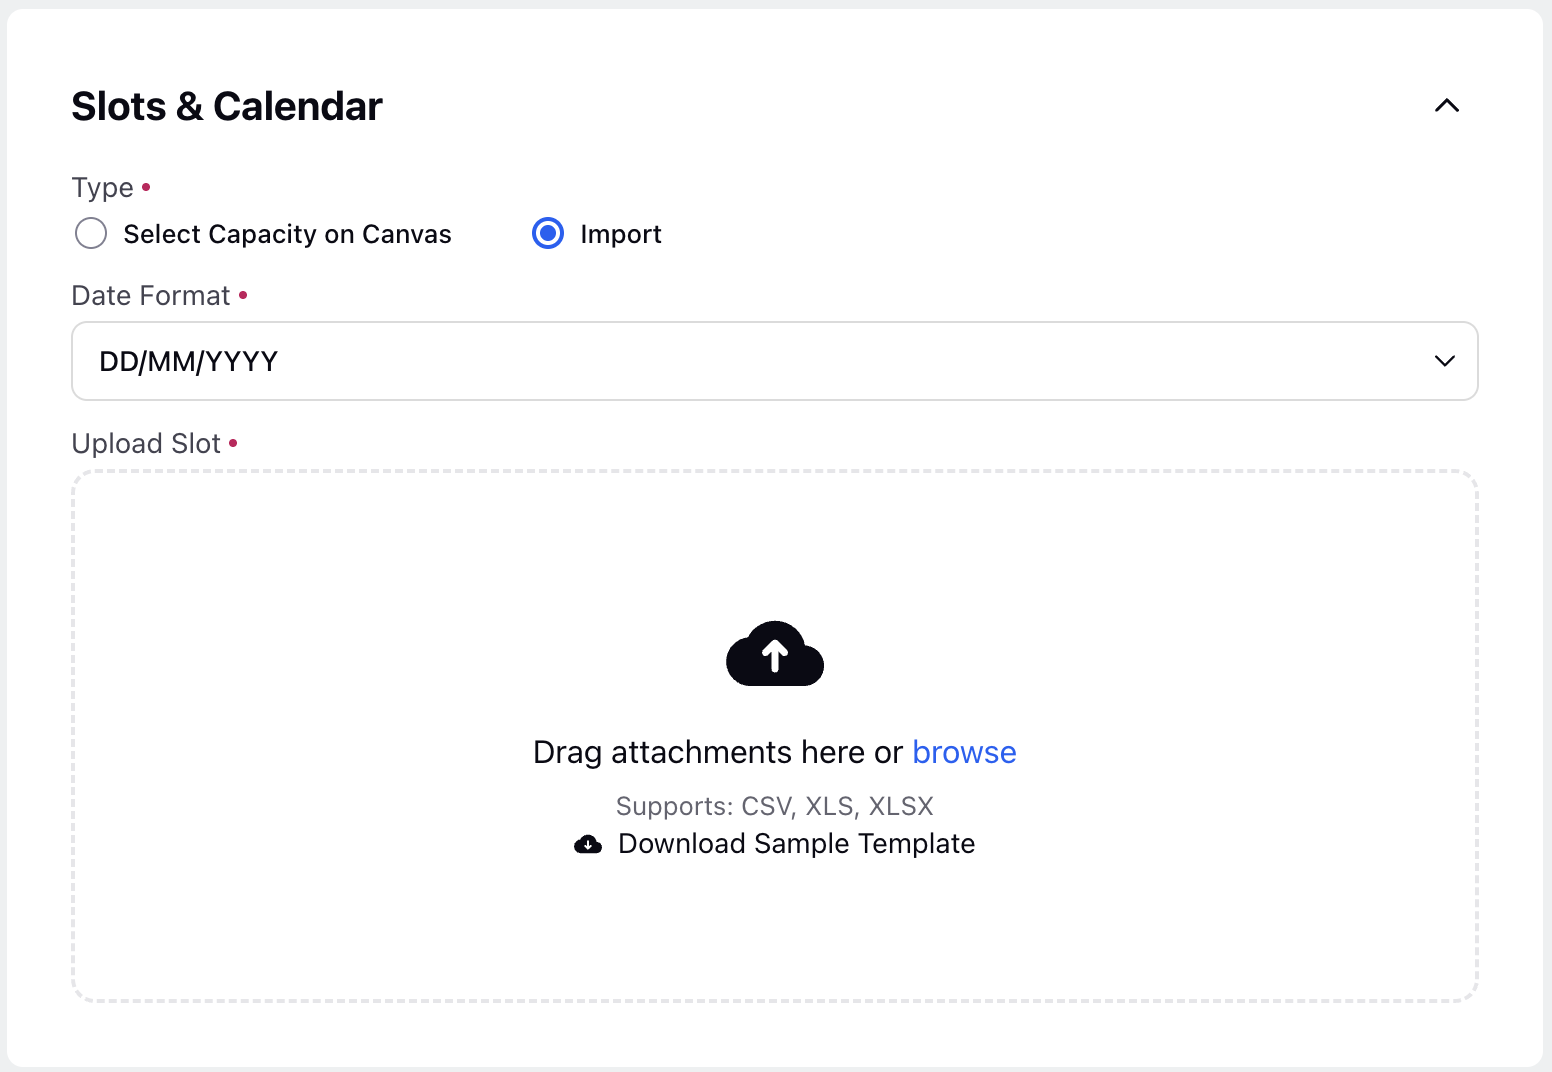
Type: Select Import. (Required)
Date Format: From the list, select the format of dates specified in the “Date” header within the import template. (Required)
Upload Slot: Upload the template file with details of the Slots. CSV, XLS, and XLSX the supported file formats. (Required)
Terms and Approval Section

Terms/Conditions: Define the terms and conditions for the Slots.
Cancellation Deadline: Specify the deadline by which the Slot request can be cancelled. It can be specified in days and hours, for example, 2 days and 12 hours.
Approval Workflow: Select how Slots will be approved once they are created. (Required)
Requires approval by the Supervisor: Select this option if the supervisor or manager must approve the Slots. This option is selected by default.
Auto Approval: Select this option to approve the Slots automatically without the need for manual intervention.
Enable Waitlist Support: Enable this toggle to activate the waiting pool mechanism. When enabled, Slot requests that exceed the maximum capacity will be placed on a waitlist and automatically approved as Slots become available.
Click the Create button at the bottom right of the page to import the Slots.
This completes the process of importing Slots. After importing Slots, you need to enable it. The following section explains how to enable/disable Slots.
Important Considerations for Importing Forecast Scenario
CSV, XLS, and XLSX are the approved file formats.
The following headers are mandatory in the file (Do not modify the header, including their case):
Parameter | Header | Remarks |
Date | Date | The date format in this column must match the option selected in the Data Format field. |
Time Off Entitlements (in Hours) | Time Off Entitlements (in Hours) | The value must be in hours. |
Enable/Disable Slots
Prerequisites for enabling or disabling Slots:
Sprinklr WFM should be enabled for the environment.
You must have access to the Workforce Manager Persona App.
Create and Edit permissions under the Slot Management section in the Workforce Management module.
Follow these steps to enable or disable a Slot:
Navigate to the Slots record manager.

Click the toggle switch in the Slot Name column corresponding to the required Slot to enable or disable it.
This completes the process of enabling or disabling Slots.
Edit Slots
Prerequisites for editing Slots:
Sprinklr WFM should be enabled for the environment.
You must have access to the Workforce Manager Persona App.
Edit permission under the Slot Management section in the Workforce Management module.
Follow these steps to edit an existing Slot:
Navigate to the Slots record manager.

Hover over the vertical ellipsis (⋮) icon corresponding to the Slot you want to edit. This will show a list of options.
Select Edit from the list of options to open the Slot updating page.
Note: Only the Terms/Conditions field can be updated.
Click the Save button at the bottom right of the Slot Details page.
This completes the process of editing Slots.