Guided Workflow nodes
Updated
The various system actions that are supported in the guided workflow are as follows:
![]() Note: AI-Based Script Generator
Note: AI-Based Script Generator
This feature leverages Sprinklr's AI+ capabilities to enhance the use of Groovy scripts within Guided Workflows. You can generate Groovy scripts, summarize existing ones, debug issues, and modify scripts to achieve complex use cases. This reduces the time and effort involved in writing Groovy scripts, making it easier for users, even those not proficient in Groovy, to accomplish complex tasks.
This feature is available in all guided workflow nodes supporting custom code.
Enablement note: To learn more about getting this capability enabled in your environment, please work with your Success Manager. |
.png)
Add Screen
The users can easily gather input from customers by utilizing various components available on a Screen. These components are designed to collect specific types of information from the user such as text, numbers, radio buttons, picklists, etc. To ensure the accuracy of the data collected, validation rules can be set to verify the user's input.
Each component on the screen should be labeled appropriately to help users understand what information is required. Additionally, each component should be assigned an API name, which is a unique identifier and may be used to fetch user input value in subsequent actions/screens in the workflow.


Add Secure Screen
One option to enhance the security of a guided workflow is to include a secure screen that transmits data directly to a PCI-compliant server. By utilizing this secure screen, sensitive data such as credit card numbers and personal identification information can be sent directly to the PCI server, bypassing the Sprinklr platform altogether. This ensures that the data remains secure and is not stored on Sprinklr's servers, minimizing the risk of unauthorized access or data breaches.


Add Transition Screen
Transition screen action is added to redirect the agent to the external website/care or profile record page or to communicate with the parent website in case of external guided workflow.
Redirect to other website action - During the configuration, a link is mapped to the URL from where the website is opened in a new tab.
Message to the Parent Website Action - This is majorly used in case of external guided workflow. On reaching this node, the payload is sent to the parent website helping in interaction with the parent website. You can also switch the locale of an external guided workflow. In the guided workflow, the "Send Message to Parent Website Action" allows communication with the brand's website team. For instance, when a user clicks the submit button, the workflow sends a "completed" event to the parent website, indicating the workflow's completion. This event can be customized based on the message contract established with the customer and can be triggered by various button actions.

Open Case Record Page - This is used to open the record page of a case that is mentioned in the node.
Open Profile Record Page - This is used to open the record page of the profile that is selected in the mode.
Apply Macro - Macro can be directly applied to a case via GP using this action.
Call IVR - Call an IVR from the guided workflow and also set a timeout for IVR to get auto-disconnected.
Restart Execution - Restart the workflow.
Transfer to Voice -
You can transfer a call to the following destinations:
IVR (Interactive Voice Response)
An agent in a specific workspace
An agent in a queue based on skills and proficiency score
An external contact
An external SIP
For transfers to an agent, queue, external contact, or external SIP, you can choose between:
Blind Transfer: Sends the call directly to the selected destination, where it will be assigned to any available agent.
Warm Transfer: Allows the current agent to speak with the receiving agent before handing over the call.
When transferring to a queue
You can enable dynamic input type to use variable selection for determining the destination queue based on specific criteria such as the nature of the inquiry or customer account details.
If using a warm transfer, you can enable the 'Allow primary agents to provide call context' option. This allows the primary agent to share call notes with the secondary agent before the transfer or assignment.

When the 'Allow primary agents to provide call context' is enabled, the agent would be able to add notes prior to the transfer as shown in the below image.

Conference To Voice - This enables conferencing the call with a Queue, Agent, IVR, or External Contact. Inputs required include selecting the relevant Queue, Agent filter, IVR, or an External Number. Additionally, enter a timeout value and a message to display during the conference in progress. While doing a conference to a queue, you can check the 'Allow primary agents to provide call context' option to enable primary agents to provide call notes to the secondary agent prior to call conference.
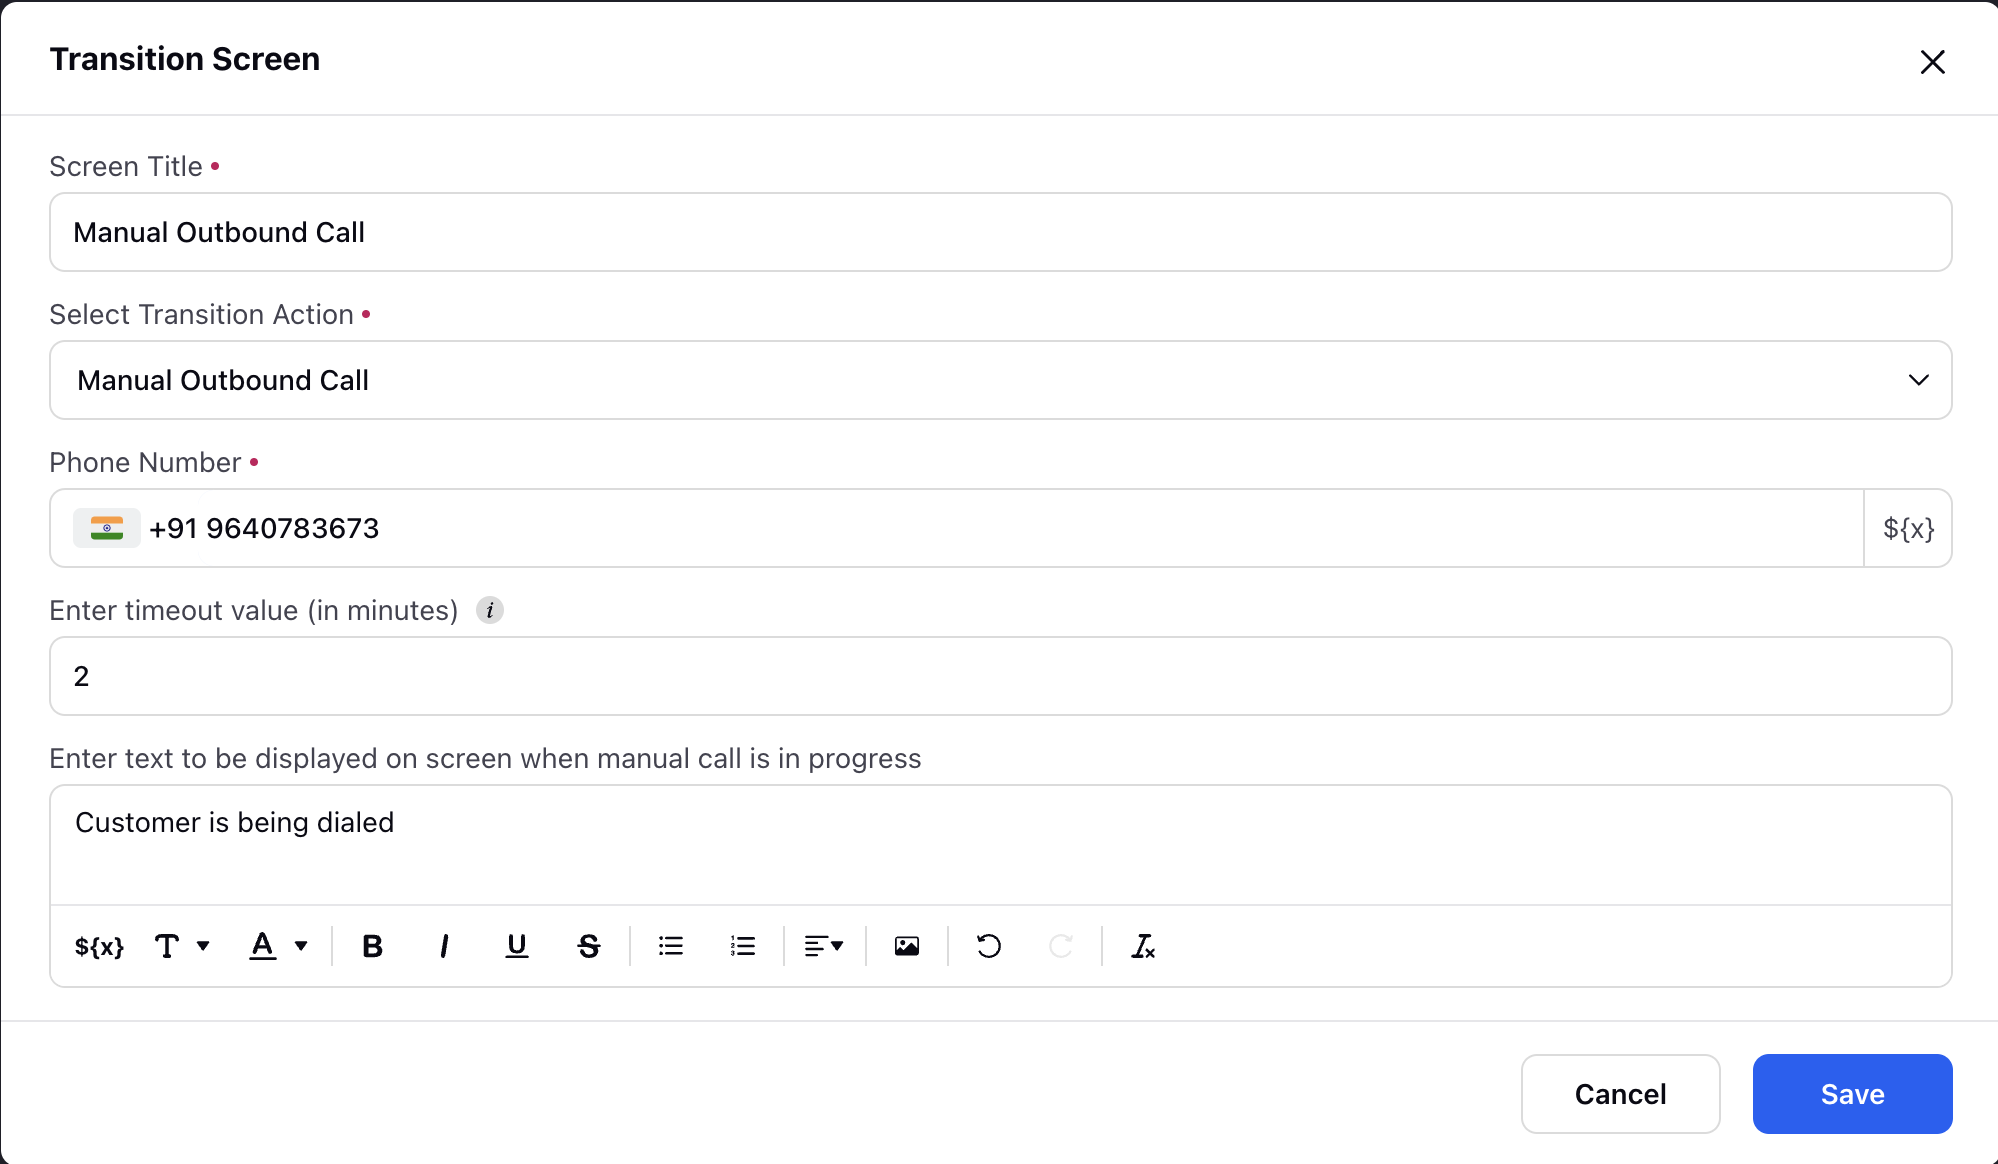
Manual Outbound Call - You can trigger manual calls within Guided Workflows. This feature allows you to choose the dialer, input the customer phone number, and display a message within the Guided Workflow, enhancing the flexibility and control of your call workflows.
Show Notification
Type: If nothing is filled then the success snackbar notification is triggered. If it contains ERROR then an error snackbar notification gets triggered.
Message: The message to be displayed on the notification.
Record Call: Enable the capability to start, pause, or delete call recordings. This feature enhances your ability to efficiently manage and document conversations, providing you with greater flexibility and control over the recording process.
Create a Snippet: Record specific segments of the conversation, such as Permissions Recording, Sales Recording, and Customer Details. When configuring this action, select the appropriate "Action Type" from the options:
- Start/Resume - Initiates or continues the recording process for the designated segment of the conversation.
- Pause - Pauses the recording process for the specified section.
- Delete - Remove the recorded information. This can be useful if there are errors or if you no longer need the recorded content for that specific segment.
This functionality allows you to efficiently manage and document various aspects of the conversation, providing flexibility in controlling the recording process.

Open smart assist: Smart Assist is conveniently available in the third pane of the Care Console through guided workflows integrated within the Guided Workflow widget. To activate this feature, simply add a button or CTA component labeled “Move to next screen.”
When agents click this button, Smart Assist opens instantly, providing immediate access to recommended Knowledge Base (KB) articles and relevant cases—eliminating the need for extra navigation. After reviewing the information, agents can close the third pane, allowing the Guided Workflow to continue seamlessly from where they left off. This ensures that all data is preserved and workflow continuity is maintained.
This enhancement significantly boosts agent efficiency by consolidating resources within the workflow, reducing unnecessary navigation, and preventing cluttered layouts.

When you open the KB article section, you’ll see a list of Knowledge Base (KB) articles recommended by Sprinklr’s AI. You can easily review these articles as per need. Once you’ve finished reviewing, simply close the third pane, and the system will transition you back to the guided workflow. During this process, a configurable transition message, such as “Opening Smart Assist,” will be displayed to keep you informed.
Additionally, the system automatically captures and retrieves the IDs of the KB articles you accessed, enabling detailed tracking of your resource usage. This ensures that when you close the pane, your workflow continues seamlessly from where you left off, with the ability to reference the reviewed articles for future analysis.

Records Management
A record can be a profile or a case-level entity that is stored in the customer database. You can get, update and create records using Guided Workflows.
1. Get Records
Get Records action allows you to fetch custom and standard fields from the database, filter using conditions or condition groups as per requirement, and store them in variables. You can then use these variables in other parts of the workflow.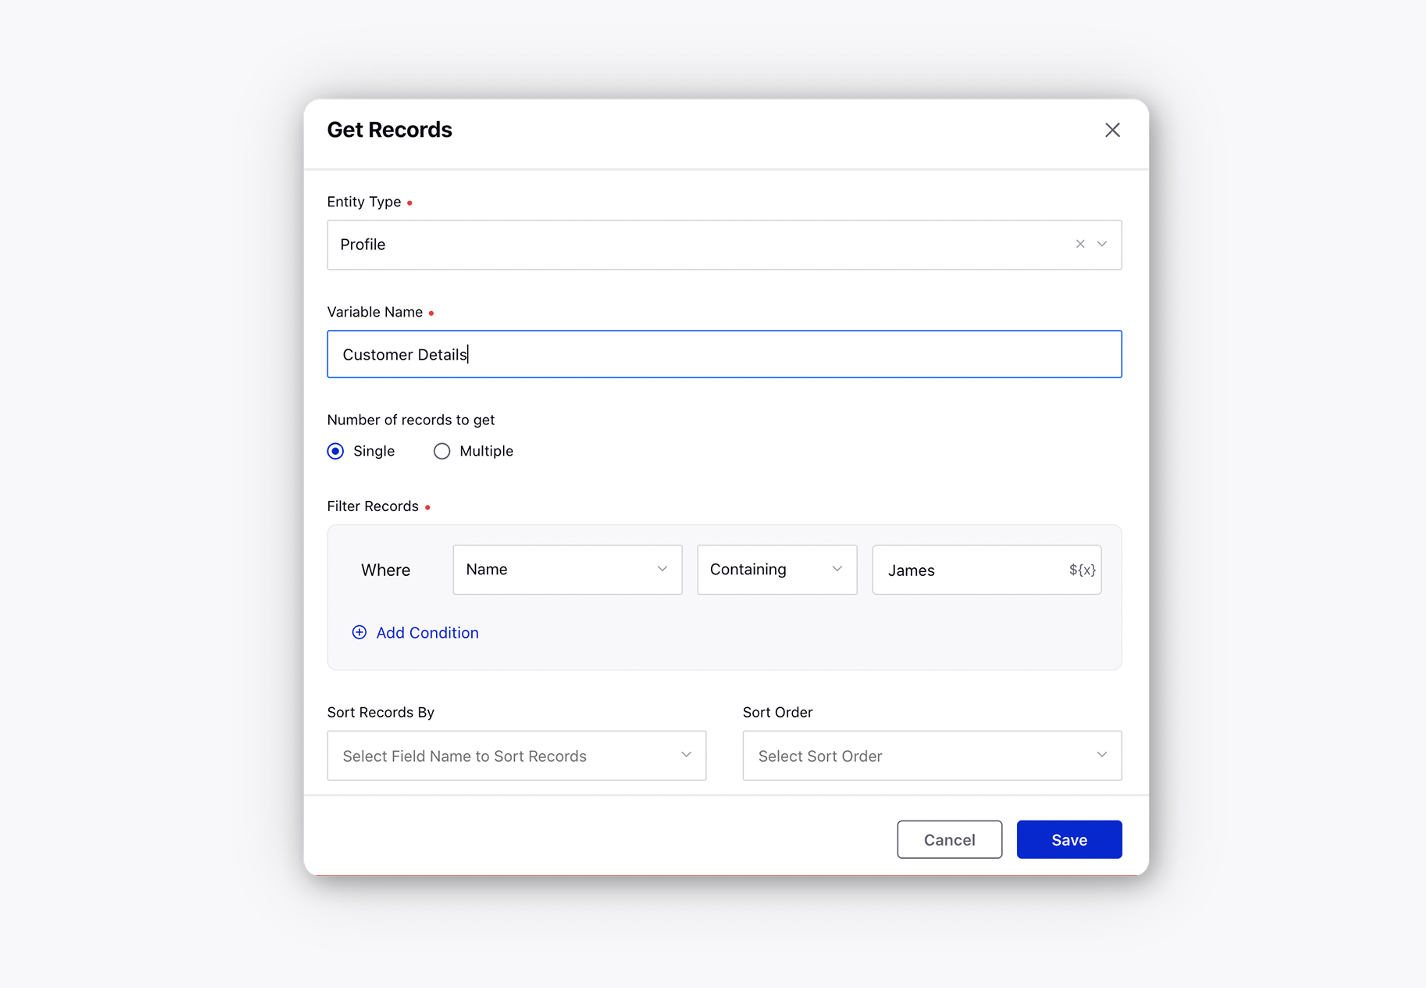
2. Update Records
Update Records action allows you to update a record when certain conditions or group of conditions are met.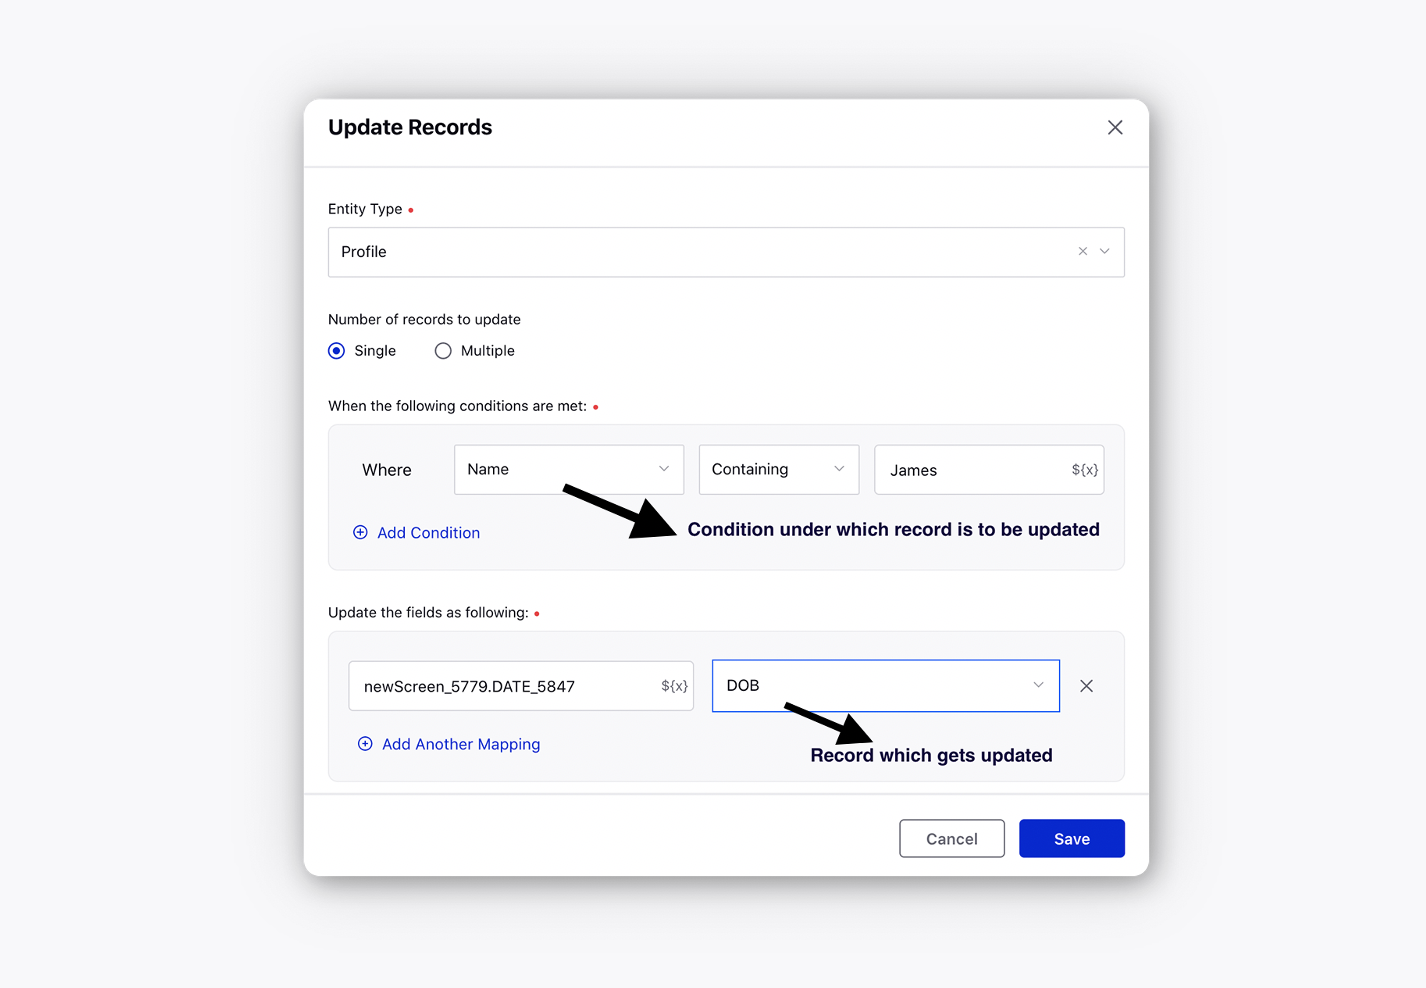
3. Create Records
Create Records action allows you to create a record wherein you set a resource value or a custom input equal to a field and store it in a variable.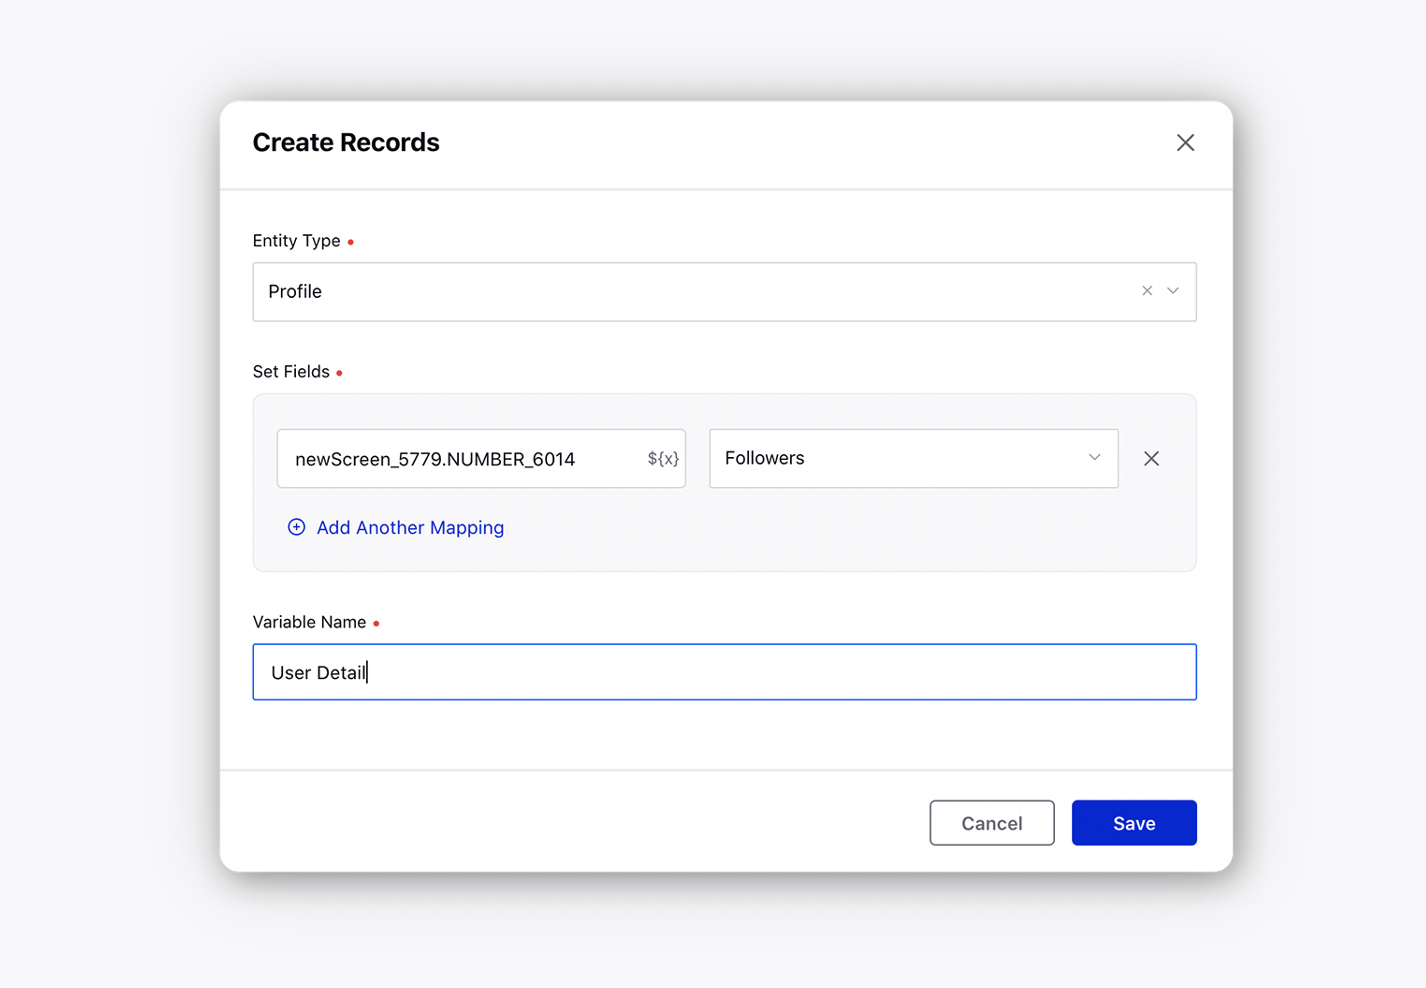
4. Count Records - Utilizing the Count Records node enables you to retrieve the count of records associated with a particular entity. You need to specify the Entity Type, apply Filters, and assign an Output Variable. When the node is executed, the output variable will hold the count of records linked to the specified entity along with the applied filters

5. Delete Records- The Delete Records node allows you to delete one or multiple records associated with a specified entity type. You need to define the Entity Type, apply Filters to identify the records for deletion and specify the Output Variable to capture the response. Upon execution, the node will remove the filtered records from Sprinklr's database and store the status or outcome of the operation in the designated output variable.
![]() Note: Deletion is supported in the Screen Recording Entity as well as Custom Entities.
Note: Deletion is supported in the Screen Recording Entity as well as Custom Entities.
6.Add API - The "Add API" functionality enables you to establish connections with external systems for data retrieval and action execution. This includes tasks such as integrating external CRM platforms or fetching customer data from client data sources. Within Sprinklr, the integration team develops extensions to call APIs, which are then invoked within guided workflows.All available inputs for an extension are automatically retrieved within the node. The configuration of the value to be sent is done on the right-hand side of the input variable mapping. Output variable mapping involves associating values returned from the API with variables that can be used within guided workflows. During API configuration, an automatic check verifies the success or failure of the API call (with an HTTPS status code = 200 check). Two legs are automatically generated once the API is configured.

Send SMS/Email/WhatsApp
This node is used to send communication through guided workflows using SMS, email, or WhatsApp.
To use this feature, you must add a social account to Sprinklr. To send a message, enter the message content or select an asset to send, and for WhatsApp messages, ensure the HSM template has been approved.
Messages can also be scheduled for a later time by entering the date and time in epoch date time format. For email messages, attachments can be included.
When a message is sent through this node, an outbound post is created. In Guided Workflows, you can set properties for messages sent using this node, and these custom properties will be tagged to the post. This allows you to track and manage outbound communications effectively, ensuring that each message is properly categorized and associated with relevant properties for better organization and analysis.
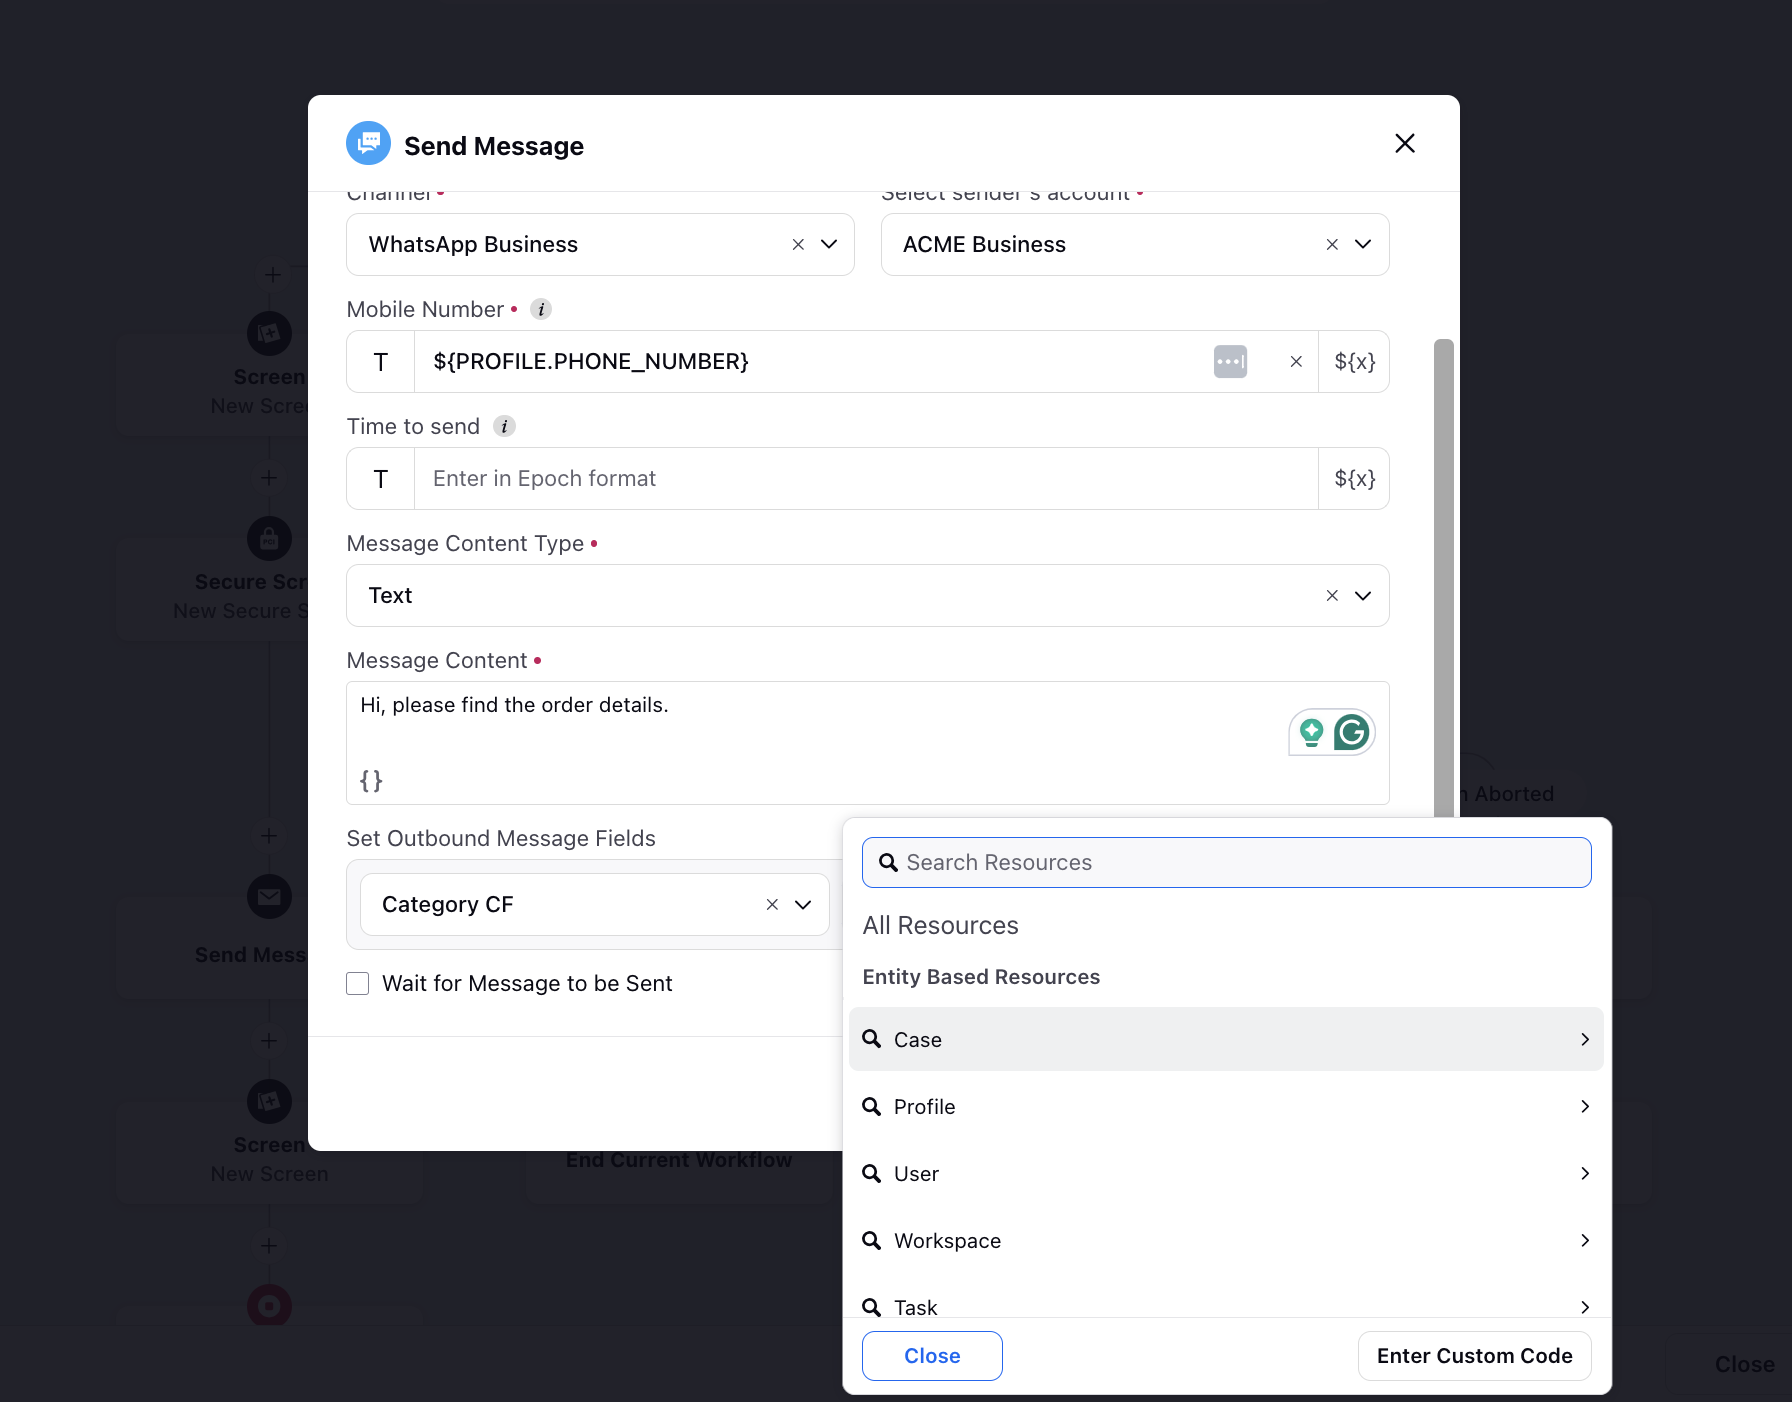
When using this node to send emails, you can use dynamic content in the "Subject" field of the Send SMS/Email/Whatsapp node within guided workflows to create a more personalized customer experience. You can combine static content with dynamic data by selecting variables from the resource selector, enhancing the overall user experience.

Confirmed Appointment
This node can be used to send the confirmed appointment details to the user. The users will have the option to Join, Reschedule, and Cancel the appointment.
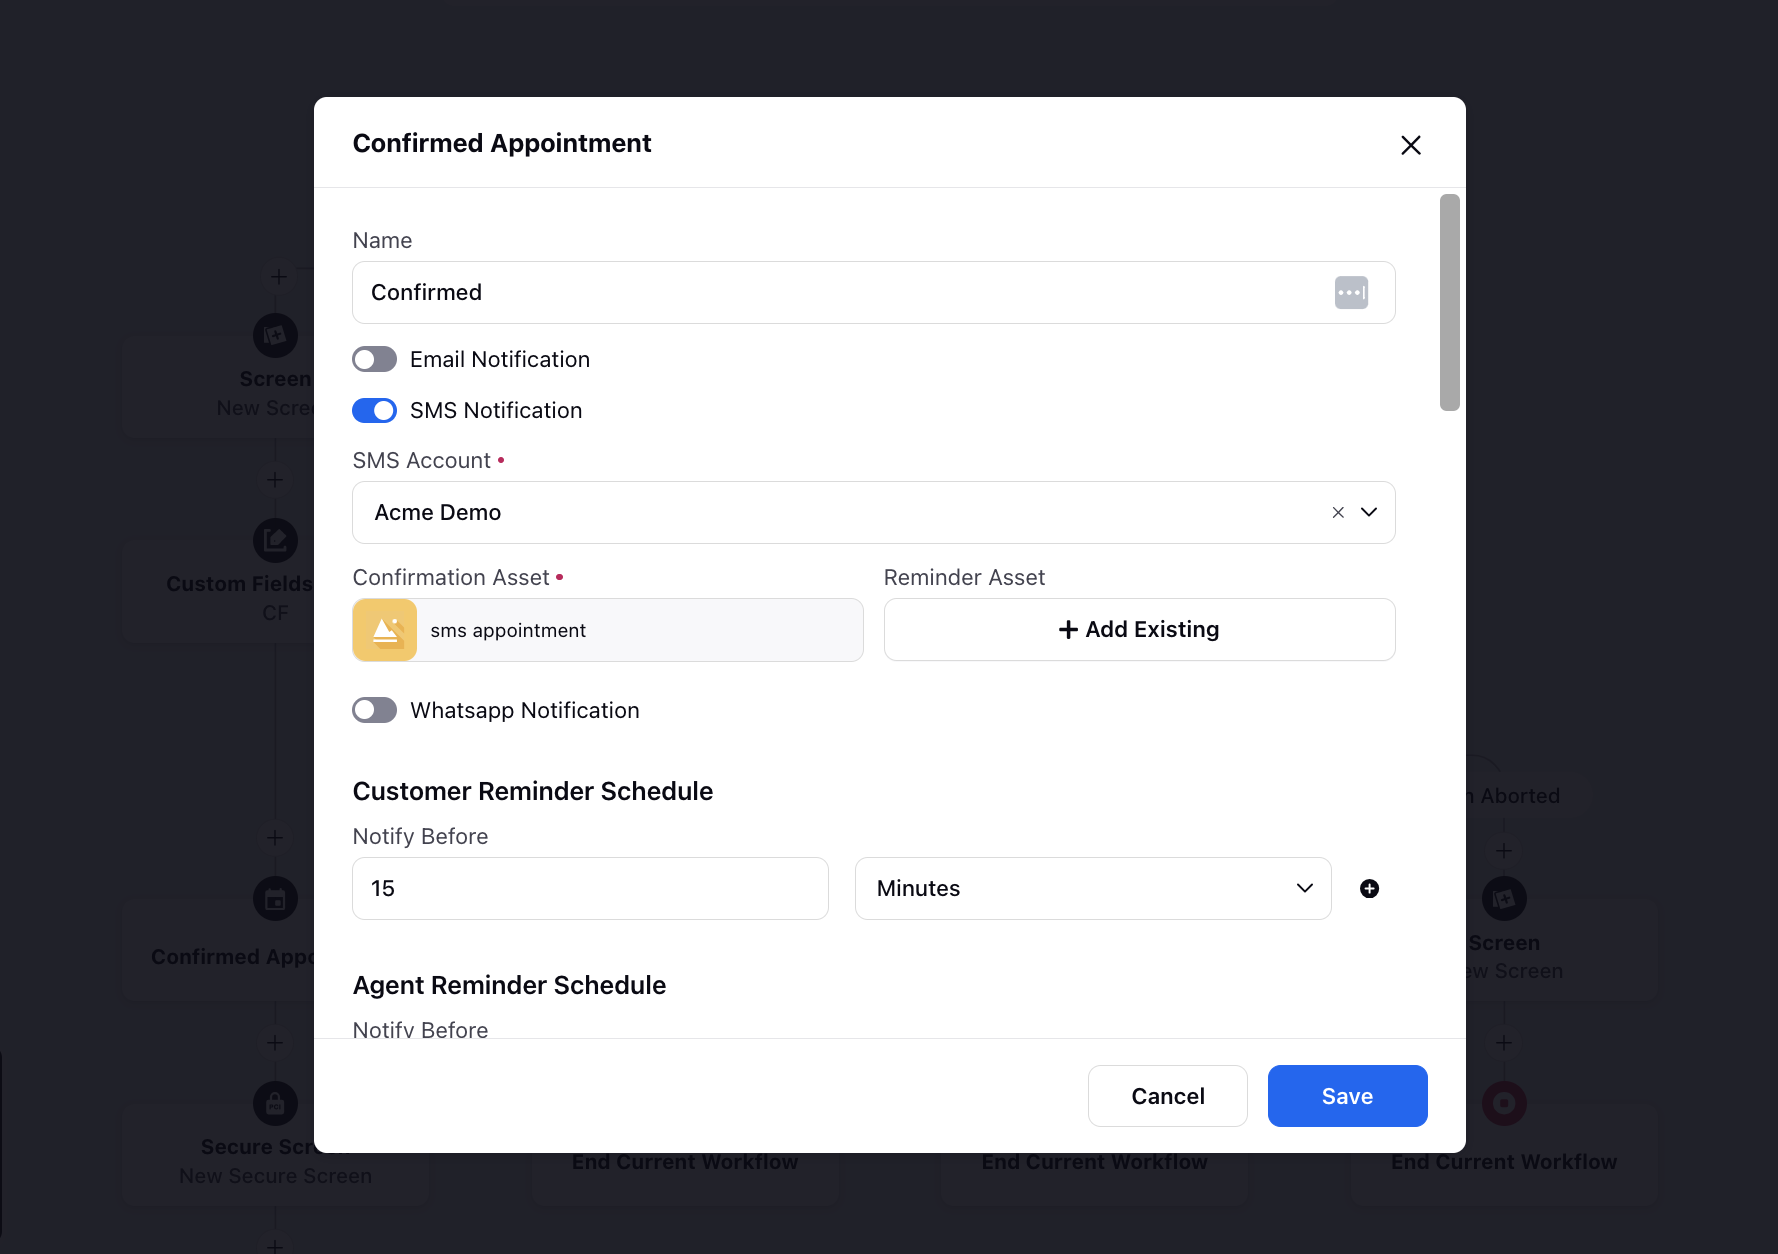
Email/SMS/WhatsApp Notification Account: Select the account to be used to send the email/SMS/WhatsApp message about the confirmed appointment details.
Email/SMS/WhatsApp Notification Confirmation Asset: Select the template to be sent via email/SMS/WhatsApp message. You can create an RTFD template in Digital Asset Manager.
Email/SMS/WhatsApp Notification Reminder Asset: Select the template to be sent via email/SMS/WhatsApp message to remind the customer about the appointment. You can create an RTFD template in Digital Asset Manager.
Customer Reminder Schedule: Choose an amount of time, in hours, minutes, etc., for the reminder to be sent to the customer. The hour or hours you choose represents the amount of time before a scheduled appointment that you want to send a reminder, for example, 2 hours before a scheduled appointment. You can add multiple reminders.
Agent Reminder Schedule: Choose an amount of time, in hours, minutes, etc., for the reminder to be sent to the agent. The hour or hours you choose represents the amount of time before a scheduled appointment that you want to send a reminder, for example, 2 hours before a scheduled appointment. You can add multiple reminders.
Appointment Mode: Select the mode of appointment, either Video Chat or Voice Callback.
Voice Callback
Priority: Enter the priority rank for the callback.
Callback Number: Enter the phone number for the callback.
Last Outbound Campaign Skill: This option allows the system to utilize the skill set from the most recent outbound campaign that the agent was involved in. It ensures that the callback is handled by agents with relevant experience and expertise.
Use Callback Campaign from Voice Campaign: This setting enables the callback to be associated with the same campaign as the voice campaign.
Callback Campaign: Select the specific callback campaign from the list.
Profile ID: If left blank, the callback will be created with the current profile. Alternatively, you can enter or select a specific profile ID to associate with the callback.
Case Number: If left blank, the current case will be chosen by default. You can enter a specific case number if needed.
Note: Enter a note or select a resource to be associated with the callback.
Expire Timeout: Set the time in minutes before the callback expires.
Reassign Timeout: Set the time in minutes before the callback is reassigned.
Preview Time: Enter the preview time in seconds.
Re-Assign to: Select either "Work Queue" or "Agent".
Work Queue/Agent: Choose the appropriate work queue/agen for re-assignment.
Re-assign Preview time: Enter the preview time for re-assignment.
Guided Workflow for Appointment Modification: Choose the appropriate guided workflow for handling appointment modifications.
URL Shortener: Select the URL shortener to shorten the URL.
Video Chat
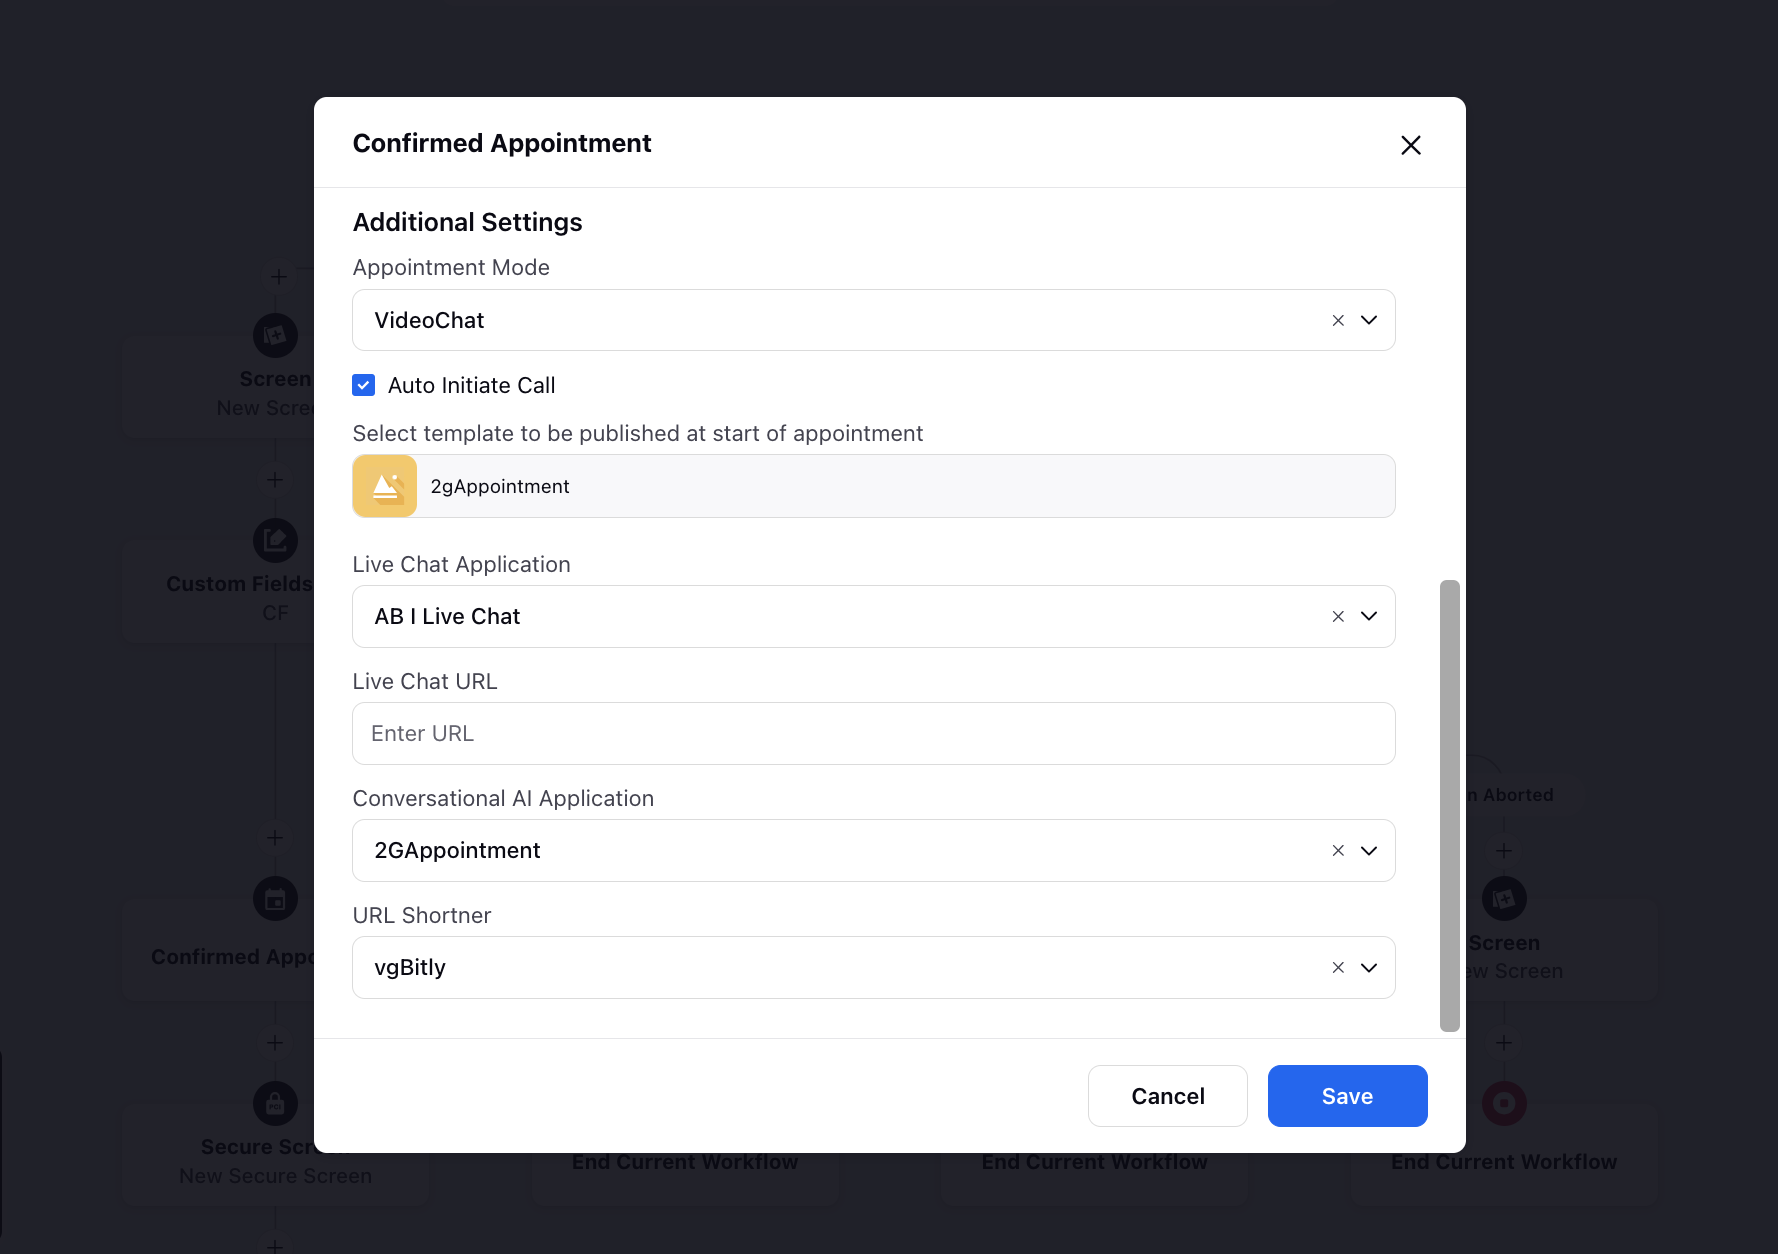
Auto Initiate Call: This setting, when enabled, automatically starts a call to the customer without requiring manual intervention from the agent.
Select template to be published at start of appointment: Select the template to be sent at the start of the appointment asking the users to join the appointment.
So, clicking the Join link on the template (confirmed appointment/reminder) will redirect the users to the Live Chat widget where this template will appear and the conversation will be reopened. You can create a card template in Digital Asset Manager.
Live Chat Application: Select the Live Chat Application to redirect the users to when they click Join/Reschedule etc.
Live Chat URL: Select the URL, where the Live Chat is configured, to redirect the users.
URL Shortener: Select the URL shortener to shorten the URL.
Cancel Appointment
In case of cancellation or modification of any appointment, the initial appointment needs to be canceled using the ‘Cancel Appointment’ node.
Email/SMS/WhatsApp Notification Account: Select the account to be used to send the email/SMS/WhatsApp message informing the customer about the cancellation.
Email/SMS/WhatsApp Notification Confirmation Asset: Select the template to be sent via email/SMS/WhatsApp message. You can create an RTFD template in Digital Asset Manager.

URL Shortener: Select the URL shortener to shorten the URL.
Close Live Chat Conversation: Slide the toggle to the right to close the Live Chat conversation.
This cancels the reserved appointments as well as confirmed appointments. In case of rescheduling also, the old appointment needs to be canceled first.
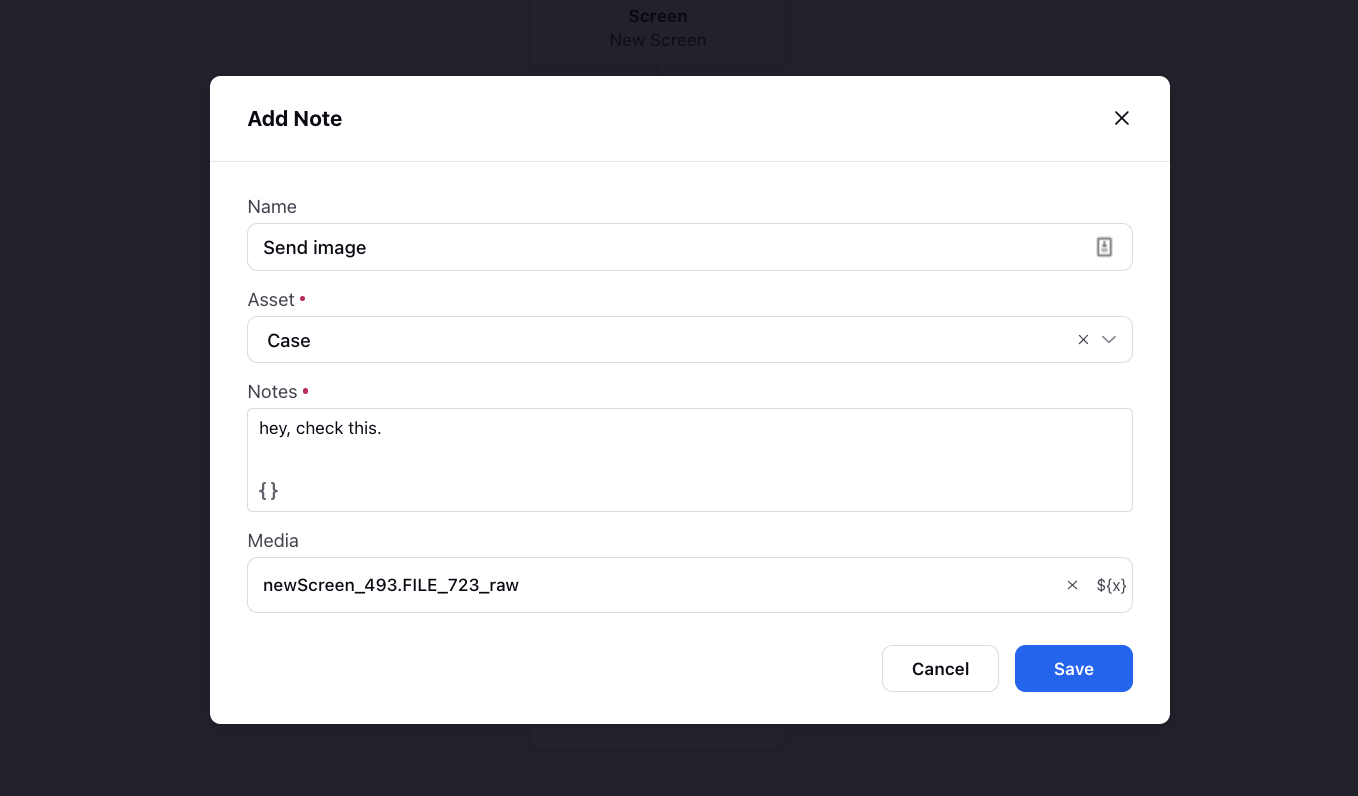
Add Notes
Notes are snippets of information that are linked to a particular entity inside sprinklr. It can be a case/ profile/ task/ etc. It is added by a particular agent for helping give context or transferring some important information to other agents. This is usually shown in the care/agent console as well. This is also used commonly for debugging purposes, for understanding where error is coming inside a guided workflow. You can also add image, video and file assets via resource selector.
Update Properties Node
Update Properties node helps to set the value of a particular variable inside a guided workflow with a static value or dynamic value that is returned after execution of a script. Script can be written inside a custom code block. Script mentioned here are written in groovy and are used for complex configuration.

Decision Box
The Decision Box is a workflow node used to branch workflows into multiple paths based on defined conditions. For example, if certain teams need to follow one branch under specific conditions and another branch under different conditions, the Decision Box enables this. Conditions can be set using case custom fields, predefined variables, or button actions. Based on these criteria, the workflow dynamically routes to the appropriate branch, ensuring flexibility and precision in workflow execution. If you want to create more than two paths, you can add additional branches. For example, to have three paths instead of two, click on Add Another Path, which creates an extra branch. This allows the workflow to handle multiple scenarios effectively.
![]() Note: The list of operators available will change based on the type of node or variable you select.
Note: The list of operators available will change based on the type of node or variable you select.

Go To Node
If you want to link one branch to a different node, you can use the go to node element. Refer to the below-attached video for a walkthrough of this capability.
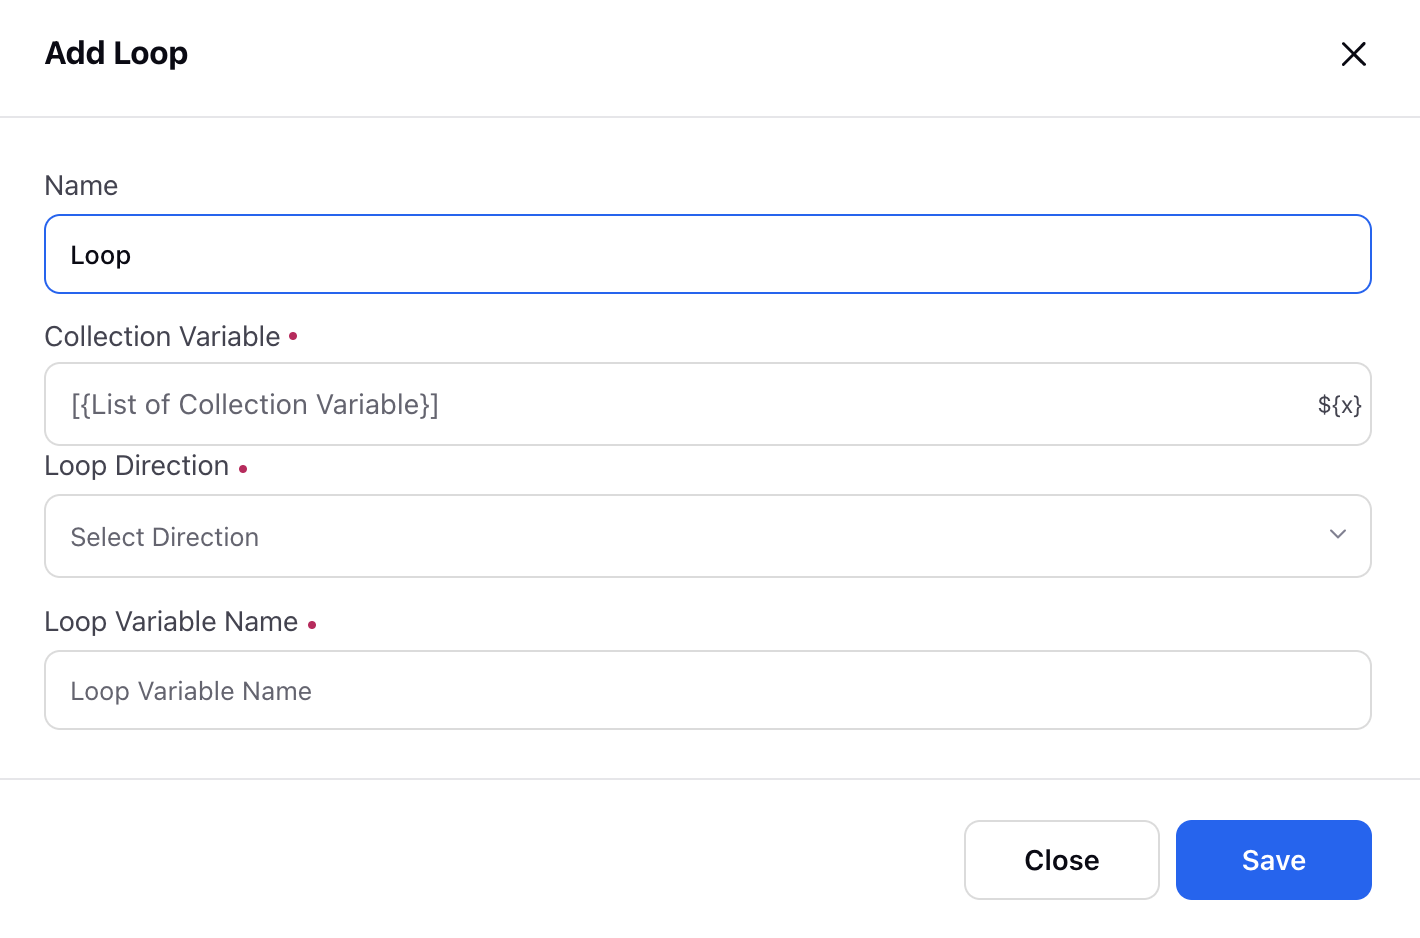
Loop Node
Loop node helps in iterating over a collective variable or an array. For adding a loop inside a workflow, you need a collective variable and then add a loop node inside workflow. The option of defining the collective variable, direction of loop (first to last or last to first) as well as iterating variable that can be used inside the loop should be defined. In case a particular scenario is achieved and if logic needs to break the loop in between, break loop mode is used. If a loop needs to be runned on all items, then auto branching happens and what needs to be runned on each item and what needs to be runned after the loop are defined. You can continue with normal workflow after each item is iterated over. Please refer to this document for more information on loop.
Break loop node
If a specific condition is met and you need to break the loop early, the Break Loop node can be used. If the loop needs to run on all items, auto-branching occurs, and you can specify actions to be executed on each item, as well as tasks to be performed after the loop completes. Once the loop iterates over all items, the workflow continues normally. For more information on the loop configuration, please refer to the related documentation.

Call another guided workflow
Call Another Workflow is a method used to run one workflow inside another. With this approach, you can pass data between workflows by setting input and output variables. You specify which variables from the calling workflow need to be passed to the called workflow. Though this method is functional, it is less commonly used today because newer methods like Embed Workflow offer better integration. However, Call Another Workflow is still helpful when you need separate workflows to work together while sharing important data.

End current Workflow
The "End Current Workflow" node is used to terminate the current workflow, which could be a particular branch or sequence of actions within a larger Guided Workflow. This action allows for selective stopping of a specific workflow or sequence while other parts of the larger workflow continue to execute. It's particularly useful when certain conditions or decisions make it necessary to stop only a segment of the process without halting the entire workflow.

End Execution
The End Execution node is used to stop the execution of the entire process. When triggered, this action halts the entire workflow, branches, and sequences within the process, effectively terminating everything in the current execution. This is useful when the entire process needs to be stopped, often due to an error or a condition that requires ceasing all activities in the workflow.

Add or Remove Case Queue
There are options of adding or removing cases from case queues via guided workflow. This helps in executing rules on cases. You can add cases to the case queue, to trigger rules.
It is important to note that this node will start giving errors in case there is no case context while guided workflow execution.

Profile List Change
This is used for modifying outbound campaign profile lists. There is an option of adding or removing a profile from various profile list (global and workspace) changes. The current profile on which guided workflow is being executed on, that profile is added or removed. It is important to note that this node will start giving errors in case there is no profile context while guided workflow execution.

Schedule Callback
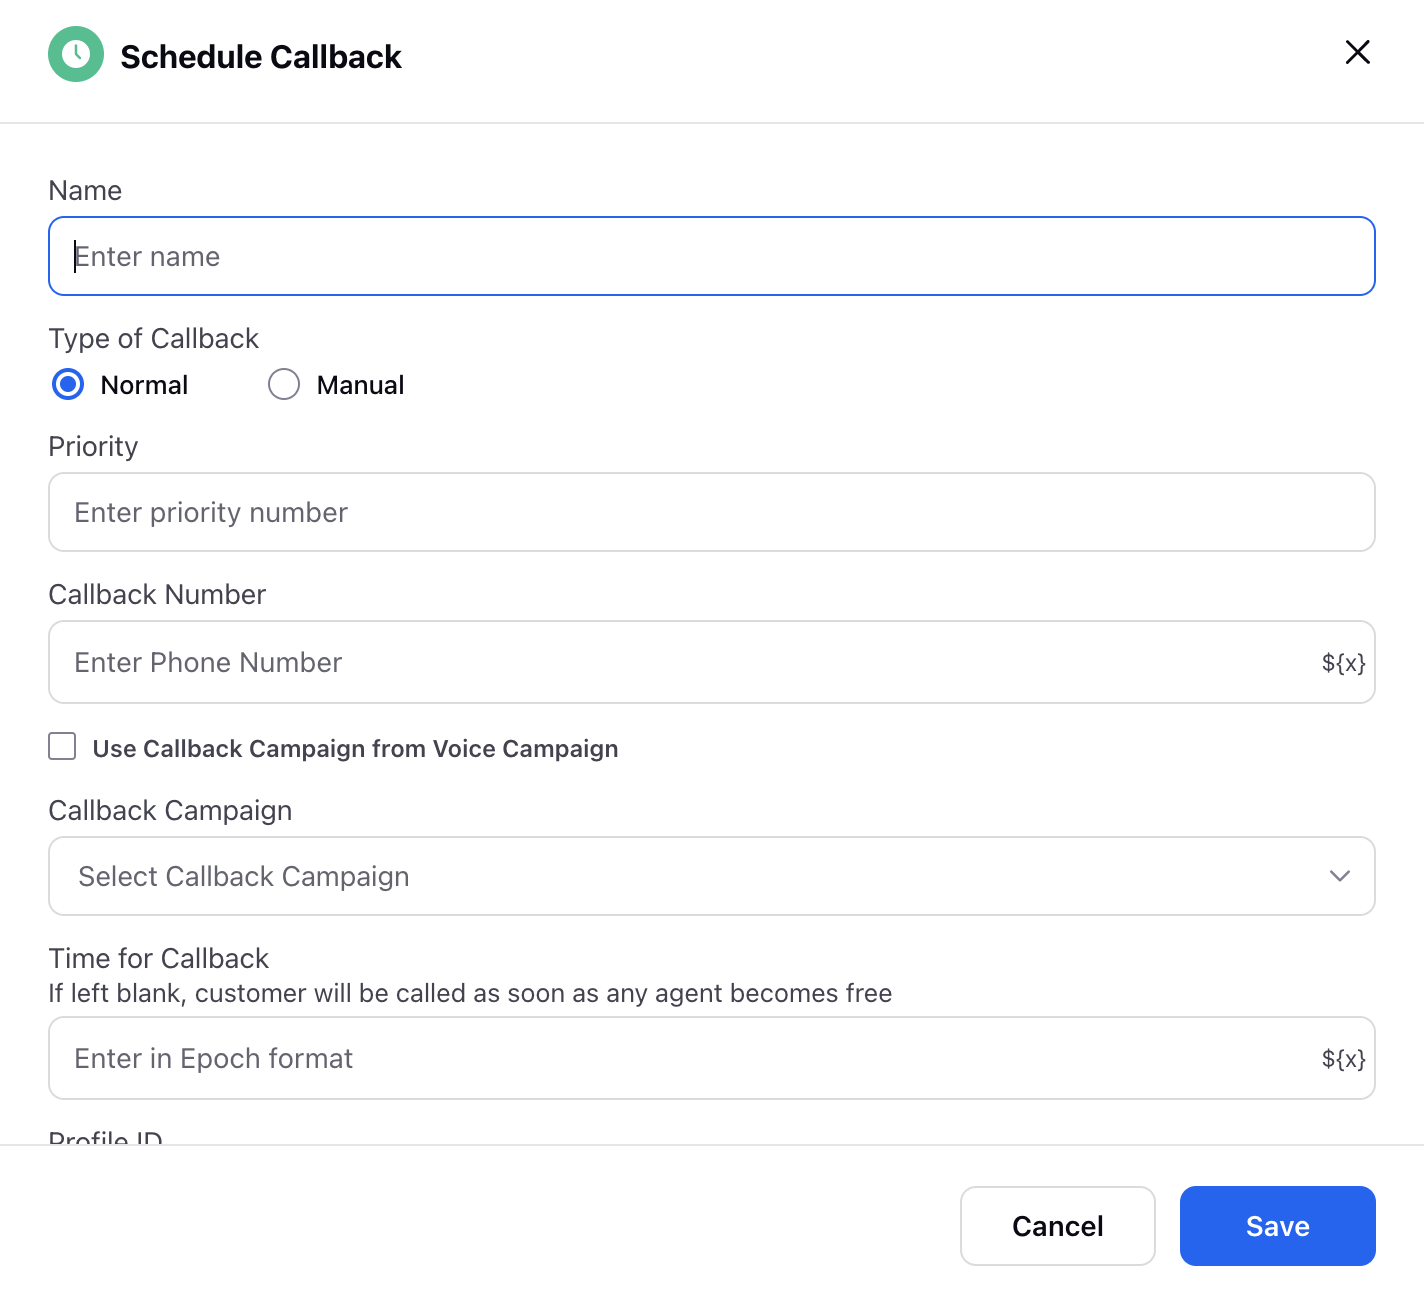
Components of the Schedule Callback node.
Name: The name of the node.
Priority: The priority/weight assigned to the callback.
Callback Number: The number to which callback is to be routed. There is a resource selector corresponding to this field to ensure that number to which a callback is to be routed can be fetched from an array of sources.
Use Callback Campaign from Voice Campaign: The enablement of this checkbox ensures that callback related configuration is fetched from the parent campaign in the case of voice campaigns.
Callback Campaign: This field is used to explicitly define the callback campaign from where callback related configuration is to be picked.
Time for Callback: In this field, you can either specify the time in epoch format or dynamically fetch it from the available entities via resource selector.
Case Number: The case number to which the particular callback is to be linked.
Note: This field is used in cases where a note has to be shown to an agent when he/she is receiving callbacks. The note can either be static or we can fetch the value for it dynamically via resource selector.
Assign To: The callback task can be allotted to either of the following:
Journey
Work Queue
Agent
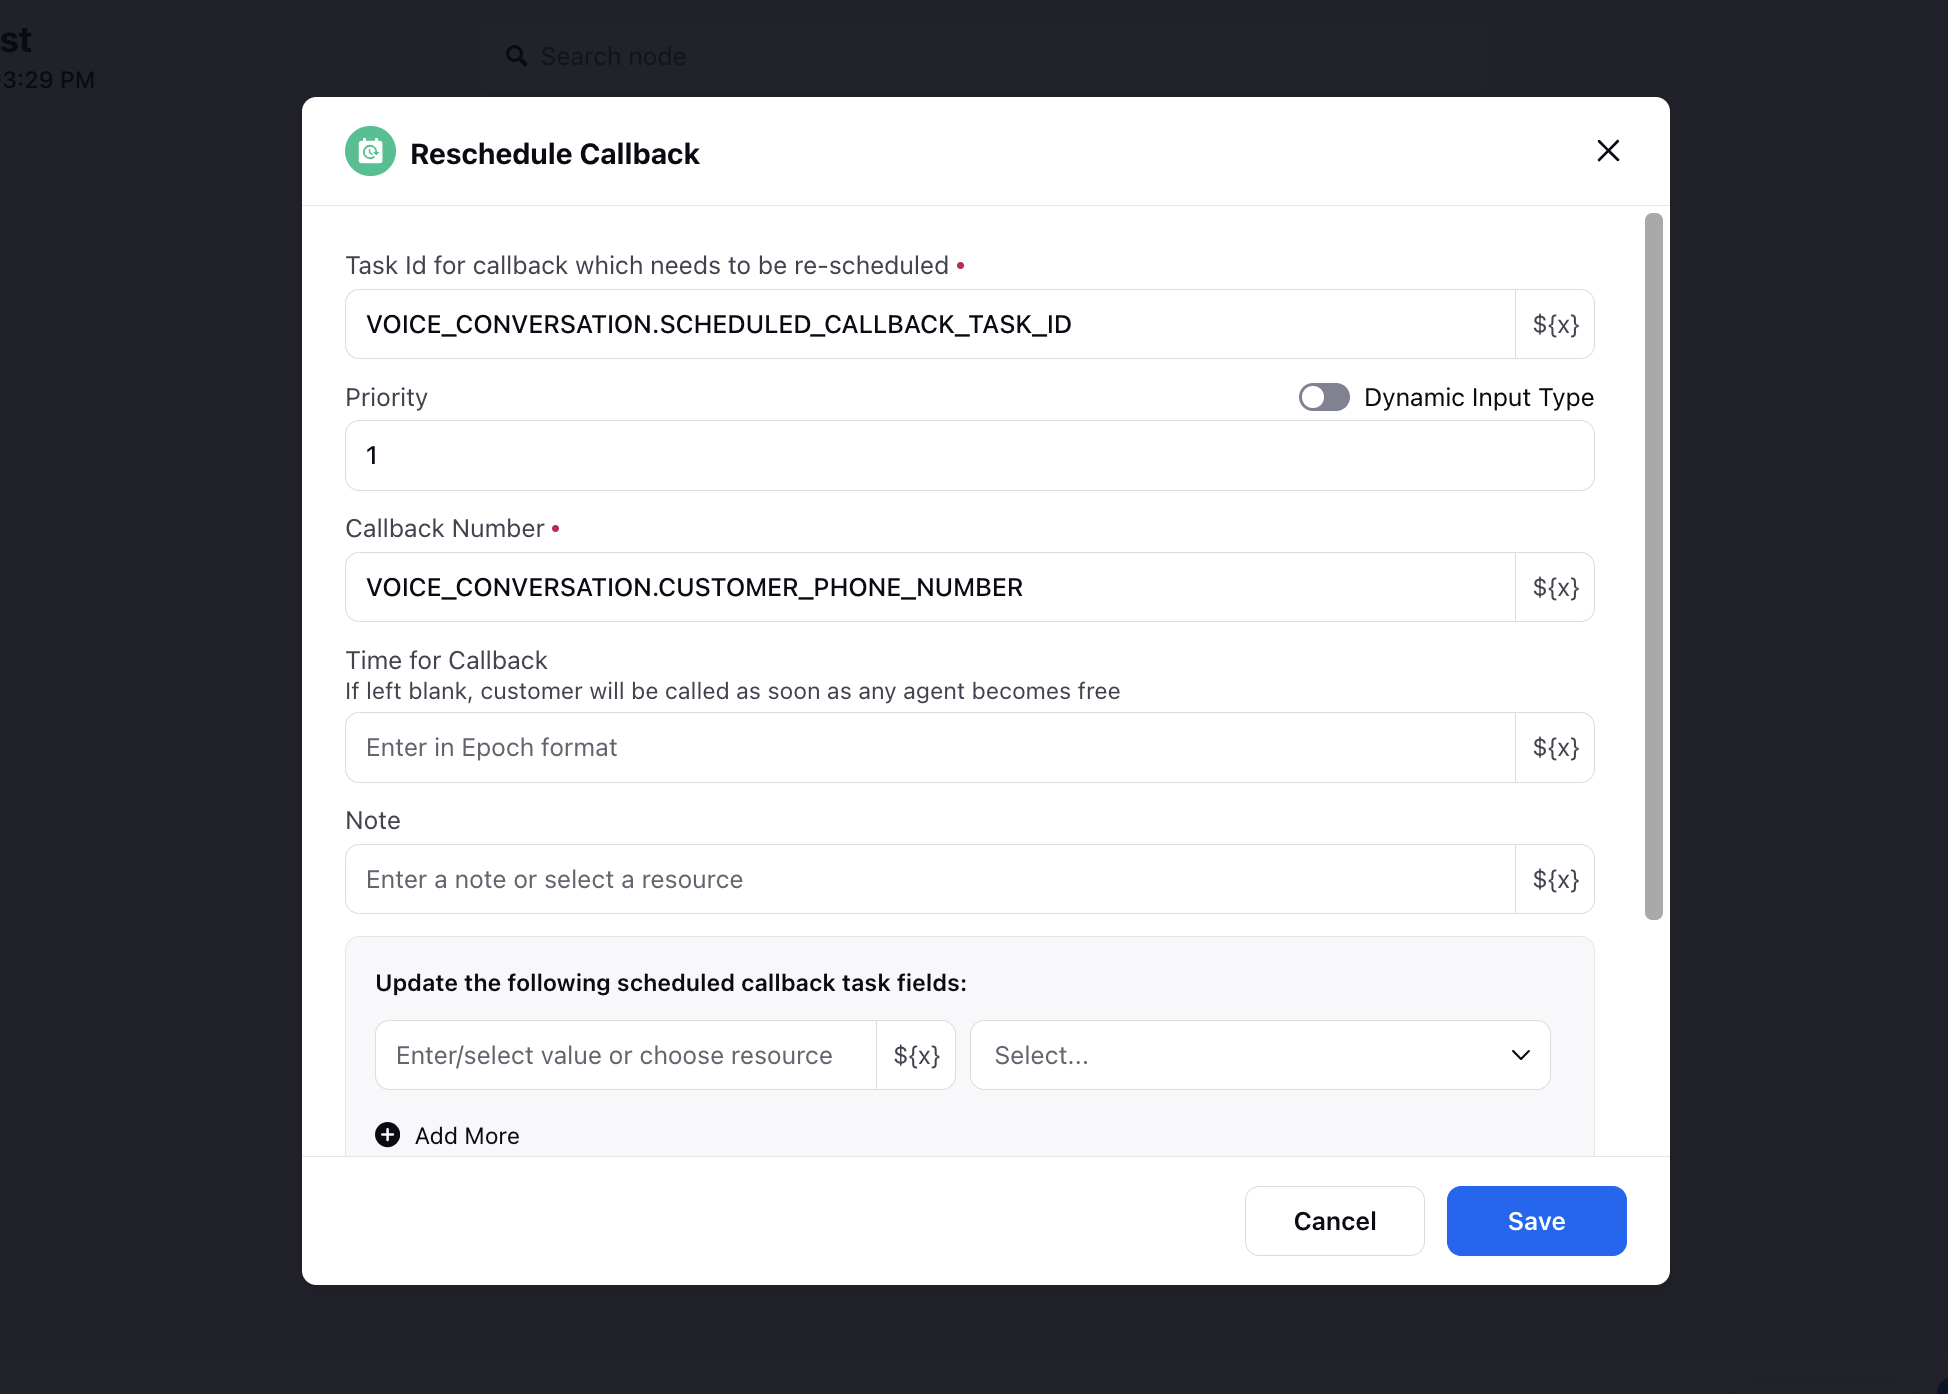
Reschedule Callback
The details of a callback task can not be altered once it is scheduled. With the reschedule callback node in Guided Workflow, agents can reschedule callbacks with changes. Key elements include:
Key Elements:
Task ID Integration:
Mandatory Task ID Column: The reschedule node includes a mandatory Task ID field, ensuring precise identification of each callback task. This allows the system to accurately match and update the correct task during the rescheduling process.
Value Retention:
Preserve Existing Details: If certain fields are left blank during rescheduling, the system will retain the existing callback details. This helps maintain consistency and prevents data loss by ensuring that only the intended changes are applied.
Comprehensive Resource Selection:
Advanced Control: Agents can select the task ID, callback number, and callback time from a resource selector. This advanced control ensures precise and accurate scheduling by allowing agents to easily modify the necessary elements while keeping other details intact.
This node streamlines the rescheduling process and enhances system reliability by providing more flexibility and control to agents.
Cancel Callback
The Cancel Callback node allows you to cancel scheduled callbacks or outbound calls based on case, profile, or specific case IDs. It ensures cleaner communication workflows by removing redundant or outdated callback actions.

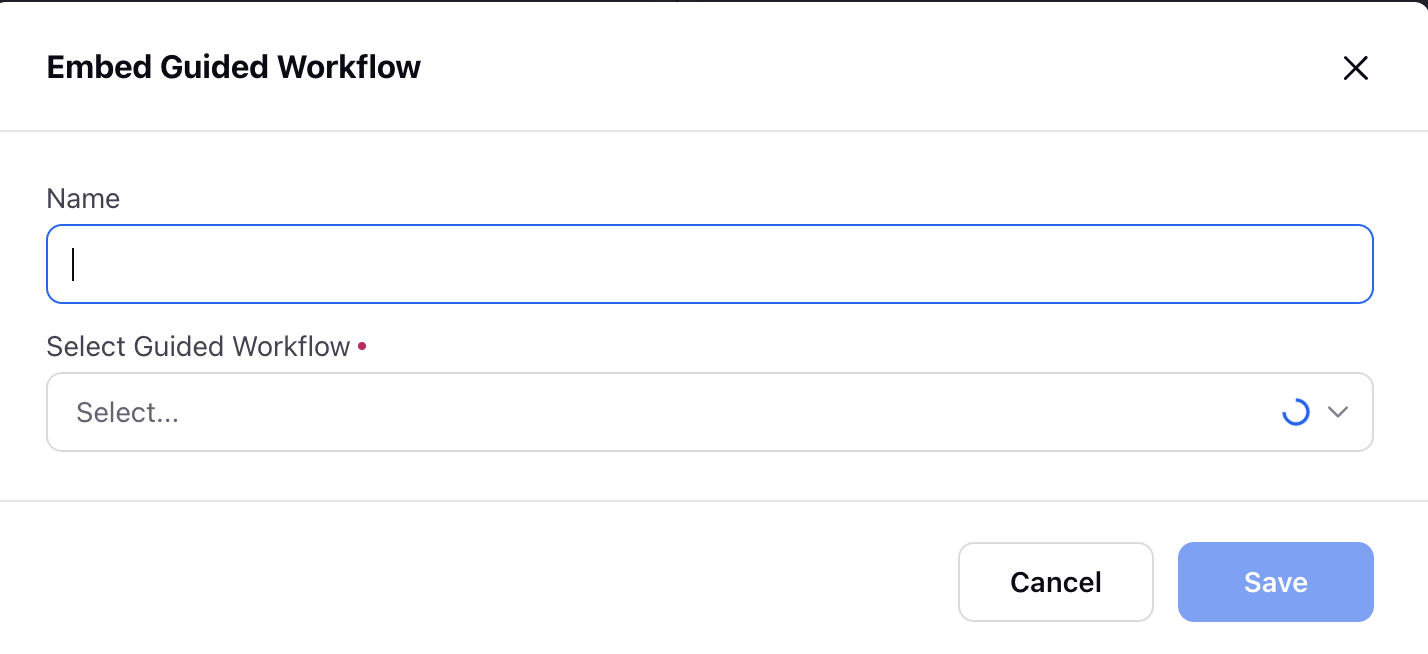
Embed Guided Workflow
This embeds another workflow inside the current workflow. All the variables that are being used in the embedded workflow, are available for use in the current workflow as well all the variables in the current workflow are available for use in the embedded workflow. This is majorly used in case you want a certain part workflow to be called in multiple workflows, Example - Making an authentication guided workflow and calling it at the start of every workflow. For effectively using this feature, it is recommended that declaring the same variable for the same variable across workflows in a partner. This helps because you can use the variable directly without setting any values as the value is pre-set from the previous workflow.
Custom Field Actions
There is an option of modifying case/profile custom fields with variables or static data. We use set custom field option when you want to set custom field with static value and copy field option when you want the custom field to be set with a dynamic value. It is important to note that this node will start giving errors in case there is no profile or case context while guided workflow execution. This is majorly used when a use case requires modification of custom fields for further processing of the case.

Create Support Case
This node is majorly used in case of guided workflow being integrated with sprinklr communities. This helps in creating support cases that are raised inside Sprinklr communities which in turn creates an Email case in the sprinklr platform. There is an option of tagging variables as well as selecting via which account you want to create the email case. For tagging custom fields, you need to add the custom field name in the variable name. This node will be deprecated soon. Users can now create support cases via the Create Support Ticket action available in the Execute Action node.

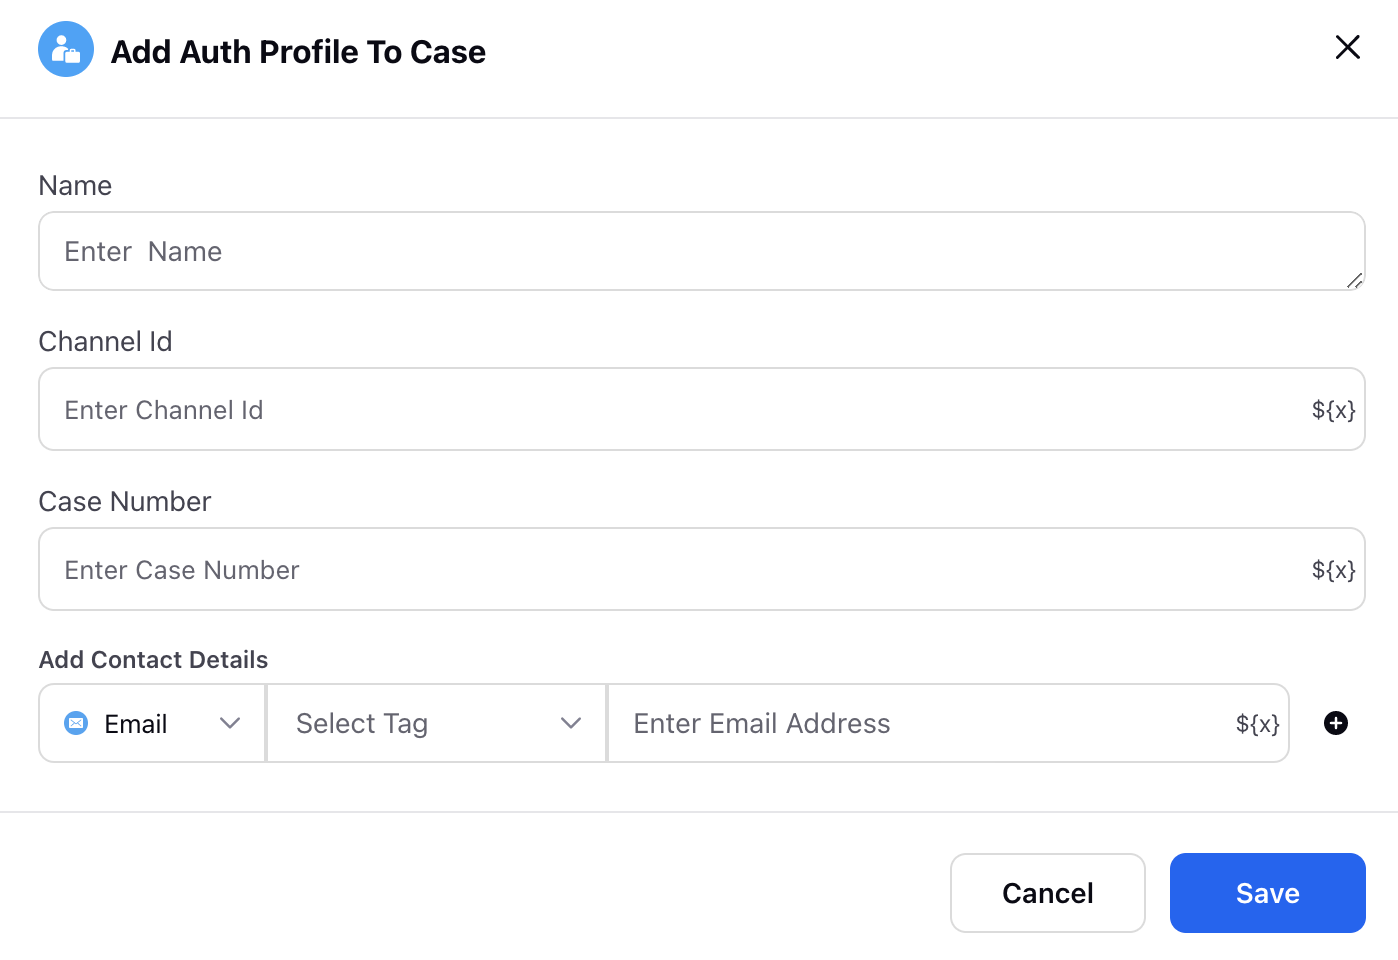
Add Auth Profile to Case
This node helps in merging a particular auth profile with any case. Channel ID is the identifier that is used for an auth profile. Using this node, you can mention the channel id of the auth profile and the case id of the case to which you want the auth profile to be merged. There is also the option of adding contact details like email and phone number with tag to the auth profile which is being added to the case that is mentioned.
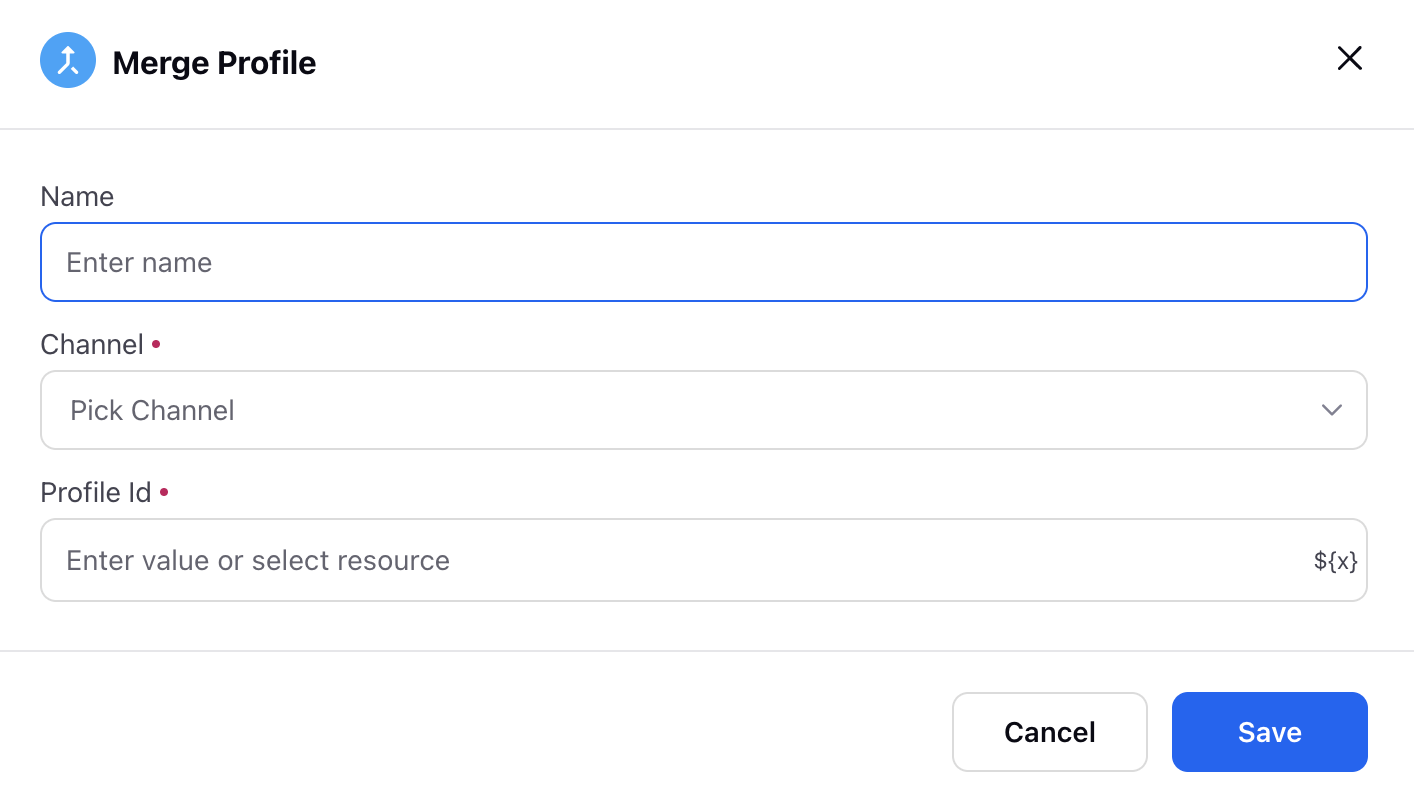
Merge Profile
In case it has been identified by the guided workflow that there are 2 profiles of a single customer, there is an option of configuring merging of profiles via this node. This will help merge 2 different profiles of different channels into one. There is an option of selecting the channel as well as mentioning the variable where the asset ID of the new profile is mentioned.
Add to suppression list
The Suppression List is a crucial tool for managing customer preferences, specifically for those who have requested not to be contacted again. This list helps ensure that businesses respect customer wishes by preventing future communications, such as calls or marketing messages, to individuals who have opted out. It is often referred to as a Do Not Disturb (DND) list and can be updated through After-Call Work (ACW) tasks.
Key Features
Contact Opt-Out Management: The suppression list holds contact details of customers who have expressed their desire not to be contacted. This ensures compliance with customer preferences and privacy regulations.
ACW Updates: Agents can update the suppression list by filling in After-Call Work (ACWs) forms when customers request not to be contacted further.
Business Use Case:
In a customer conversation, if a customer indicates that they no longer wish to be contacted, agents are responsible for marking these customers on the suppression list. This action helps avoid sending future marketing communications or promotional offers, ensuring that businesses respect customer privacy and preferences while maintaining a positive brand reputation.

Execute Action
You can utilize this node to apply a macro, fetch all attachments linked to a case in Care Console and display them within the "Attach File" component of the Screen node, or add the pending cases/calls to the holding queue.
You can also create an email case with an inbound message and mandatory fields populated upfront. Additionally, case-level custom fields can be easily tagged by selecting the desired custom fields.
Below this node, you'll find two branches: one for "Success" and the other for "Failure."

Create External Workflow URL
Create external workflow URL nodes helps in creating workflow URLs that can be shared with customers. There is an option of selecting the guided workflow for which URL needs to be generated. There is an option of sending values of some variables to the URL. There are options for deciding link validity time period. Selecting the type of URL shortener. Finally the URL that is saved in a variable that is defined in the node. There is also the option of sending case context/ profile context, etc to the guided workflow URL.
You can select a “Guided Workflow Application” to ensure a consistent branding experience for your customers(including fonts and colors). By selecting the appropriate Guided Workflow Application, the chosen application’s branding will be applied to your dynamic, customer-facing workflows.

Generate Document
This node enables the generation of Word documents to capture specific details filled out in the screen input components of a guided workflow. To add this node, you are required to upload a template Word file containing predefined placeholders. Subsequently, you can define Placeholder Value Mapping, specifying which data from the guided workflow should be extracted and seamlessly inserted into the Word document.
Upon execution of this node, a Word document is generated. The placeholders defined earlier are automatically populated with corresponding data retrieved from the guided workflow, ensuring accurate and customized documentation based on the information provided in the workflow.

Create customer session
The Customer Session node is used to create temporary sessions for displaying specific data to a customer for a set period, such as 15 minutes. This session allows an agent to show particular data to the customer for the defined duration and automatically remove it afterward.
The session can be defined on various entities like the user profile, case, or message. For example, you can link the session to a specific user ID and set the session to last for one minute, using the defined variable as the reference for managing the customer session.

Configure Business hour check
With the Business Hour Check node available in Guided Workflows you can easily configure a business hour check to ensure cases are transferred to the appropriate departments based on the current time and the predefined business hours in the system.
To add a business hours node in your guided workflow , follow the below steps :
In your Guided workflows, select the Business Hours node.

Enter your node name
Select Business hours. This determines the business hours for which this check will be conducted.
Define the variable name for Is in business hour. This field allows you to assign a variable that will hold either "true" or "false" depending on whether the case is received during business hours or outside of business hours. This variable can be used later to make decisions or handling cases accordingly.
Enter Start of Next Business Hours (optional). This field lets you assign a variable that holds the date and time for the beginning of the next business hour. This variable is useful for informing customers about the upcoming start of business hours, scheduling messages to be sent at the start of the next business hour, or setting up callbacks for that time.
Enter End of Next Business Hours (optional). This variable is used when we intend to inform the customer about the end time of our business hours for the next time slot.
Define Start of Business Hour Format. This variable lets you choose the format of Start of Business Hour variable to be returned. Following are the formats options available with example-
Time Day Date and Month - 10 AM, Monday, 12th June
Date Month and Time - 12th June, 10 AM
Day and Time - Monday 10 AM
Timestamp - This will return in epoch format
Click Save to save the defined Business Hours node.

![]() Note:
Note:
Before using, you need to define the values for the Business Hours field separately on Sprinklr platform under All settings > Manage Customer > Business Hour > Create business hour. Once configured, they will be available in a dropdown menu for selection.
Business Hour node bifurcates into two paths- In Business Hours and Not In Business hours. The case takes respective path as per the business hour and the time of the call.

Assign Cases to Queues
Using the Assign Case Node in Guided Workflows you can dynamically assign incoming cases to designated work queues, resulting in optimized agent allocation and streamlined case distribution.
To add an assign agent node in your guided workflow , follow the below steps :
In your Guided workflows, select the Assign Case node.
.png "assign case node 1.png")
Enter the Node name .
Select the work queue you would like the case to be routed to. You can also select the resource selector to dynamically choose the work queue by specifying the work queue ID.

Create Child Cases from Case
You have the ability to easily create sub-cases through a guided workflow interface using the sub-case event within the Execute action node.
To create the sub case using the execute action node, follow the below steps -
In your Guided workflows, select the Execute Action node.

Provide a name for your node and select the event as Create Child Case.
Specify the Output variable Name , Exception Name and click save.
The Output Variable Name is the variable that shall store the child-case details and can also be used in the workflow.
The Exception Name is error variable that captures and stores the error details in the event of failure.
This would lead to the guided workflow being split into two paths - success (when the sub case is successfully created) and failure(when an error occurs). Define the paths as per your use case.


Assign Agent
The Assign Agent node is used to route a case directly to a specific agent or work queue. You can configure the assignment statically by selecting a fixed agent or queue, or dynamically by passing the agent ID or queue ID using variables or resource selectors. This node is essential for automating case assignment logic—such as assigning high-priority cases to specific agents or routing cases to regional queues based on predefined conditions—ensuring efficient and accurate case handling.

Select Queue: You can select the Work Queue either statically (by choosing a queue from the dropdown) or dynamically by enabling the toggle and passing the Work Queue ID. This allows flexible case routing based on your use case.
Preferred Agent: You can define a preferred agent for case assignment within a work queue. If multiple agents are available but you want a specific agent to be prioritized—especially for high-priority or escalated cases—you can set their Agent ID manually (in double quotes) or dynamically using the resource selector. This ensures the preferred agent is considered first during assignment.
Try and Assign only to Preferred agent: To make the above field work, you need to enable this toggle before saving the node.
Set Skills
Whenever a case is created in Sprinklr, you can attach a Skill Required criterion to ensure it is routed to the most appropriate agent. For example, if a case originates from India and requires English language support, you can specify that only agents with the “India” location skill and “English” language skill should be eligible.

Name: You can give any name to your node.
Manage Required Skills: It allows you to configure agent skill requirements dynamically on a case. It provides four dropdown options to manage skills associated with the case:
Merge: Adds the new skills to the existing ones. For example, if a case already has a “Language” skill and you add “Product Knowledge” with a proficiency score of 50, both will be retained
Set: Replaces all existing skills with the newly defined ones in this node.
Unset: Removes all skills currently attached to the case.
Remove: Allows selective removal of specific skills (e.g., remove "Product Knowledge" but retain "Language").
Dynamic Skill and Proficiency: You can enable this toggle to configure the above skills dynamically.
Proficiency Score: You can define a minimum proficiency score (e.g., 50) to ensure the agent meets the required expertise level. This helps in accurate and efficient case assignment based on agent capabilities
Set Priority Rank
When multiple agents (e.g., 10) already have active cases and are part of the same work queue, but additional cases are pending assignment, the system uses the Priority Rank to determine assignment order. Cases with a higher priority rank are assigned first, regardless of their creation time, ensuring that more critical issues are handled ahead of lower-priority ones.

Name: You can give a name to your node.
Priority Rank: You can define the priority rank in a numerical value set between 1-100. A higher priority rank indicates greater urgency, meaning the case will be assigned first regardless of when it was created.