Customer Authentication
Updated
If a user is already logged in on the components, you can securely pass their authenticated details to the chat for user authentication. This process is called pre‑authentication. With pre‑authentication, you don’t need to request customer details again during the chat flow. Instead, you can reuse the information already provided in the workflow.
Information Passed During Pre‑Authentication
In pre-authentication, you can pass the following information securely from the website to the chat:
id (required)
First Name
Last Name
Profile Image Url
Phone Number
Email
Hash
Hash Creation Time
Example Implementation
<script>window.sprChatSettings = window.sprChatSettings || {};window.sprChatSettings = {"appId": "app_600000609","user": {"id": "1234","firstName": "John","lastName": "Doe","profileImageUrl": "https://example.com/profilePic.jpg","phoneNo": "9876543210","email": "John.Doe@example.com","hash": "f30c3b0835ecd378a134c74bce8cea866df8c5b6e12a8c219c9bb288f7270e22","hashCreationTime": "1738141500"}}</script><script>…</script>
Parameters
Parameter | Required/Optional | Description |
id | Required | Unique identifier for the user. |
firstName | Optional | User’s first name. |
lastName | Optional | User’s last name. |
profileImageUrl | Optional | URL of the user’s profile picture. |
phoneNo | Optional | User’s phone number. |
Optional | User’s email address. | |
hash | Required | HMAC SHA‑256 signature generated using user details and API key. |
hashCreationTime | Optional | The timestamp (in epoch milliseconds) when the hash associated with the user was generated.
The hash will only be valid within the configured expiry window (default: ±1 minute), after which it will be considered invalid. |
![]() Note: The chat user signature (or hash) should always be generated on the backend server. This will make sure that the API Key is not exposed to third parties and overall security is not compromised.
Note: The chat user signature (or hash) should always be generated on the backend server. This will make sure that the API Key is not exposed to third parties and overall security is not compromised.
How to Generate Chat User Signature or Hash?
The chat user signature is a generated HMAC or Hash-based Message Authentication Code. For HMAC, Sprinklr uses the sha256 hash function. You need to generate HMAC for the following "string" of user details. User details are concatenated to form a string, separated by underscore as shown below:
userId_firstName_lastName_profileImageUrl_phoneNo_email_hashCreationTimeSo for the above example, the string for which you need to generate the chat user signature would be:
12345_John_Doe_https://example.com/profilePic.jpg_9876543210_John.Doe@example.com_1754565280133
Sample code to generate HMAC is given below for following languages - PHP, Python 2.7, Python 3.6.1, Ruby (Rails), Java, Node.js
What if some values are missing when generating the chat user signature?
Let’s say you don’t have profileimageUrl. In this case, insert an underscore _ in its place within the string. This means there will be two consecutive underscores (__) after lastName to represent the missing detail.
For example:
userId_firstName_lastName__phoneNo_email_hashCreationTime
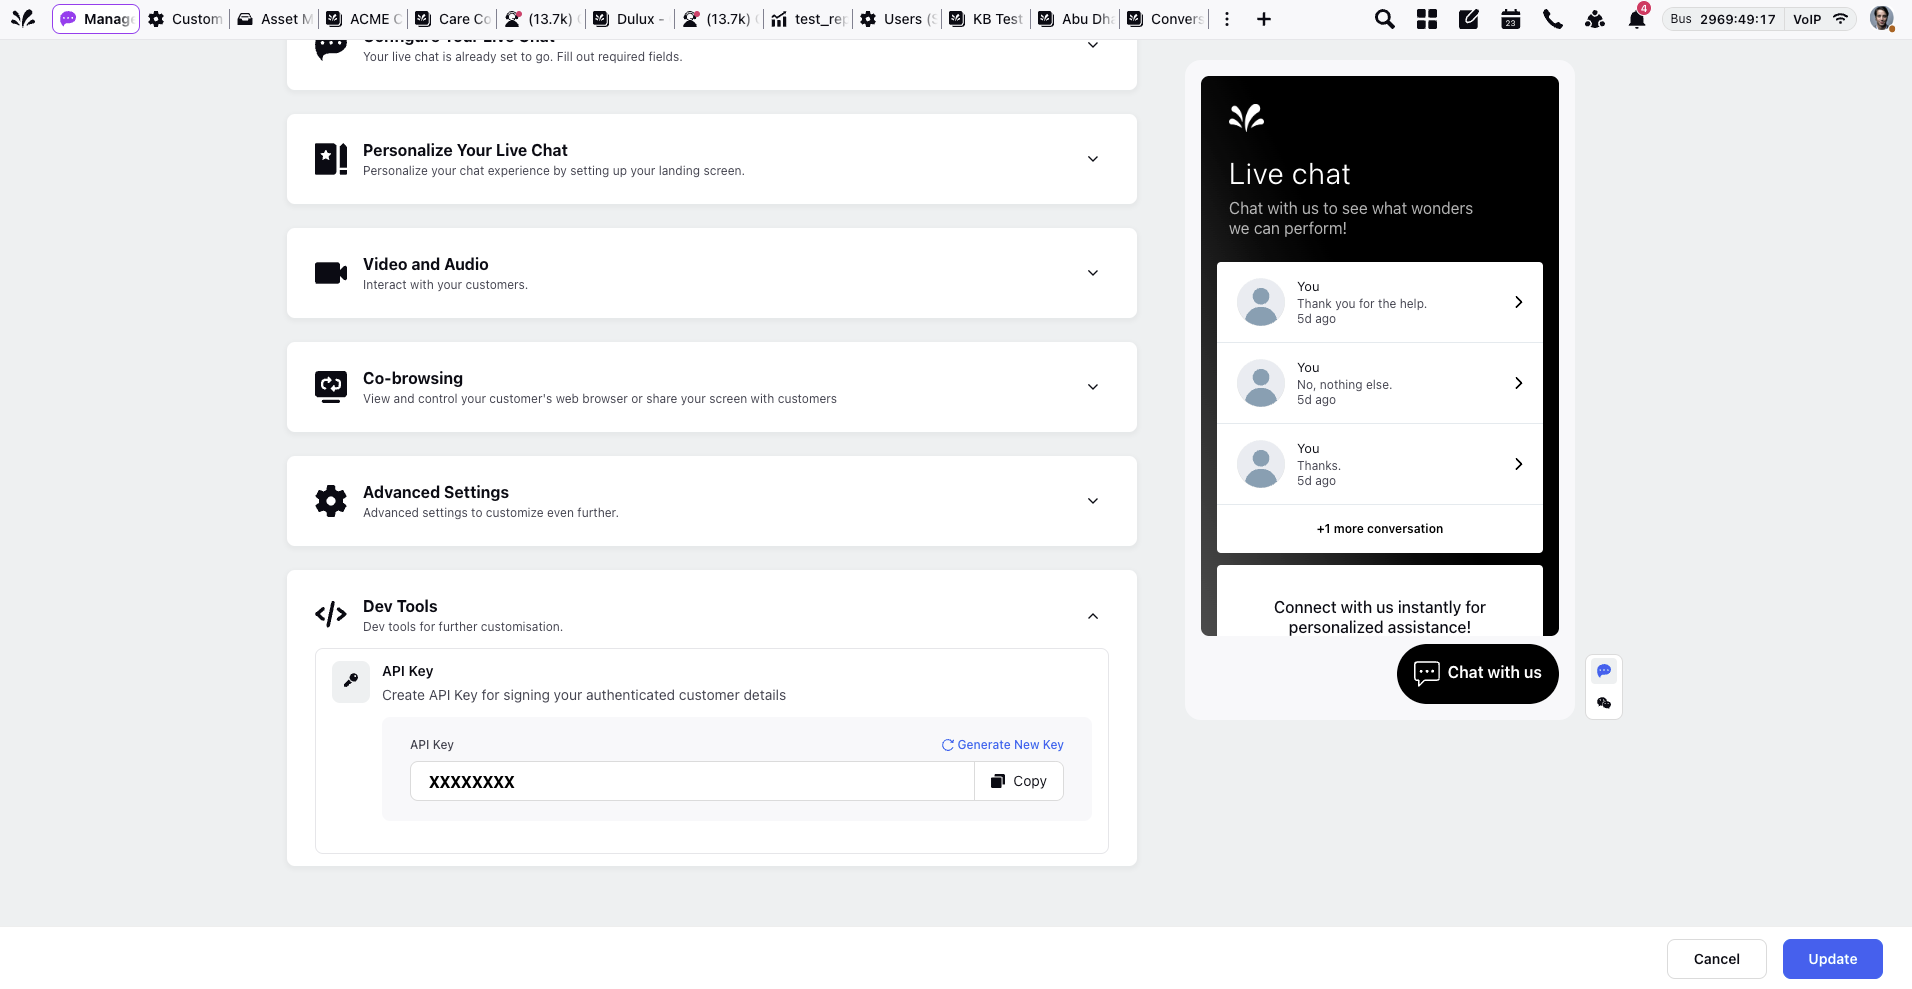
Where to find the secret key?
The secret key can be found in the Live Chat Builder under the Dev Tools section, as shown below:
Sample Code for Chat User Signature Generation
This section provides practical examples of how to generate a chat user signature using different programming languages.
PHP
$secretKey = "acf32e61-14a6-291b-3a1b-cc8854134ea1";$userId = "12345";$firstName = "John";$lastName = "Doe";$profileImageUrl = "https://example.com/profilePic.jpg";$phoneNo = "9876543210";$email = "John.Doe@example.com";$hashCreationTime = "1738141500";$userDetails = $userId . "_" . $firstName . "_" . $lastName . "_" . $profileImageUrl . "_" . $phoneNo . "_" . $email . "_" . $hashCreationTime;$userHash = hash_hmac('sha256', $userDetails, $secretKey);echo "User Hash: " . $userHash;
Run the above PHP code online [updated - 11 Jan 2022]:
https://replit.com/@AbhishekPriyam/HMACPHPExamplev2#main.php
Python 2.7/3.6.1
import hmacimport hashlibuserId = "12345"firstName = "John"lastName = "Doe"profileImageUrl = "https://example.com/profilePic.jpg"phoneNo = "9876543210"email = "John.Doe@example.com"hashCreationTime = "1738141500"userDetails = userId + "_" + firstName + "_" + lastName + "_" + profileImageUrl + "_" + phoneNo + "_" + email + "_" + hashCreationTimedef create_sha256_signature(key, data):byte_key = key.encode()data = data.encode()return hmac.new(byte_key, data, hashlib.sha256).hexdigest()userHash = create_sha256_signature("acf32e61-14a6-291b-3a1b-cc8854134ea1", userDetails)print("User Hash:", userHash)
Run the above Python code online:
https://replit.com/@AbhishekPriyam/HMACPythonExample#main.py
Ruby (Rails)
require 'openssl'key = 'acf32e61-14a6-291b-3a1b-cc8854134ea1'userId = "12345"firstName = "John"lastName = "Doe"profileImageUrl = "https://example.com/profilePic.jpg"phoneNo = "9876543210"email = "John.Doe@example.com"hashCreationTime = "1738141500"userDetails = userId + "_" + firstName + "_" + lastName + "_" + profileImageUrl + "_" + phoneNo + "_" + email + "_" + hashCreationTimedigest = OpenSSL::Digest.new('sha256')userHash = OpenSSL::HMAC.hexdigest(digest, key, userDetails)puts "User Hash: #{userHash}"
Run the above Ruby code online:
https://repl.it/@AbhishekPriyam/HMACRubyExample
Java
import javax.crypto.Mac;import javax.crypto.spec.SecretKeySpec;import java.security.NoSuchAlgorithmException;import java.security.InvalidKeyException;import javax.xml.bind.DatatypeConverter;class Main {public static void main(String[] args) {try {String key = "acf32e61-14a6-291b-3a1b-cc8854134ea1";String hashCreationTime = "1738141500";String message = "12345_John_Doe_https://example.com/profilePic.jpg_9876543210_John.Doe@example.com_" + hashCreationTime;Mac hasher = Mac.getInstance("HmacSHA256");hasher.init(new SecretKeySpec(key.getBytes(), "HmacSHA256"));byte[] hash = hasher.doFinal(message.getBytes());System.out.println((DatatypeConverter.printHexBinary(hash)).toLowerCase());} catch (NoSuchAlgorithmException e) {} catch (InvalidKeyException e) {}}}
Run the above Java code online:
https://repl.it/@AbhishekPriyam/HMACJavaExample
C#
using System;using System.Security.Cryptography;using System.Text;class Program{static void Main(string[] args){string key = "acf32e61-14a6-291b-3a1b-cc8854134ea1";string userId = "12345";string firstName = "John";string lastName = "Doe";string profileImageUrl = "https://example.com/profilePic.jpg";string phoneNo = "9876543210";string email = "John.Doe@example.com";string hashCreationTime = "1738141500";string userDetails = $"{userId}_{firstName}_{lastName}_{profileImageUrl}_{phoneNo}_{email}_{hashCreationTime}";using (HMACSHA256 hmac = new HMACSHA256(Encoding.UTF8.GetBytes(key))){byte[] hashBytes = hmac.ComputeHash(Encoding.UTF8.GetBytes(userDetails));string userHash = BitConverter.ToString(hashBytes).Replace("-", "").ToLower();Console.WriteLine(userHash);}}}
Run the above Java code online:
https://replit.com/@RoshanDash1/HmacCExample
Node.js
var crypto = require('crypto');var key = 'acf32e61-14a6-291b-3a1b-cc8854134ea1';var hashCreationTime = '1738141500';var userDetails = '12345_John_Doe_https://example.com/profilePic.jpg_9876543210_John.Doe@example.com_' + hashCreationTime;var hash = crypto.createHmac('sha256', key).update(userDetails).digest('hex');console.log(hash);
Run the above Node.js code online:
https://replit.com/@AbhishekPriyam/HMACNodeExample#index.js
Example CONTRACT
To ensure the Live Chat widget is available on every page of your website, add the following code to the footer section. This setup is required only once, so you do not need to call this script repeatedly.
<script>window.sprChatSettings = window.sprChatSettings || {};window.sprChatSettings = {"appId": "xxx",}</script><script>(function(){var t=window,e=t.sprChat,a=e&&!!e.loaded,n=document,r=function(){r.m(arguments)};r.q=[],r.m=function(t){r.q.push(t)},t.sprChat=a?e:r;var o=function(){var e=n.createElement("script");e.type="text/javascript",e.async=!0,e.src="https://prod4-live-chat.sprinklr.com/api/livechat/handshake/widget/"+t.sprChatSettings.appId,e.onerror=function(){t.sprChat.loaded=!1},e.onload=function(){t.sprChat.loaded=!0};var a=n.getElementsByTagName("script")[0];a.parentNode.insertBefore(e,a)};"function"==typeof e?a?e("update",t.sprChatSettings):o():"loading"!==n.readyState?o():n.addEventListener("DOMContentLoaded",o)})()</script>
Validating Chat User Signature
Check the expected chat user signature for any authenticated user passed inside chat settings.
1. Click the New Page (+) icon to open the Launchpad.
2. Under Sprinklr Service, go to Listen > Brand Care > Live Chat Care.

3. On the Live Chat Applications page, locate the Live Chat application for which you want to validate the chat user signature.
4. Click the three-dots (![]() ) icon next to the application name.
) icon next to the application name.
5. Select Validate User Hash.
6. In the Validate User Hash window, enter the following details:
Field | Description |
User ID | A unique identifier for the user. |
Profile Image URL | The URL pointing to the user's profile image. |
First Name | The user's first name. |
Last Name | The user's last name. |
Phone Number | The user's contact phone number, including country code. |
The user's email address. | |
Hash Creation Time | The timestamp (in epoch milliseconds) when the hash associated with the user was generated. The hash will only be valid within the configured expiry window (default: ±1 minute), after which it will be considered invalid. |
7. Once done, click Copy Generated Hash.

Guest User Flow
The below script will be there always, you need not call again.
![]() Note: This script must be included only once. Do not call or duplicate it again.
Note: This script must be included only once. Do not call or duplicate it again.
<script>window.sprChatSettings = window.sprChatSettings || {};window.sprChatSettings = {"appId": "xxx",}</script><script>(function(){var t=window,e=t.sprChat,a=e&&!!e.loaded,n=document,r=function(){r.m(arguments)};r.q=[],r.m=function(t){r.q.push(t)},t.sprChat=a?e:r;var o=function(){var e=n.createElement("script");e.type="text/javascript",e.async=!0,e.src="https://prod4-live-chat.sprinklr.com/api/livechat/handshake/widget/"+t.sprChatSettings.appId,e.onerror=function(){t.sprChat.loaded=!1},e.onload=function(){t.sprChat.loaded=!0};var a=n.getElementsByTagName("script")[0];a.parentNode.insertBefore(e,a)};"function"==typeof e?a?e("update",t.sprChatSettings):o():"loading"!==n.readyState?o():n.addEventListener("DOMContentLoaded",o)})()</script>
Scenario 1: Login refreshes the website automatically
When a guest user logs in to the website and becomes a logged-in user and refresh happens automatically, then you need to do the following after the user logs in to your website:
![]() Note: The following code snippet is a script.
Note: The following code snippet is a script.
<script>window.sprChatSettings = window.sprChatSettings || {};window.sprChatSettings = {"appId": "xxxx","user": {"id": "12345","firstName": "John","lastName": "Doe","profileImageUrl": "https://example.com/profilePic.jpg","phoneNo": "9876543210","email": "John.Doe@example.com","hashCreationTime": "1738141500","hash": "f30c3b0835ecd378a134c74bce8cea866df8c5b6e12a8c219c9bb288f7270e22"}}</script><script>…</script>
When the website is launched with the already logged in user, add the following code on webpage load:
<script>window.sprChatSettings = window.sprChatSettings || {};window.sprChatSettings = {"appId": "xxxx","user": {"id": "12345","firstName": "John","lastName": "Doe","profileImageUrl": "https://example.com/profilePic.jpg","phoneNo": "9876543210","email": "John.Doe@example.com","hashCreationTime": "1738141500","hash": "f30c3b0835ecd378a134c74bce8cea866df8c5b6e12a8c219c9bb288f7270e22"}}</script><script>…</script>
As soon as the user logs out from the website, you need to call this function:
![]() Note: This is not a script, but a function/SDK that must be called to remove user details.
Note: This is not a script, but a function/SDK that must be called to remove user details.
window.sprChat('updateUserSettings');Scenario 2: Login doesn’t refresh the website automatically
When a guest user logs in to your website and becomes a logged-in user and refresh doesn't happen, then you need to do the following after user logs in in your website:
![]() Note: This is a function provided by the SDK, not a script. This function must be called to send user details.
Note: This is a function provided by the SDK, not a script. This function must be called to send user details.
window.sprChat('updateUserSettings', {"user": {"id": "12345", //mandatory"firstName": "John", //optional, can send empty"lastName": "Doe", //optional, can send empty"profileImageUrl": "https://example.com/profilePic.jpg", //optional, can send empty"phoneNo": "9876543210", //optional"email": "John.Doe@example.com", //optional"hashCreationTime": "1738141500", //mandatory → include timestamp used in hash generation"hash": "f30c3b0835ecd378a134c74bce8cea866df8c5b6e12a8c219c9bb288f7270e22" //mandatory → you need to generate your own},});
When the website is launched with the already logged in user, add the following code on webpage load:
<script>window.sprChatSettings = window.sprChatSettings || {};window.sprChatSettings = {"appId": "xxxx","user": {"id": "12345","firstName": "John","lastName": "Doe","profileImageUrl": "https://example.com/profilePic.jpg","phoneNo": "9876543210","email": "John.Doe@example.com","hashCreationTime": "1738141500","hash": "f30c3b0835ecd378a134c74bce8cea866df8c5b6e12a8c219c9bb288f7270e22"}}</script><script>…</script>
As soon as user logs out from the website, you need to call this function.
![]() Note: This is not a script, but a function/SDK that must be called to remove user details.
Note: This is not a script, but a function/SDK that must be called to remove user details.
window.sprChat('updateUserSettings');