Step 1: Data Management
Updated
This step helps you define the knowledge sources that power your Agent Copilot’s responses. By connecting internal content such as Knowledge Base articles, documents, historical cases, and guided workflows, you enable the Copilot to generate relevant, contextual answers.
This configuration is part of the "Manage your Copilot" series and lays the foundation for intelligent, data-driven interactions.
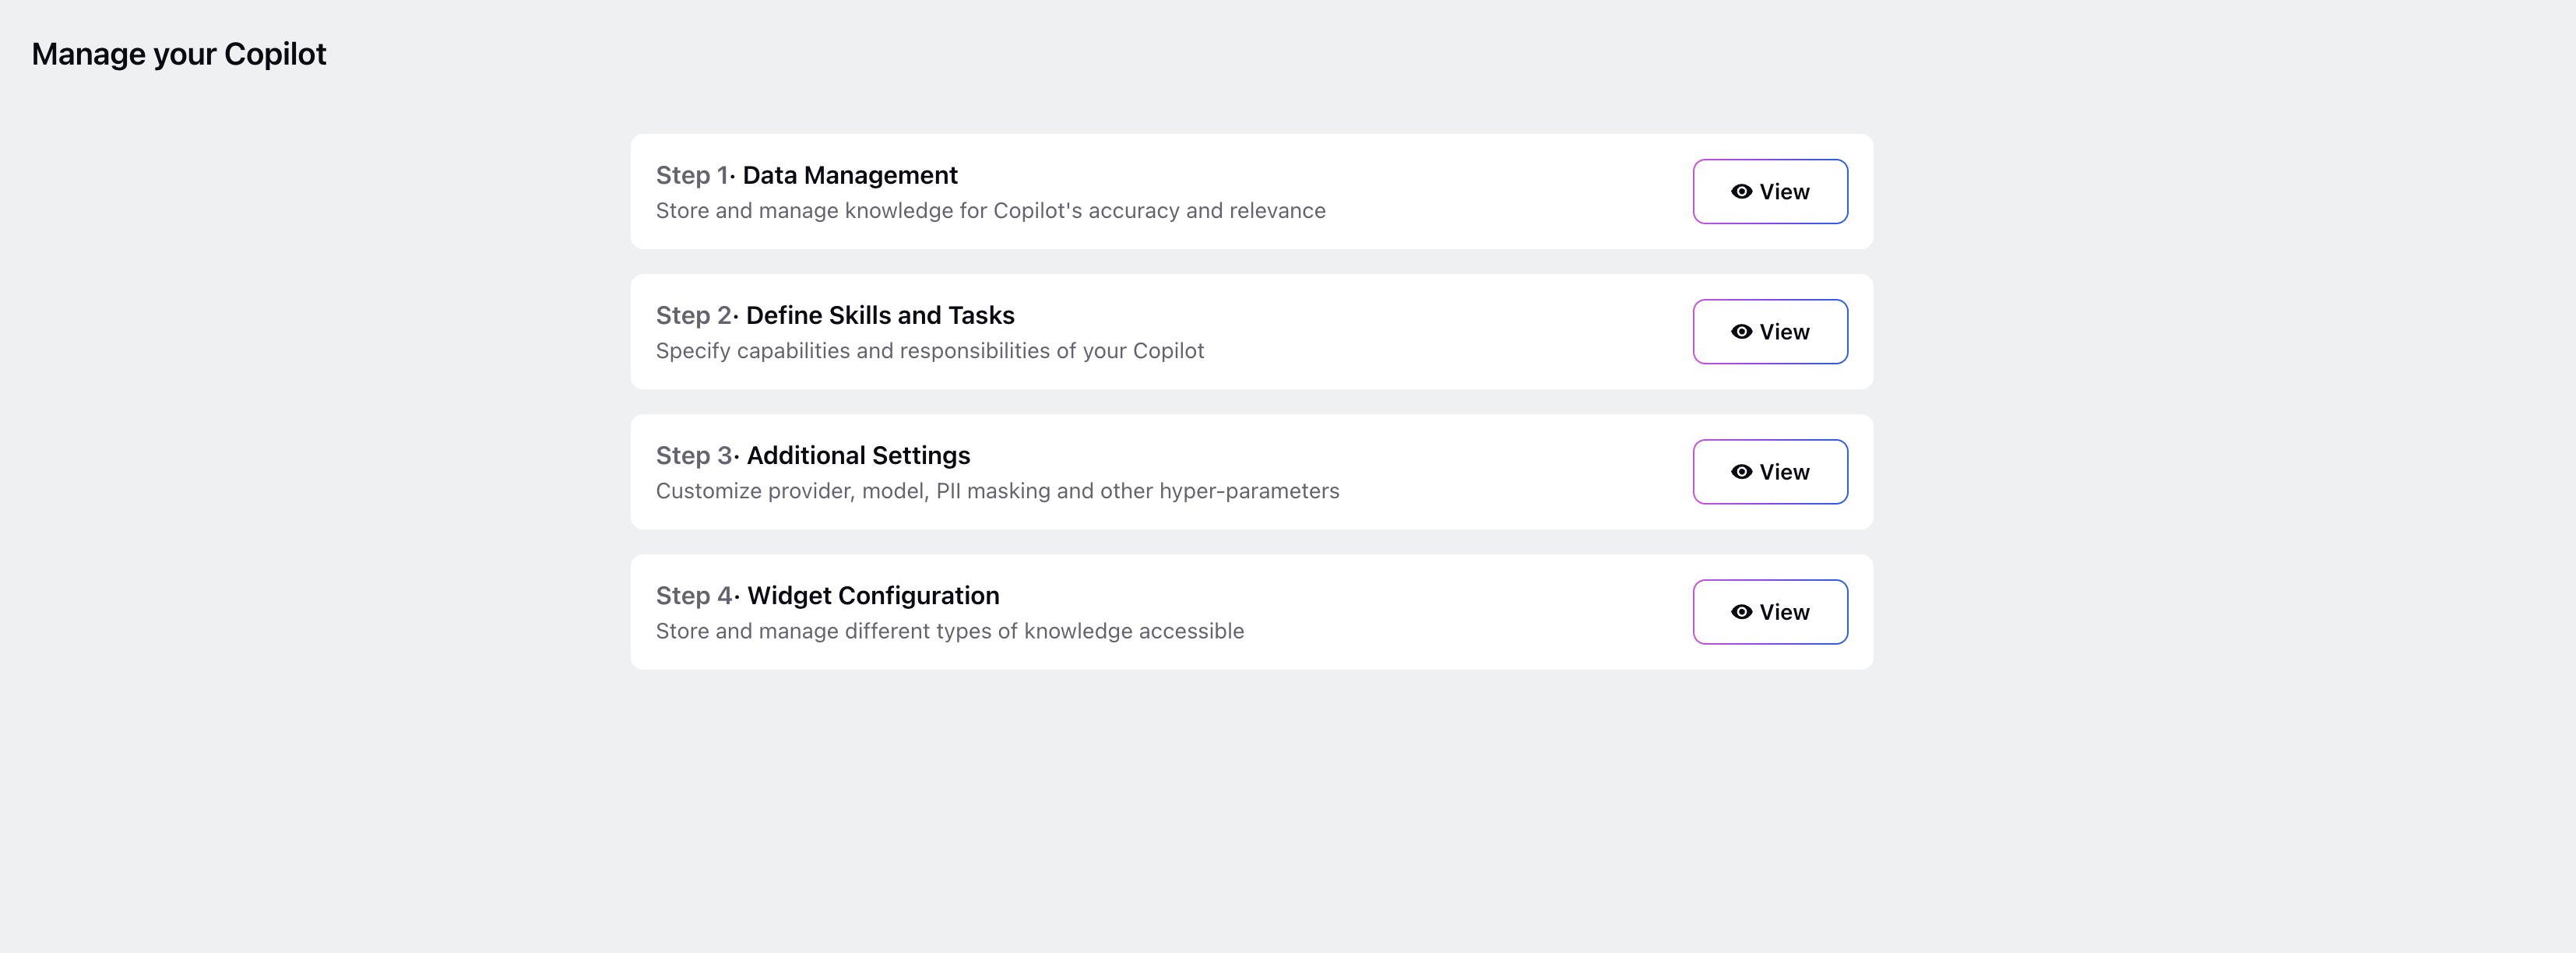
To begin, click the View button inside the Step 1: Data Management tab. The Training Content screen will open, displaying available training content types.

Add Knowledge Base Content
Knowledge Base content is one of the core training sources for your Agent Copilot. You can add specific articles or categories and configure them for auto-sync and filtering.
Follow these steps to configure Knowledge Base content:
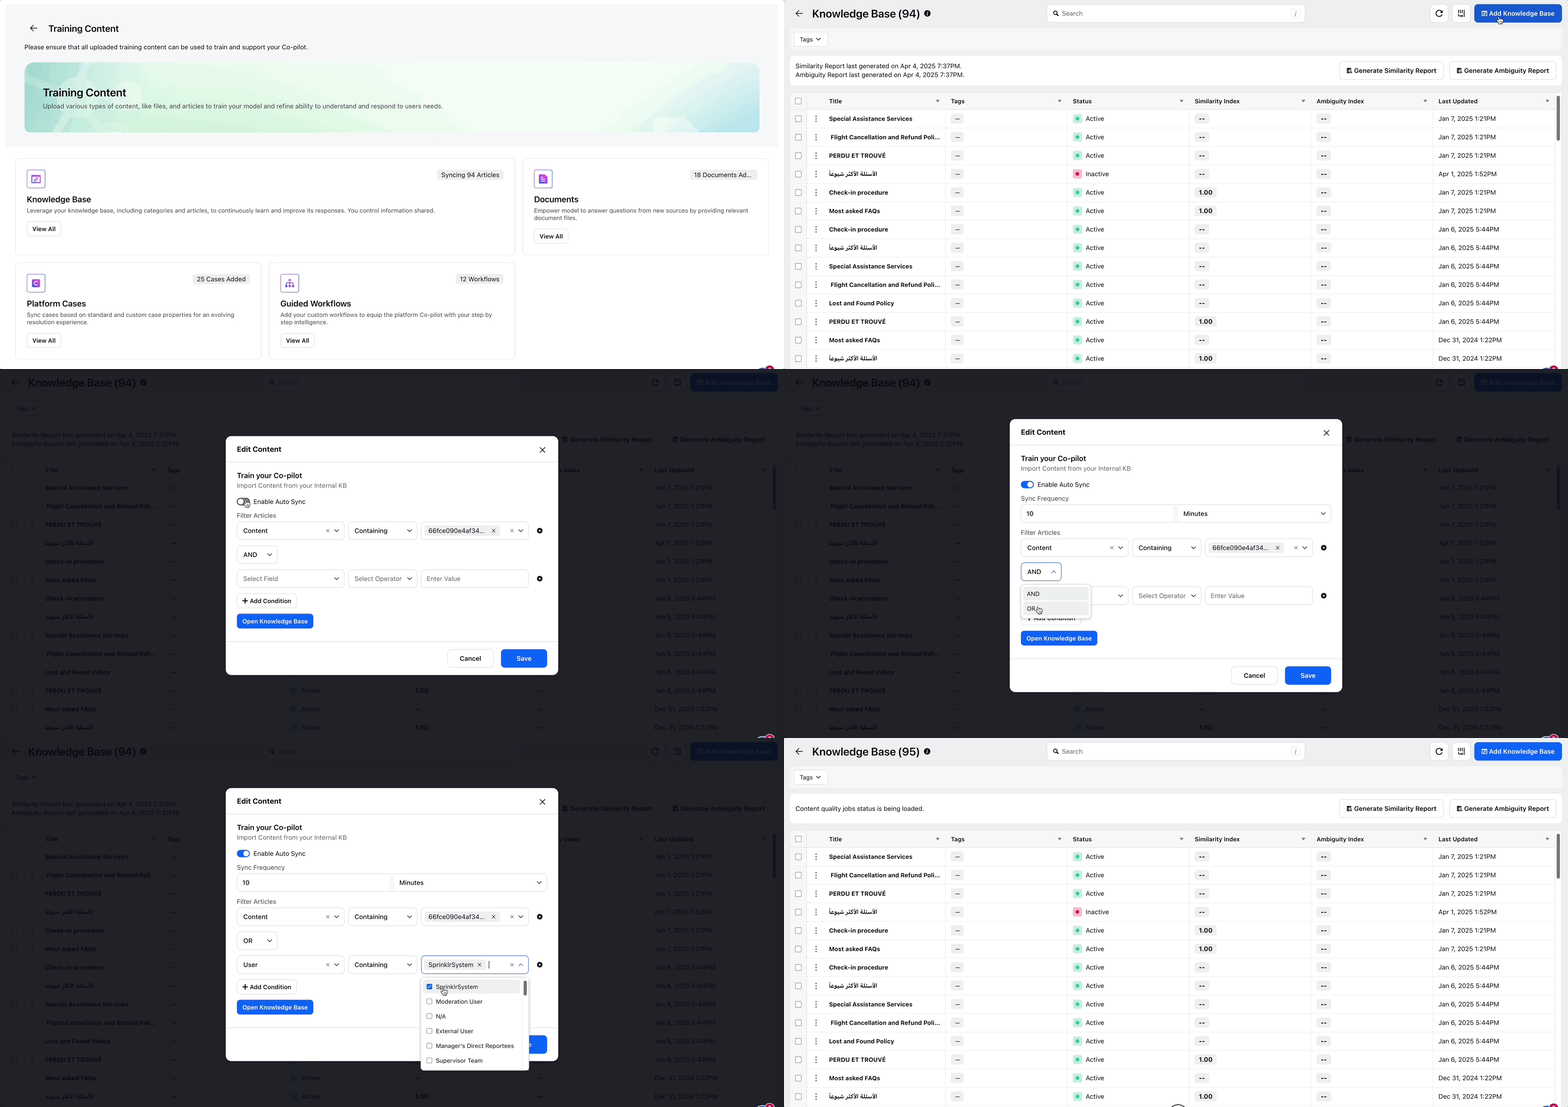
1. In the Knowledge Base section, select View All. The Knowledge Base Record Manager opens.
2. Click Add Knowledge Base in the top-right corner.
3. On the Edit Content screen, configure the following:
Enable Auto Sync: Toggle this setting to automatically synchronize content. Set the sync frequency in minutes, days, or weeks.
Filter Articles: Apply filters based on system or custom fields. Use AND or OR logic to combine multiple filters.
4. Click Save to apply your settings.
Add Documents
Documents such as PDFs, slide decks, and internal documentation can also be used to train your Copilot. You can upload them directly through the interface.
Follow these steps to upload documents:
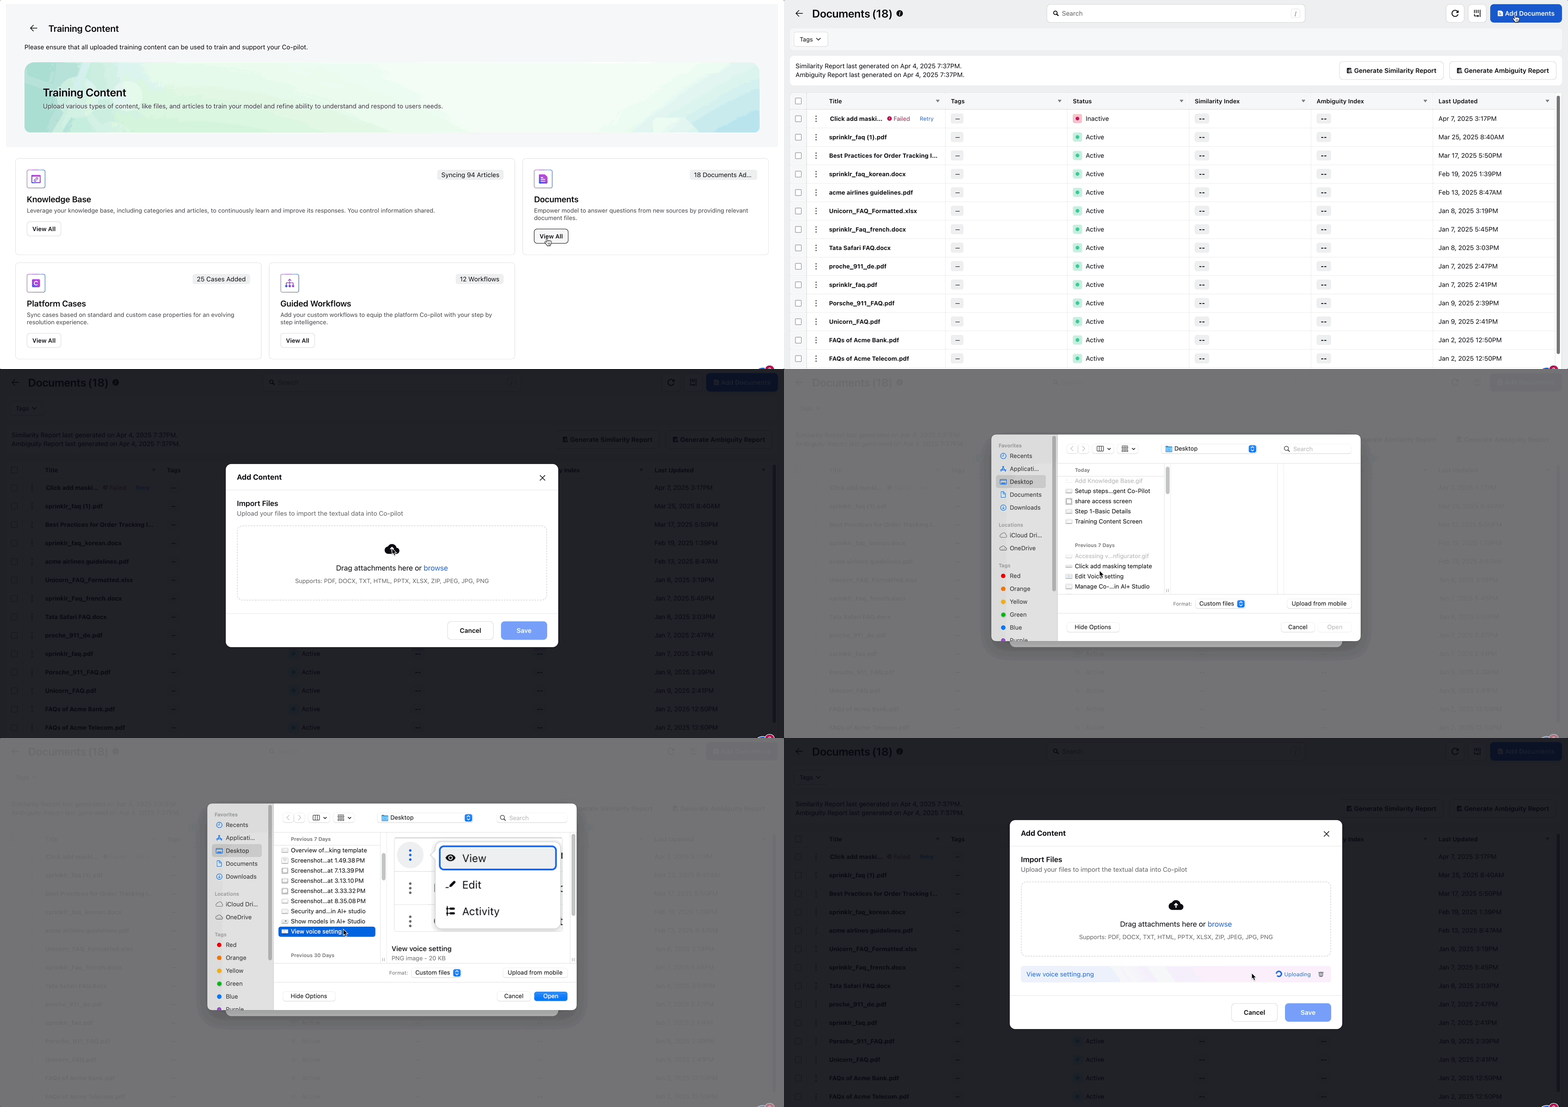
1. Click the View All button in the Documents section.
2. Select Add Document.
3. In the import window:
Drag and drop files into the Import File area, or
Click Browse to select files from your device or internal storage.
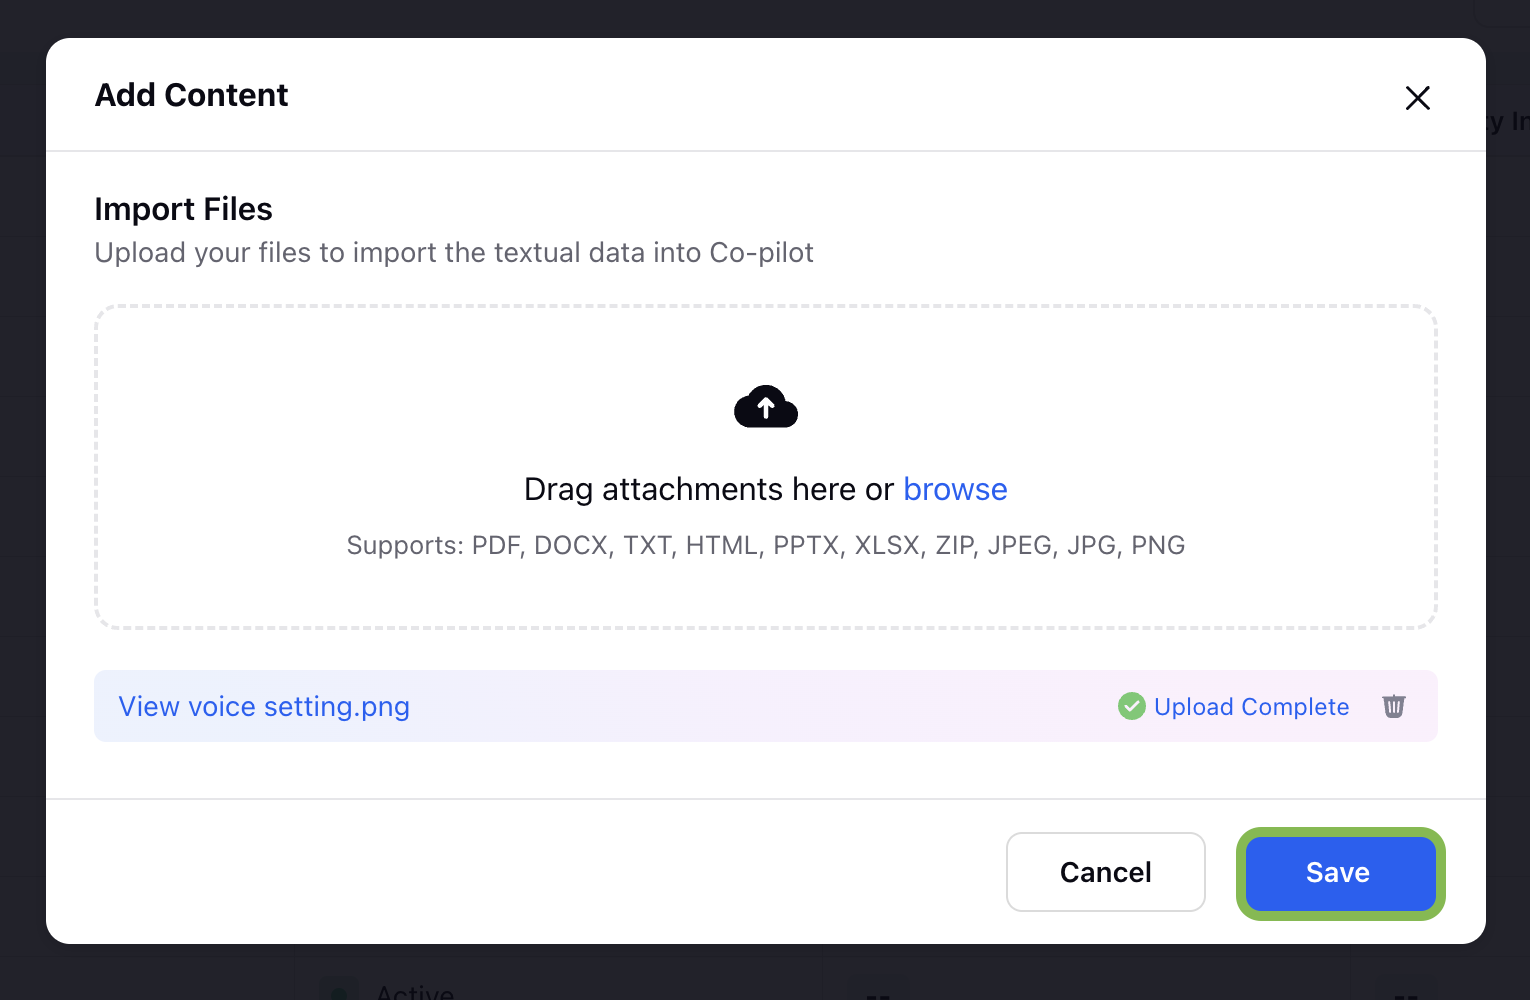
4. After the upload completes, click Save to add the documents to the training set.
Add Platform Cases
Training your Copilot on real platform cases allows it to understand customer interactions and respond with higher accuracy.
Follow these steps to add platform cases:
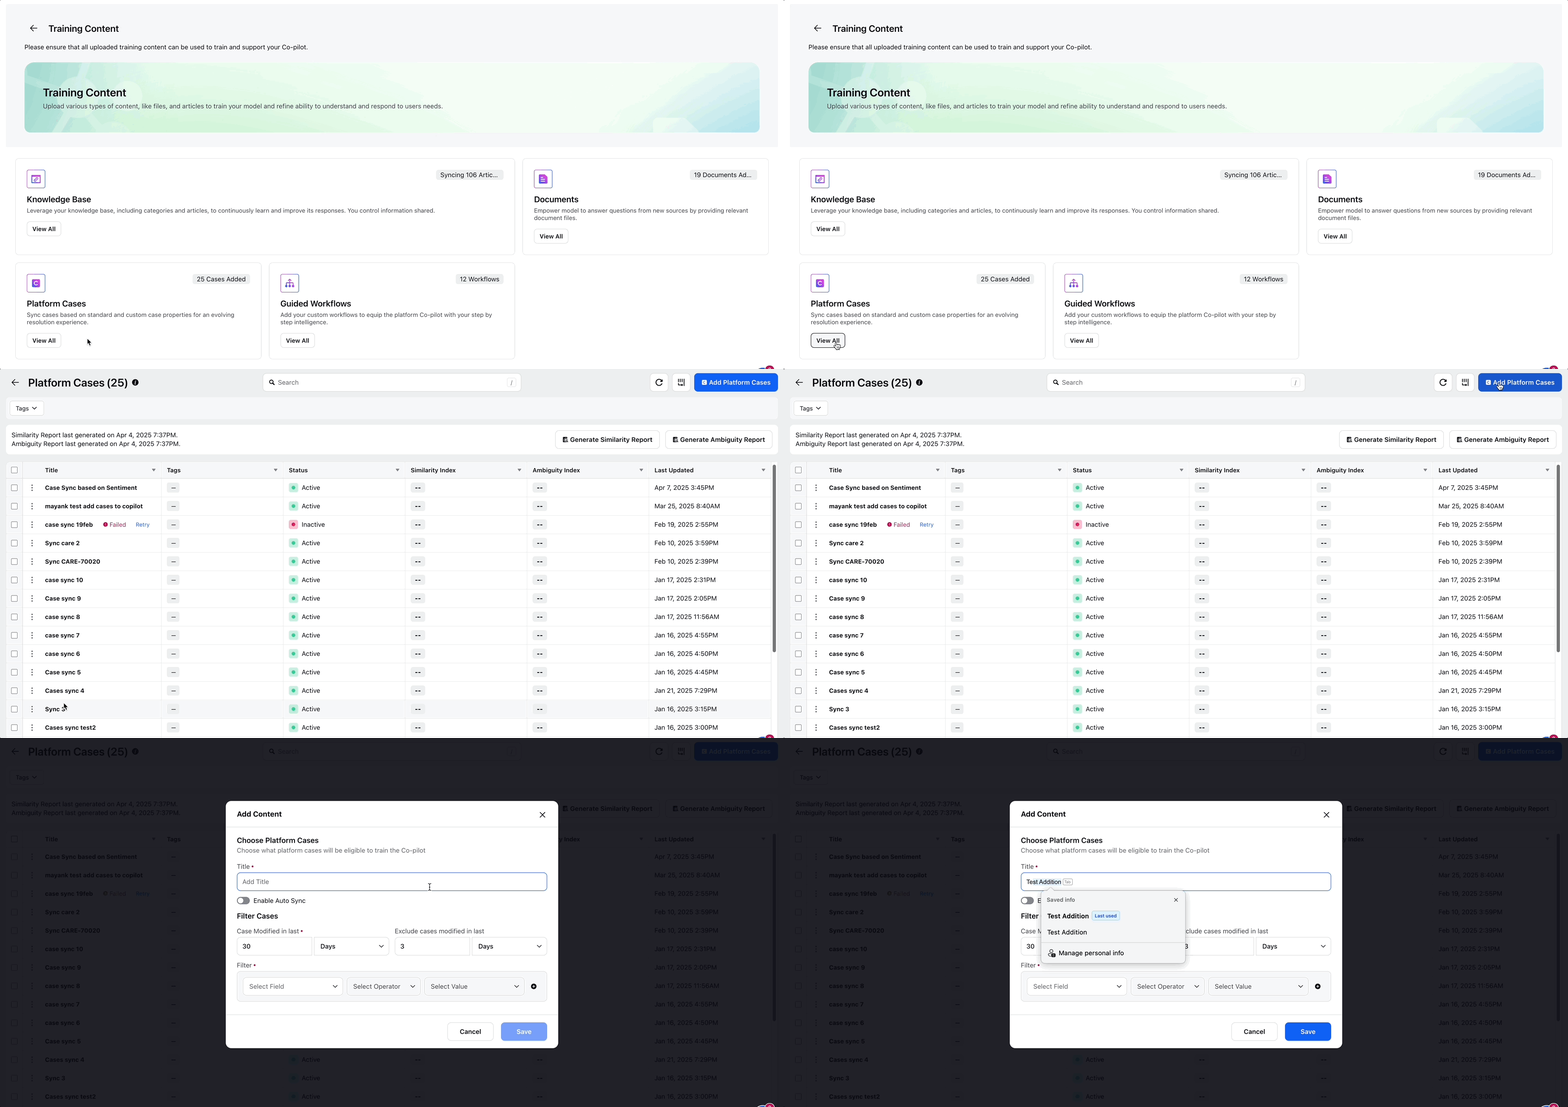
1. Click the View All button in the Platform Cases section.
2. Click Add Platform Cases.
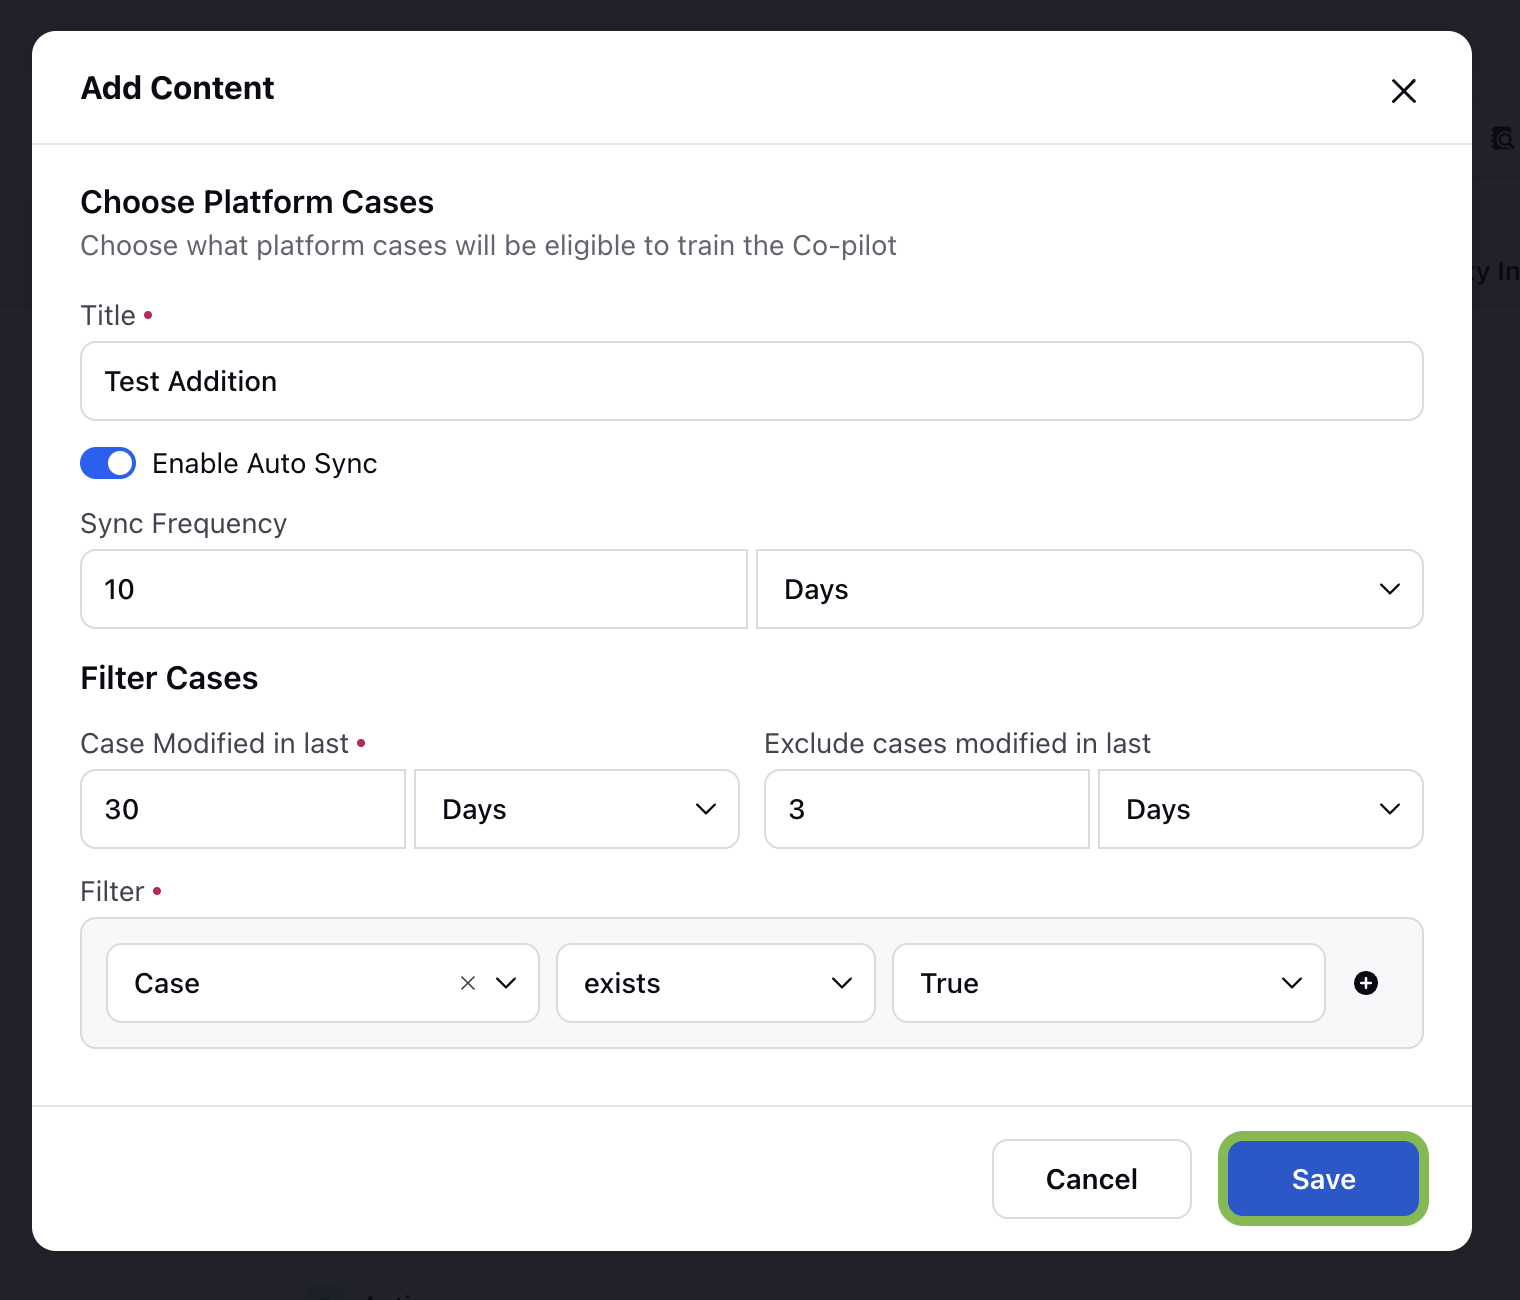
3. On the Choose Platform Cases screen, configure the following:
Title: Enter a name for the case group.
Enable Auto Sync: Toggle this setting to keep content updated automatically. Specify sync frequency in minutes, days, or weeks.
Filter Cases:
Case Modified in Last: Define a time window for recently updated cases.
Exclude Cases Modified in Last: Optionally exclude very recent updates.
Case Filters: Apply filters using case-level properties such as Case Number, Agent, Account, User, or Sentiment.
Select Field, Operator, and Value: Define conditional logic for each filter.
4. Click Save to add the selected platform cases.
Add Guided Workflows
Guided workflows simulate interactive steps and can be used to enhance your Copilot's task performance. Once indexed, the copilot will fetch the most relevant GW as an answer for the query asked by the user. The user can then click on “Execute Workflow” button to execute the GW as they normally do.
Best practices: Ensure that proper description is added in your indexed GW. A proper description includes the purpose and scenario when GW is used.
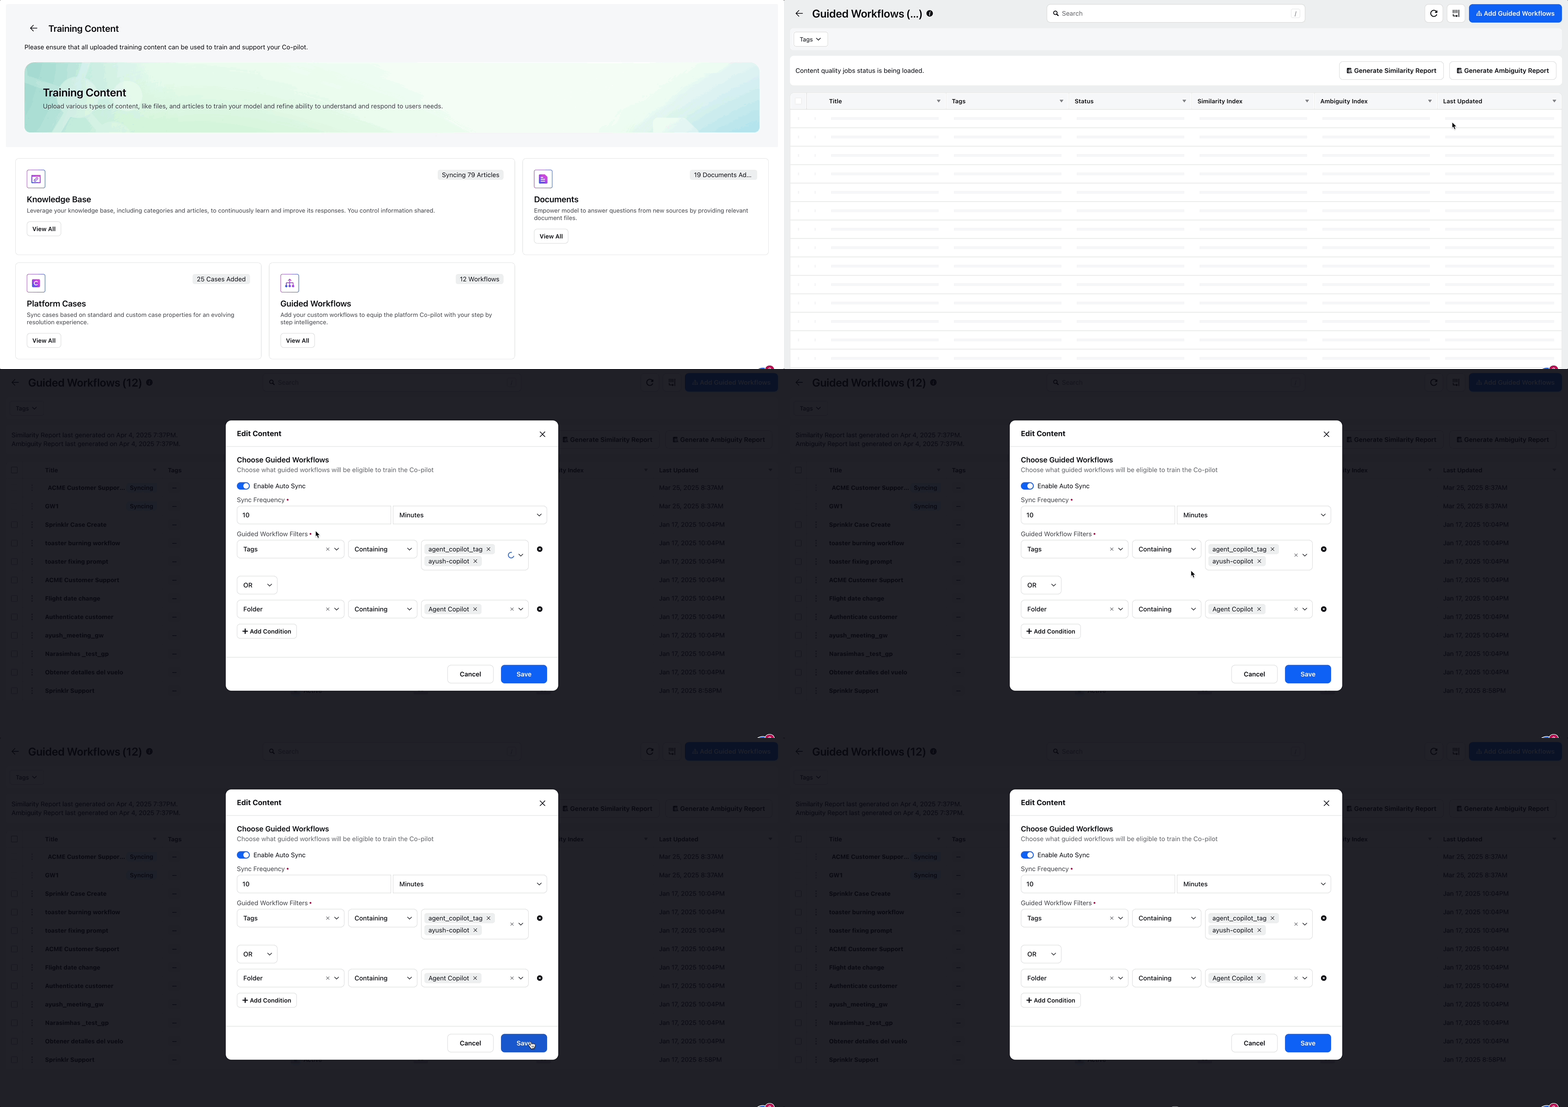
Follow these steps to add guided workflows:
1. Click the View All button in the Guided Workflow section.
2. Click the Add Guided Workflows button in the top right corner.
3. On the Choose Guided Workflows screen, configure the following:
Enable Auto Sync: Toggle this setting to keep workflows up to date. Enter the desired sync frequency.
Guided Workflow Filters:
Filter by Tags or Folders.
Click Add Condition to use multiple filters. Combine them using AND/OR logic based on your use case.
4. Click Save to finalize the configuration.
Add Canned Responses
Select the set of canned responses that will be available to train the Copilot. Only the chosen responses will be considered when generating suggestions or replies.

Follow these steps to add guided workflows:
1. Click the View All button in the Canned Responses section.
2. Click the Add Canned Responses button in the top right corner.
3. On the Choose Guided Workflows screen, configure the following fields:
Sync Frequency: Define how often canned responses are synchronized with the Copilot. Enter the desired sync frequency.
Canned Responses Filters: Use filters to control which canned responses are included in the training process. This allows you to narrow down responses based on specific attributes.
Type: Select the attribute or property of the canned response you want to filter on (for example, response category).
Operator: Define the comparison operator.
Select Values: Choose the exact values that match your filter criteria.
Click + Add Condition button to use multiple filters. Combine them using AND/OR logic based on your use case.
4. Click Save to finalize the configuration.
By managing each content source, you ensure your Agent Copilot is trained on the most relevant and up-to-date information available.
Next Steps