Import training datasets using FPDI
Updated
Brands desire greater authority over their Text Classification training datasets.
They prefer to have their data scientists create the training datasets themselves, determining which message variations to include, rather than relying on suggested messages from social and website sources. Additionally, they require the capability to reproduce their previous Text Classification models hosted outside Sprinklr by reimporting the training datasets without repeating the tagging work.
To achieve this objective, you can use FPDI (First-Party Data Ingestion) and Sprinklr AI Studio together. In this article, we will guide you through the complete process of constructing your AI models using messages imported from sources outside of Sprinklr.
What is AI Studio?
Sprinklr's AI Studio allows you to test the AI models to your satisfaction and provide feedback to customize the model as per your requirements.
Text Classifier classifies the messages matching a query or coming from selected sources without the need to implement any rule and maintain any keyword list. With the help of Text Classifier, you will be able to filter out the common terms when they are not relevant to your brand, product, or industry. Besides, Text Classifier is a must-have solution for those who want to group mentions that share a certain customized objective without creating any massive configuration for it.
First-Party Data Ingestion (FPDI)
Sprinklr offers the capability to import data in the form of an excel file, which can be viewed and integrated into Social Listening. This is made possible by the First-Party Data Ingestion (FPDI) feature, which simplifies the process of adding data from an excel file to the platform.
Importing data enables you to access advanced analytics based on your imported data. By using the imported data as a filter, you can customize your brand's dashboard and widget in the platform, thus allowing you to map your data for enhanced reporting.
Additionally, along with data import, you also get AI-powered reporting on your data, providing you with deep and actionable insights to help plan your business strategies.
Steps to import training datasets
To achieve your goal, it is essential to understand the roles of both FPDI and AI Studio –
FPDI: You will use FPDI to import your training dataset and additional messages for reviewing the behaviour of the AI model that you will create based on them.
AI Studio: You will use AI Studio to build your AI model within Sprinklr.
To ensure a successful import of a tagged training dataset without the need to recreate these datasets again, you need to follow the below steps in order –
Creating a custom field
Before using FPDI to import your training datasets, you need to create a custom field on a message level.
For single-select models, you should create a picklist custom field on a message level.
For multi-select models, you need a multi-select picklist custom field on a message level.
The values of the custom field should be mapped to the values you are using in your FPDI excel file. No more, no less.
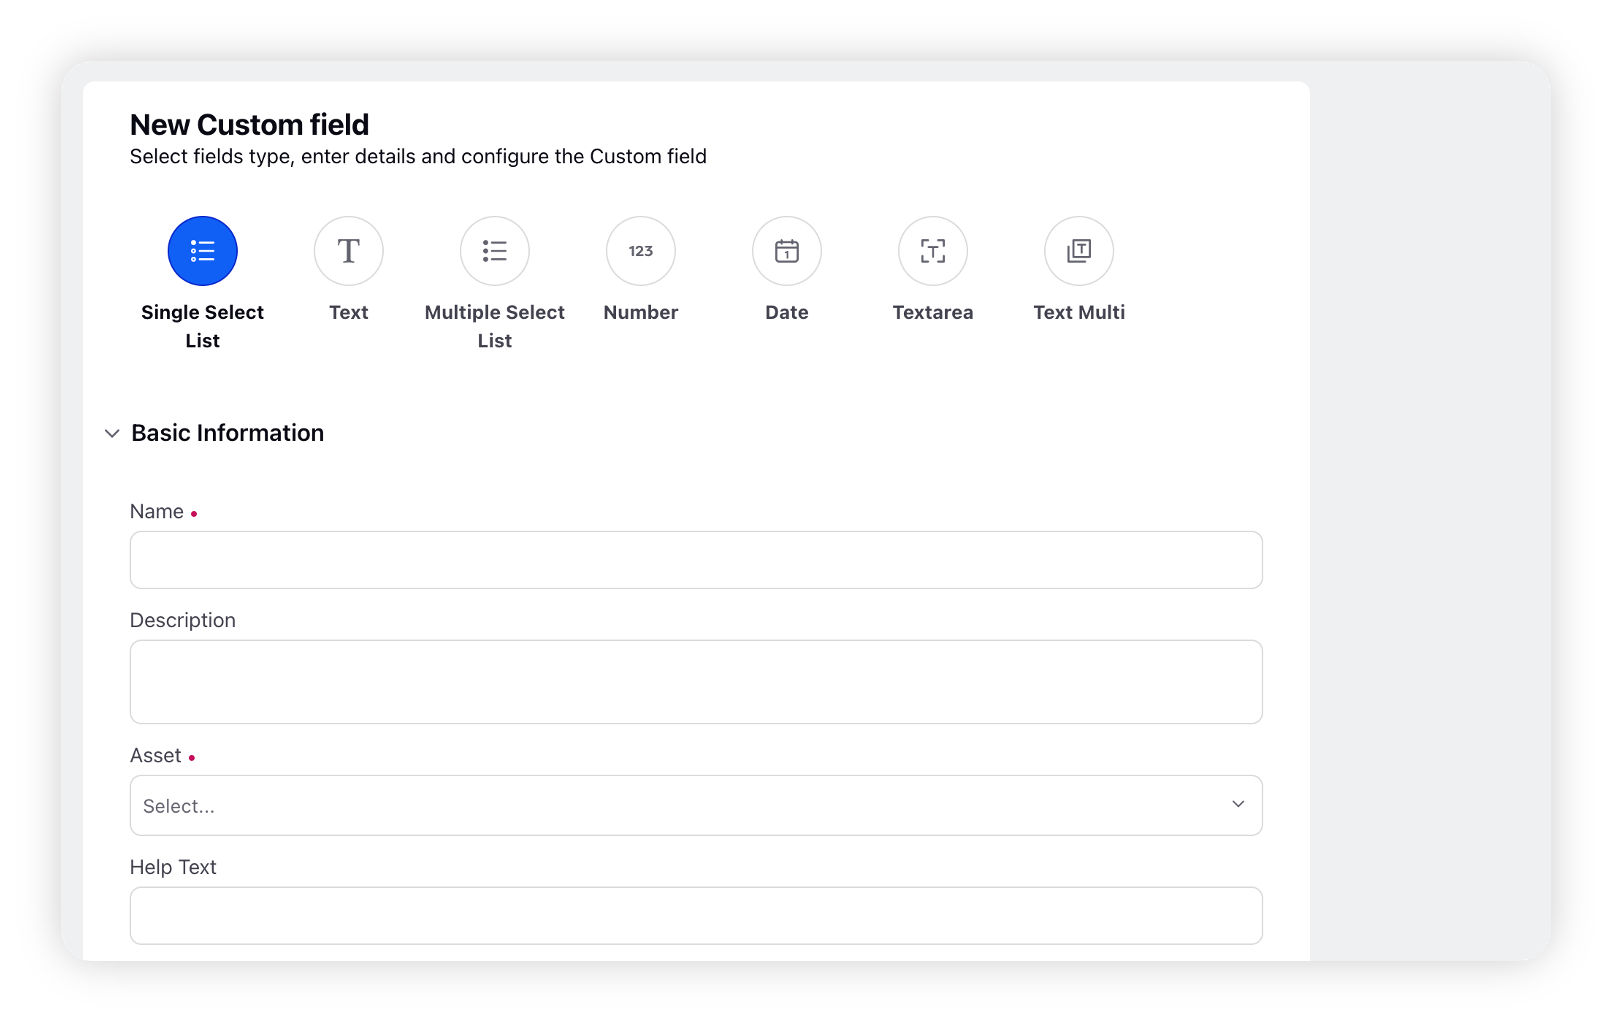
To know more about the steps to create a new Custom Field, refer to this article – Create Custom Fields for AI Studio.
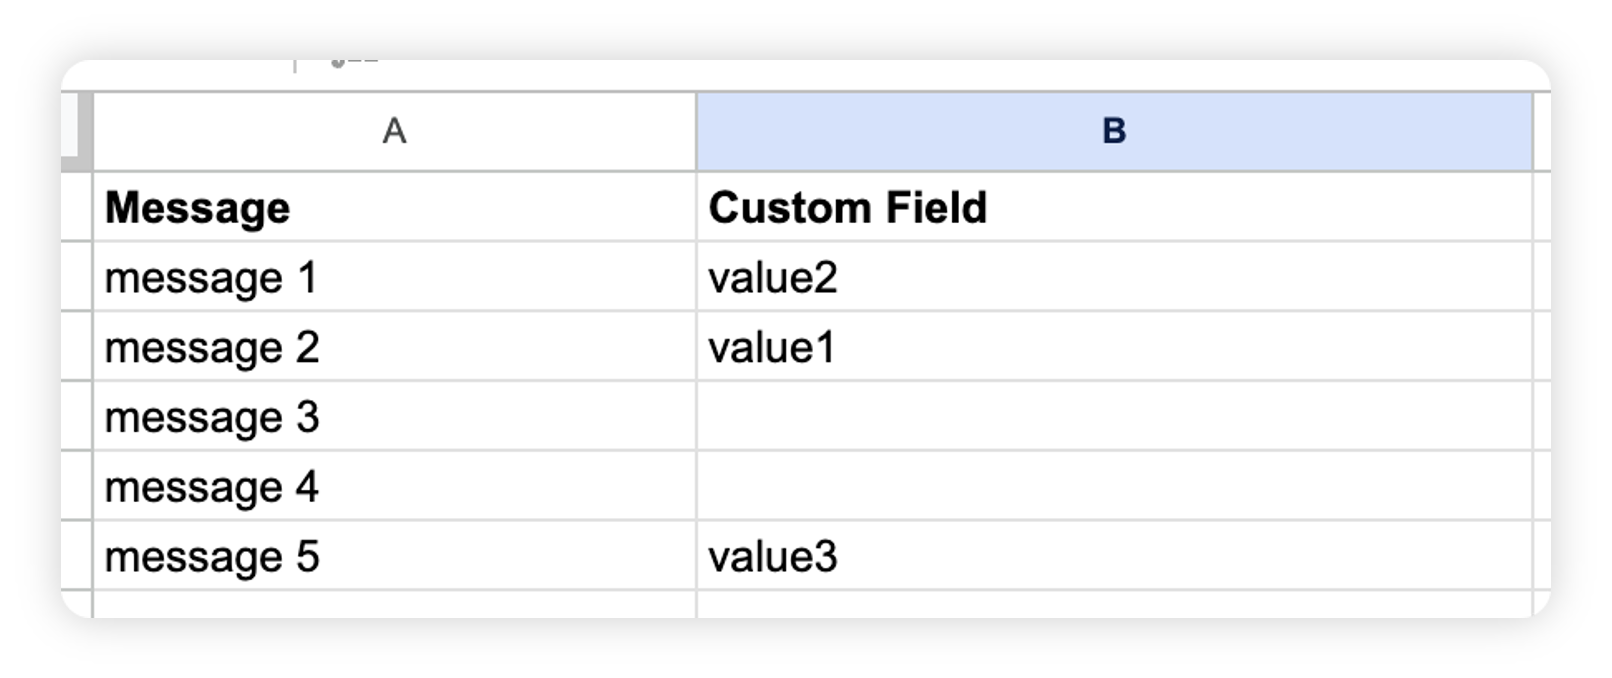
How to build a FPDI file
You need to Build an excel sheet with your older training dataset with 2 columns: Message and Custom Field Values.
For a single select model, you need one value in the second row per message.
For a multi-select model, where every message may be mapped to two or more values of the custom field, you can put custom field values separated by a semicolon (;).
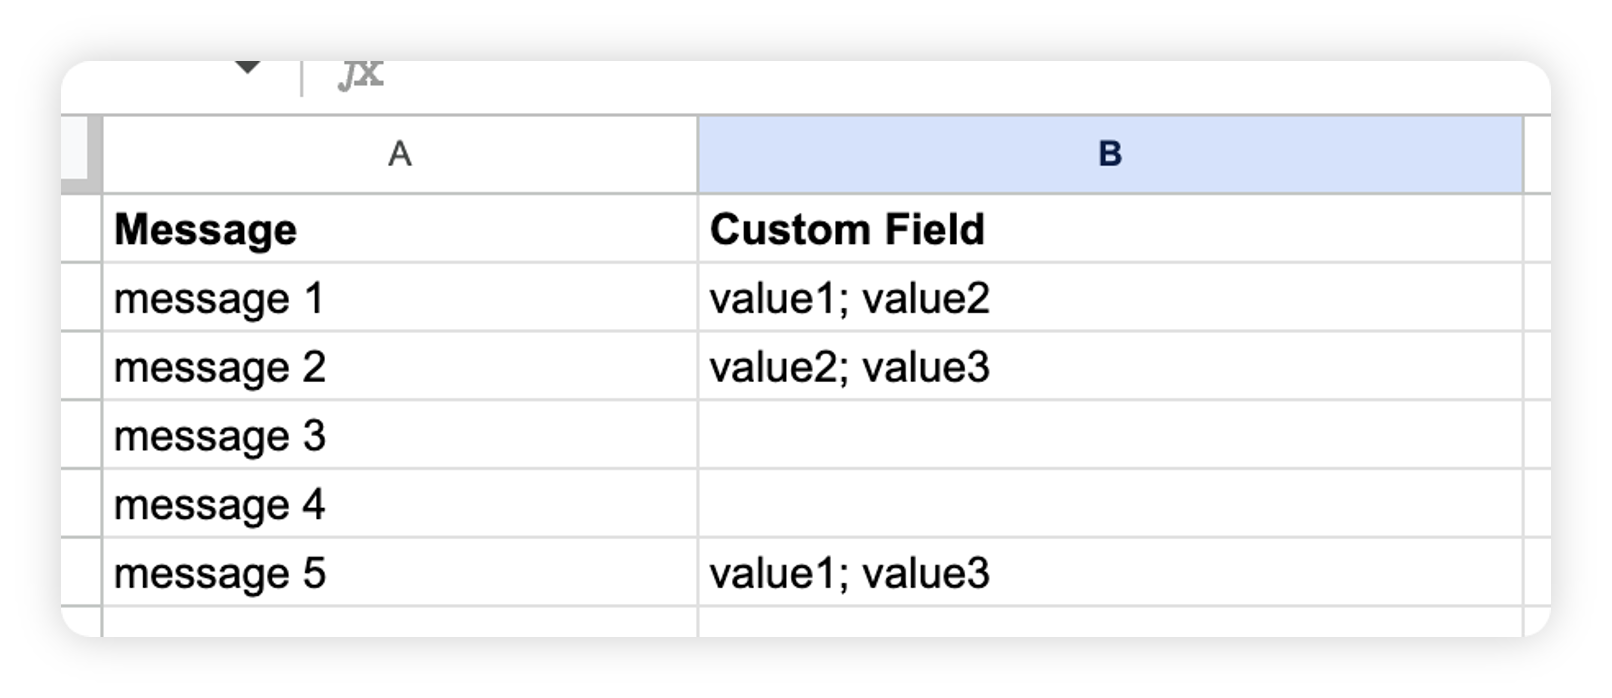
![]() Note: It is important to include messages without tags in your FPDI file, where the custom field column is left empty. These messages will be useful in reviewing the behaviour of the model through sample predictions.
Note: It is important to include messages without tags in your FPDI file, where the custom field column is left empty. These messages will be useful in reviewing the behaviour of the model through sample predictions.
Best practices while building a FPDI file
Make sure your FPDI file has only two columns, one for messages and the other for custom field values.
Include messages with no tags in your FPDI file. These are the messages you will use to check the behaviour of the model by reviewing sample predictions from them.
Ensure that the messages in your FPDI file are relevant to your business use case and reflect the language and tone of your target audience.
Use accurate custom field values to help the AI model understand the intent behind the messages. Avoid using generic or ambiguous terms that may confuse the model.
Remove any irrelevant or redundant information from the messages in your FPDI file to avoid noise in the data and ensure that the AI model focuses on the most important aspects of the messages.
Aim to ingest a diverse range of messages that are not too like one another. For instance, messages that contain identical text but different emojis are not considered unique for training purposes.
Validate the format and content of your FPDI file before uploading it to Sprinklr. Check for any errors, inconsistencies, or missing values that may affect ingestion process.
As a practice, you can consider using a random sample of your FPDI file to validate the performance of the AI model before using the entire dataset. This can help you identify any issues or improvements needed before deploying the model to your entire dataset.
Ideally, when using AI Studio, it is recommended to have at least 7000 messages in your FPDI file, including 5000 tagged messages and 2000 untagged messages.
Example 1 - For instance, if your file contains 7000 messages, 5000 tagged messages will be used for message classification, while 2000 untagged messages will be used to review sample predictions.
Example 2 - If your file contains 7000 messages with 4000 tagged and 3000 untagged messages, 5000 tagged messages will be used for message classification, prioritizing the 4000 tagged messages, and picking an additional 1000 untagged messages. The remaining 2000 untagged messages will be used to review sample predictions.
Import FPDI file
After you are ready with your FPDI Excel file, you need to follow the below steps to import it into the Sprinklr Platform.
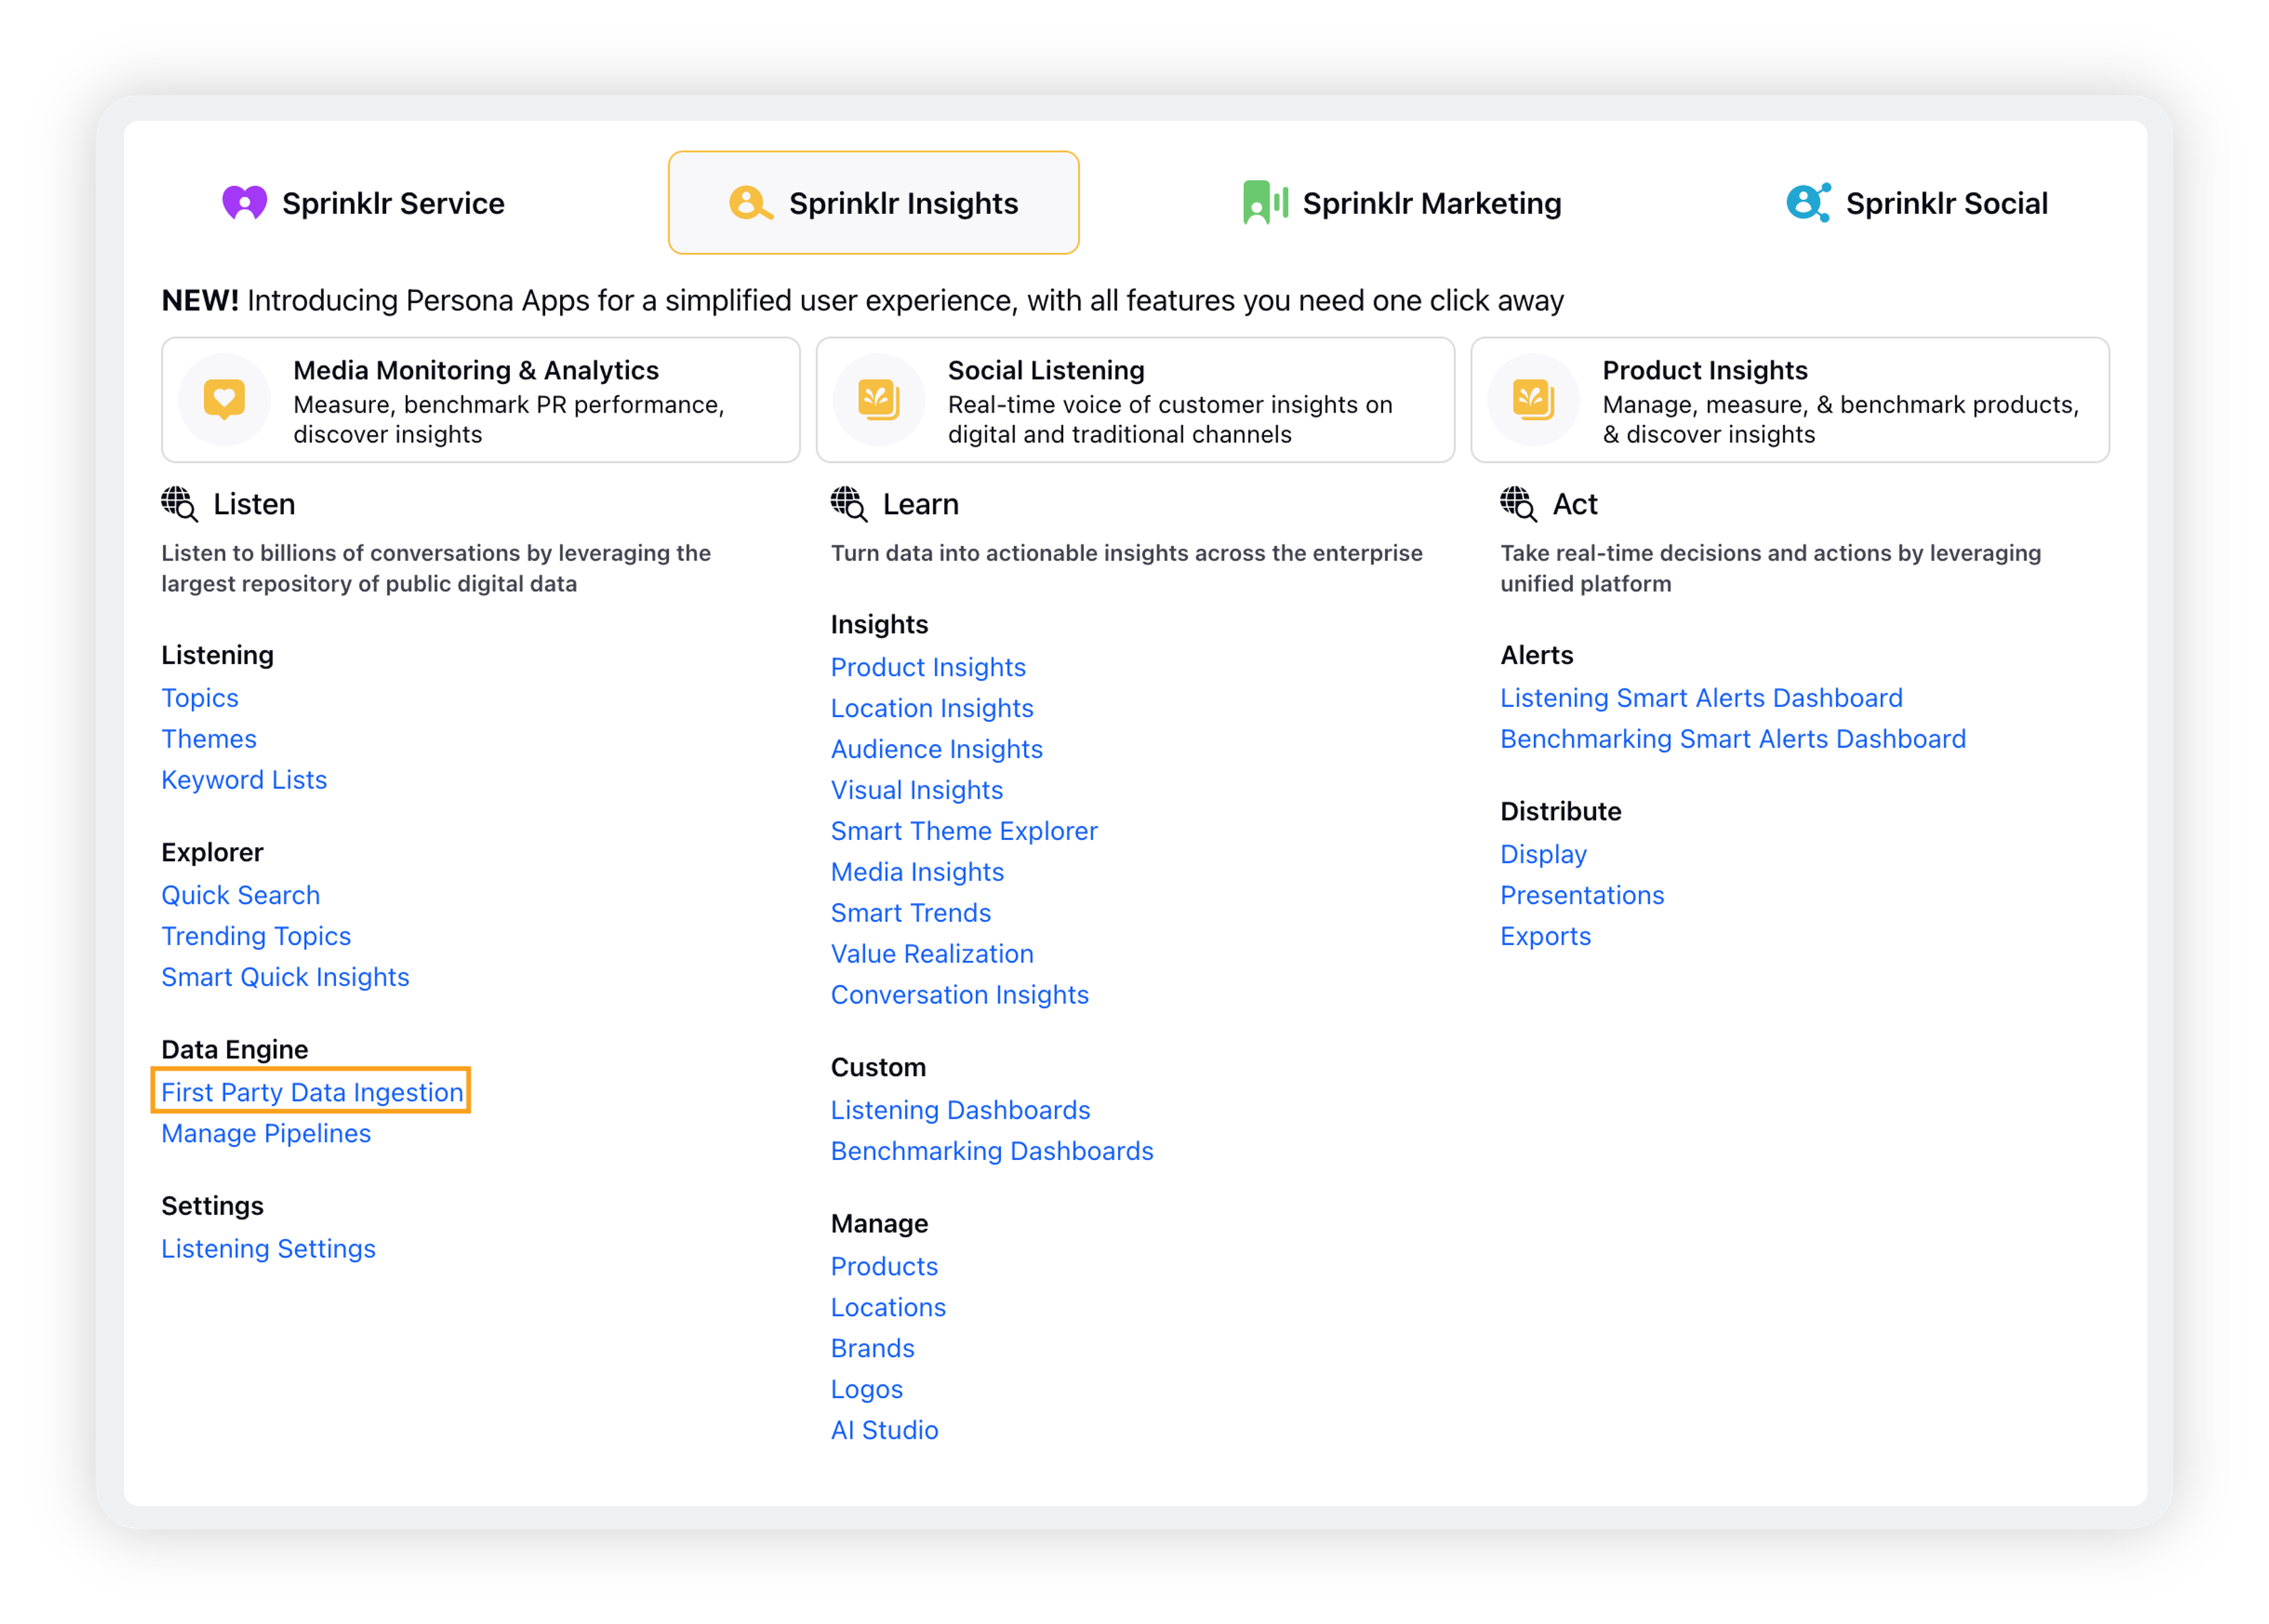
Click the New Tab icon. Under Sprinklr Insights, click First Party Data Ingestion within Listen.
In the top right corner of the Import Data window, click Import From Excel.
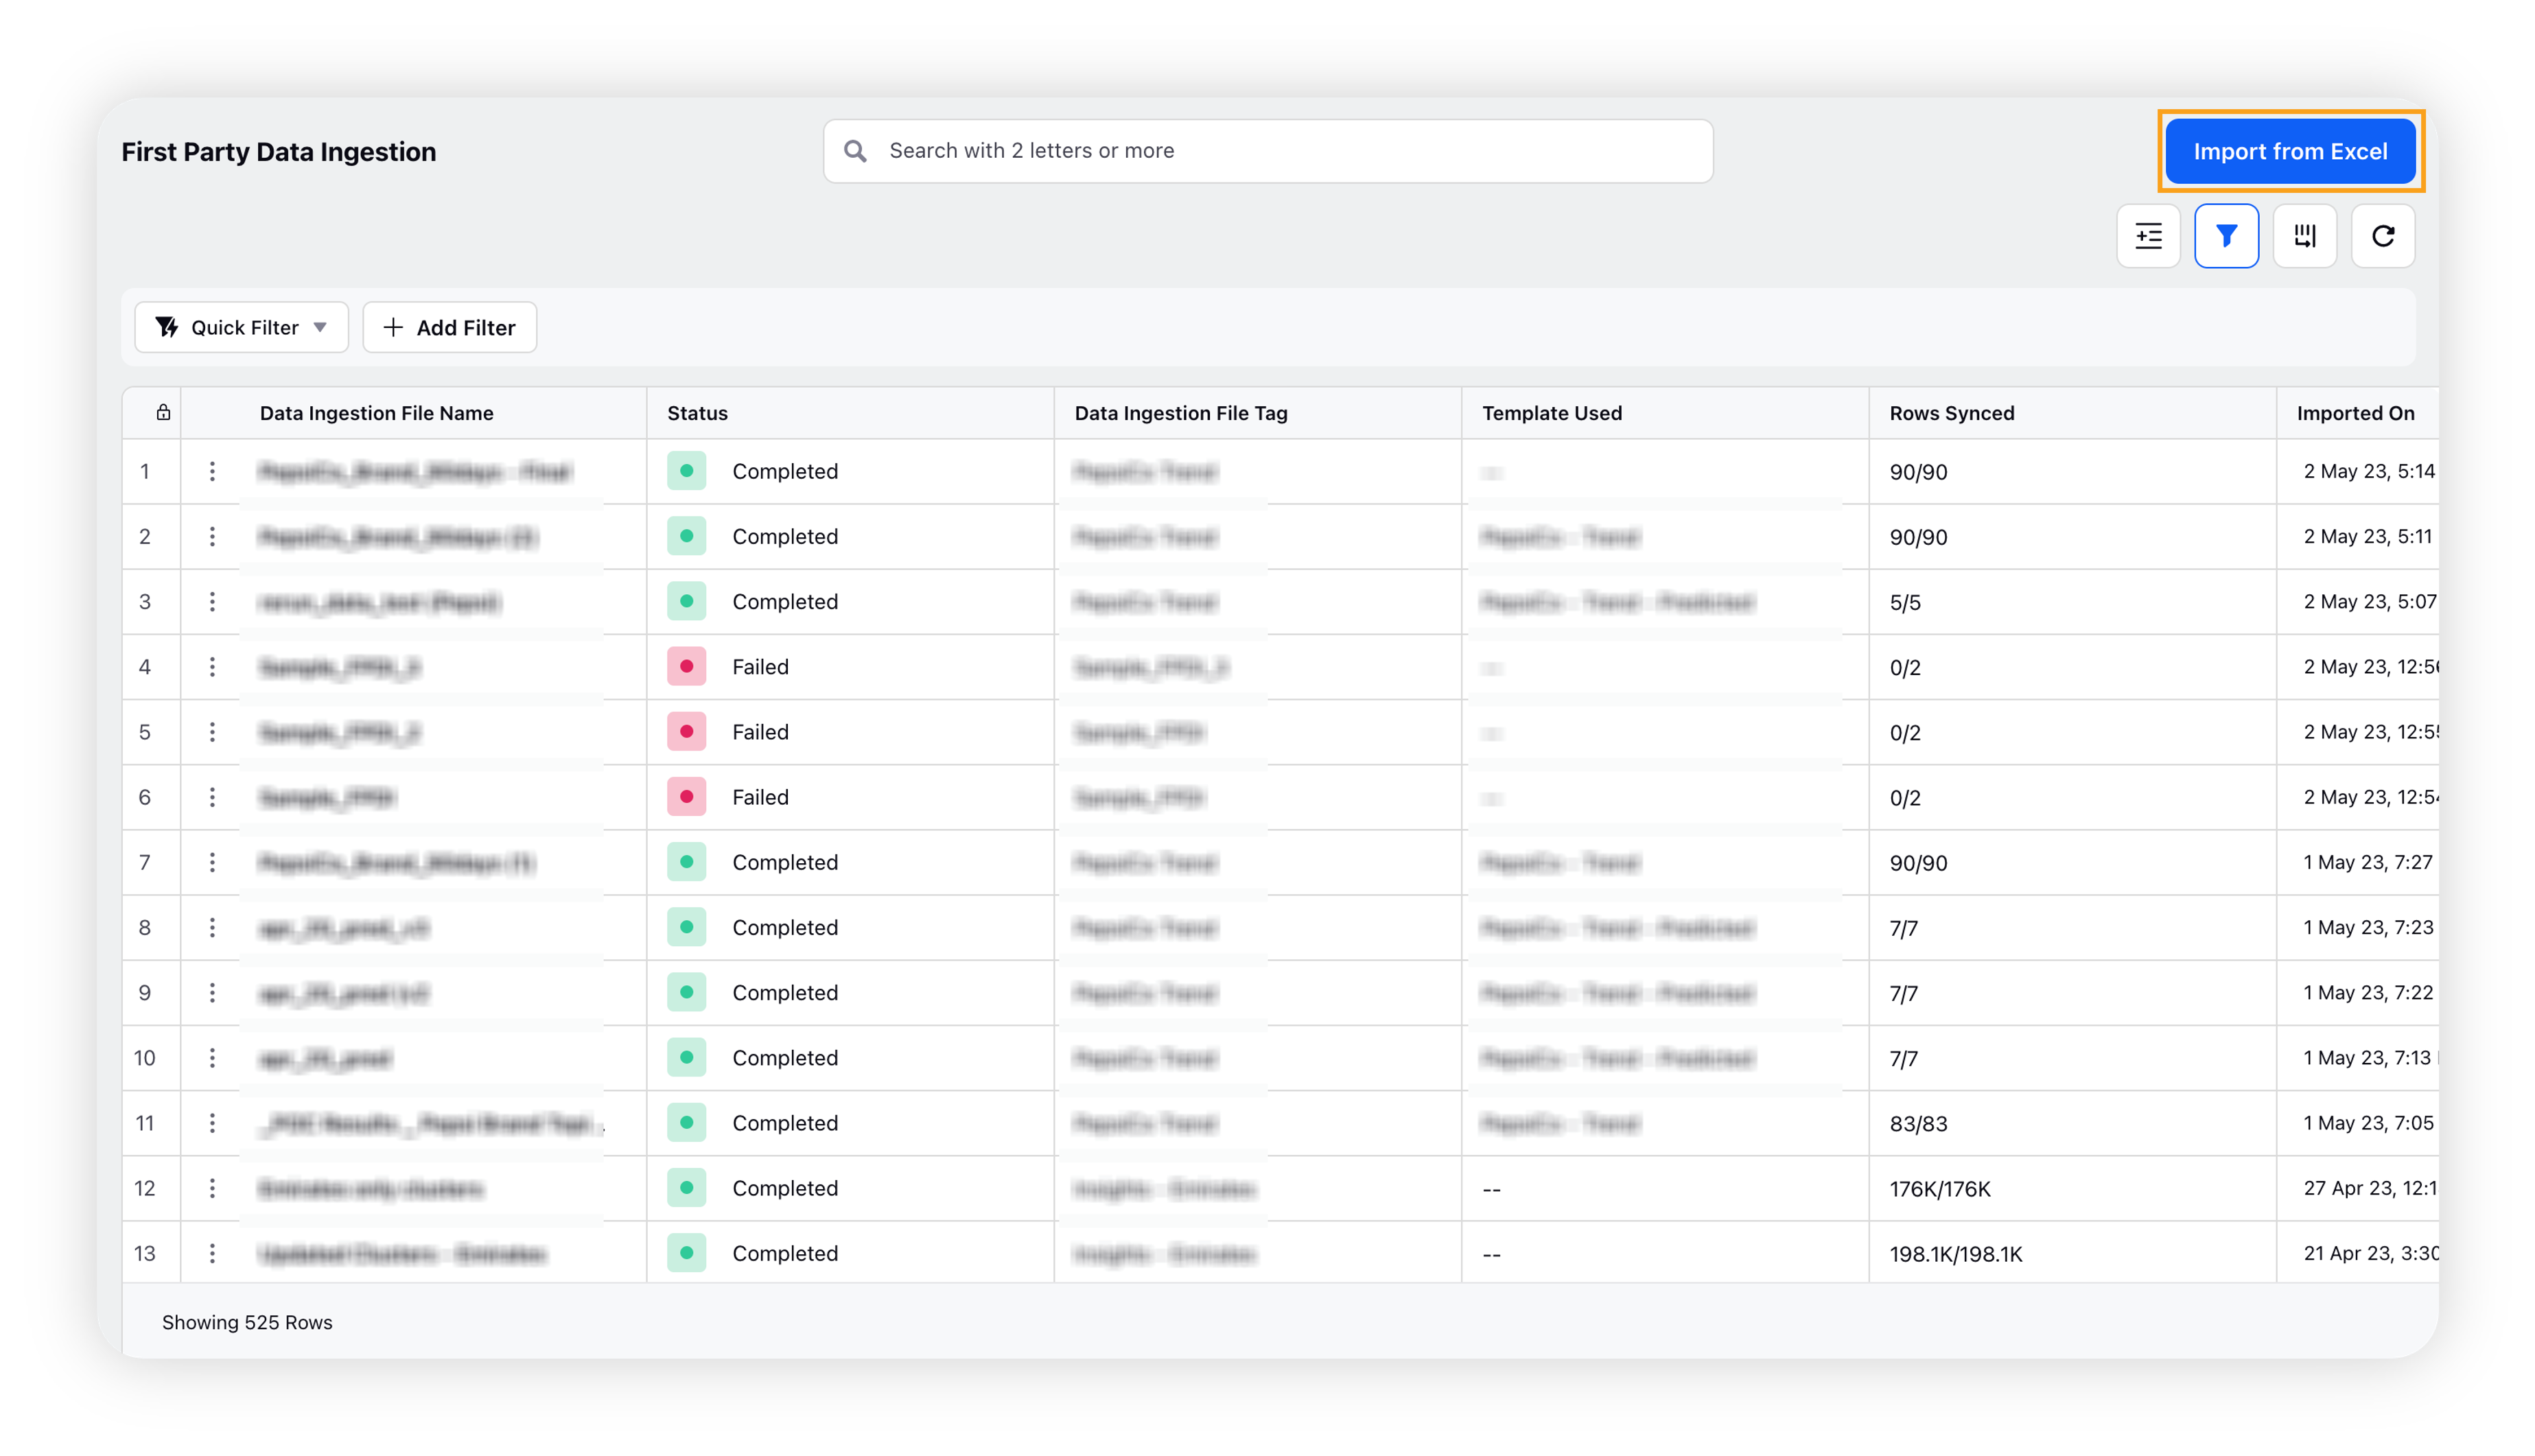
On the pop-up window, select the excel data file from your computer/device, and click Open.
On the Import Data window, fill in the import file name and import file tag.
You can map your message column to Message, and your custom field values column to the custom field you have created previously.
Click Import in the bottom right corner of the Import Data window.
Upon successful import of the file, messages will be in Sprinklr tagged with that custom field and we can continue to AI Studio to create our AI model.
![]() Note: Importing messages using FPDI counts as a Listening consumption.
Note: Importing messages using FPDI counts as a Listening consumption.
Create AI Project
You can now proceed to AI Studio to create your AI model.
Follow the steps as described in the create a new Text Classifier project article. Following are some main things you should consider –
You should an AI project of the New Model Training Project type.
You must select your FPDI file as a source in the Conditions section.
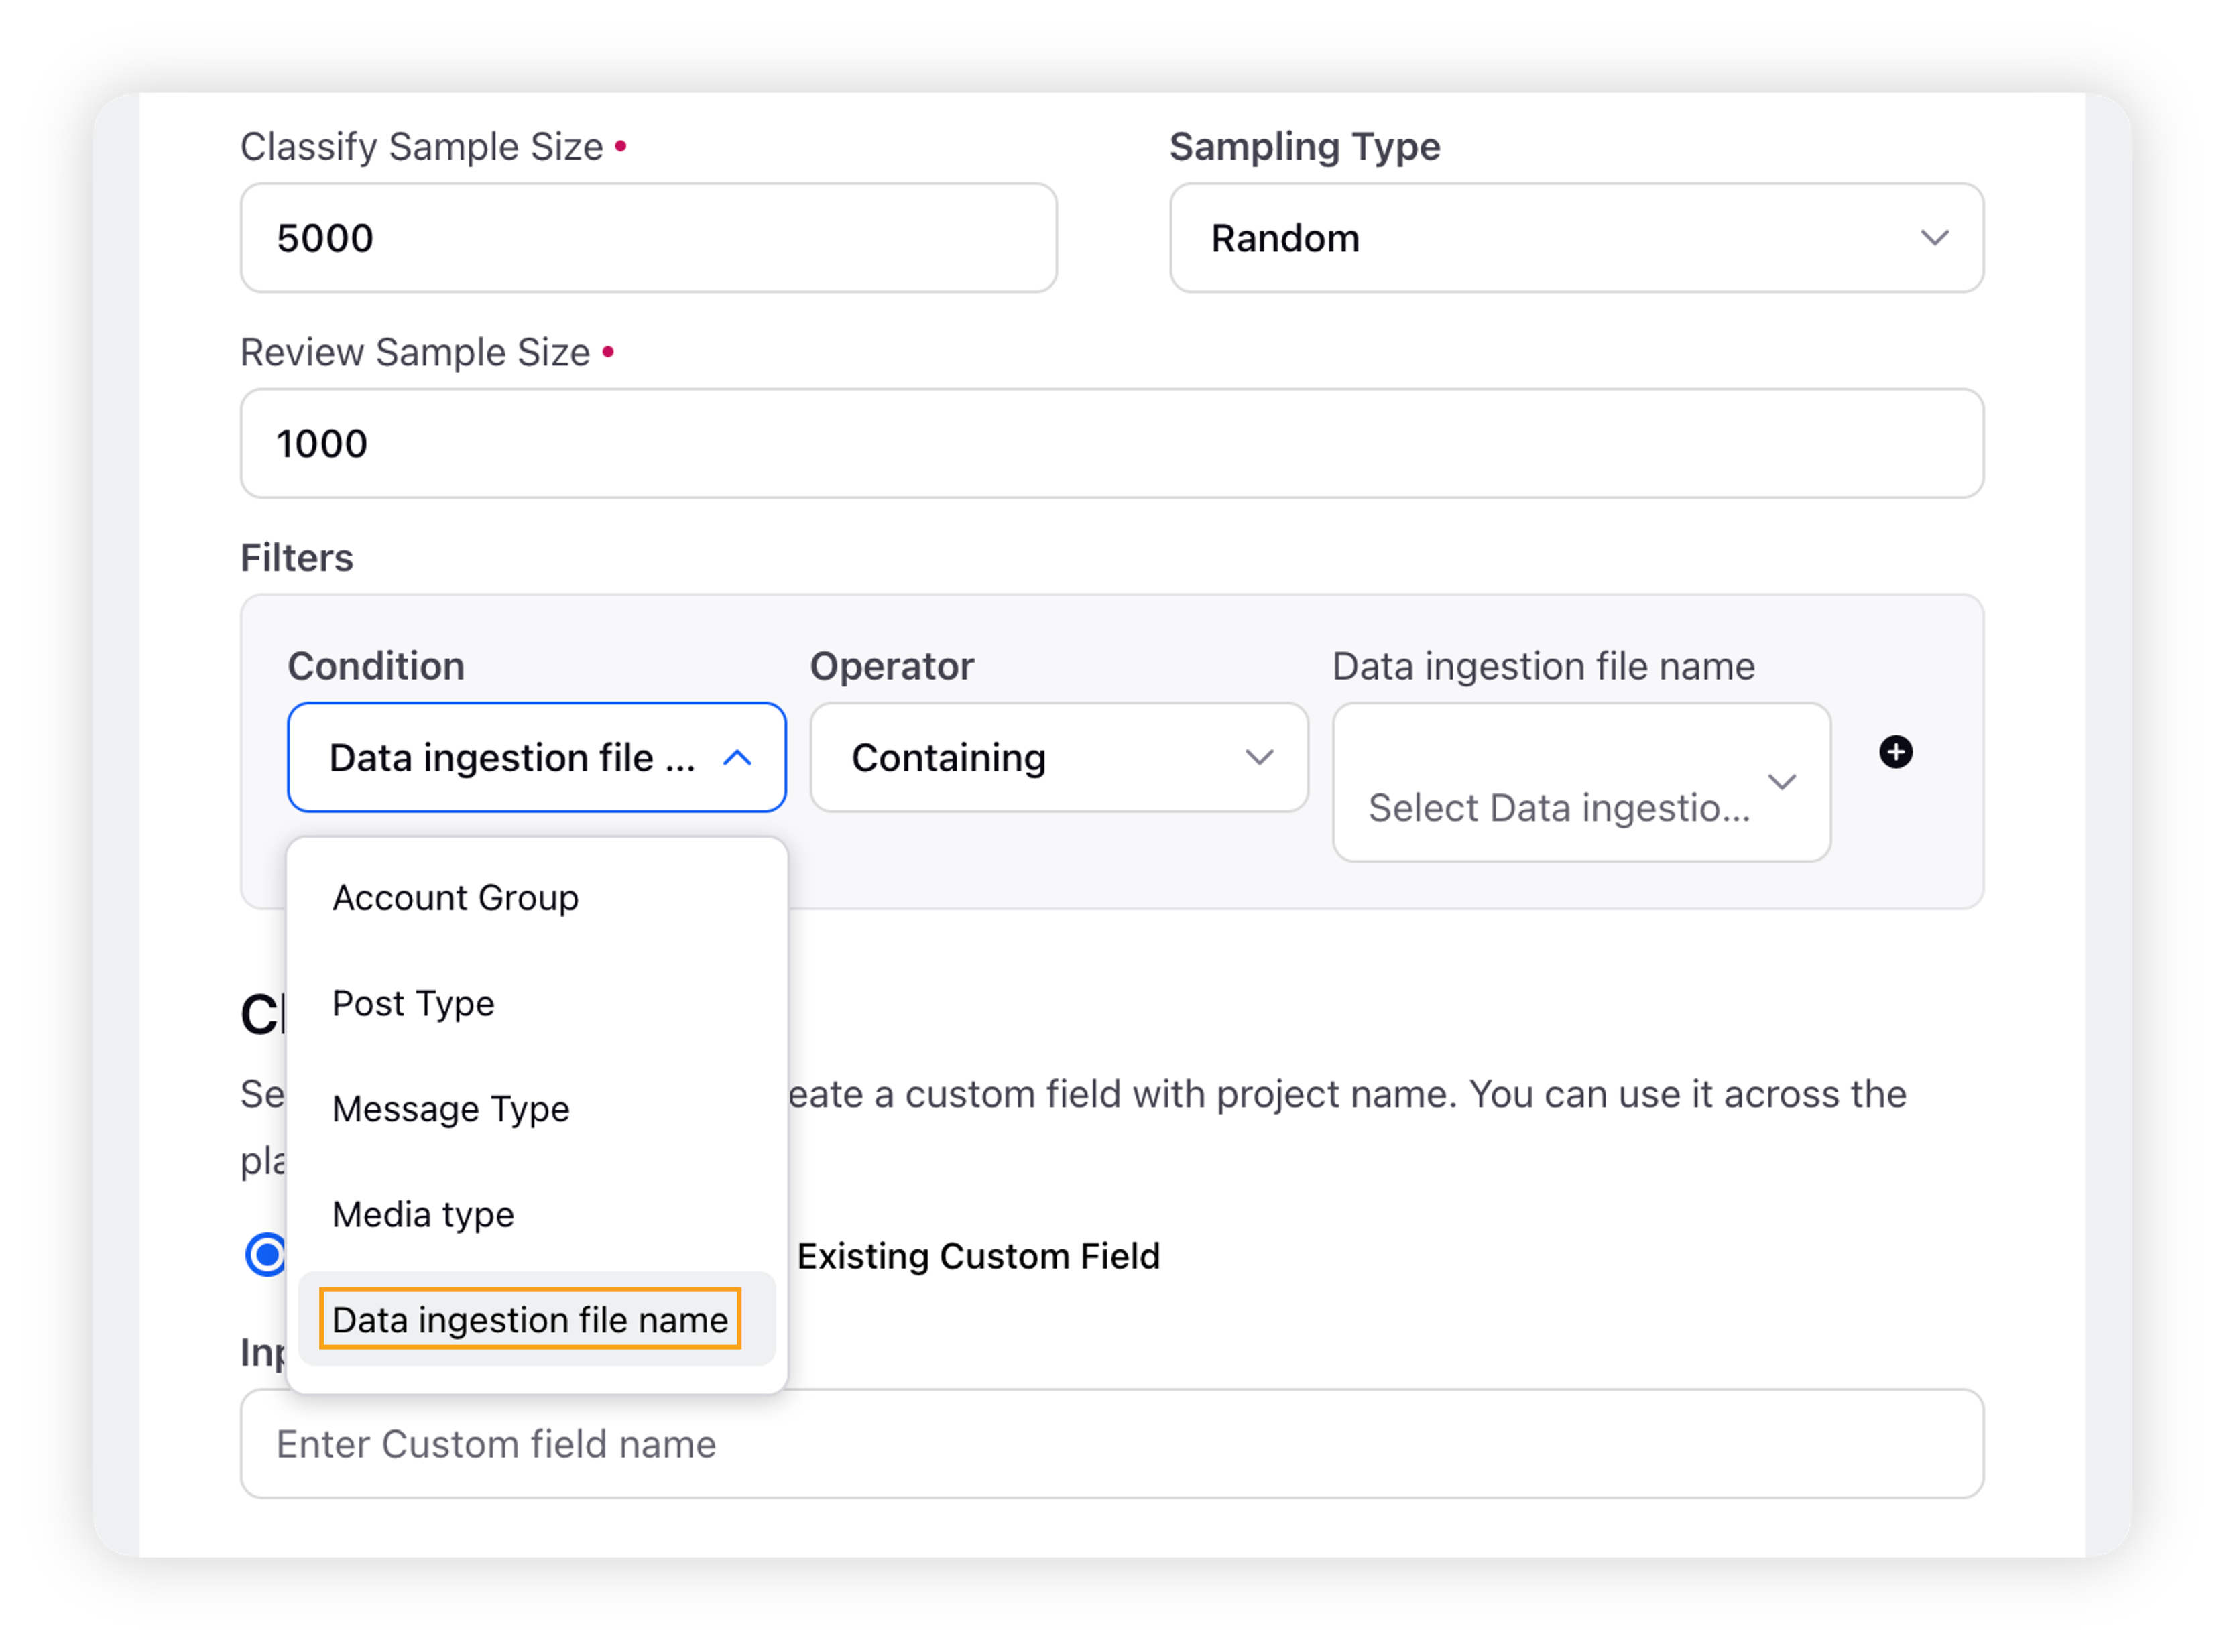
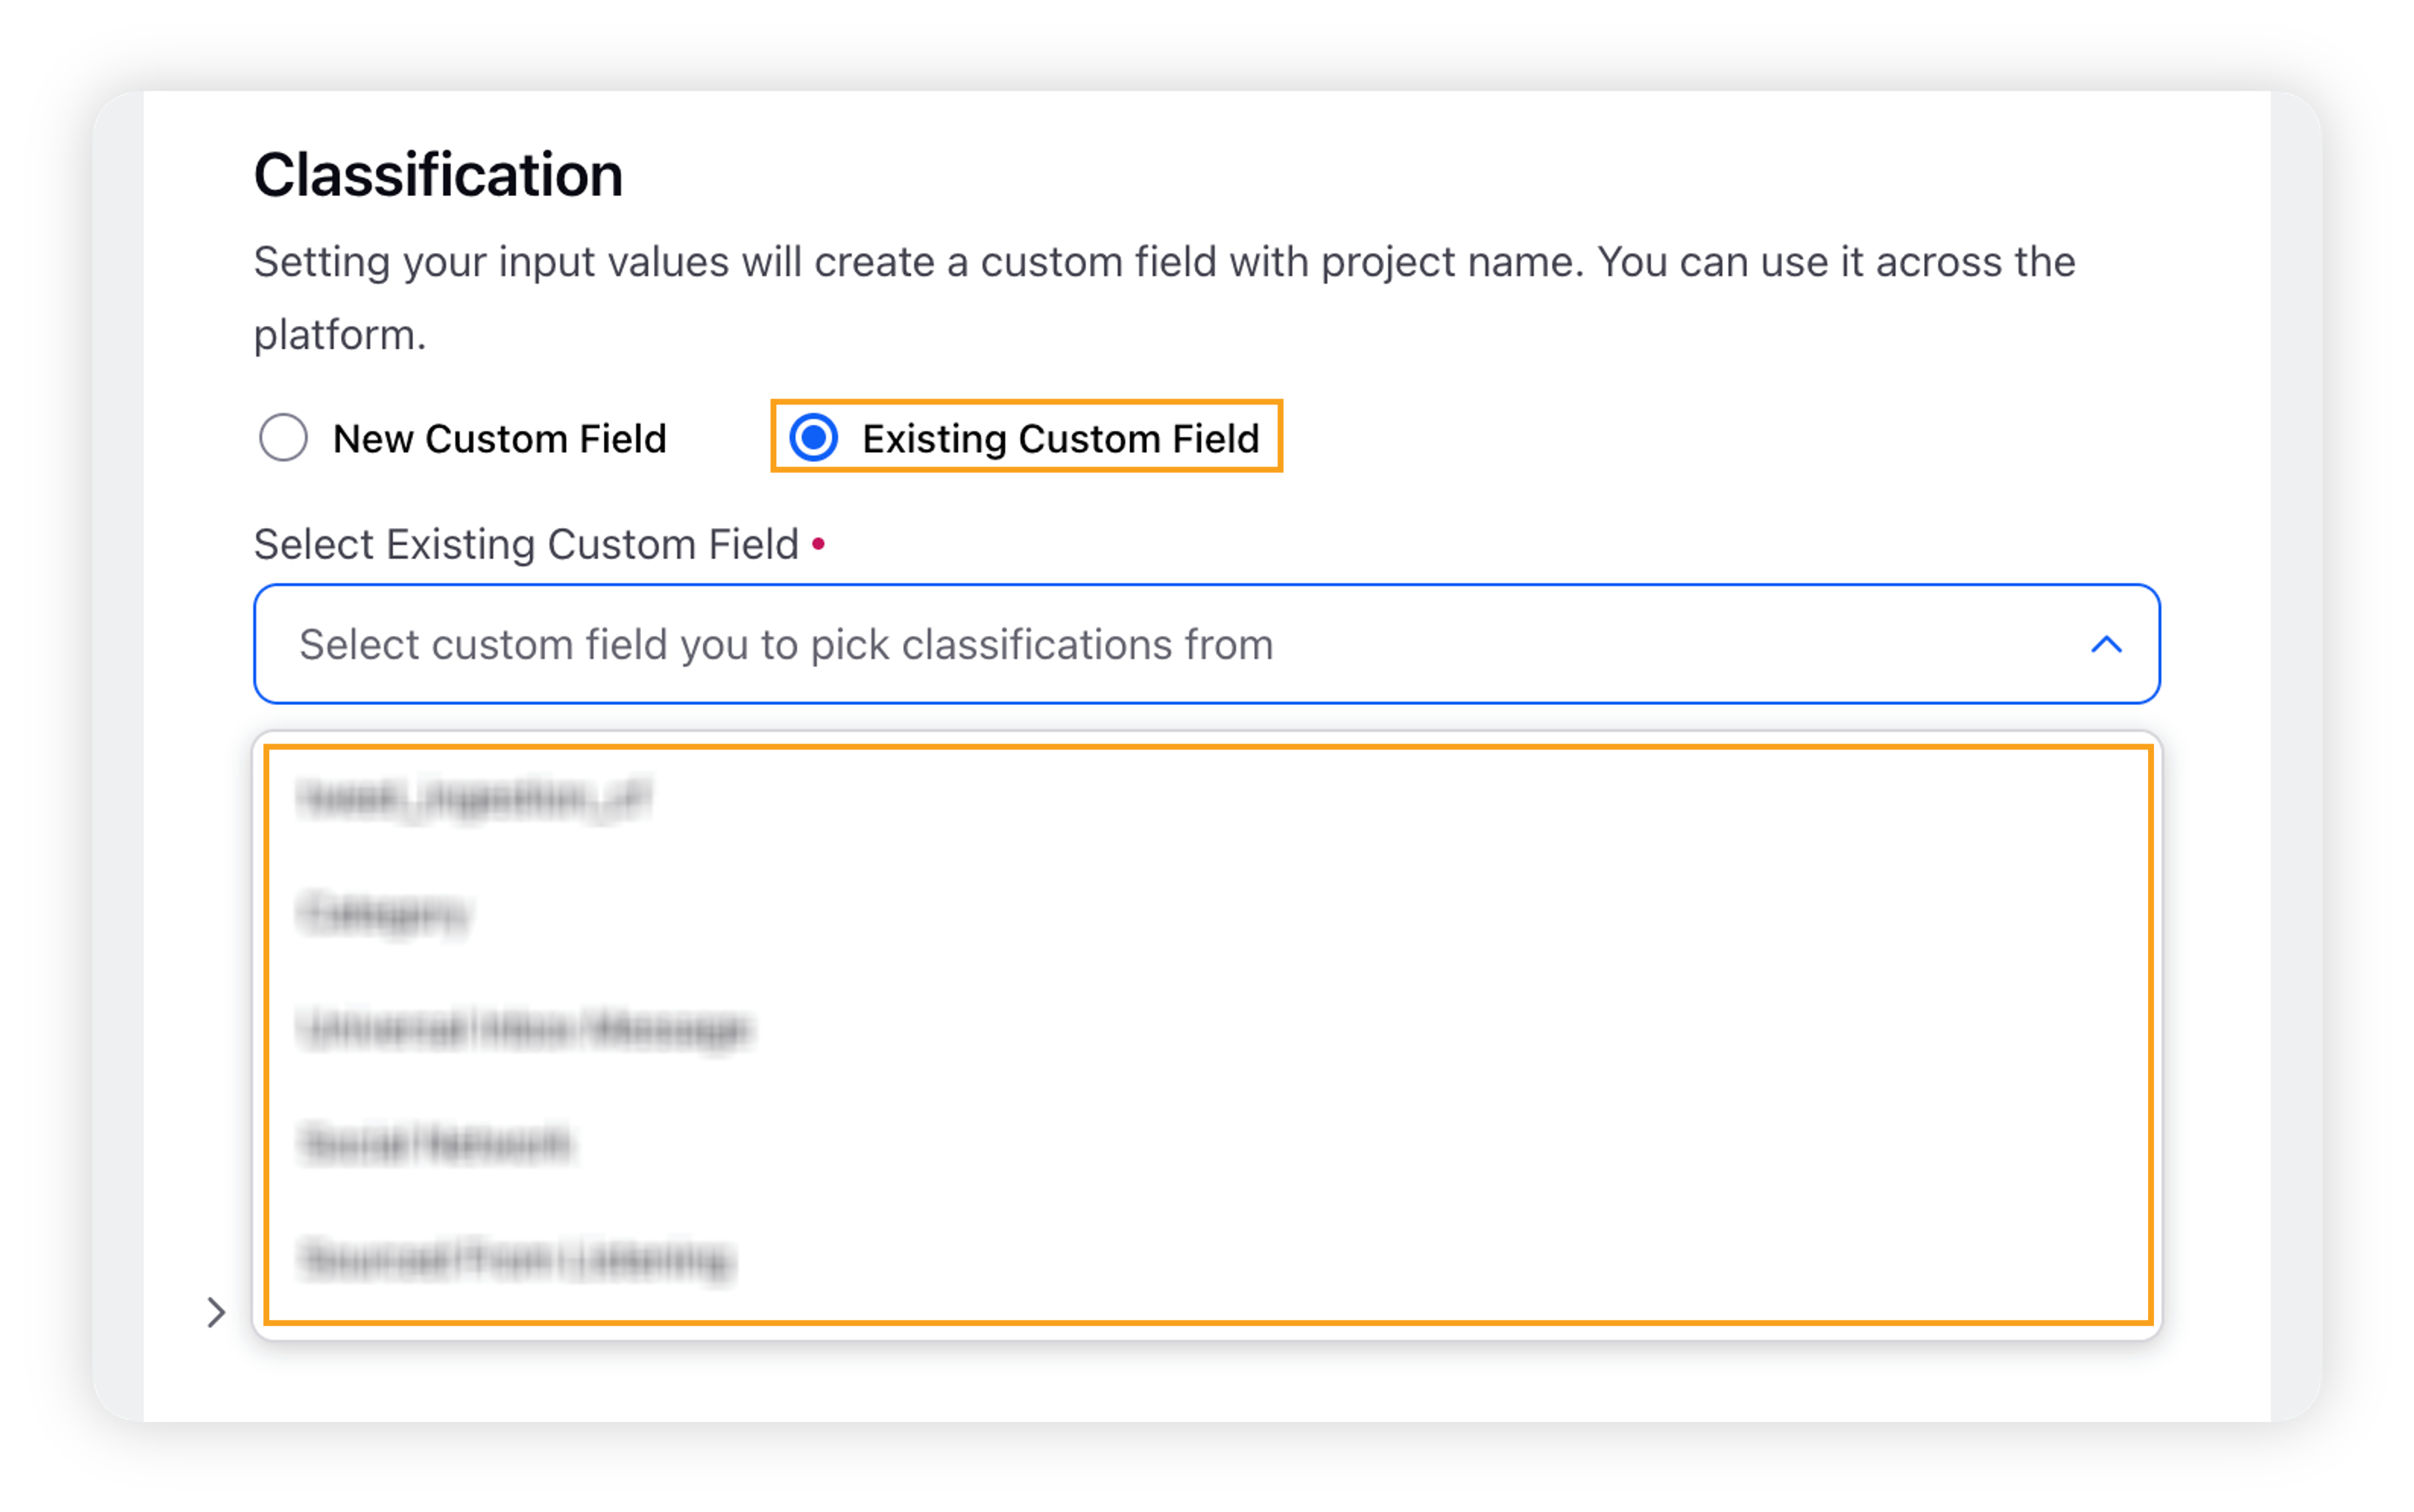
You must ensure that you are selecting the Existing Custom Field from the dropdown, select the relevant CF as you named while importing.
 Note: This step is essential to ensure you do not do the retagging work on the imported messages.
After following the other steps, you can Create the project.
Check training dataset in AI Studio
Once the project processing is successfully completed, you can access the Classify Messages option from the 3 dots menu in the Record Manager.
The Classify Message form should show you your training datasets with messages already tagged.
You can now review them or click the Train Model button in the left-right area of the screen directly.
Review Sample Predictions and Deploy Model
After the model completes training, you can continue with the New Model Training workflow remaining steps –
Review Sample Predictions: This is the form where your untagged messages from your FPDI file will appear with predictions from the trained model. Upon reviewing at least 200 messages, you will have clarity on the precision, recall, and F1 score of the model.
Accept and Deploy: This screen can be accessed through a button in the right bottom area of the Review Sample Predictions form, after reviewing at least 200 messages. It will allow you to choose the sources on which you want to deploy your model. After successful deployment, the model will process messages from these sources and predict the best custom field values on them.