Manage Master Schedule
Updated
The Master Schedule View provides a comprehensive overview of all agents' schedules. This holistic view facilitates tracking traded shifts, days off, and activities. Administrators and Workforce Managers can access the Master Schedule to view shifts and days off.
Navigate to Master Schedule
Follow these steps to navigate to the Master Schedule:

Go to the Workforce Manager Persona App on the Launchpad.

Select Scheduling from the Left Pane to open the Scheduling page.
Select Master Schedule from the sub-menu on the left of the Scheduling page.
Master Schedule Viewing Modes
Master Schedule can be viewed in two ways: Intraday View, which shows data for a single day, and Multiday View, where you can select a specific date range for the data. When you open Master Schedule, Day View is selected by default, and you can select the date for which data should be displayed.
Intraday View

When Intraday View is selected, the Master Schedule details page displays data for the selected date. It shows the schedules of all agents for that day.

You can quickly view the data from the next day or the previous day by clicking the Next or Prev button in the data range selector.
Note: Traded shifts are displayed with slanted lines across them to distinguish them from regular shifts.

Multiday View

When Multiday View is selected, the Schedule Scenario details page displays data for the chosen date range. This page shows the agents' total time, paid time, and unpaid time for the specified period.
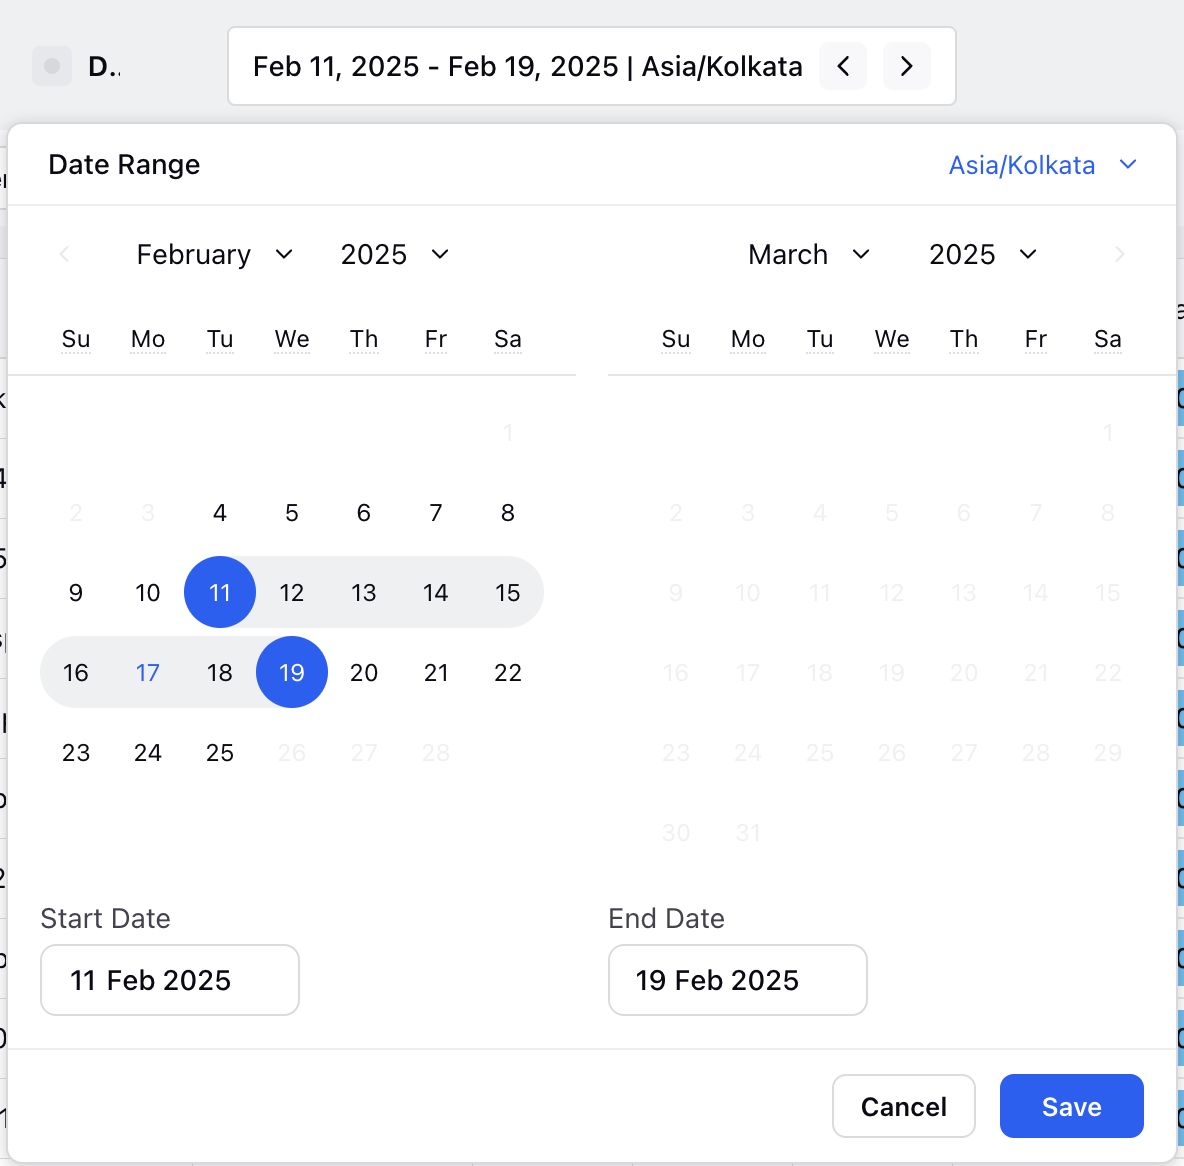
For example, if you select 11 February 2025 to 19 February 2025 in Multiday View, the data for agents' total time, paid time, and unpaid time will be shown for the entire selected date range.
Hover over an agent’s Shift on any day to view the following details:
Total Shift duration and timings.
Office Activities with their timings and duration.
Work location (office or home).
Preference accommodation status.
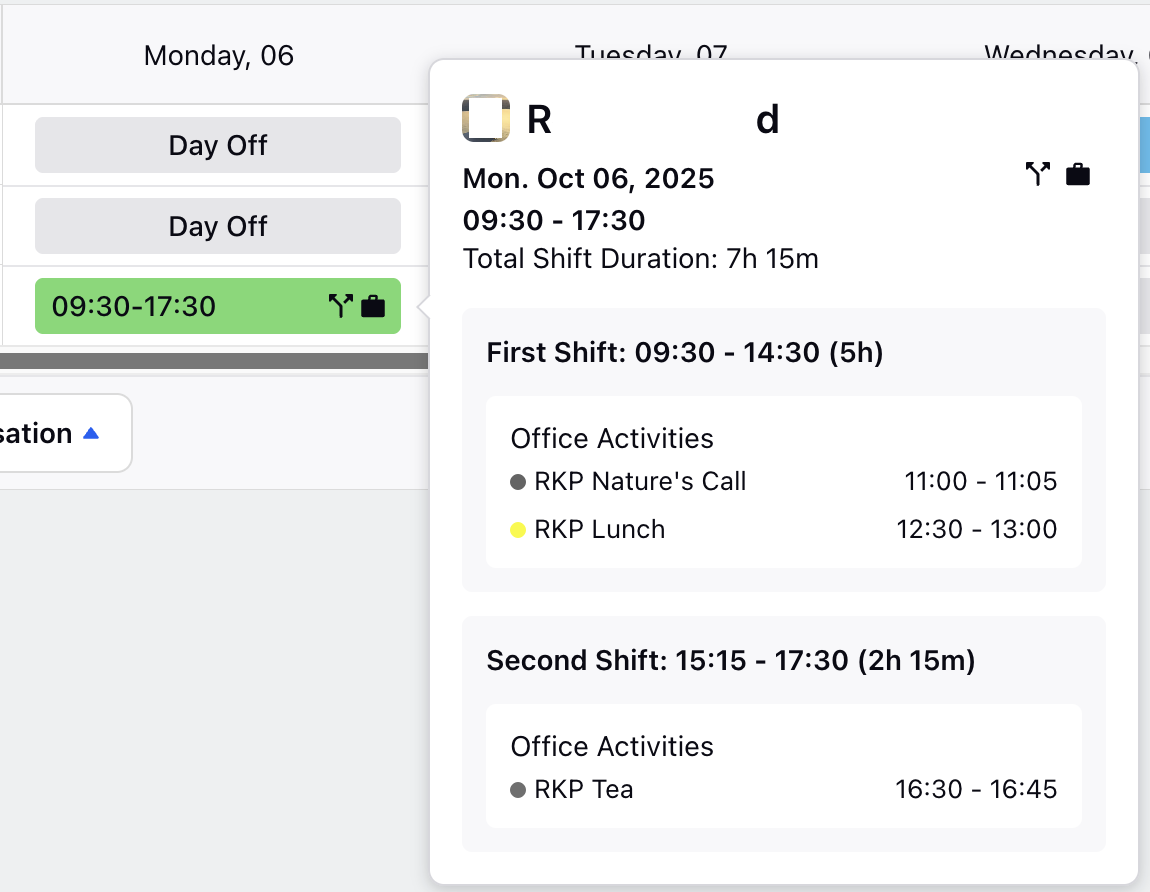
If the agent has a Split Shift, the hover card will display separate sections for each Shift (such as First Shift and Second Shift) along with their respective timings and durations.
Note: Traded shifts are displayed with slanted lines across them to distinguish them from regular shifts.

Rolling Date Range
While in the Intraday or Multiday View, you can configure a rolling date range for the Master Schedule. This creates a dynamic date range for tracking schedules where the start date and end date are automatically updated on a rolling basis.
Rolling End Date: Enable this toggle to automatically extend the end date by one day every day.
Rolling Start Date: Enable this toggle to automatically extend the start date by one day every day.
Note: The Rolling Start Date toggle can be enabled only when the Rolling End Date is enabled.
Rolling Date Range Behavior
The Rolling Date Range behavior is governed by the Rolling End Date and Rolling Start Date toggles. Let us understand the behavior in detail.
Both Rolling Start Date and Rolling End Date toggles are OFF
The selected date range remains fixed and does not update automatically. For example, if you select April 6 to April 13, the range stays the same every day.
Both Rolling Start Date and Rolling End Date toggles are ON
The entire date range shifts forward by one day every day. For example, if the initial range is April 6 to April 13, it will update to April 7 to April 14 the next day and continue rolling forward daily.
Rolling Start Date is OFF and Rolling End Date is ON
The start date remains fixed, while the end date moves forward by one day every day. For example, if the initial range is April 6 to April 13, the next day it becomes April 6 to April 14, then April 6 to April 15, and so on.
Agent Sorting
You can sort the agents while viewing the Master Schedule to quickly locate specific agents. This makes it easier to scan the list and find the agents you need. Access the sorting option by clicking the More Actions (...) button at the top right of the page and then selecting Sort By from the list.
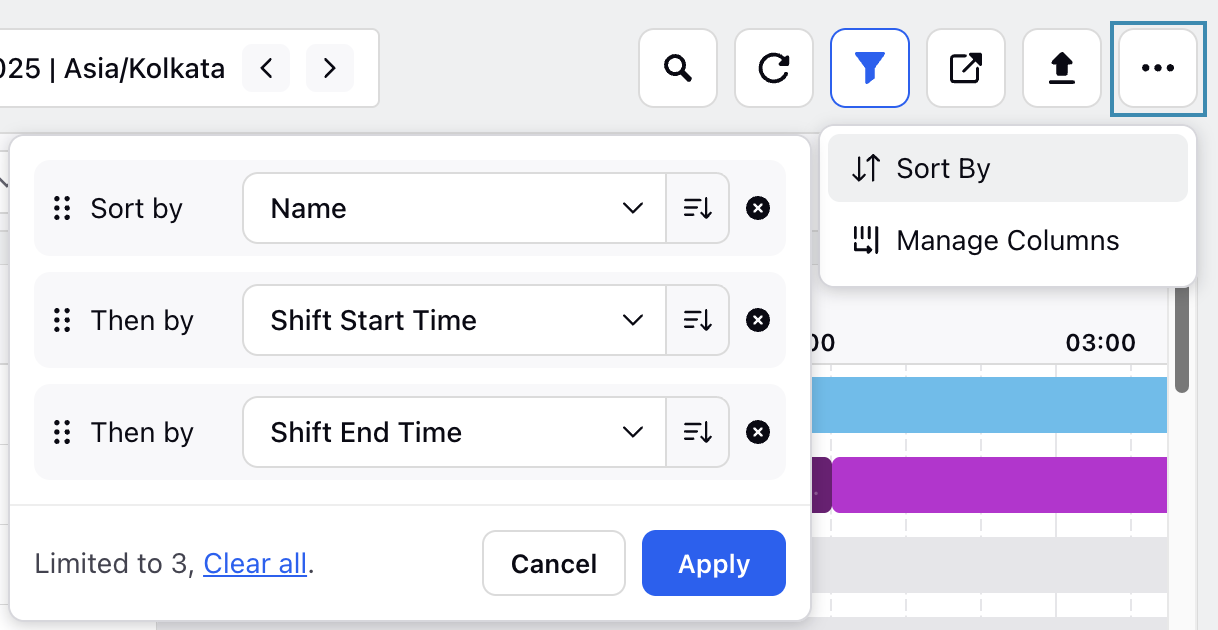
You can sort agents by their names in alphabetical order, Shift Start Time, and Shift End Time in ascending and descending order. These sorting options can also be applied simultaneously, depending on your requirements. Click the Apply button once you have selected the sorting options to sort agents based on the selection.
Note: Shift Start Time and Shift End Time sorting options are available only when viewing the Master Schedule in Intra-day View.
All User Accessible Permission
The All Users Accessible permission allows administrators and Workforce Managers to filter agents based on the following categories:
All Agents: This category is governed by the user’s accessible permissions.
My Team Group: This will only be displayed if DP is enabled and the Supervisor Team field is populated on the agent's page.
My Team: This is present by default on the Master Schedule page and will appear in filters only if you have direct or indirect reportees.
My Reportees: This is also present by default on the Master Schedule page and will appear in filters only if you have direct or indirect reportees.

Note: Using the Manage Access permission under the Master Schedule permissions, the Master Schedule can now be locked at the department, brand, or any Custom Field level to segment agents by their respective teams. This allows administrators to view all schedules, while Workforce Managers and agents can only access schedules within their own team.
View Agent Preference Accommodation Status
You can verify whether approved Agent Preferences have been accommodated in the final schedule from the Master Schedule. This section explains how to view this in both Intraday and Multiday views.

In Intraday View, the Preference column shows the status as either Accommodated or Not Accommodated for each agent.
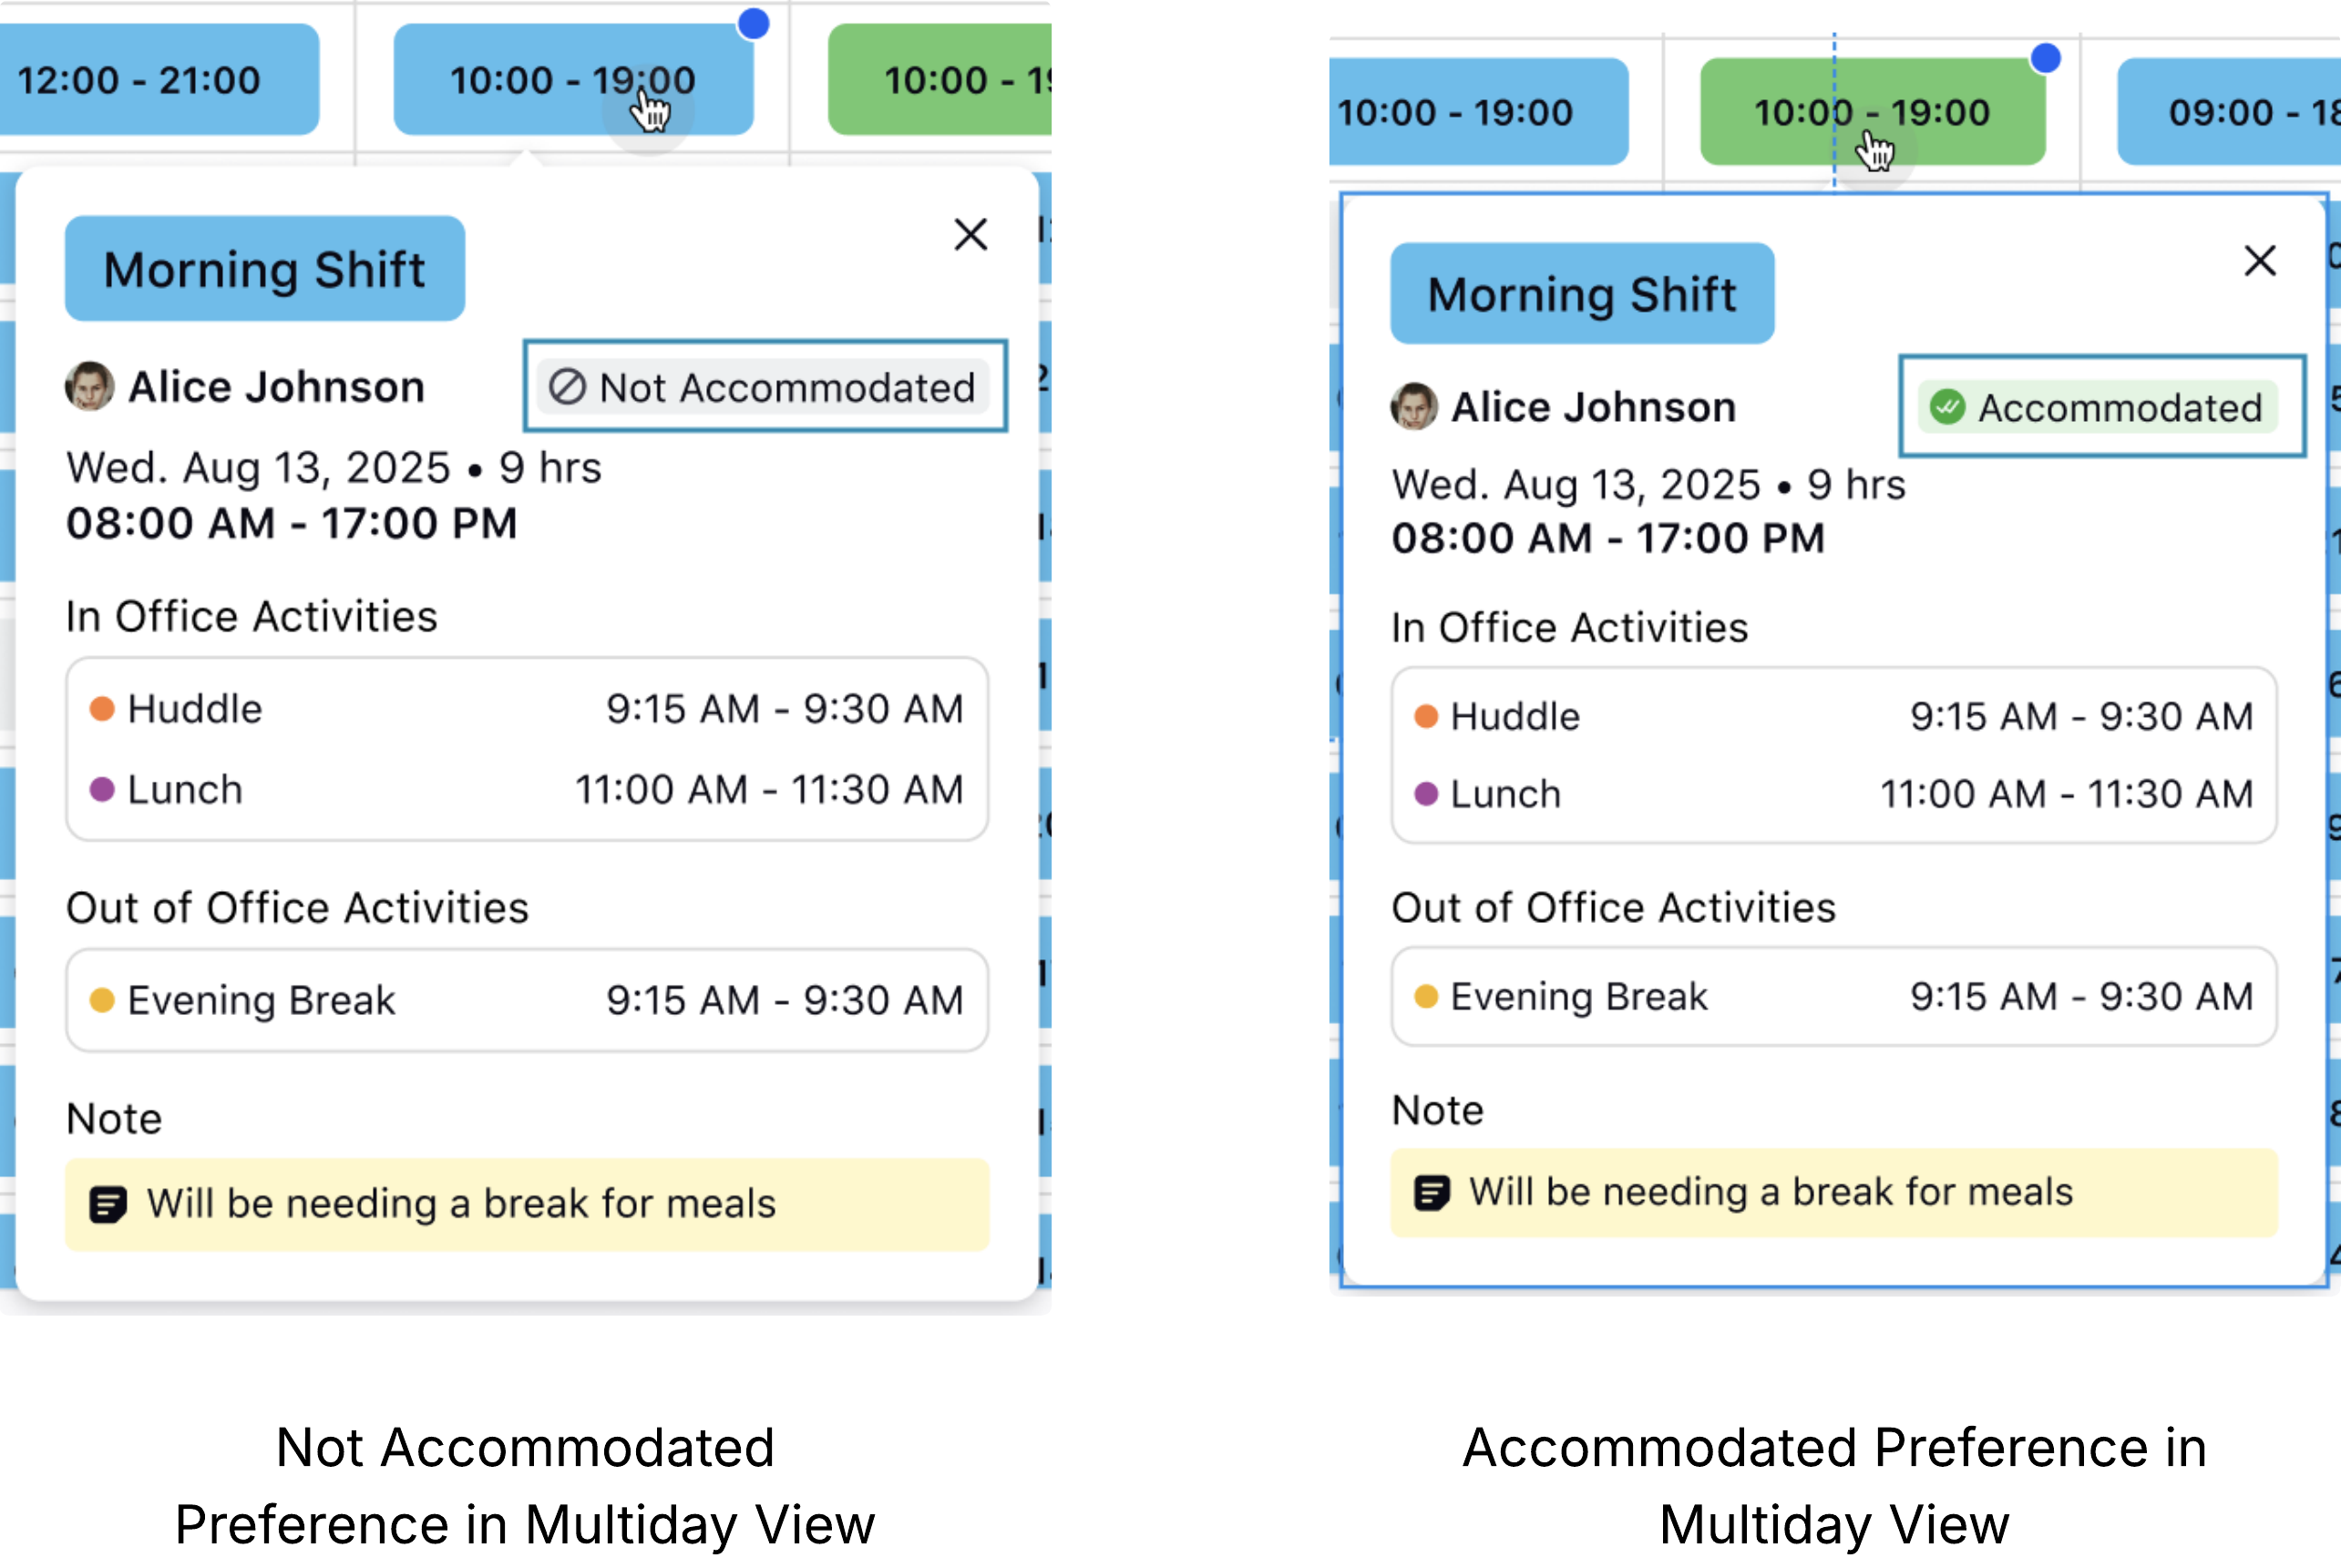
In Multiday View, hover over an agent’s schedule to see a details card. It will display a tag indicating whether the agent’s Preference for that day was accommodated.
Export Master Schedule
Prerequisites for exporting Master Schedule:
Workforce Management should be enabled for the environment.
You must have access to the Workforce Manager Persona App.
View permission under the Master Schedule section in the Workforce Management module.
Follow these steps to export the Master Schedule:
Navigate to Master Schedule.

Click the Export button at the top right of the page to open the Export Schedule dialog box.
Fill in the fields in Export Schedule dialog box. Fields marked with a red dot are mandatory. Below are the descriptions of the fields on this window:
File Name: Enter the name of the file with which the Master Schedule will be exported. (Required)
Export Type: Choose between Intraday View and Multi-day View. (Required)
Date Range: Enter the date and time duration for which the Master Schedule will be exported. (Required)
Date Format: Select the desired format for the dates in the exported file. (Required)
Format: Excel will be selected by default. (Required)
Click the Submit button at the bottom right of the dialog box to submit the Master Schedule export request.

After some time, you will receive a platform notification containing the link to download the report. Open the link to download a zip folder containing the report.
View Source Schedule Scenario of Agents' Schedule
You can view the Schedule Scenario directly from the Master Schedule, which is used to generate agent shifts. This allows you to navigate to the specific Schedule Scenario used to create the current agent schedule. It provides quick access to the source Schedule Scenario, streamlining schedule analysis and management.
Prerequisites:
View and Edit permissions under the Scheduling section.
View Source Schedule permission under the Master Schedule section.
The source Schedule Scenario must be shared with you.
Follow these steps to view the source Schedule Scenario of the agent's schedule:
Navigate to Master Schedule.
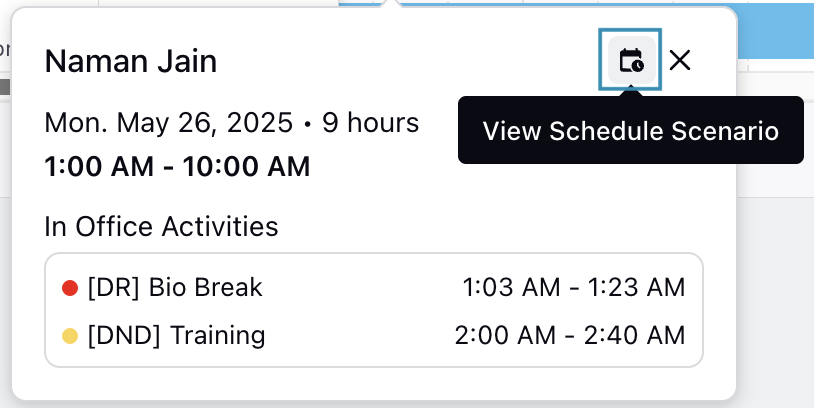
Hover over the agent's schedule to open an information card with details on the agent's schedule. This works in both Intraday View and Multiday View.
Click the View Schedule Scenario button in the information card to open the Schedule Scenario used to create the agent's schedule.
This will open the Schedule Scenario using which the agent's schedule was created.
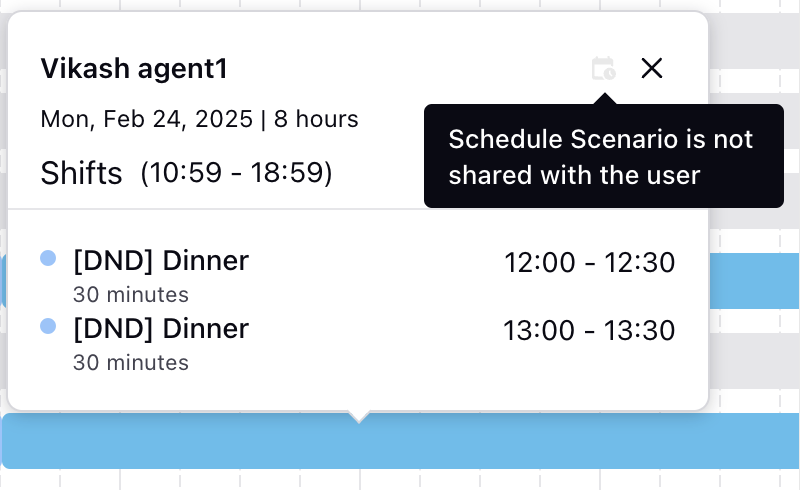
Note: The View Schedule Scenario button will be accessible only if the prerequisite conditions are met.
Agent Schedule Adherence
The Real-Time Adherence (RTA) enhances operational oversight by enabling supervisors to monitor agent adherence to scheduled shifts, breaks, and activities in real-time. Adherence scores and deviations are visually represented with color-coded intervals (green for adherent and red for non-adherent), providing clear insights into performance and resource allocation. Users can drill down into historical adherence data to identify patterns and optimize scheduling. Real-time alerts notify users of deviations, enabling proactive management of workforce adherence.

It is also divided into Adherence Percentage and Non-Adherent Time, clearly providing insights into how much time the agent was non-adherent.

Click the Show All Adherence Timelines button at the top right of the Master Schedule Record Manager to show or hide the Adherence Timelines of all agents.
View Schedule Audit of Agents
You can view the audit of the changes made to each agent’s schedule from the Master Schedule. Access the schedule audit of agents by clicking the vertical ellipsis (⋮) icon next to the agent and selecting Schedule Audit from the list.
Note: You can view the schedule audit of agents in the Intra-Day View only.
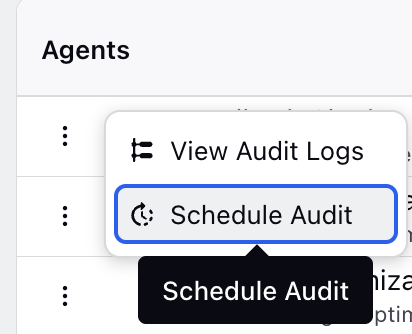
This opens a drawer at the bottom of the page, displaying the following columns with details for the selected date:
Modified By: Shows the user who made the particular modification.
Modified On: Shows the date and time at which the modification was made.
Source: Shows the source of the change to the agent’s schedule. The source can be Schedule Publish, Shift Trade, Shift Change, Time Off, or Overtime.

Note: Previous schedules of the agent cannot be restored from Master Schedule.
You can export an agent’s schedule audit for external use by clicking the Export button at the top right of the drawer. A notification will confirm when the export is successful. The exported file includes details of all previous schedules for the agent and contains the following columns:
Column | Description |
Agent Name | Shows the name of the agent. |
Modified By | Shows the user who made the particular modification. |
Modified On | Shows the date and time at which the modification was made. |
Source | Shows the source of the change to the agent’s schedule. The source can be Schedule Publish, Shift Trade, Shift Change, Time Off, or Overtime. |
Shift Start Date | Shows the date on which the Shift will start. |
Shift / Day Off | Indicates whether the agent was assigned a shift or had a Day Off on that date. |
Shift Timings | Shows the start and end time of the Shift. In case of a Day Off, it will show no data (NA). |
Shift Duration | Shows the duration of the Shift. In case of a Day Off, it will show no data (NA). |
Activity Details | Shows the details of all Activities assigned in that Shift, such as the Activity start time and duration. In case of a Day Off, it will show no data (NA). |
Note: If an agent has a night shift in any previously published version, the audit trail drawer extends into the next day until the shift’s end time.
Note: While the schedule audit of an agent is open, you cannot view the Master Schedule in Custom View.
View Activity Log of Agents' Schedule
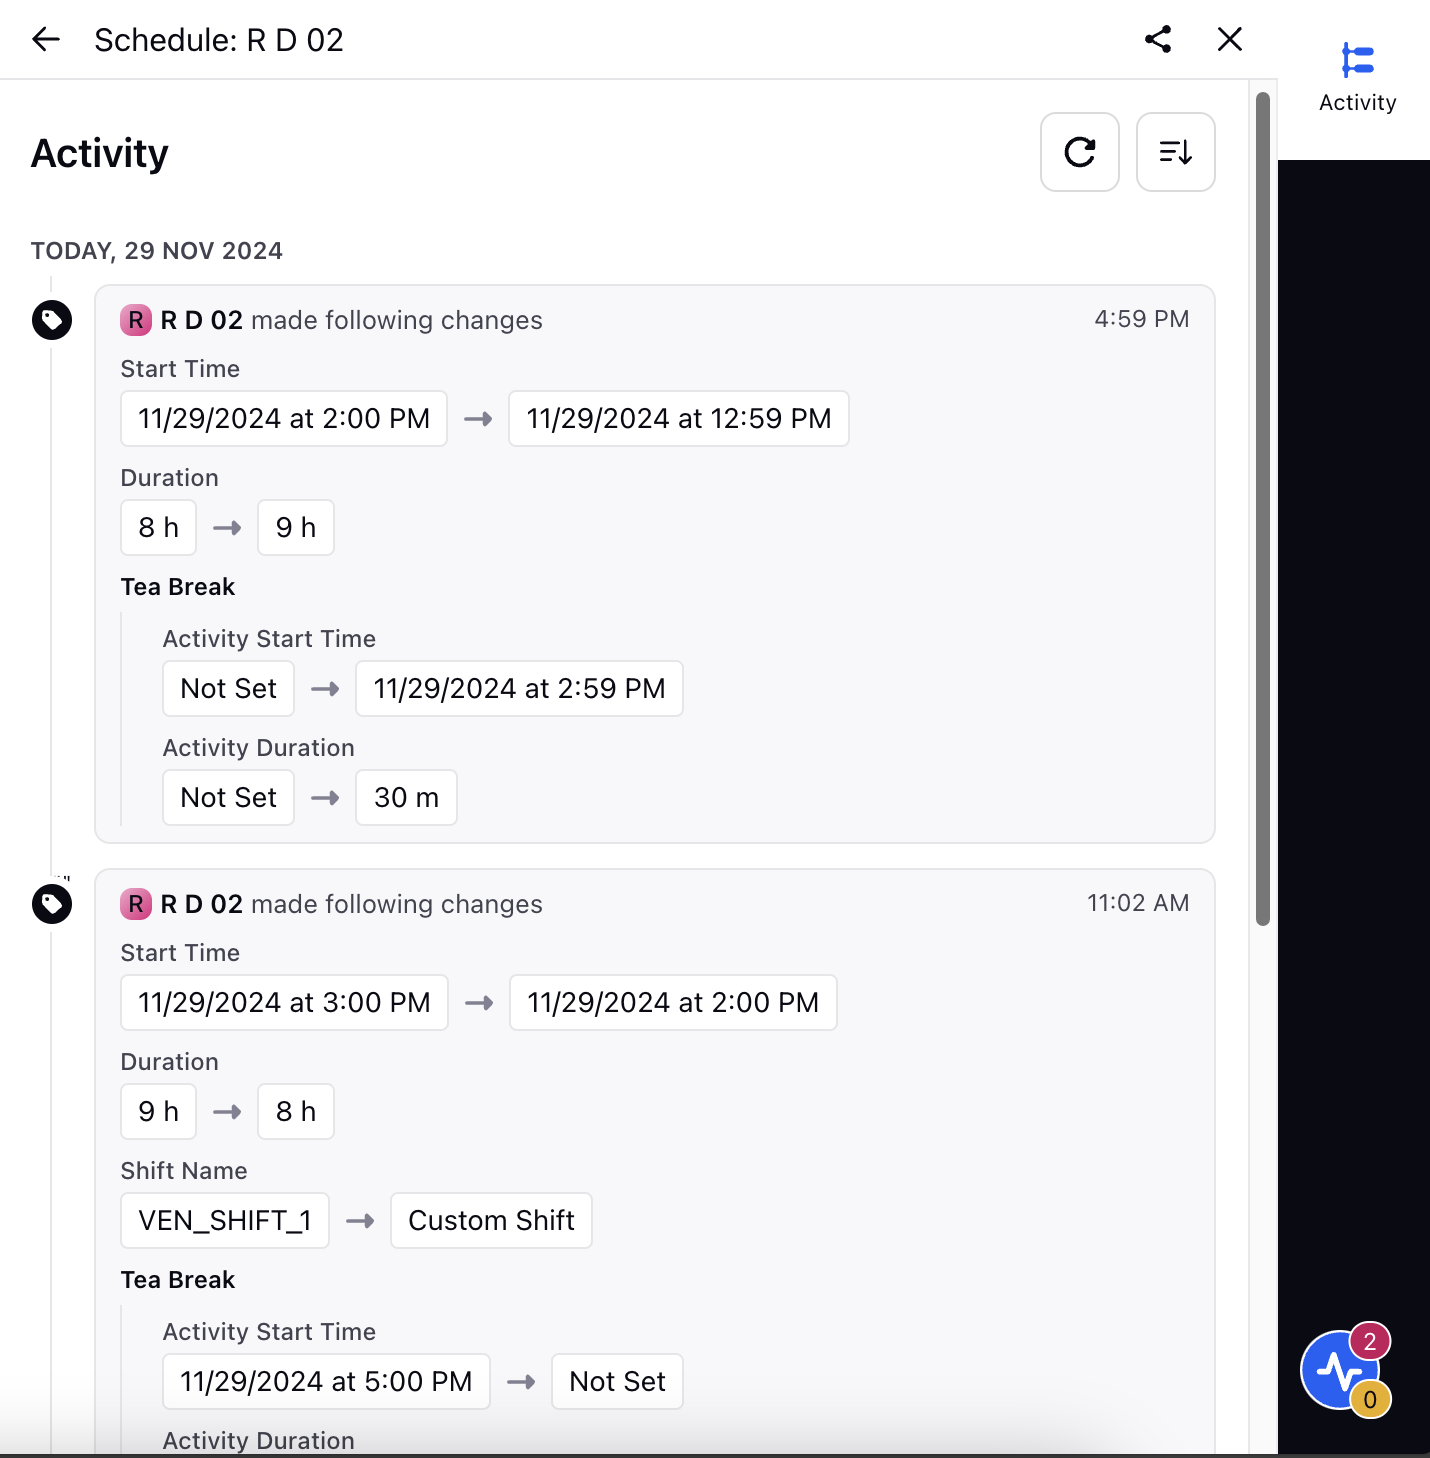
Viewing the activity log of changes made to an agent's schedule helps Workforce Managers track all modifications and understand the reasons behind them including swapped shifts between agents. This transparency allows for prompt action to address any issues and ensures efficient management.

Hover over the vertical ellipsis icon (⋮) corresponding to the agent's name to show the View Audit Logs option. Click the View Audit Logs option to open the activity log from the Third Pane.
Filter Agents Based on Active/Inactive Status
On the Master Schedule page, you can filter agents based on their Active/Inactive status on the Sprinklr platform.
Follow these steps to filter agents based on their activity status:

Click the Status filter in the filter toolbar.
Select either Active or Inactive, depending on which agents you want to view in the Master Schedule.
Click the Apply button to implement the filter.
Automatically Activate or Deactivate Agents
You can configure to automatically activate or deactivate agents in your environment by creating a Rule from the Rule Engine. Refer to Create a Rule for detailed steps on creating Rules using the Rule Engine.
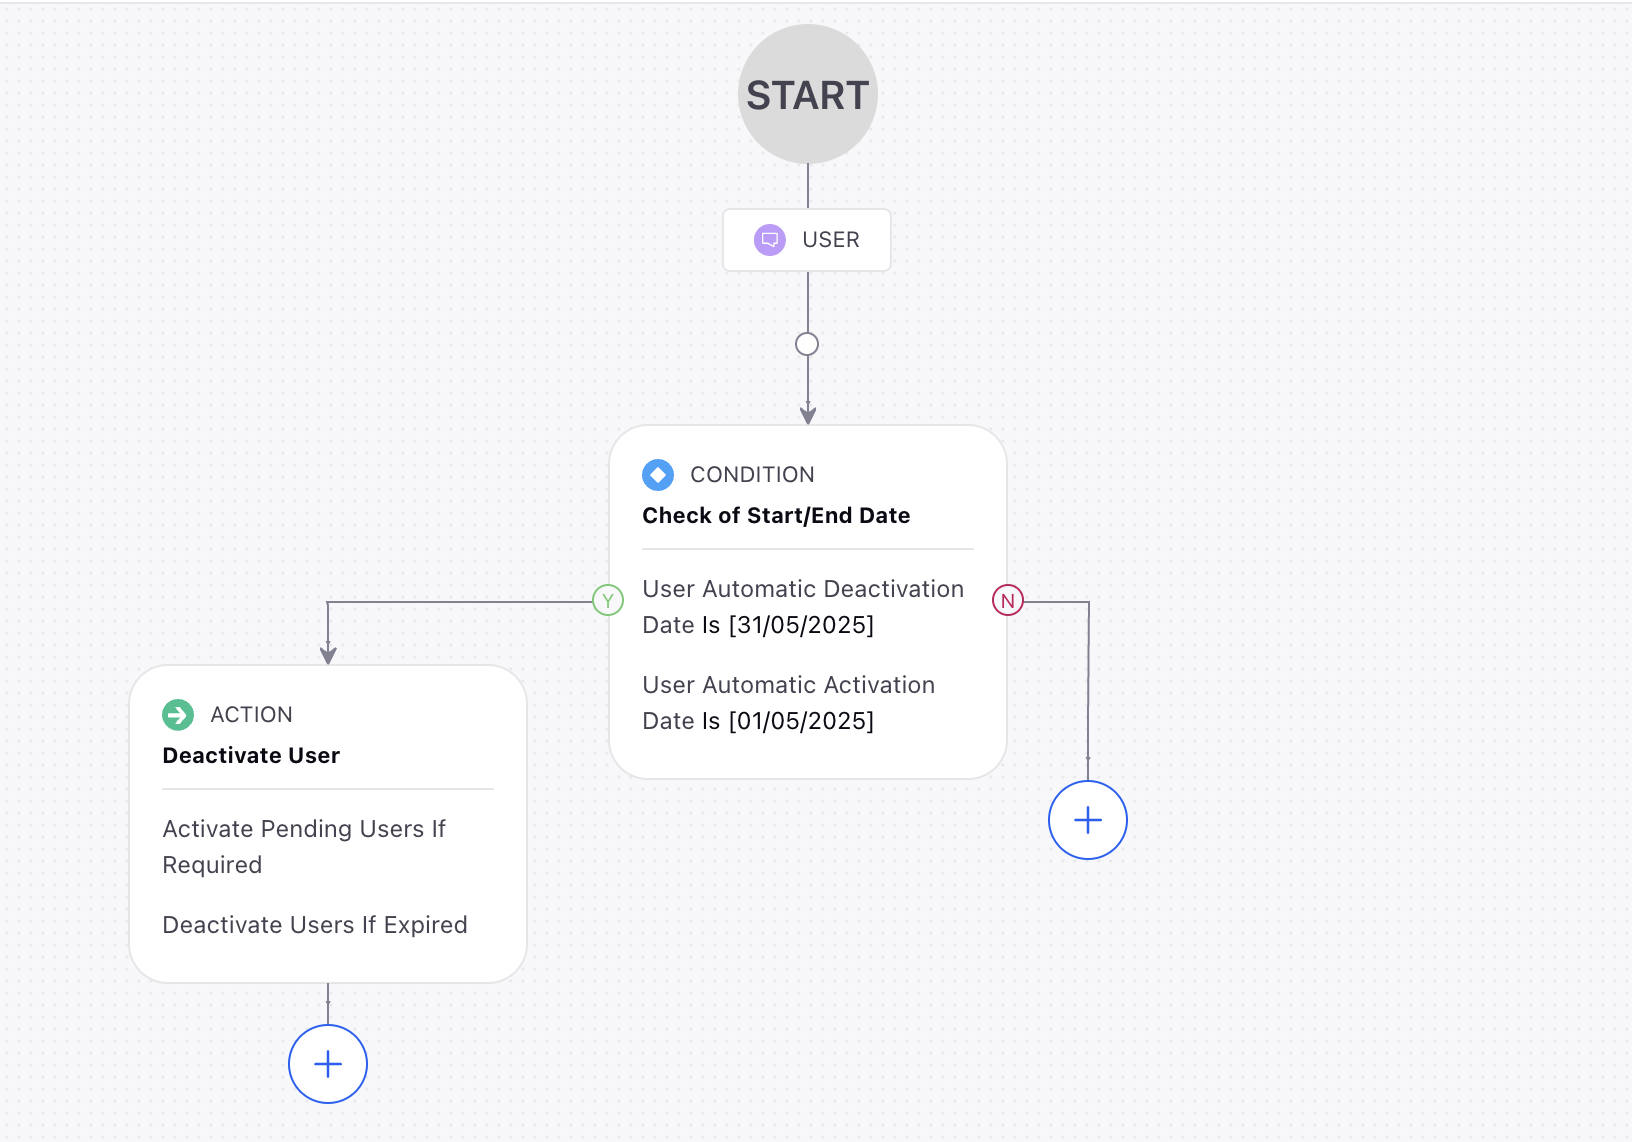
The following are the configurations for creating the Rule to activate or deactivate agents automatically:

Workspace must be selected in the Rule Scope field.
User must be chosen in the Context field.
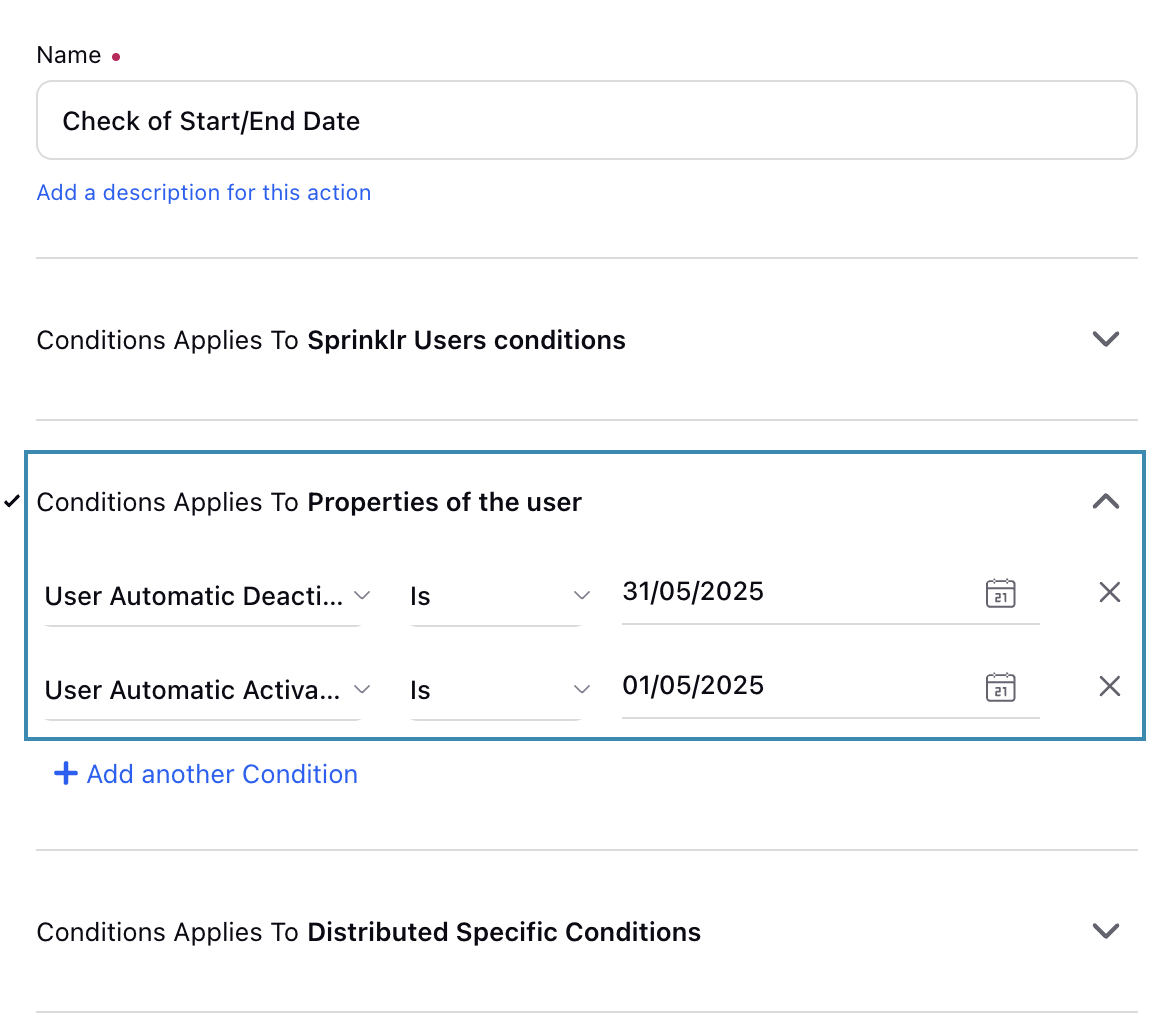
In the first Condition, define the dates on which the agents must be automatically activated or deactivated. Enter the start date in the User Automatic Activation Date field and the end date in the User Automatic Deactivation Date field.
Note: Shifts will be assigned to agents only till the date specified in the User Automatic Deactivation Date field.
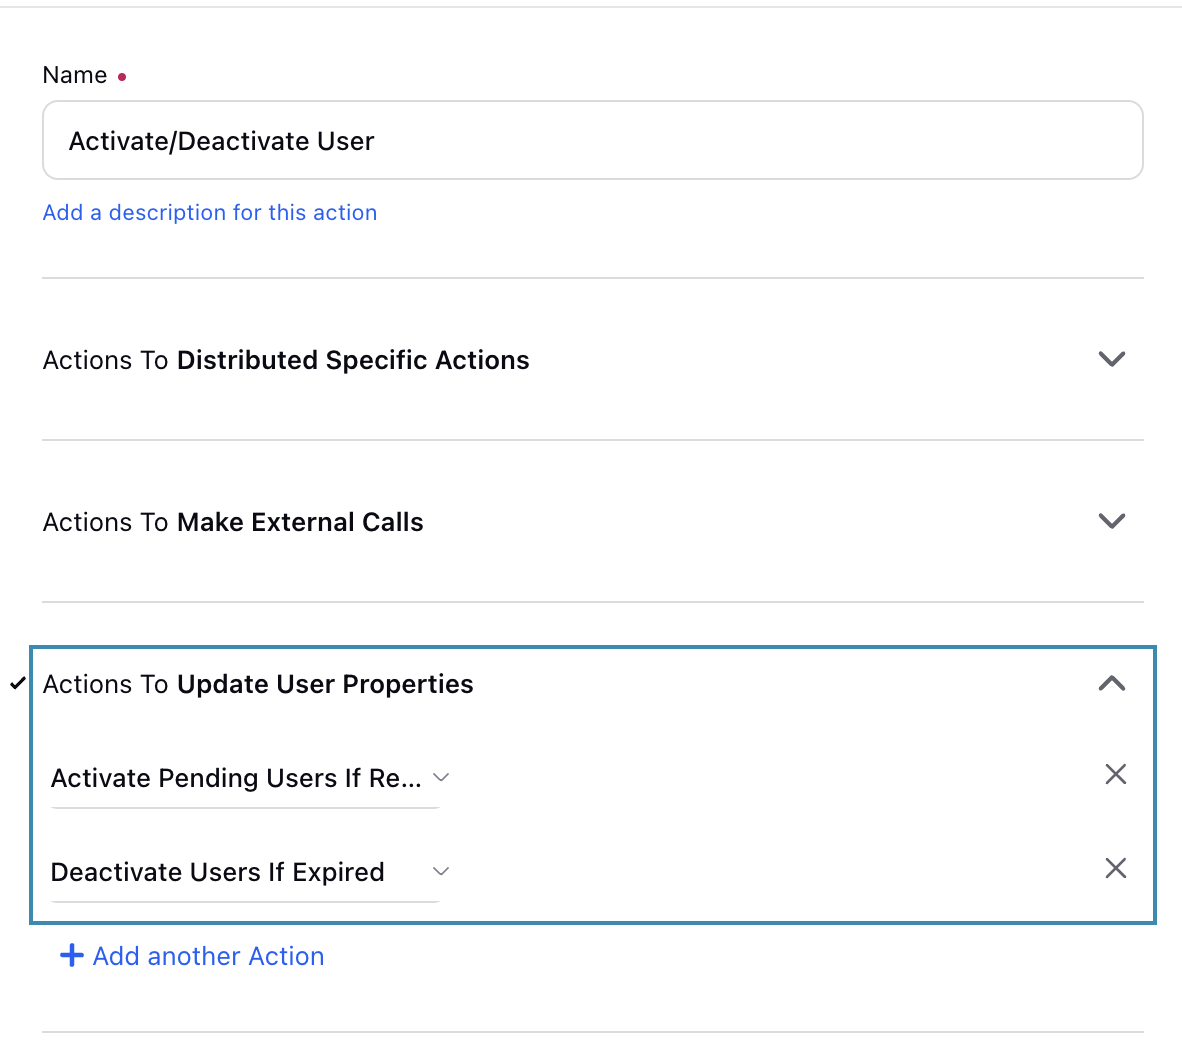
In the Yes branch, choose an Action box and select the Activate Pending Users If Required and the Deactivate Users If Expired fields.
Click the Save button at the bottom right. The Rule will be applicable only when it is enabled.
Change Time Format

The Master Schedule page shows the Schedule in 24-hour format by default, which can be switched between the 24-hour and 12-hour formats. Contact your Success Manager to switch the default time format.