Setting Up Unified Reporting
Updated
Sprinklr unifies data from paid advertisements, brand-owned content, and earned media within a single, AI-powered platform that provides marketing teams with complete visibility, consistent reporting, and actionable insights across the customer journey.
In this article, you will learn:
The benefits of Paid, Owned, Earned (POE) dashboards.
How to set up a Custom Entity.
How to tag custom entities across Social, Insights, and Paid modules.
How to plot a Custom Entity on widgets.
Benefits of POE Dashboards
Understanding the impact of paid and owned content on your brand and how earned engagements contribute to your brand's growth is crucial to capture the full voice of the customer. POE dashboards consolidate all this data into a single view, offering the following advantages:
Consolidated data across paid ads, brand-owned content, and earned media in one dashboard to understand what channels and content types are driving true business impact.
Consolidated and enriched meta tags for improved efficiency.
Move beyond traditional single-campaign reports by slicing and analyzing data by events, products, or content titles directly within the dashboard.
Cross-Channel views with breakdowns by media type including organic posts, ad campaigns, influencer content, and customer engagement.
Collaboration across departments, helping global teams align their strategies, track progress, and measure outcomes according to a shared set of standards.
Custom Entities
Custom Entities in Sprinklr act as centralized databases that can be created, stored, and accessed across multiple modules (Care, Marketing, Reporting, Listening, AI, and so on.). They differ significantly from custom fields and variables:
Custom Fields: Limited to message, case, or profile level.
Variables: Scoped within a dialogue tree of a conversational AI workflow and cannot be reused outside that tree.
Custom Entities: Independent, reusable databases accessible across the platform.
Example:
Imagine running a restaurant chain:
Custom Fields = Sticky notes on individual orders (example, “Urgent” or “VIP”) – only valid for that order.
Variables = A waiter’s scratchpad note for one table (“Extra spicy”) – disappears after use.
Custom Entities = The master Recipe Book (Excel file) listing all dishes, ingredients, and prices.
Anyone (chef, cashier, marketing, reporting) refers to the same book.
Ensures consistency, standardization, and easy analysis across the entire business.
Prerequisites to Setting Up a Custom Entity
To set up and report on a custom entity in a POE dashboard, you need:
Access to CRM Studio
Event-based reporting enabled
Contact your success manager with the modules where you'd like to enable custom entities, or submit a request at tickets@sprinklr.com.
Create Custom Entity from CRM Studio
Custom entities act as centralized database solutions accessible across Sprinklr applications. Once created, you can use them as dimensions in dashboards to:
Unify Filtering Across Channels: Filter data from paid, social, and listening channels using a single dimension, eliminating the need to apply multiple custom fields.
Enable Event-Based Filters: Analyze content performance based on specific events and corresponding dates.
Steps to Create Custom Entity:
Open the CRM Studio persona app.
In the Entity Manager, switch to the Custom tab.
Click +Create Custom Entity in the top right corner.
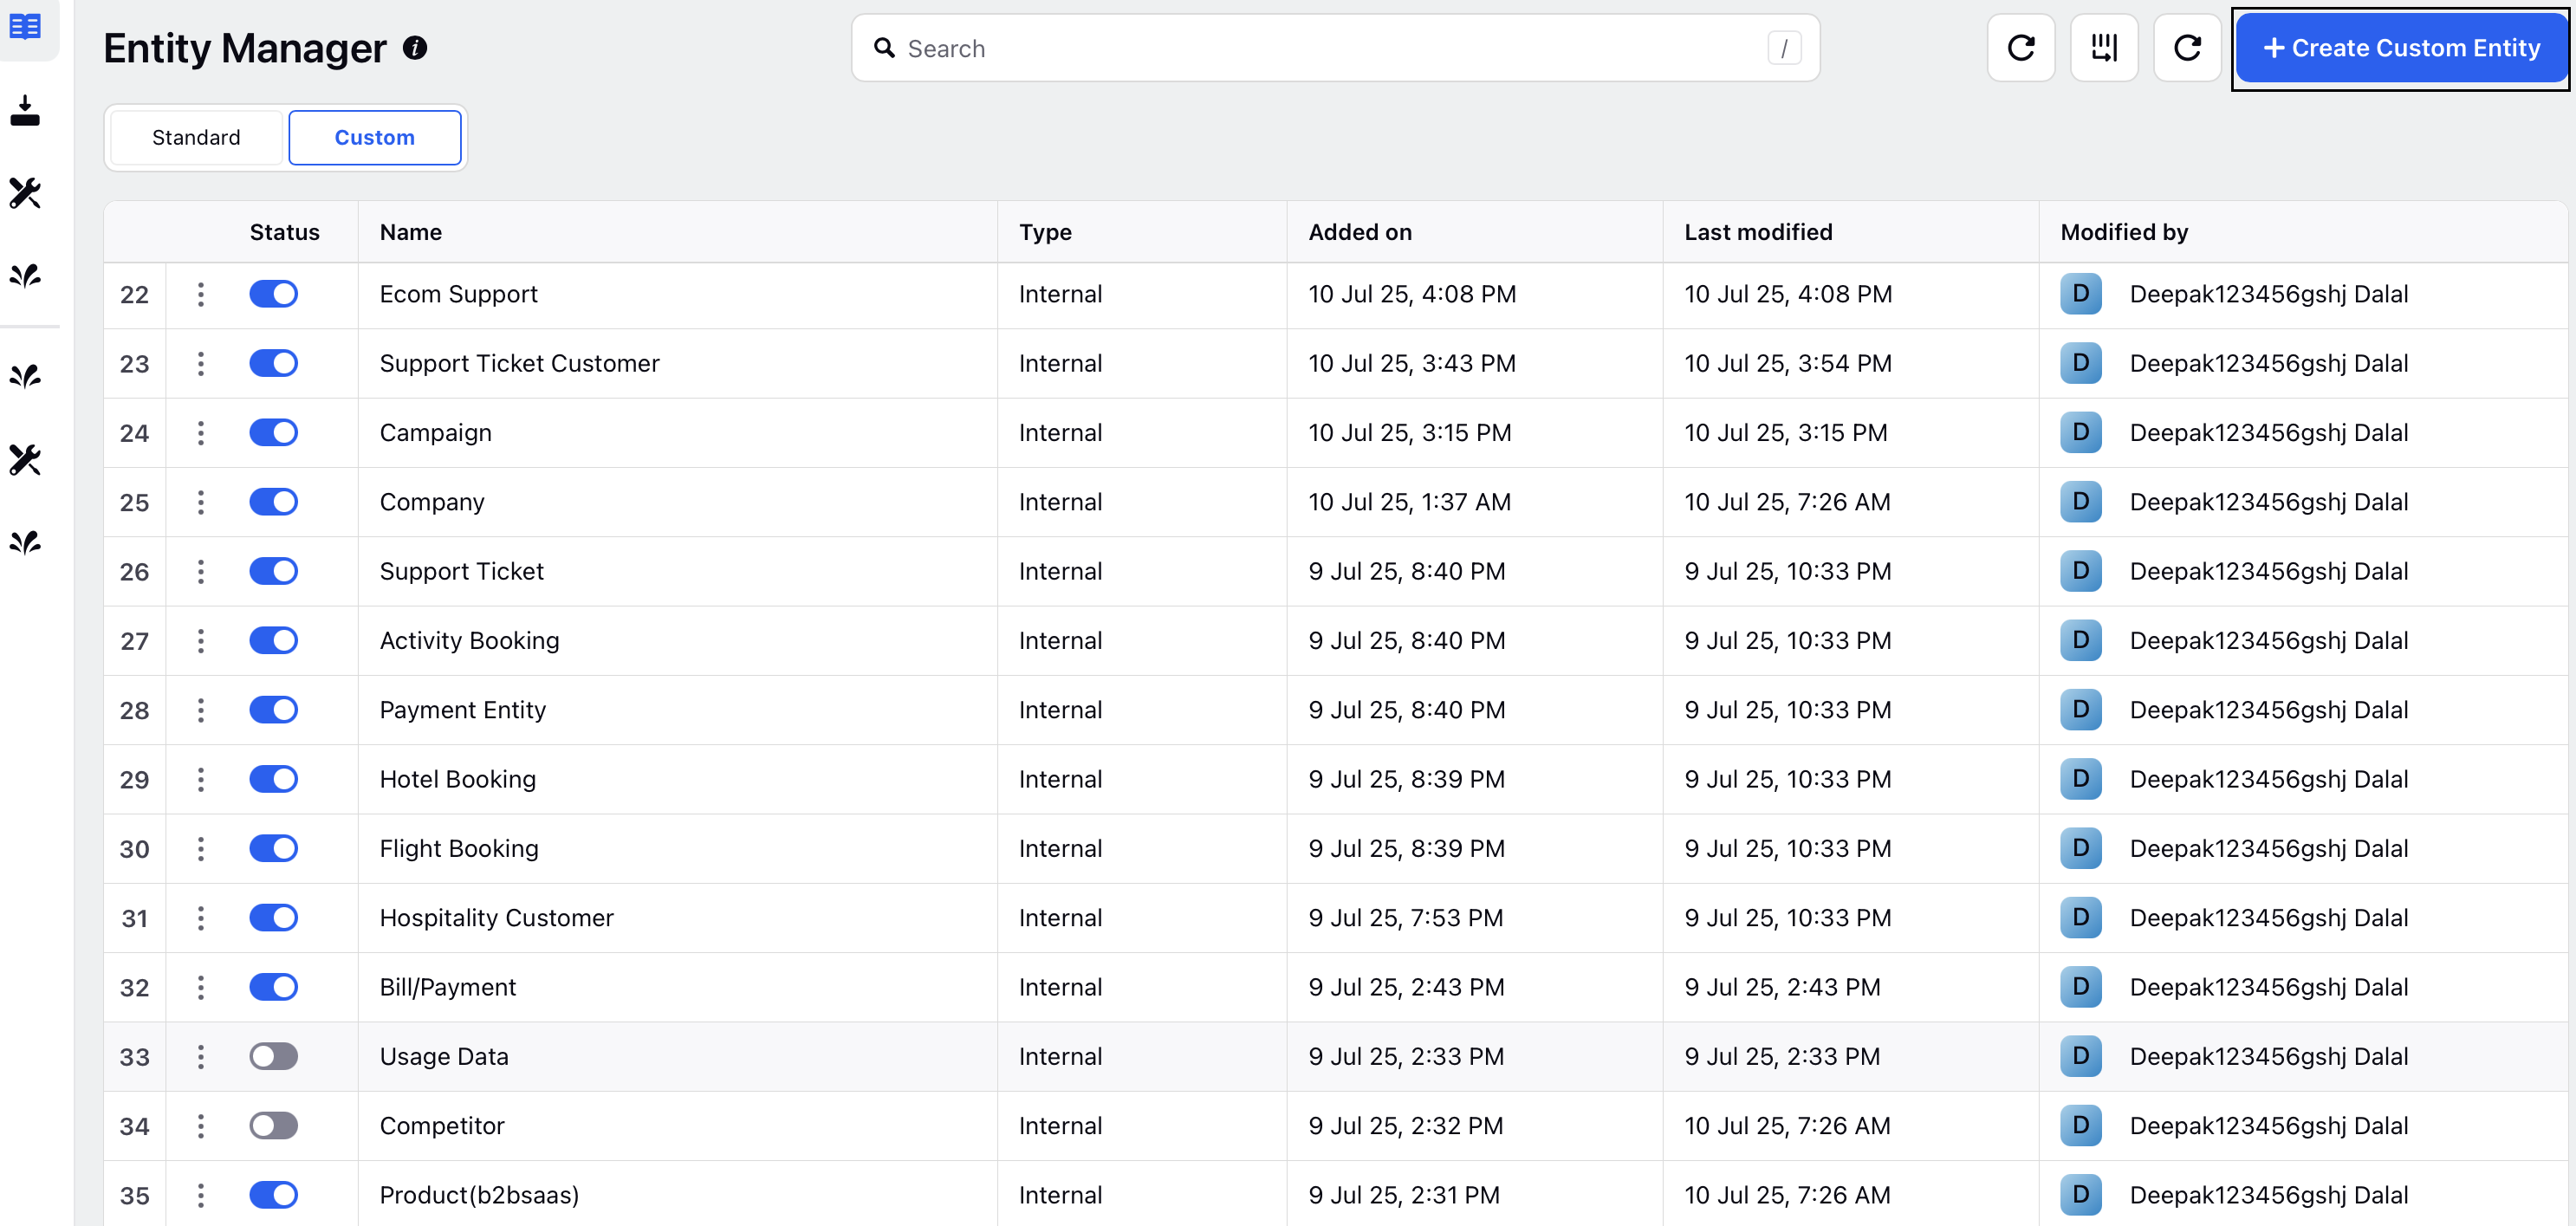
The Create Custom Entity screen is displayed.
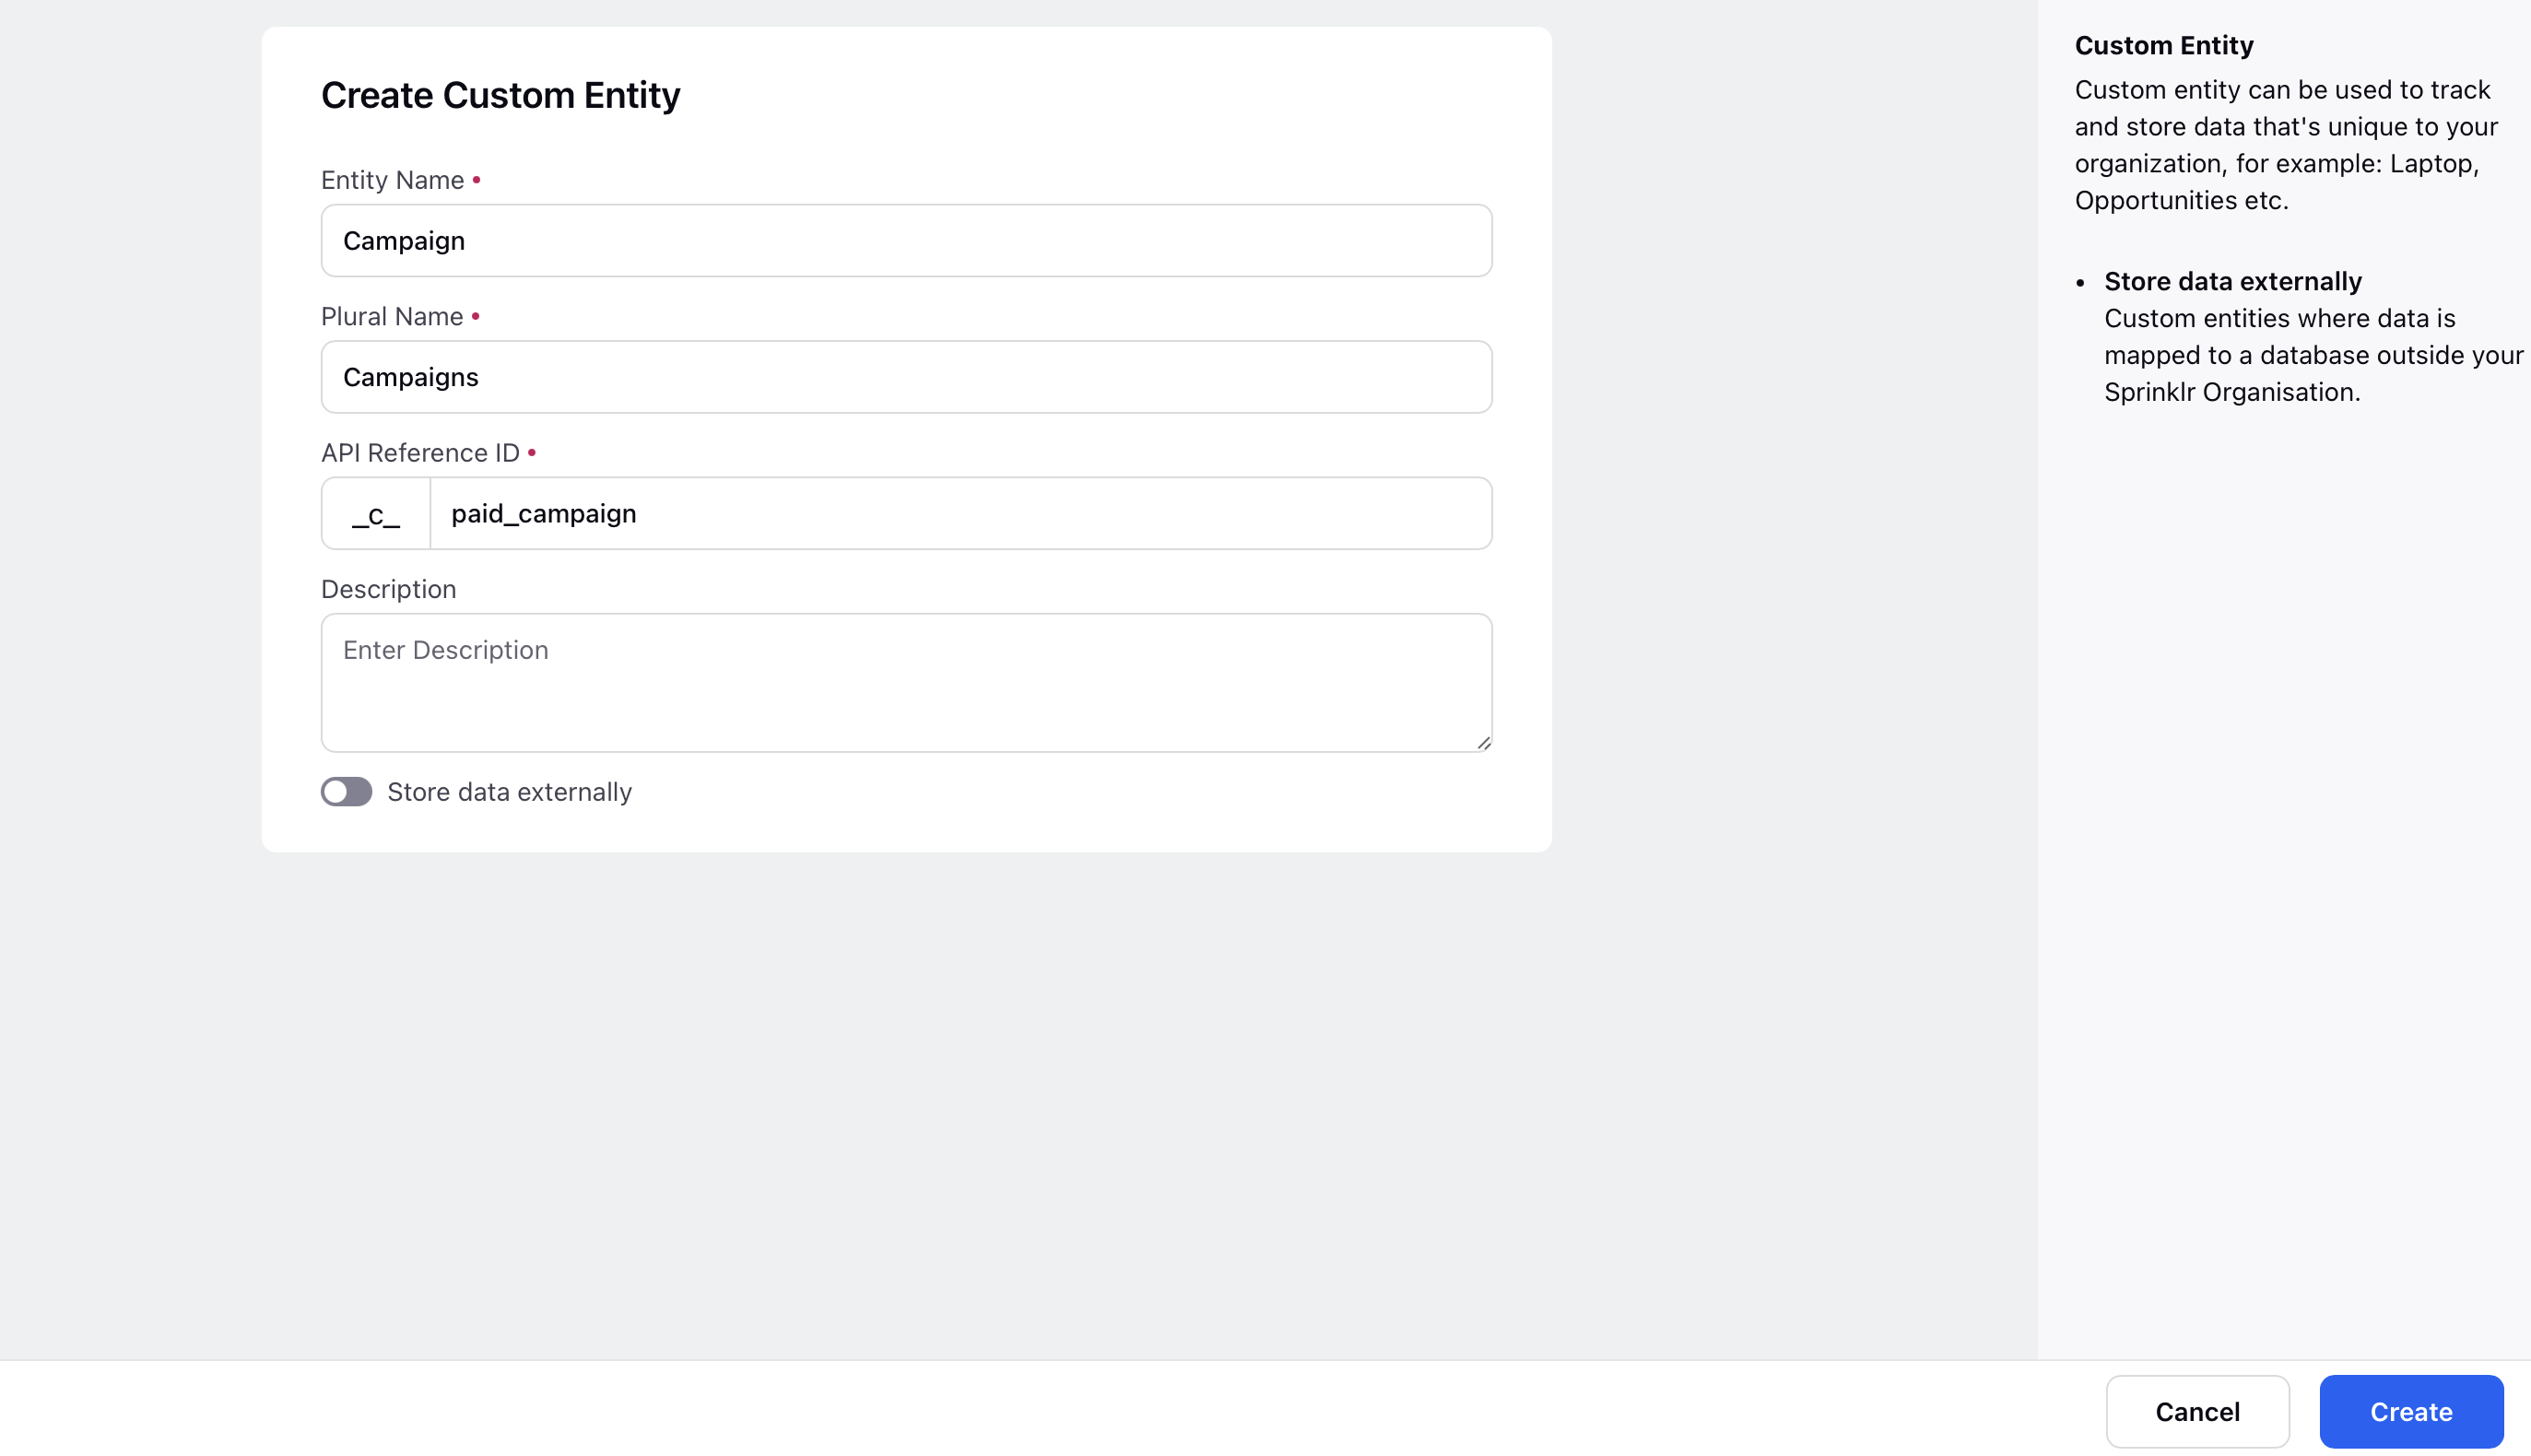
Enter the Entity Name.
Enter the Plural Name.
Enter the API Reference ID.
Enter the Description.
Click the Store data externally toggle button if you want the data to be stored externally.
Click Create in the bottom right corner to save.
Once created, add entity fields to link multiple custom fields in the custom entity.
Refer to the following table for the parameter details of the Create Custom Entity screen.
Parameter | Description |
Entity Name | Primary display name of the entity. |
Plural Name | Used when referencing collections of entities. |
API Reference ID | Unique identifier for API usage and integration. |
Description | Internal description of the entity’s purpose. It is an Optional field. |
Steps to Add Entity Fields
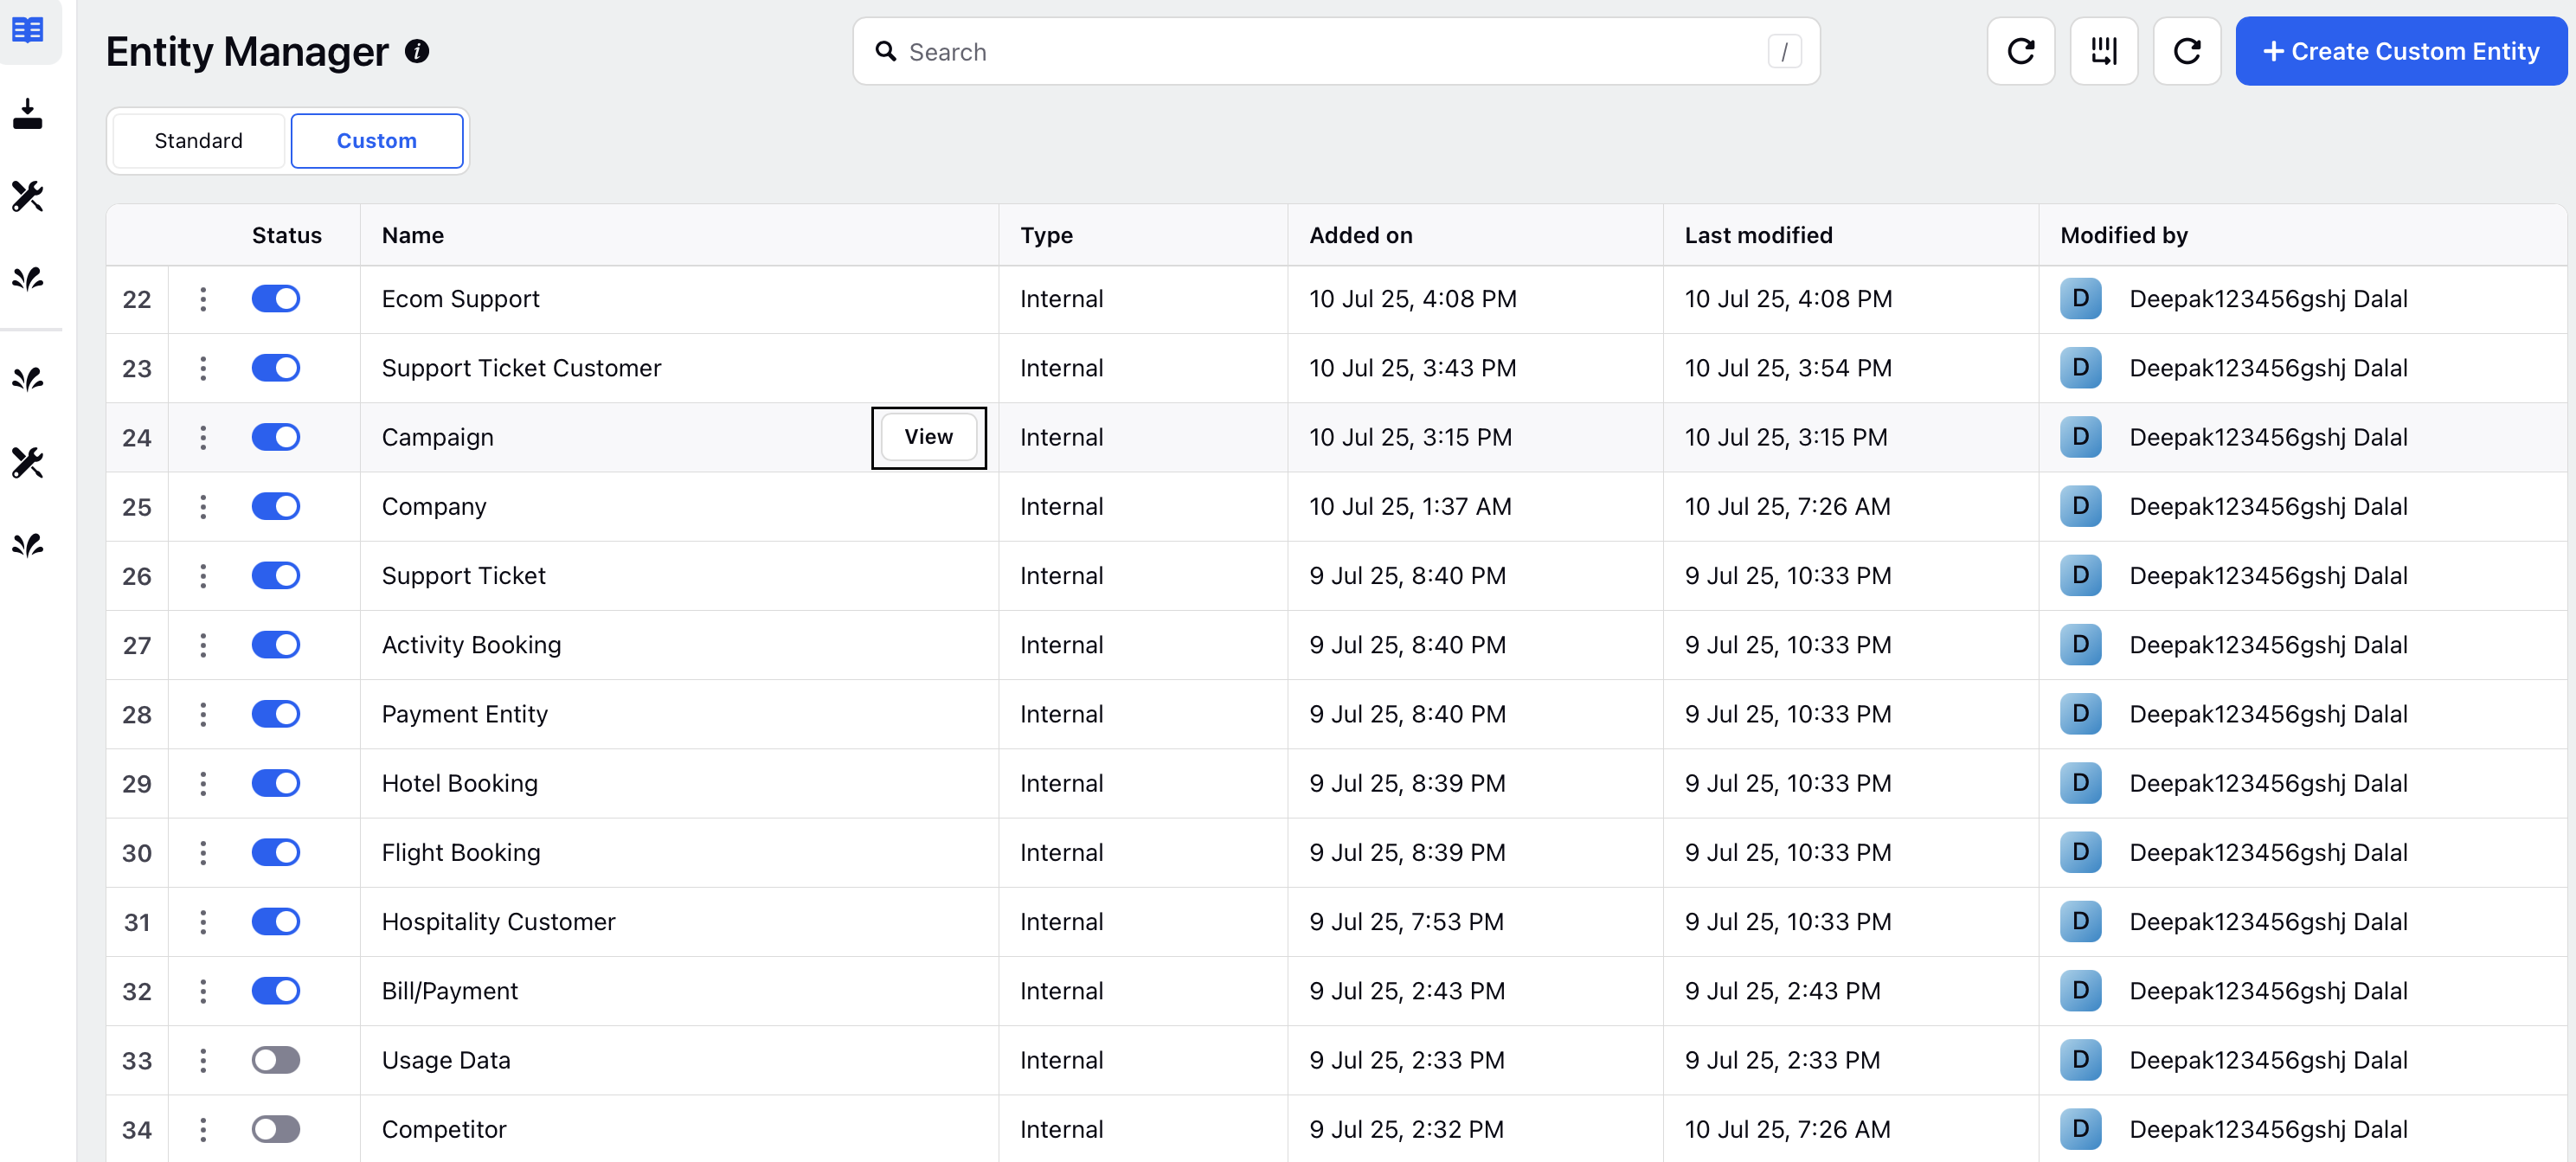
Double-click on a custom entity to view the corresponding entity fields. Alternatively, hover over the entity and click View.
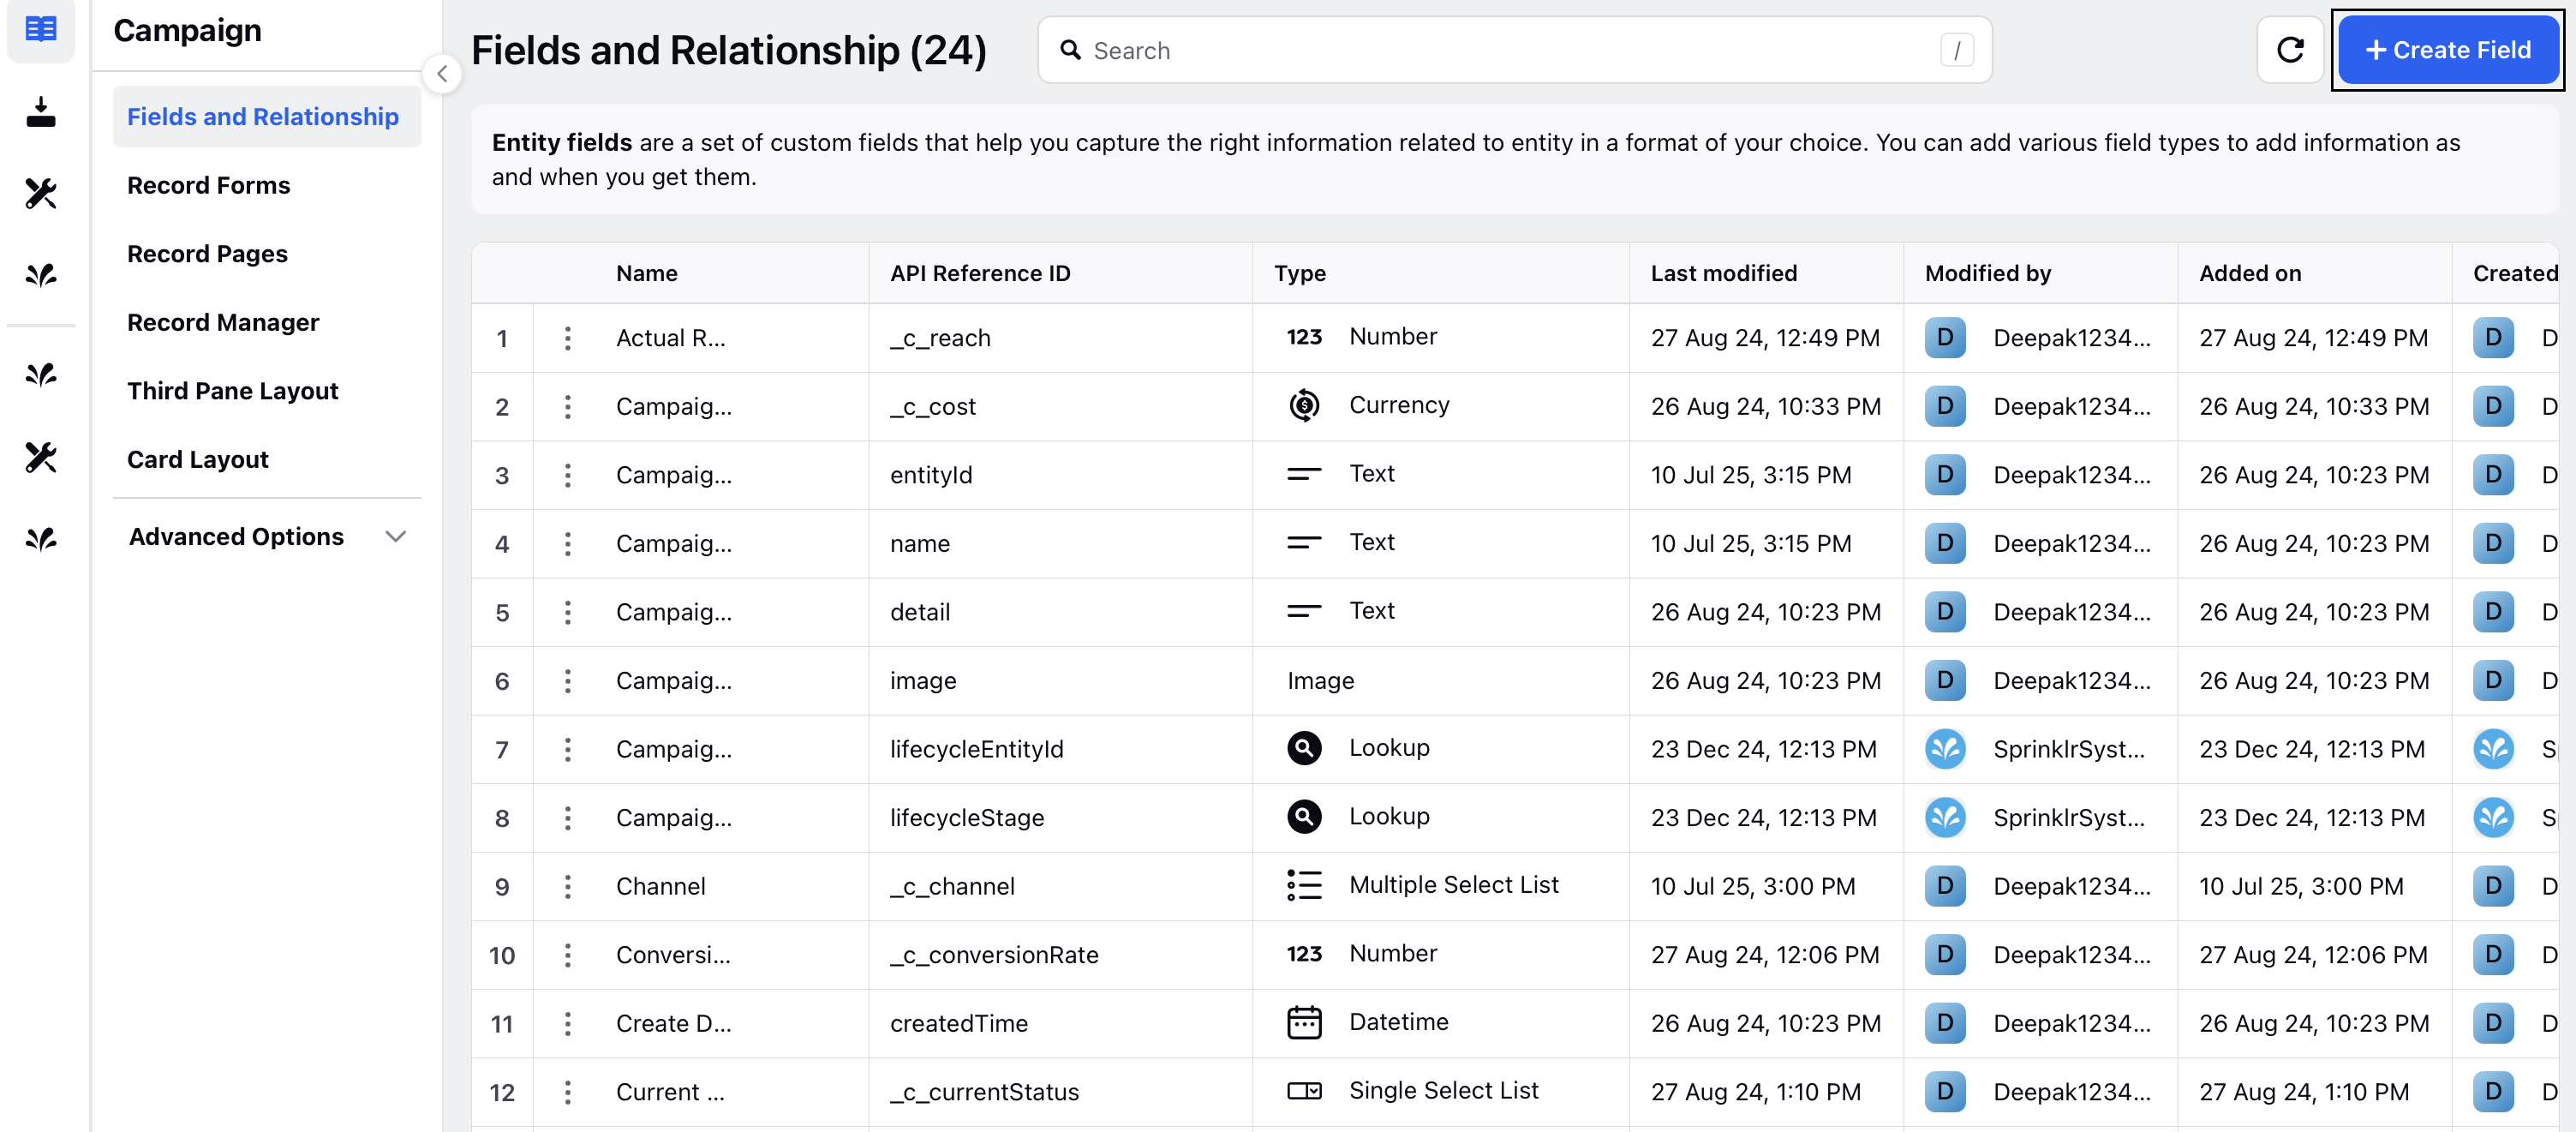
In the Fields and Relationships screen, click +Create Field in the top right corner.
Select the Field Type for your entity field from the dropdown.
Enter a Name and API Reference ID.
Add Help Text and a Placeholder for the field. The placeholder text will be displayed when the field is empty.
Enable/disable the toggles (Mandatory, Enable Sorting, Enable Searching and more) as required for the entity field.
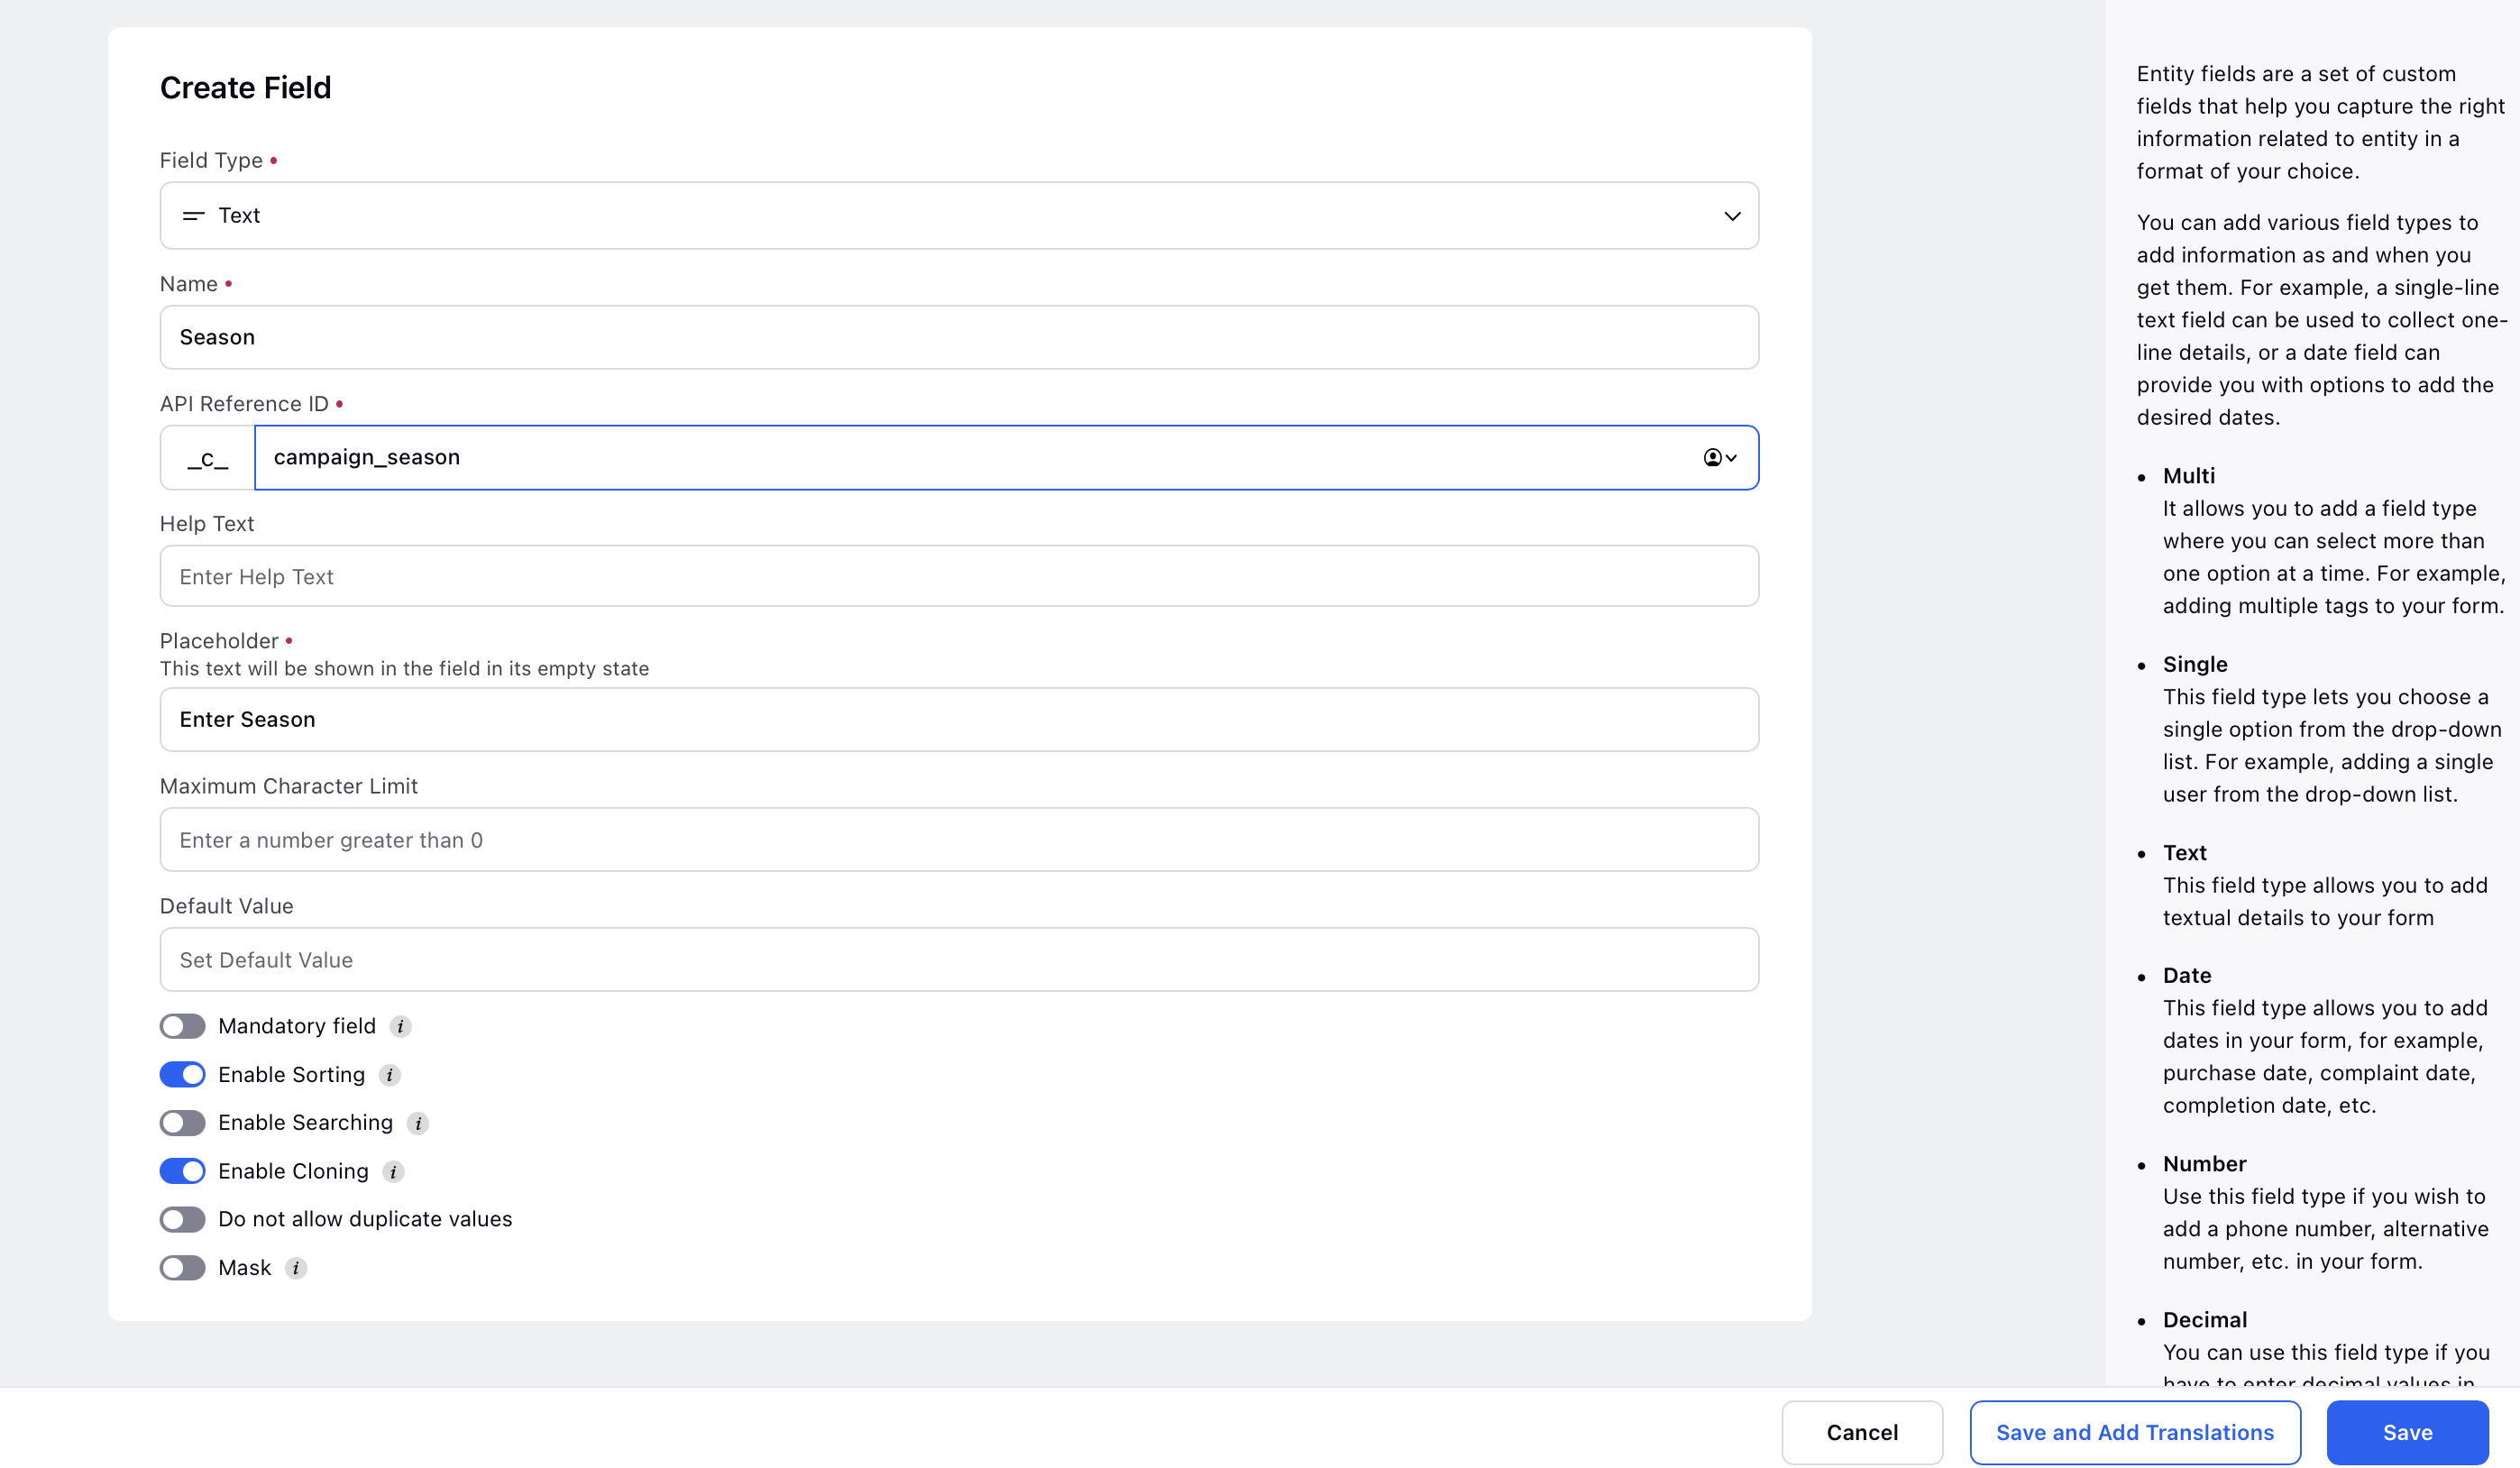
Click Save in the bottom right corner to complete the entity field setup.
For further details, refer to Creating Custom Entities in Sprinklr.
Uploading data in Custom Entity
You can upload data to your custom entity in two ways:
Using API: Sprinklr supports API-based data uploads.
Using Data Connectors: Data connectors allow you to upload data into the custom entity directly through Sprinklr. Follow these steps to install a data connector -
In CRM Studio, go to Data Connector in the left menu.
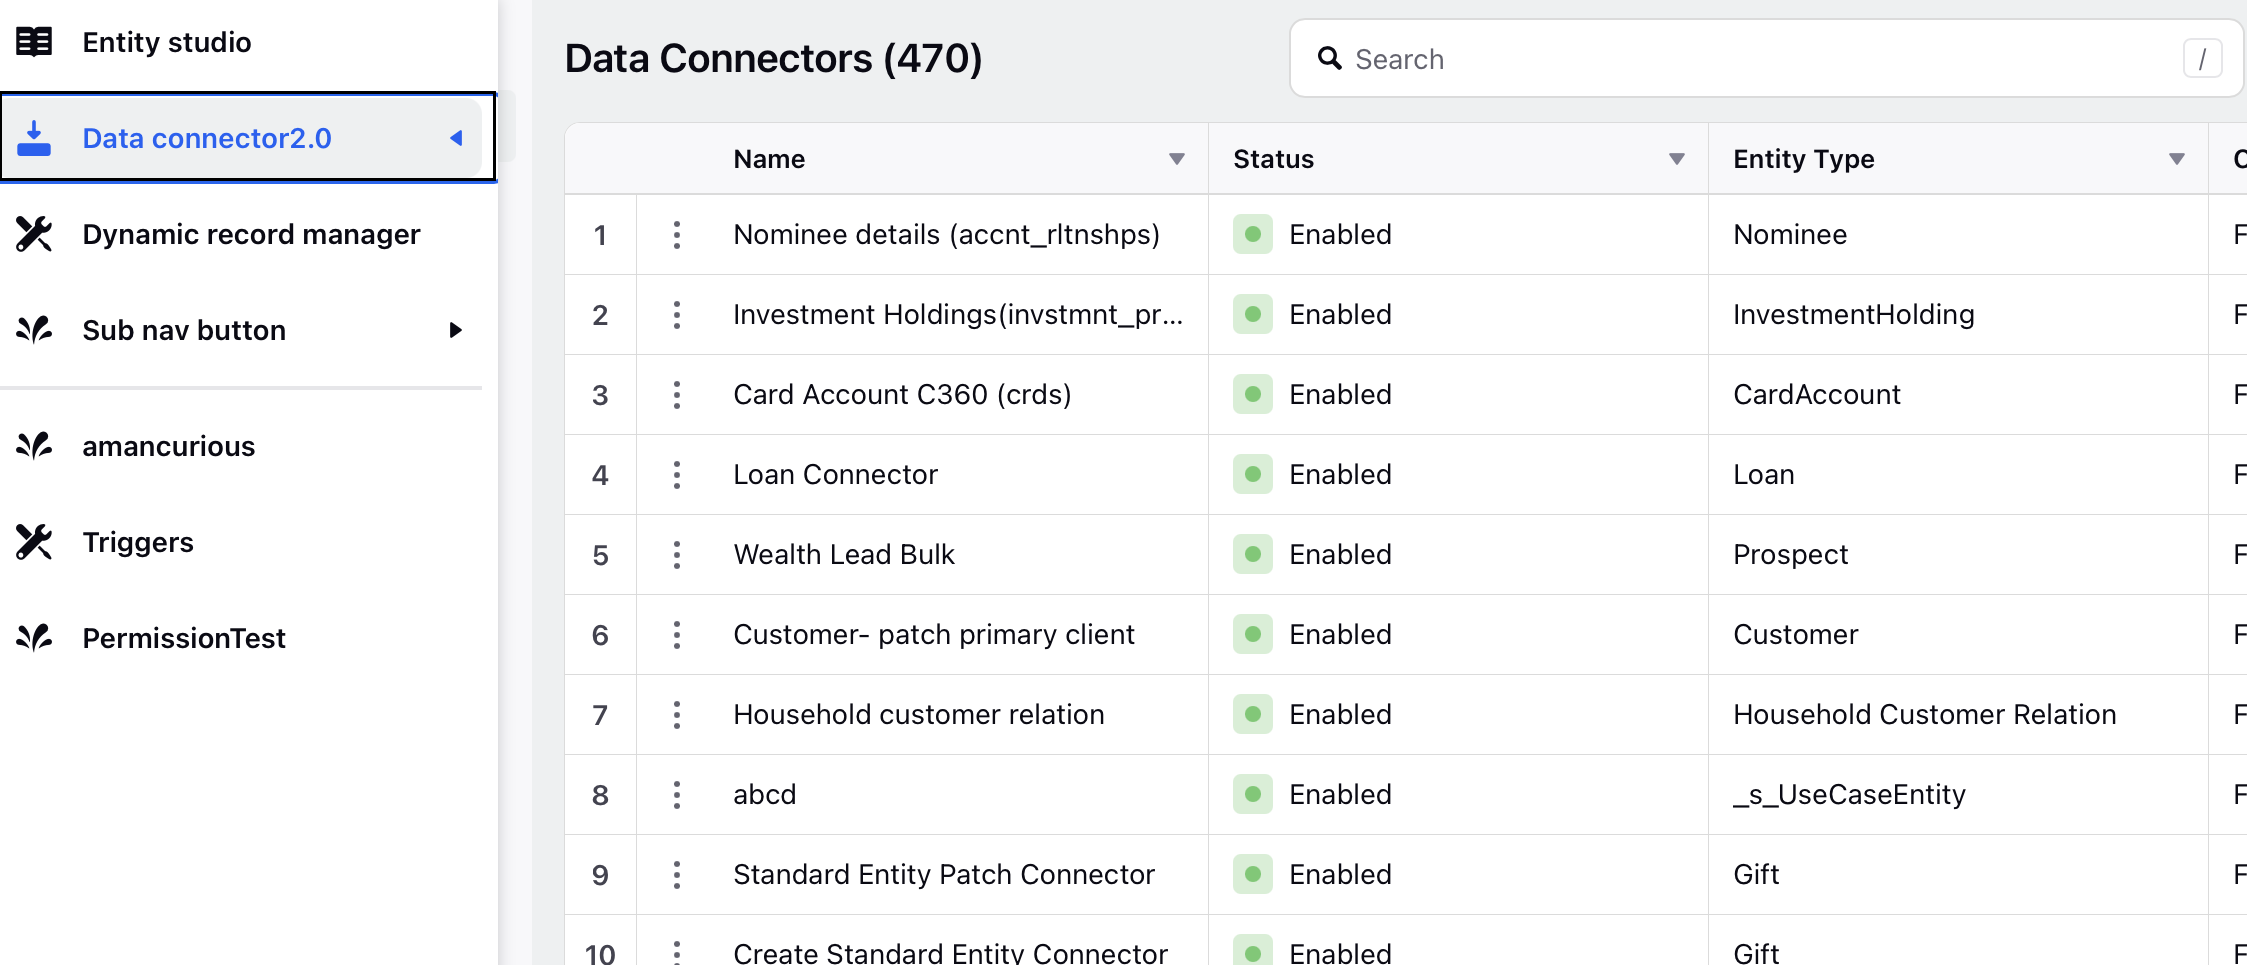
Click + Install Connector in the top right corner. The Entity Selection screen is displayed.
On the Entity Selection screen choose your custom entity.
These entities allow you to create data objects that cater specifically to your unique workflows or specialized needs. This ensures that the platform can adapt to your specific requirements, offering greater control over data management and interaction.
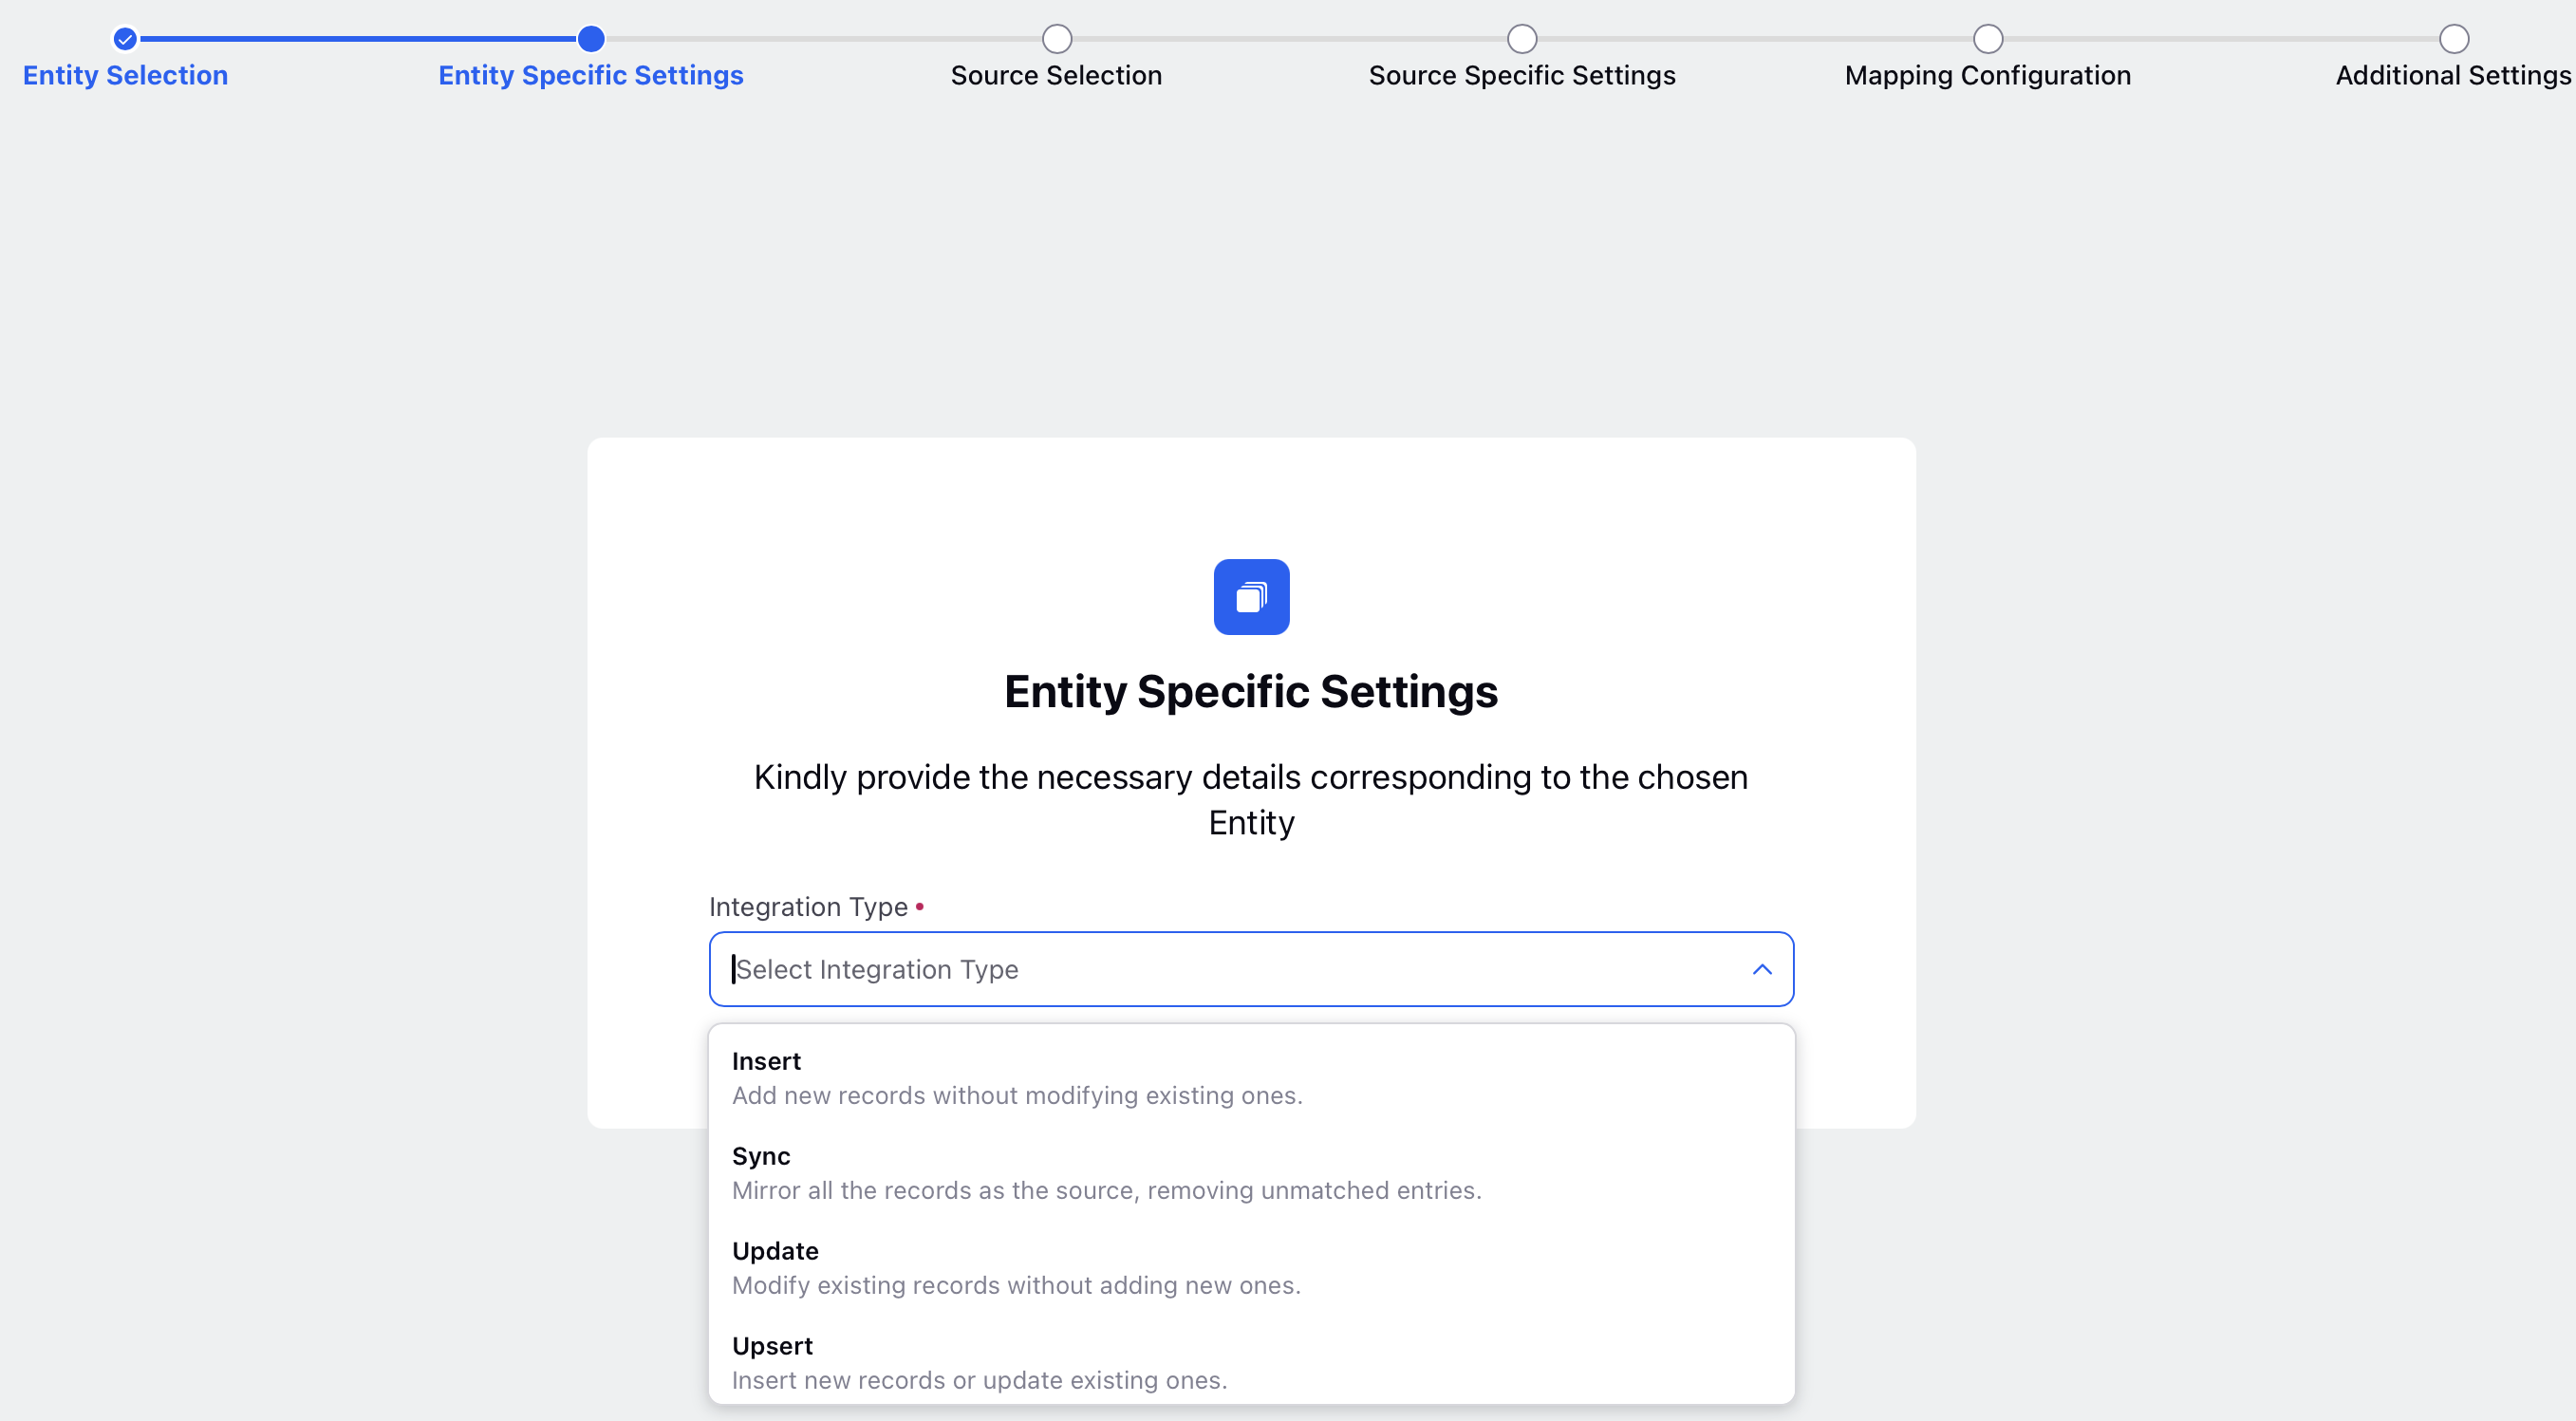
Click Next. The Entity Specific Settings screen is displayed. Select the Integration Type from the drop down menu.
You can select settings specific to the Entity chosen in the Entity Selection screen. For example, you can configure the integration settings such as data synchronization methods and entity-specific details from the Entity Specific Settings screen.
Click Next.
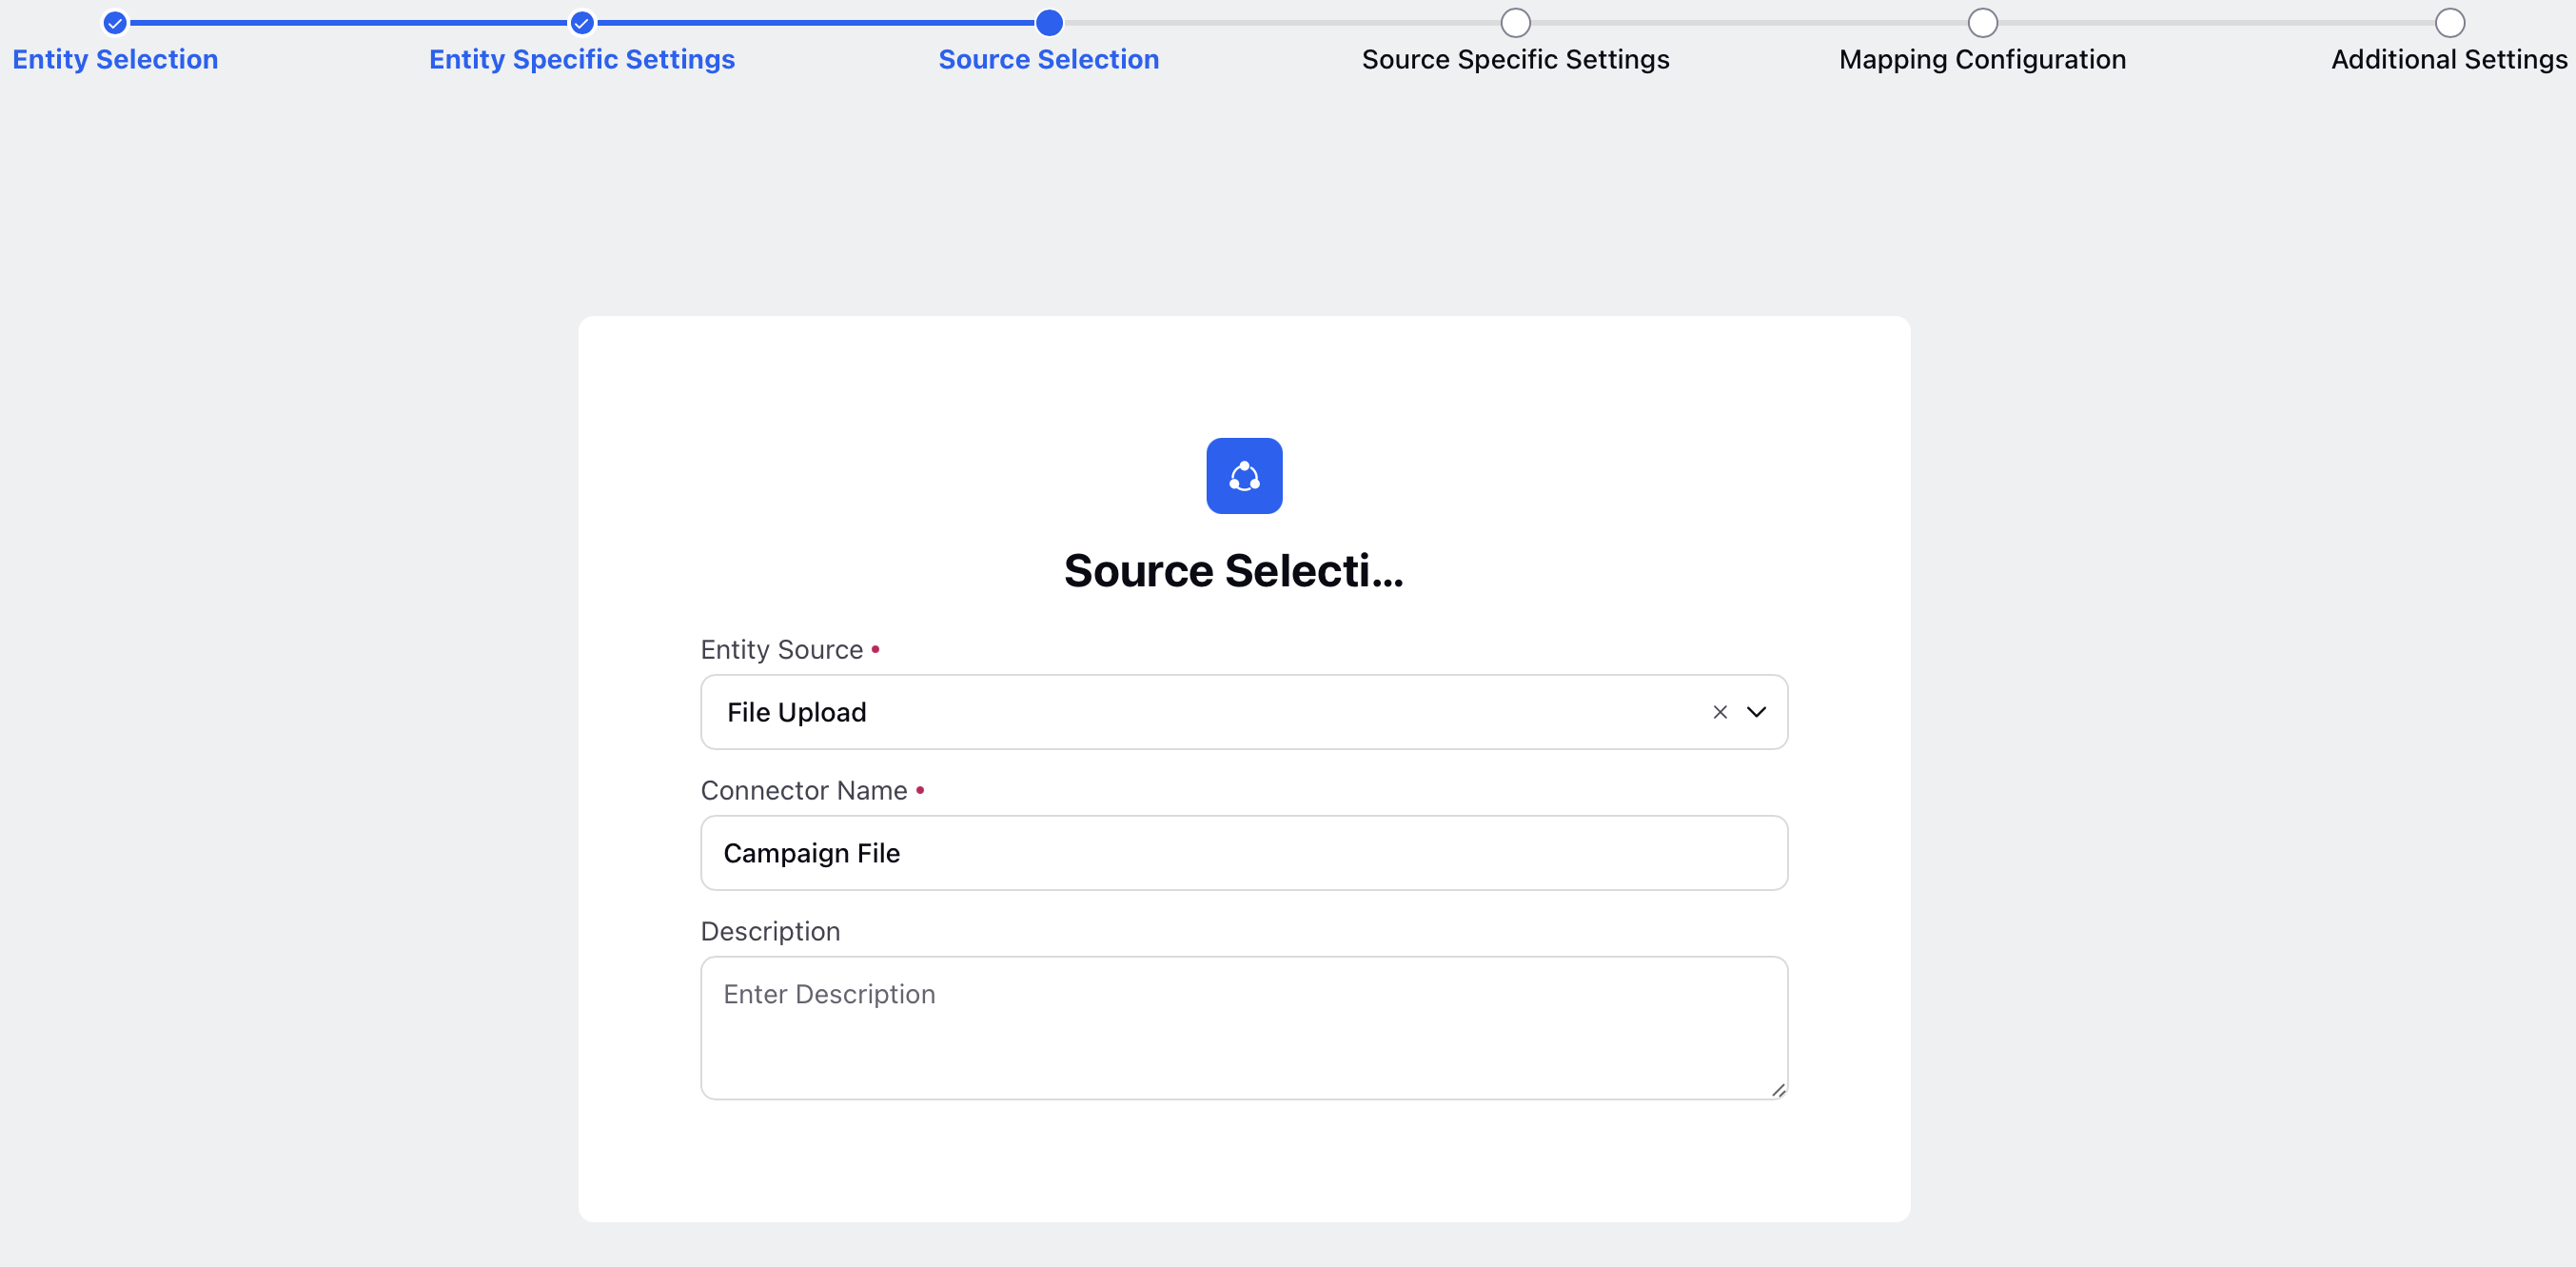
The Source Selection screen is displayed.
Select the Entity Source from the drop down menu. The different entity sources present in Sprinklr are:
S3: This is a cloud storage service for Amazon. Amazon has created various buckets from where you can import the entity onto your platform.
GCS: This is a cloud storage service from Google.
SFTP: This is a cloud location where all the files are located. To access the files, you require a username and a password to unlock the folder where the files are situated.
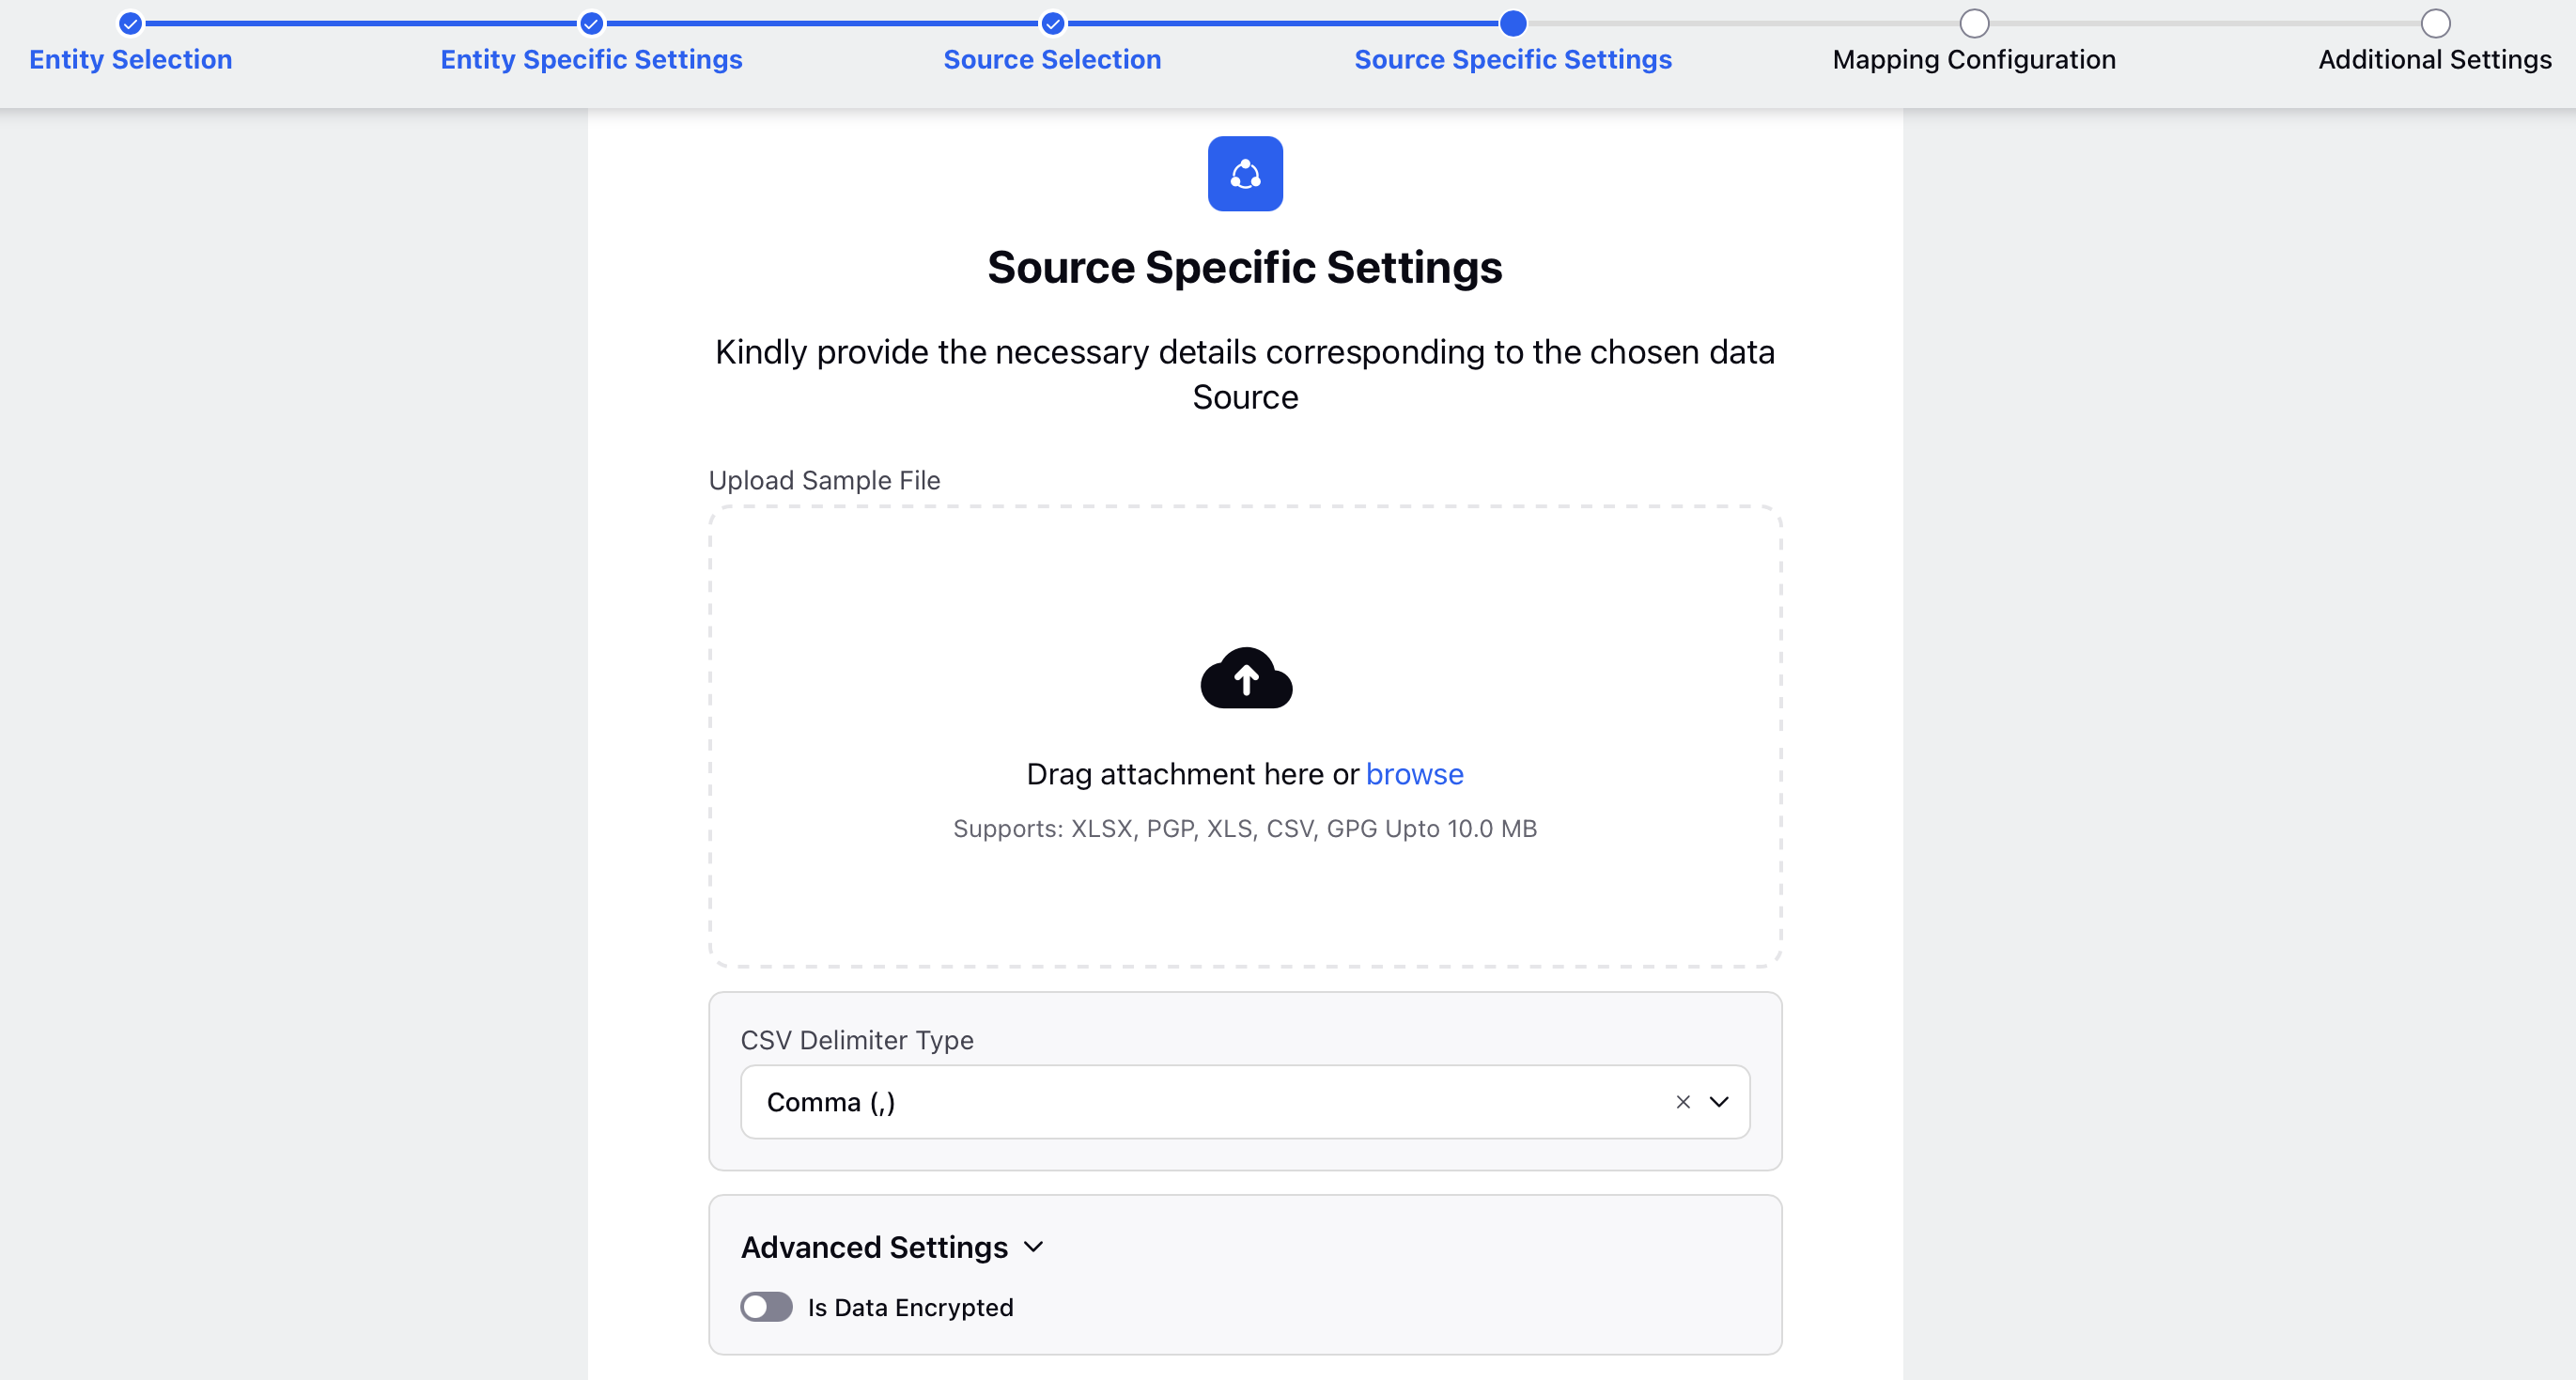
File Upload: Using File Upload, you can manually upload the file without fetching the file from any location.
Azure Blob: This is a cloud based storage that is useful for managing large datasets, importing files, and ensuring seamless workflows between Sprinklr and Azure storage.
Enter the Connector Name and Description.
Click Next.
The Source Specific Settings screen is displayed. This is a dynamic screen. The values that appear in this form depends on the Connector type chosen in the previous screen. Depending upon the selected Entity Source, additional specifications can be configured from the Source Specific Settings screen. You can also upload a sample mapping file.
Click Next.
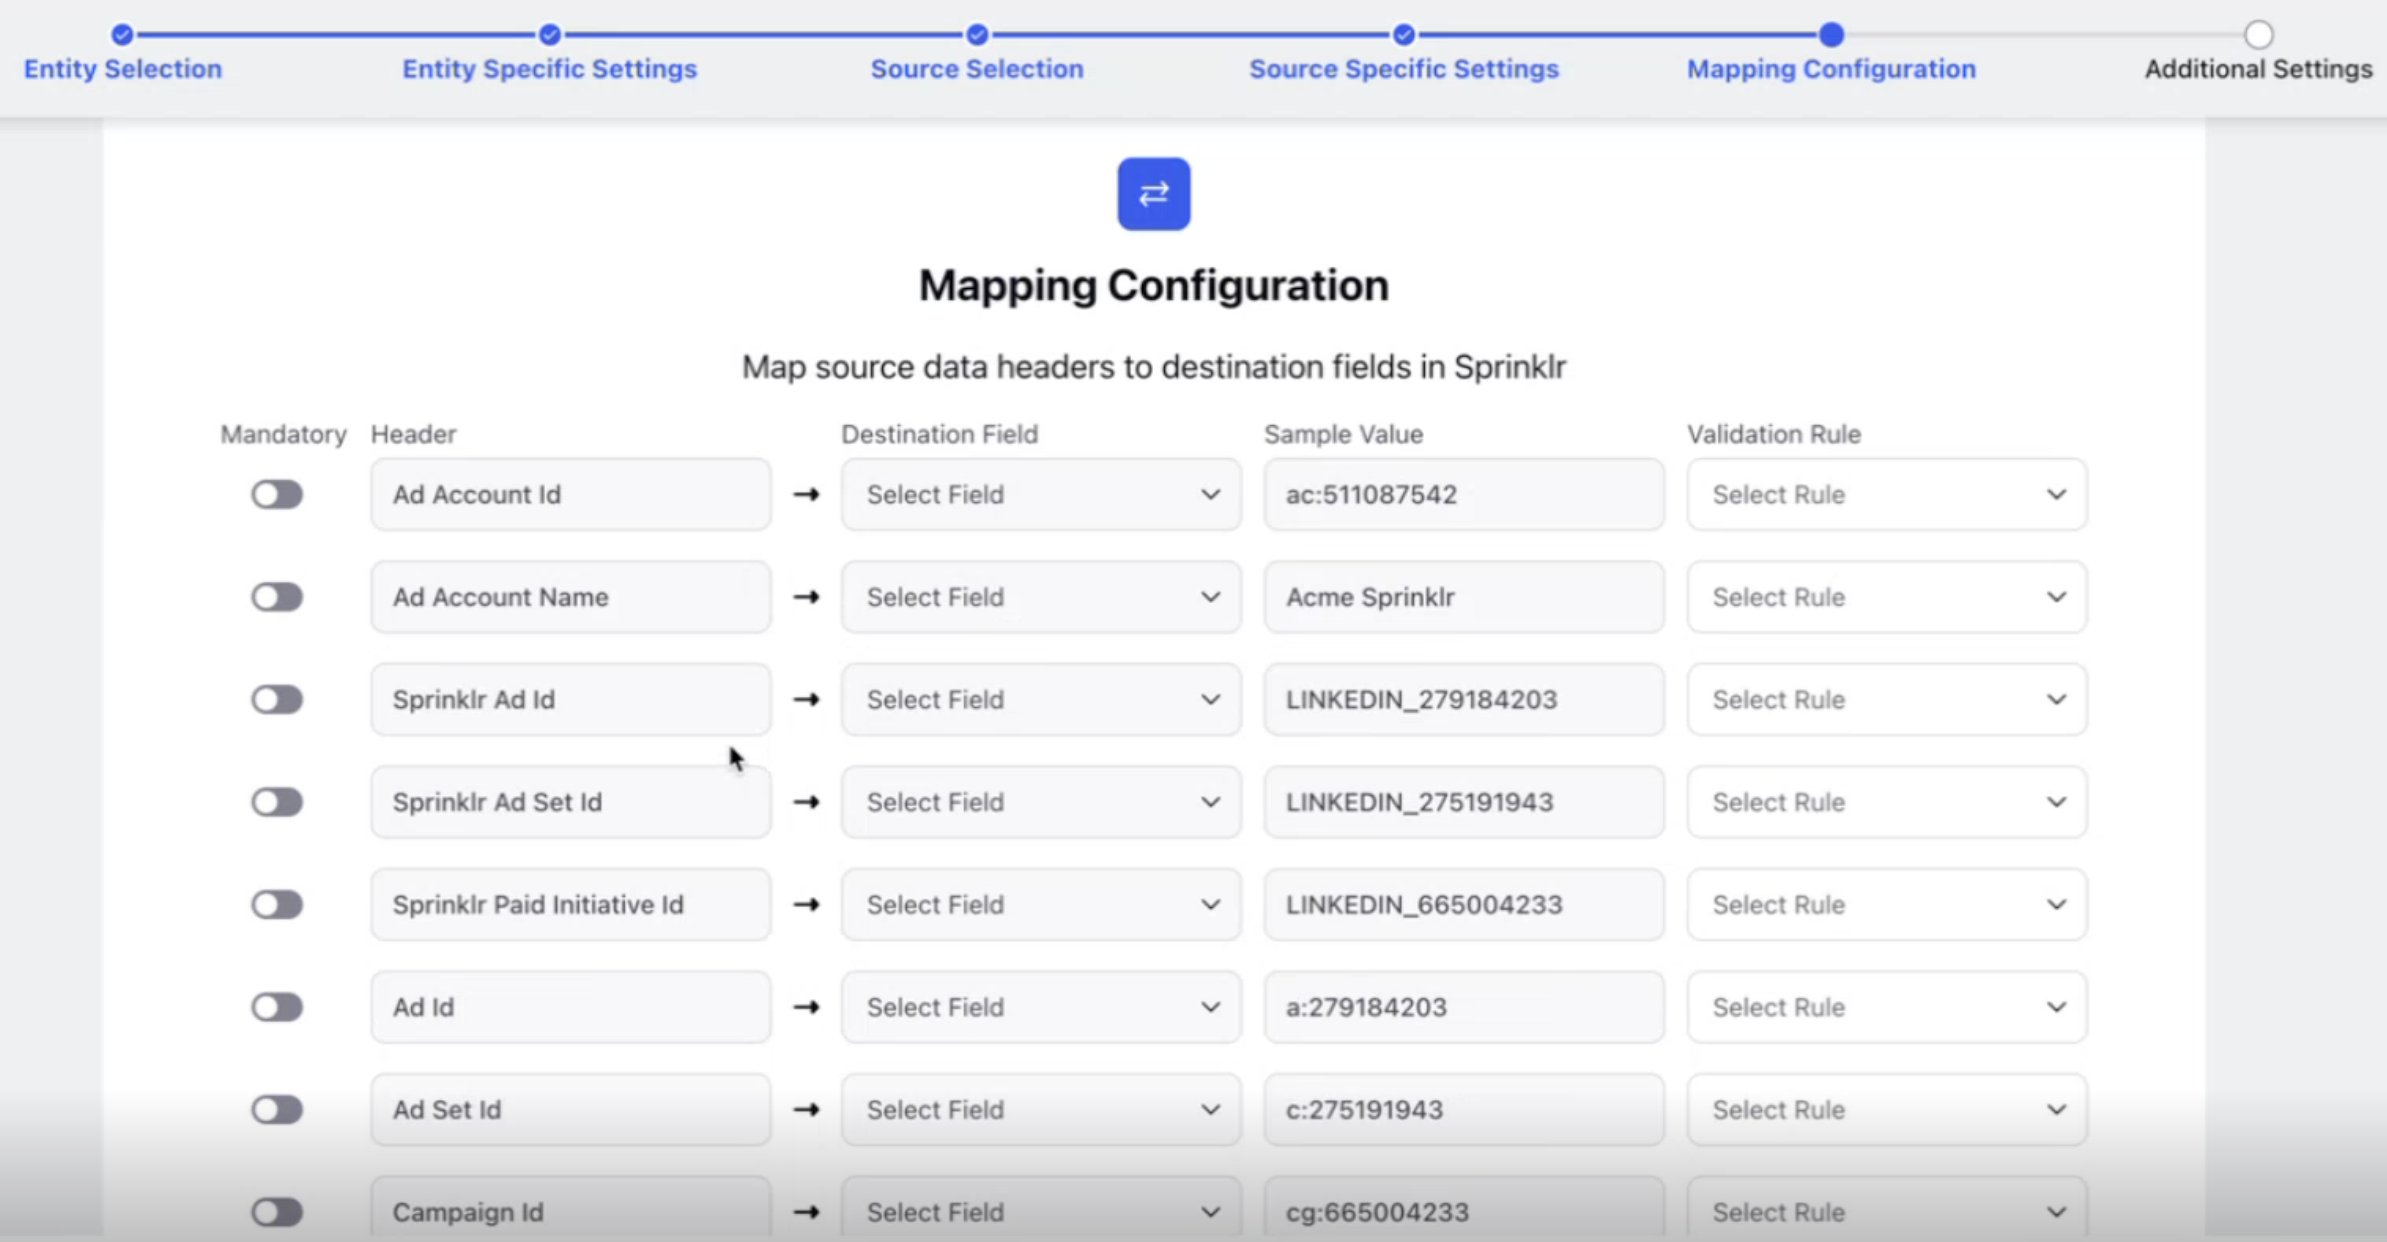
The Mapping Configuration screen is displayed. Once data sources are configured, proceed to map data columns to corresponding fields in Sprinklr, applying validation rules like regex patterns for data consistency. You can map the fields in your file to custom entity fields.
Enable the Mandatory toggle button if you want to make the field mandatory.
Enter the Header.
Select the Destination Field from the drop down menu.
Enter the Sample Value.
Select the Validation Rule from the drop down menu.
Click Next.
The Additional Settings screen is displayed. You can manage access permissions through share settings, specifying user groups and assigning permissions ranging from view-only access to full administrative control.

Click Save to finish setup.
Upload your Excel data file via the configured connector.
For further details, refer to Data Connector Configuration.
Plotting Custom Entity on Widgets
After completing the above setup, follow these steps to visualize and verify data using custom entities in widgets:
Navigate to the desired POE dashboard and create a new widget. Refer to Create a Widget for more details.
In the widget creation screen, select Custom Entity as the data source.
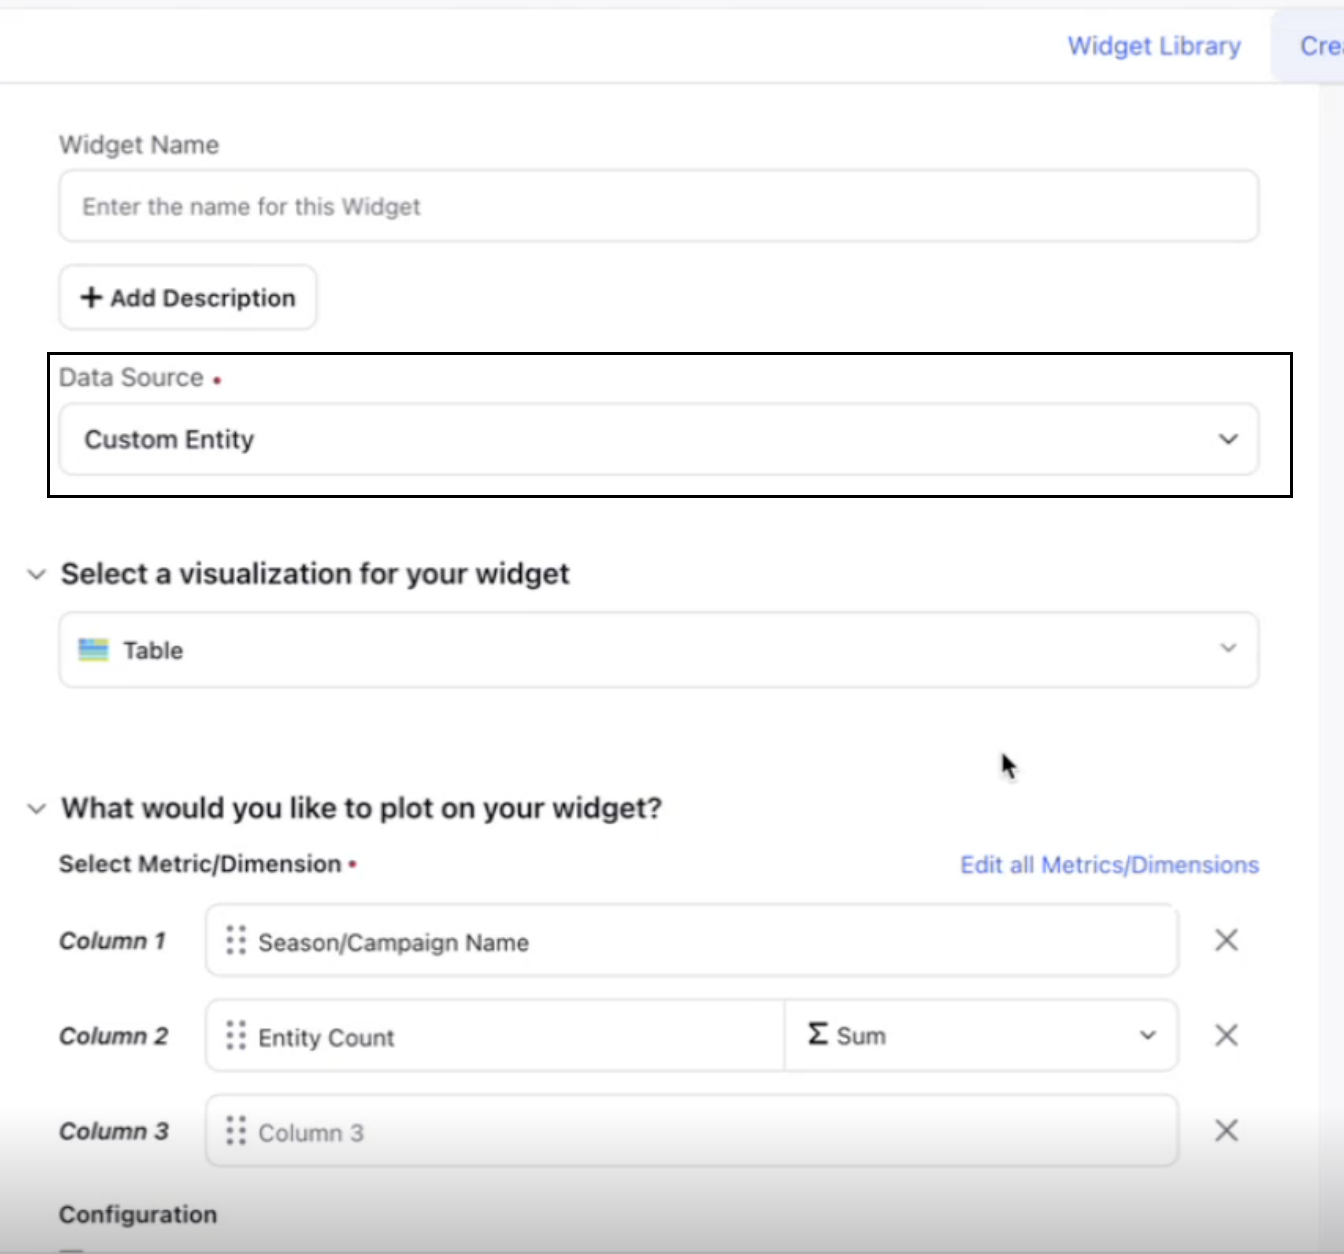
Choose the custom entity you created as the dimension.
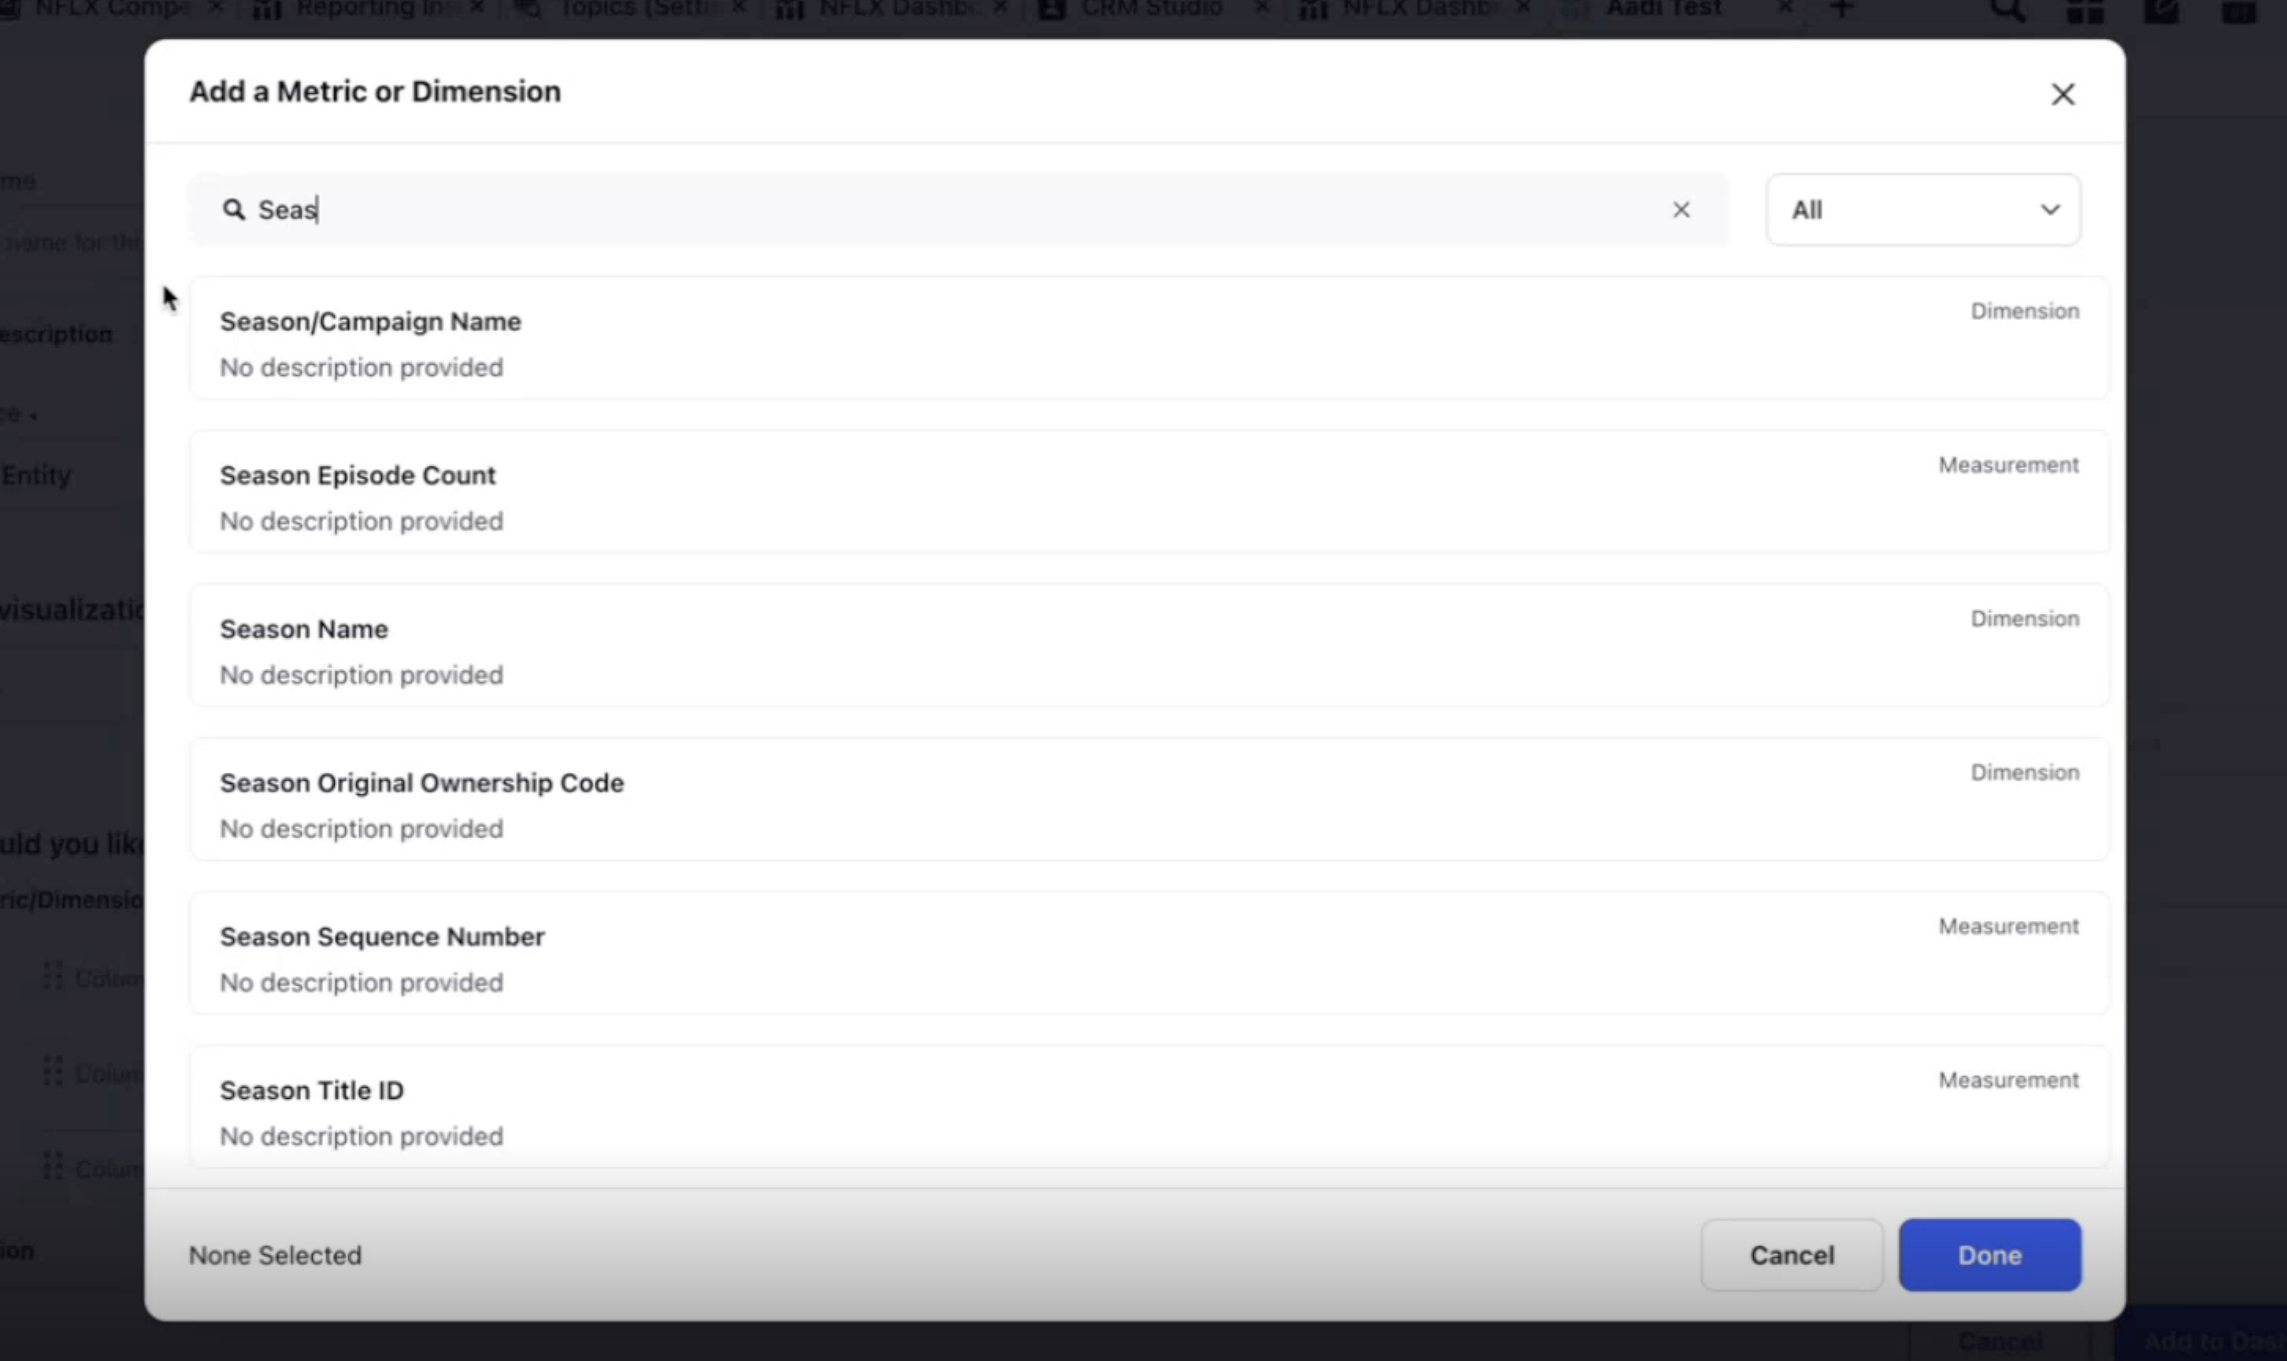
Click Add to Dashboard to add the widget to your dashboard.
How to Report on Custom Entity in Different Modules
After setup, tag your custom entities to the appropriate modules: Insights, Social, and Paid.
Insights
While creating a topic, enter topic details and scroll to the Custom Entity section. For more details on creating a topic, refer to Topic Creation & Setup.
In Custom Entity Type, select your custom entity.
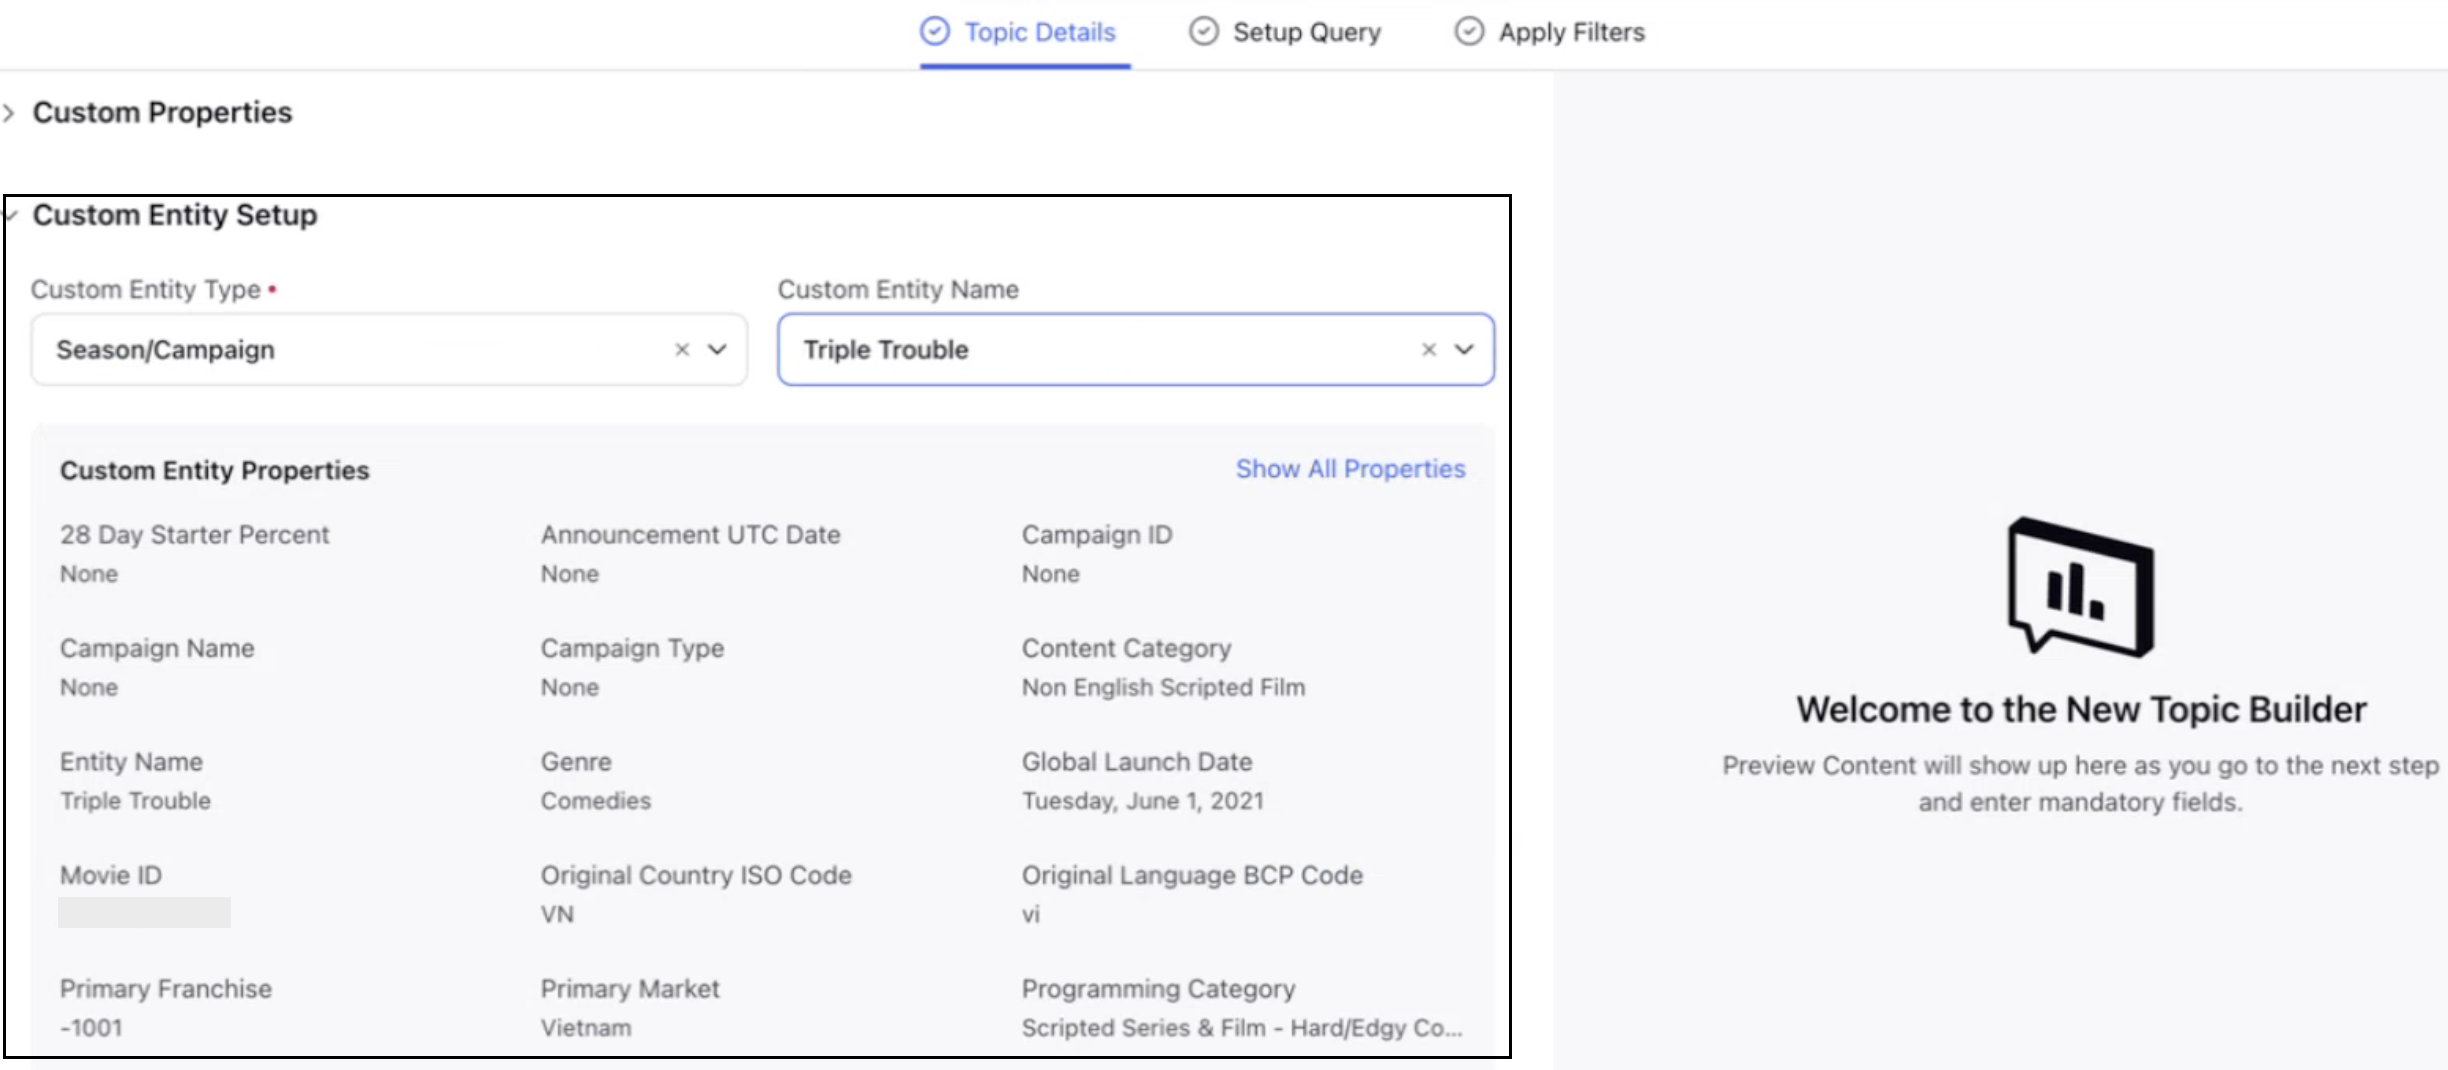
Choose the appropriate entity field in Custom Entity Name. Once selected, all the corresponding properties will be displayed.
Click Save to tag the custom entity to the topic.
Social & Paid
To report on custom entities within the Social and Paid modules, you first need to link the custom entity fields to corresponding custom fields. This linkage ensures that Sprinklr can pull relevant data from these fields during reporting and visualization.
Link Custom Entities to Custom Fields
Before using custom entities in Paid Initiatives or Outbound Messages, you must associate the entity with a custom field. Follow these steps to link the custom entities:
Navigate to Custom Fields in All Settings and create a custom field. For more details, refer to Add a Custom Field.
In the Set Values section:
Choose Custom Entity as the field Type.
In the Source dropdown, select the custom entity you want to associate.
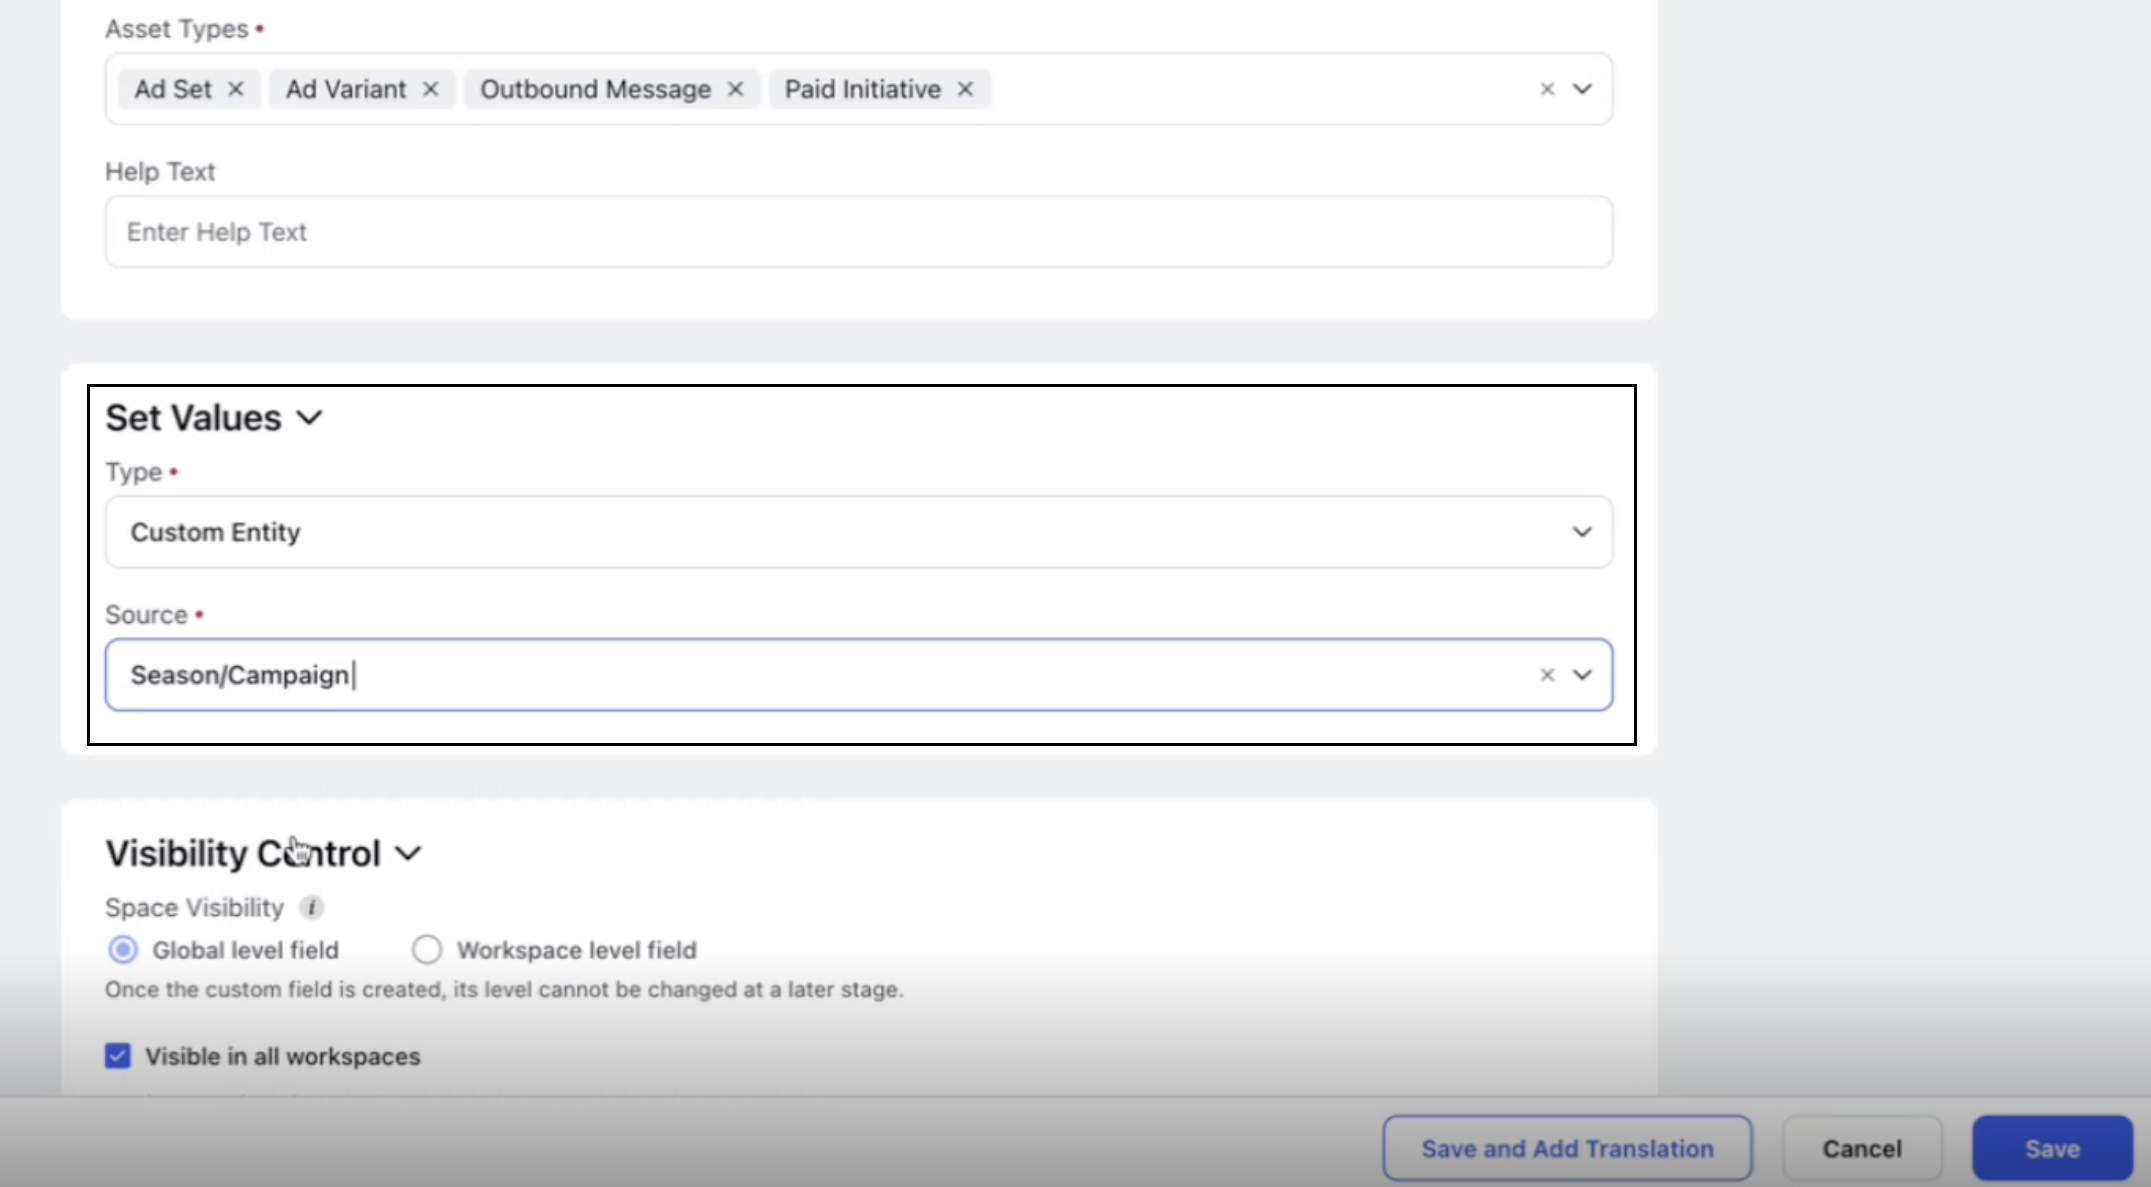
Once linked, you can tag custom entity fields in Paid Initiatives and Outbound Messages for reporting purposes.
To tag custom entities in Paid Initiatives:
Navigate to Ads Manager and edit the required Paid Initiative. For more details, refer to How to Edit Ad Entities in Ads Manager.
At the Paid Initiative level, scroll to the Paid Initiative Properties section.
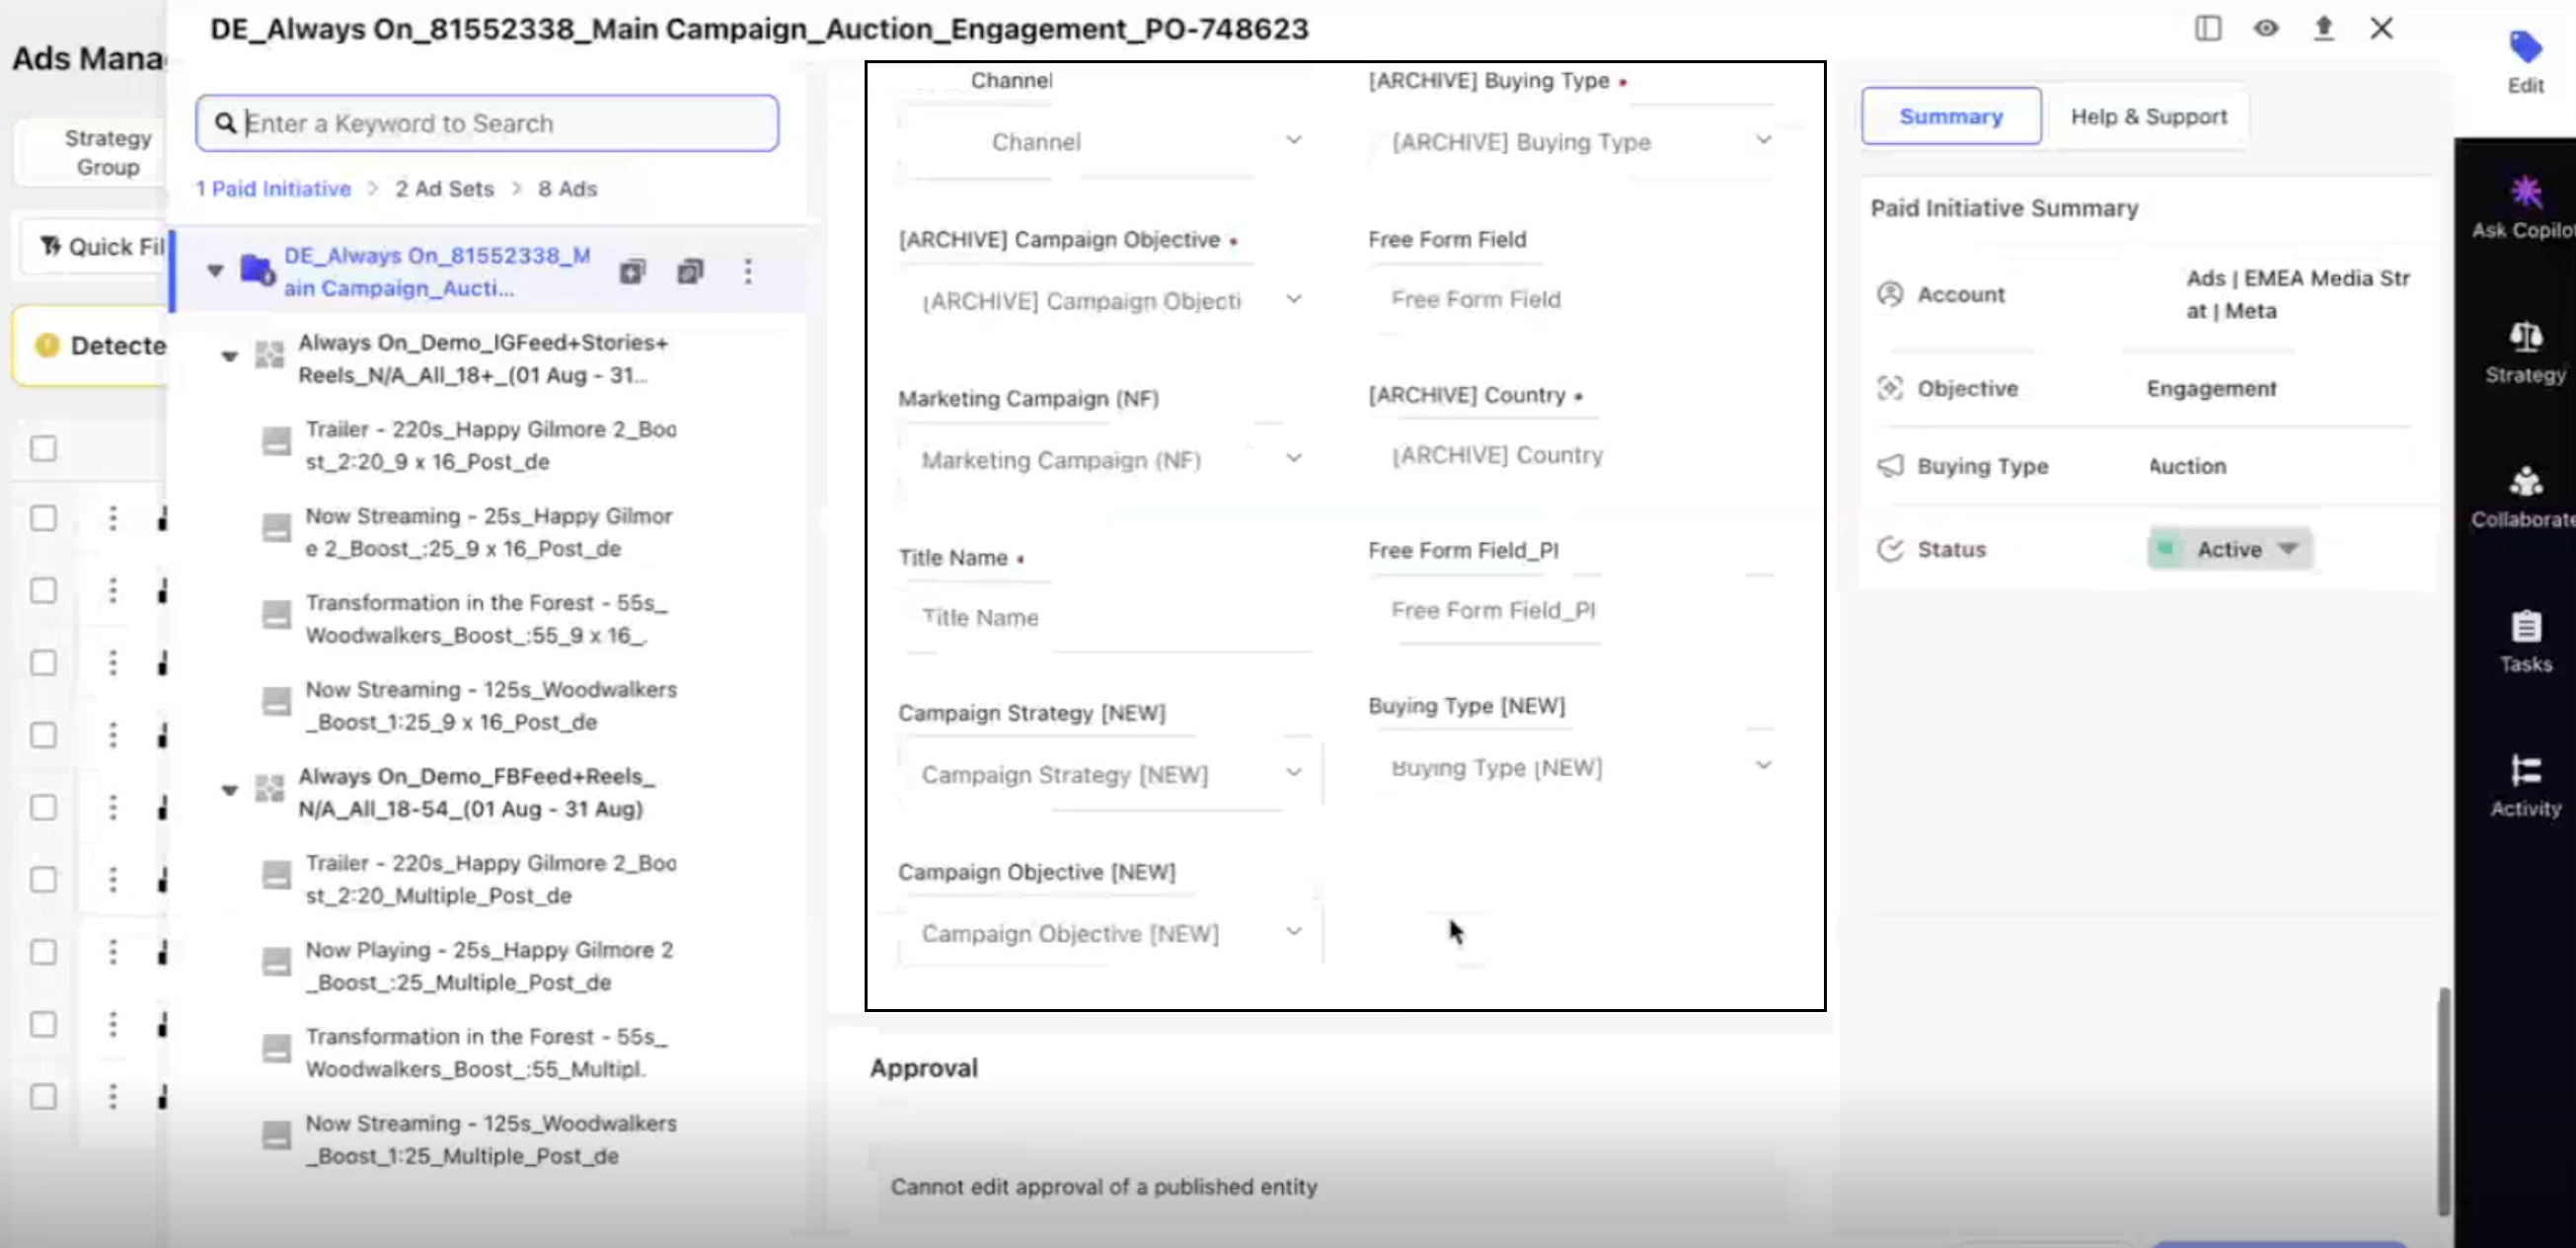
Click on the custom entity fields to tag them.
Alternatively, you can also tag them using Macros and Reverse Naming Conventions.
To tag custom entities in Outbound Messages:
Access the third pane of the required outbound message. Refer to accessing third pane for more details.
Go to the Properties section in the third pane.
In the Custom Entities section, click on the custom entity fields to tag and update them.
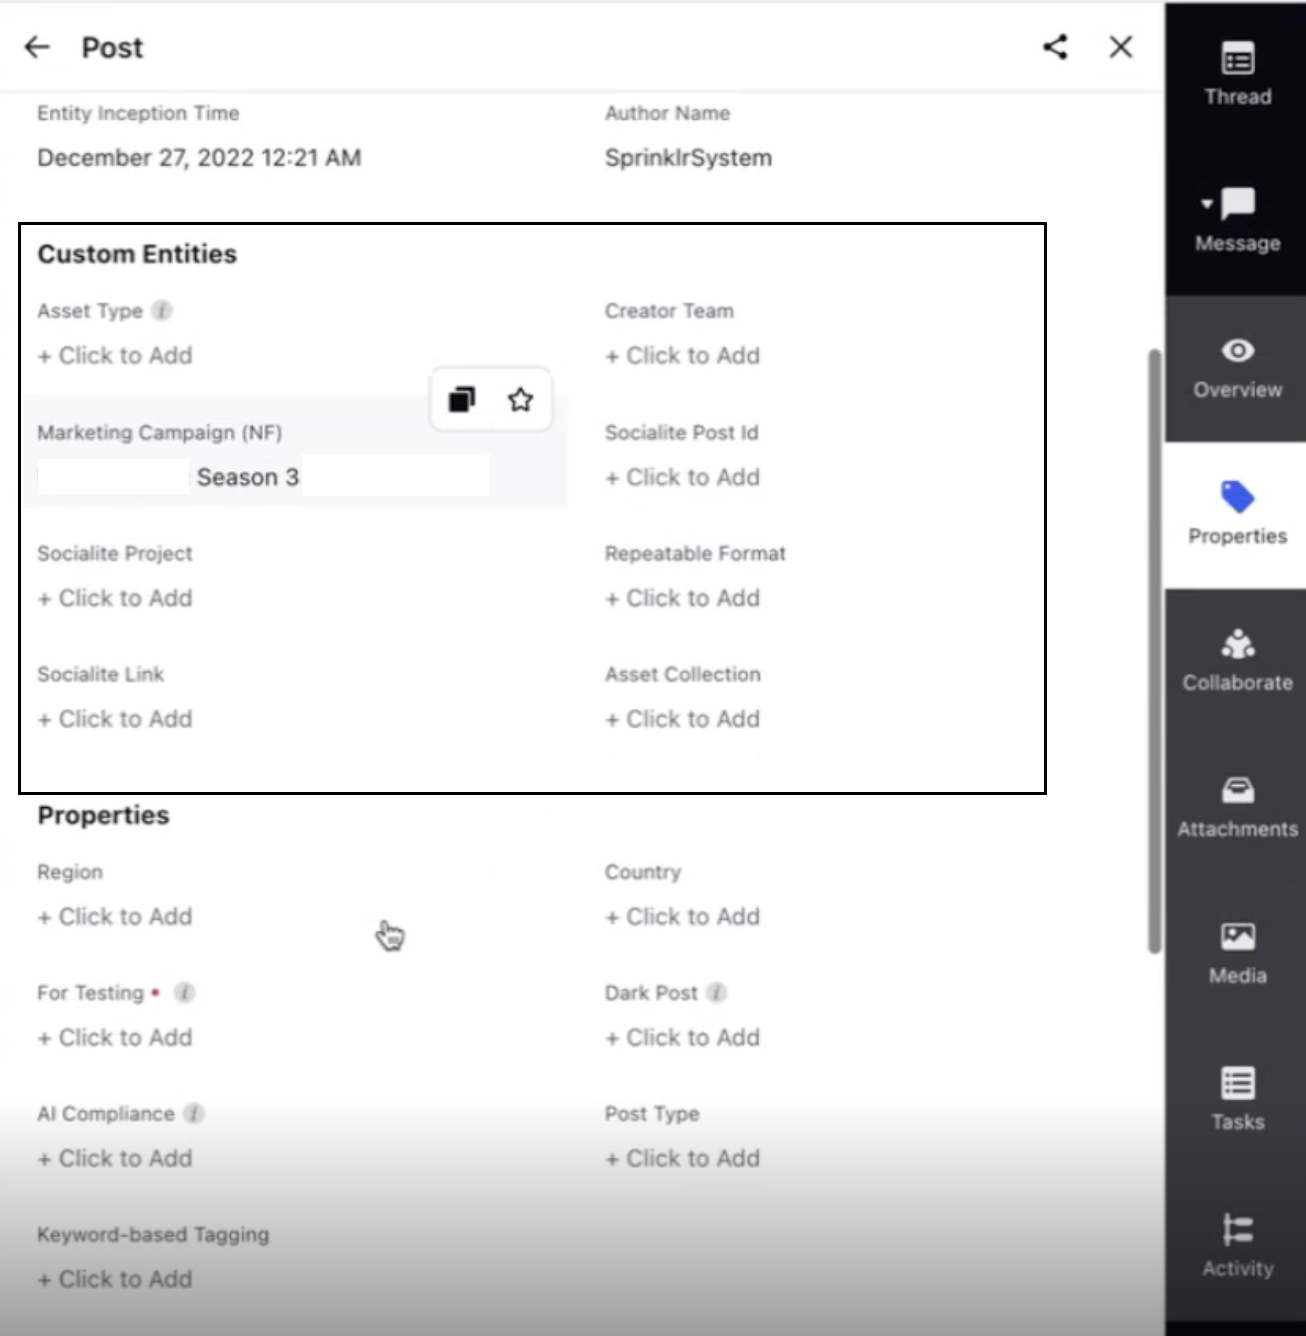
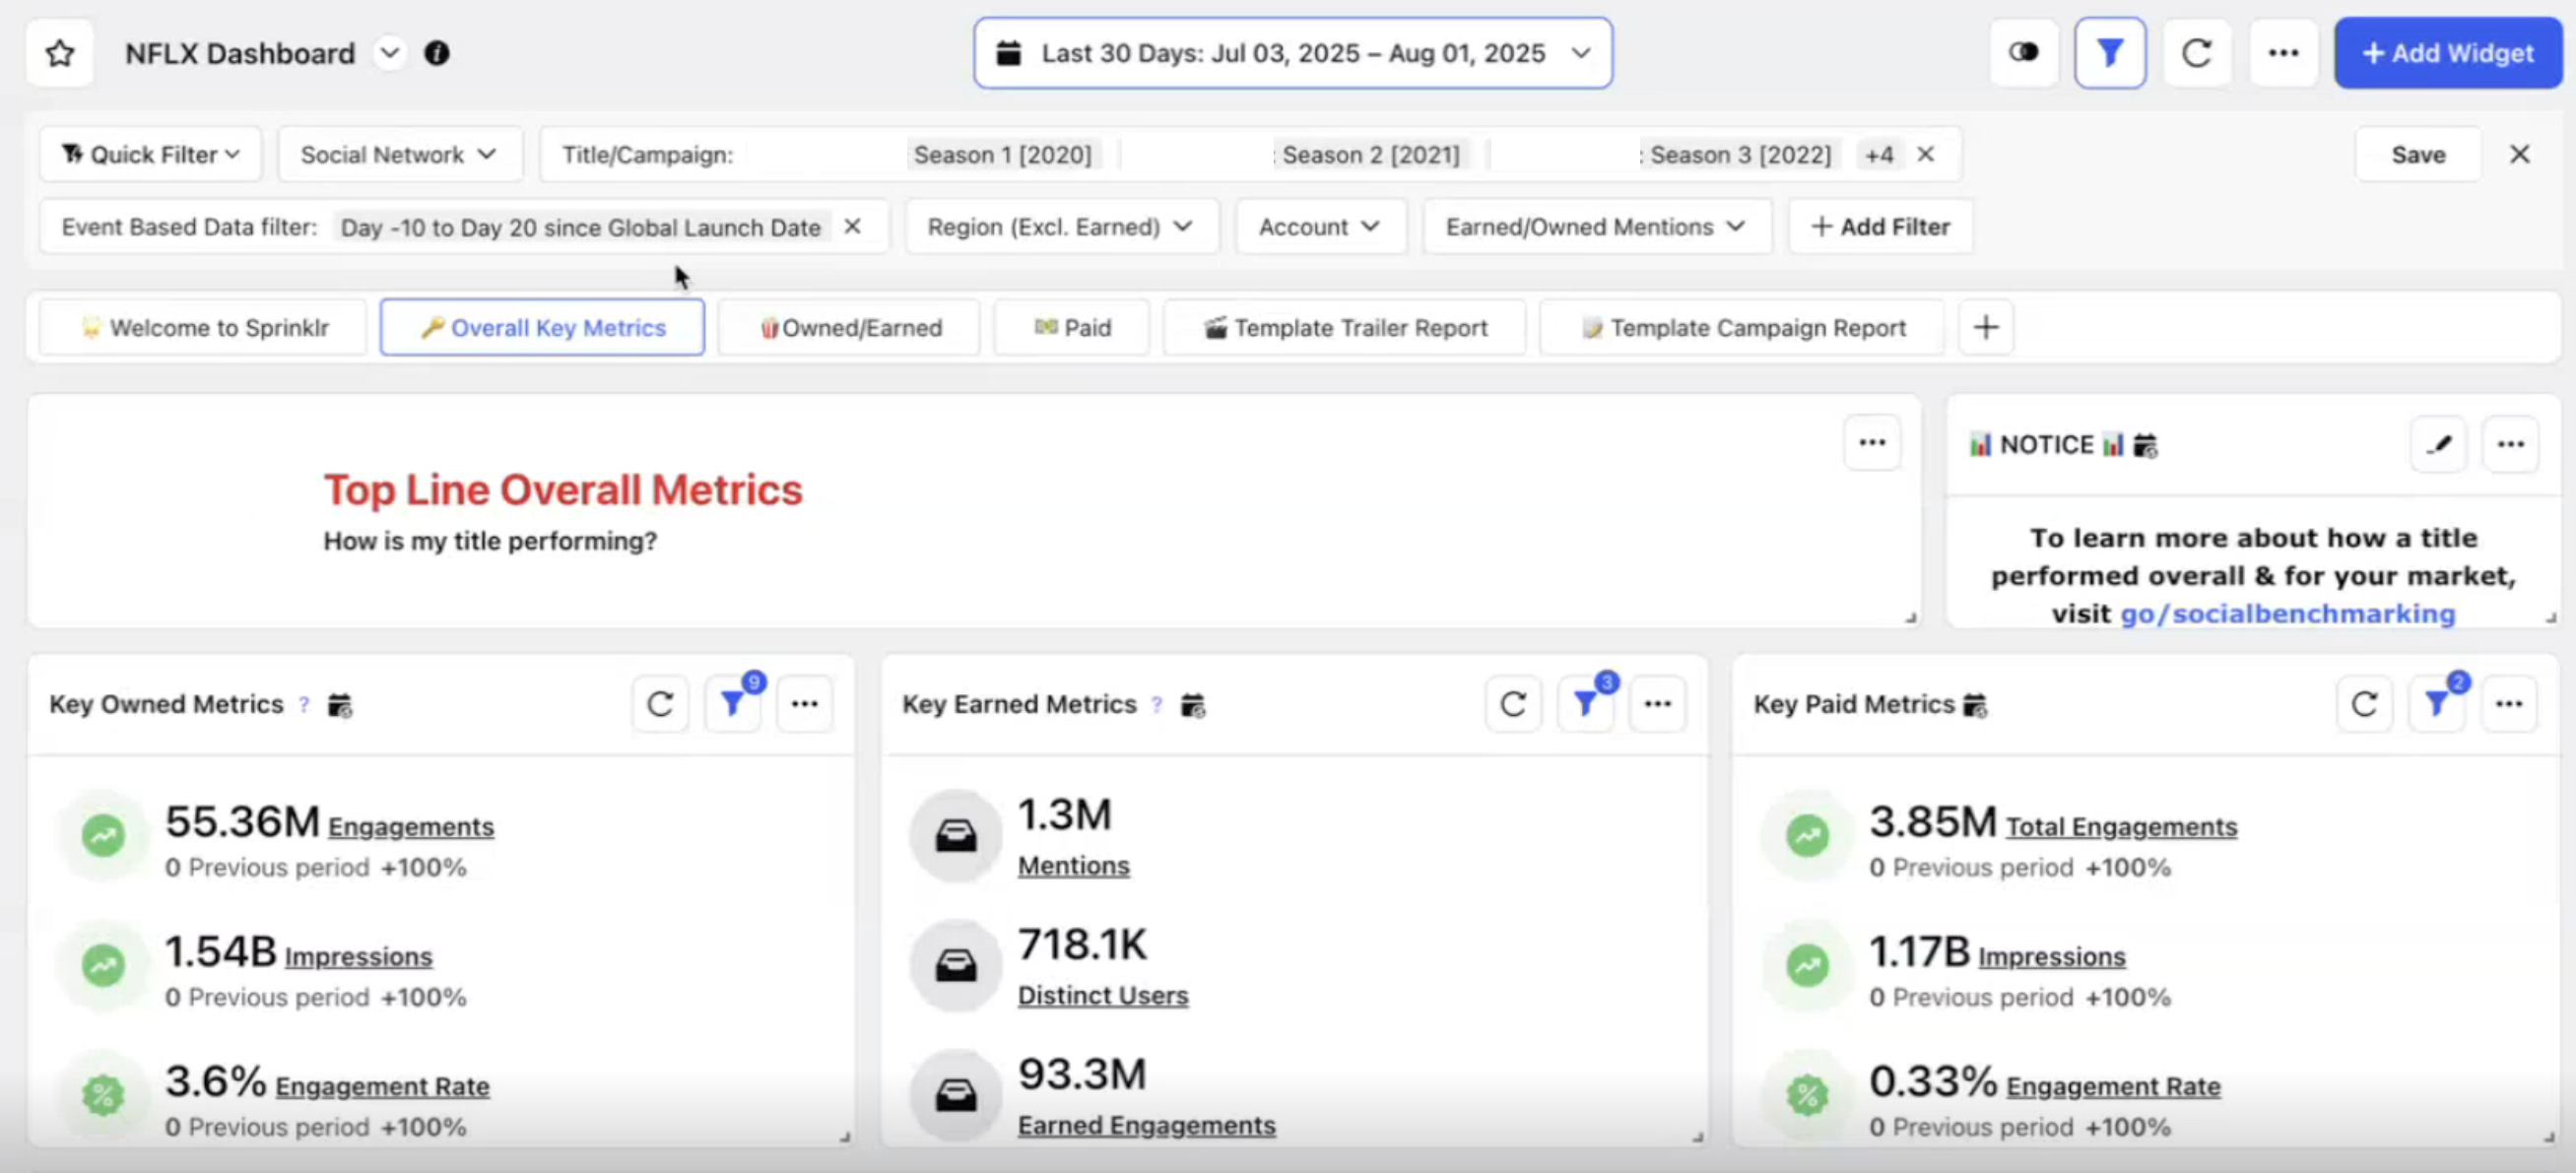
Once the setup is complete, you can start creating your dashboard to visualize Insights, Paid and Social data using custom entities.
Limitations
Listening: You must use either a custom entity or a topic theme to report on data.
Event-Based Reporting: Custom entities are necessary to report on event-specific data. Without them, you can't apply event-based filters.