Configuring AI-Powered ACW Prefill
Updated
ACW - An Overview
After Call Work (ACW) refers to the tasks that agents perform once a customer interaction ends. This typically includes entering call details, selecting appropriate dispositions, logging follow-ups, and completing form-based documentation.
AI-Powered ACW Prefill analyzes the conversation transcript to automatically populate After Call Work (ACW) fields with relevant information.
To improve the accuracy and relevance of prefill suggestions, the system now generates the prefill data using only the most recent conversation transcript associated with the case.
AI-Powered ACW Prefill
The AI-Powered ACW Prefill feature uses AI to automatically fill ACW forms using information extracted from the call transcript.
This includes:
Disposition
Sub-disposition
ACW Form Fields
Additional screen components relevant to your business use case
Agents will have the ability to review and edit the AI-generated responses before submission.
Feature Scope
Automation applies only to post-call ACW.
The interface covered is a multi-screen ACW form. Refer to AI Studio Deployment for Multi Screen ACW article for more information on configuring and deploying multiple screen ACWs deployment.
Benefits
This table lists the benefits of using this feature:
Benefit | Description |
Time Efficiency | Significantly reduces ACW time, allowing agents to move to the next call faster |
Accuracy | Improves data quality by minimizing manual entry errors |
Productivity | Enables agents to focus on high-value interactions instead of form-filling |
Consistency | Ensures standardization across agent-submitted data |
 Note: Access to this feature is controlled by the following dynamic properties.
AI_PREFILL_REVAMP_ENABLED
FILTER_SERIALIZATION_ENABLED_IN_AI_PREFILL_REVAMP
SCREEN_AI_PREFILL_ENABLED
Value: true (Boolean)
SCREEN_AI_PREFILL_WAIT_IN_MILLIS
Value: <integer> (milliseconds)
If the AI does not respond within the configured timeframe:
The ACW form is displayed without prefilled values
A fallback message appears: "Failed to autofill the form."
The timeout is set to 20,000 milliseconds (20 seconds) by default
You only need to configure this property if you want to change the default timeout
To enable this feature in your environment, contact your Success Manager. Alternatively, you can submit a request at tickets@sprinklr.com.
Prerequisite
Ensure that the Agent Copilot is enabled in your environment to use the ACW Prefill feature. For more details, see Getting Started with Agent Copilot.
Configure ACW Prefill
Perform the following steps to configure the ACW Prefill.
1. AI Provider and Model Setup
Click New Tab
 or Launchpad
  .
. Navigate to Platform Modules, under Manage AI Use-Cases, click AI+ Studio.

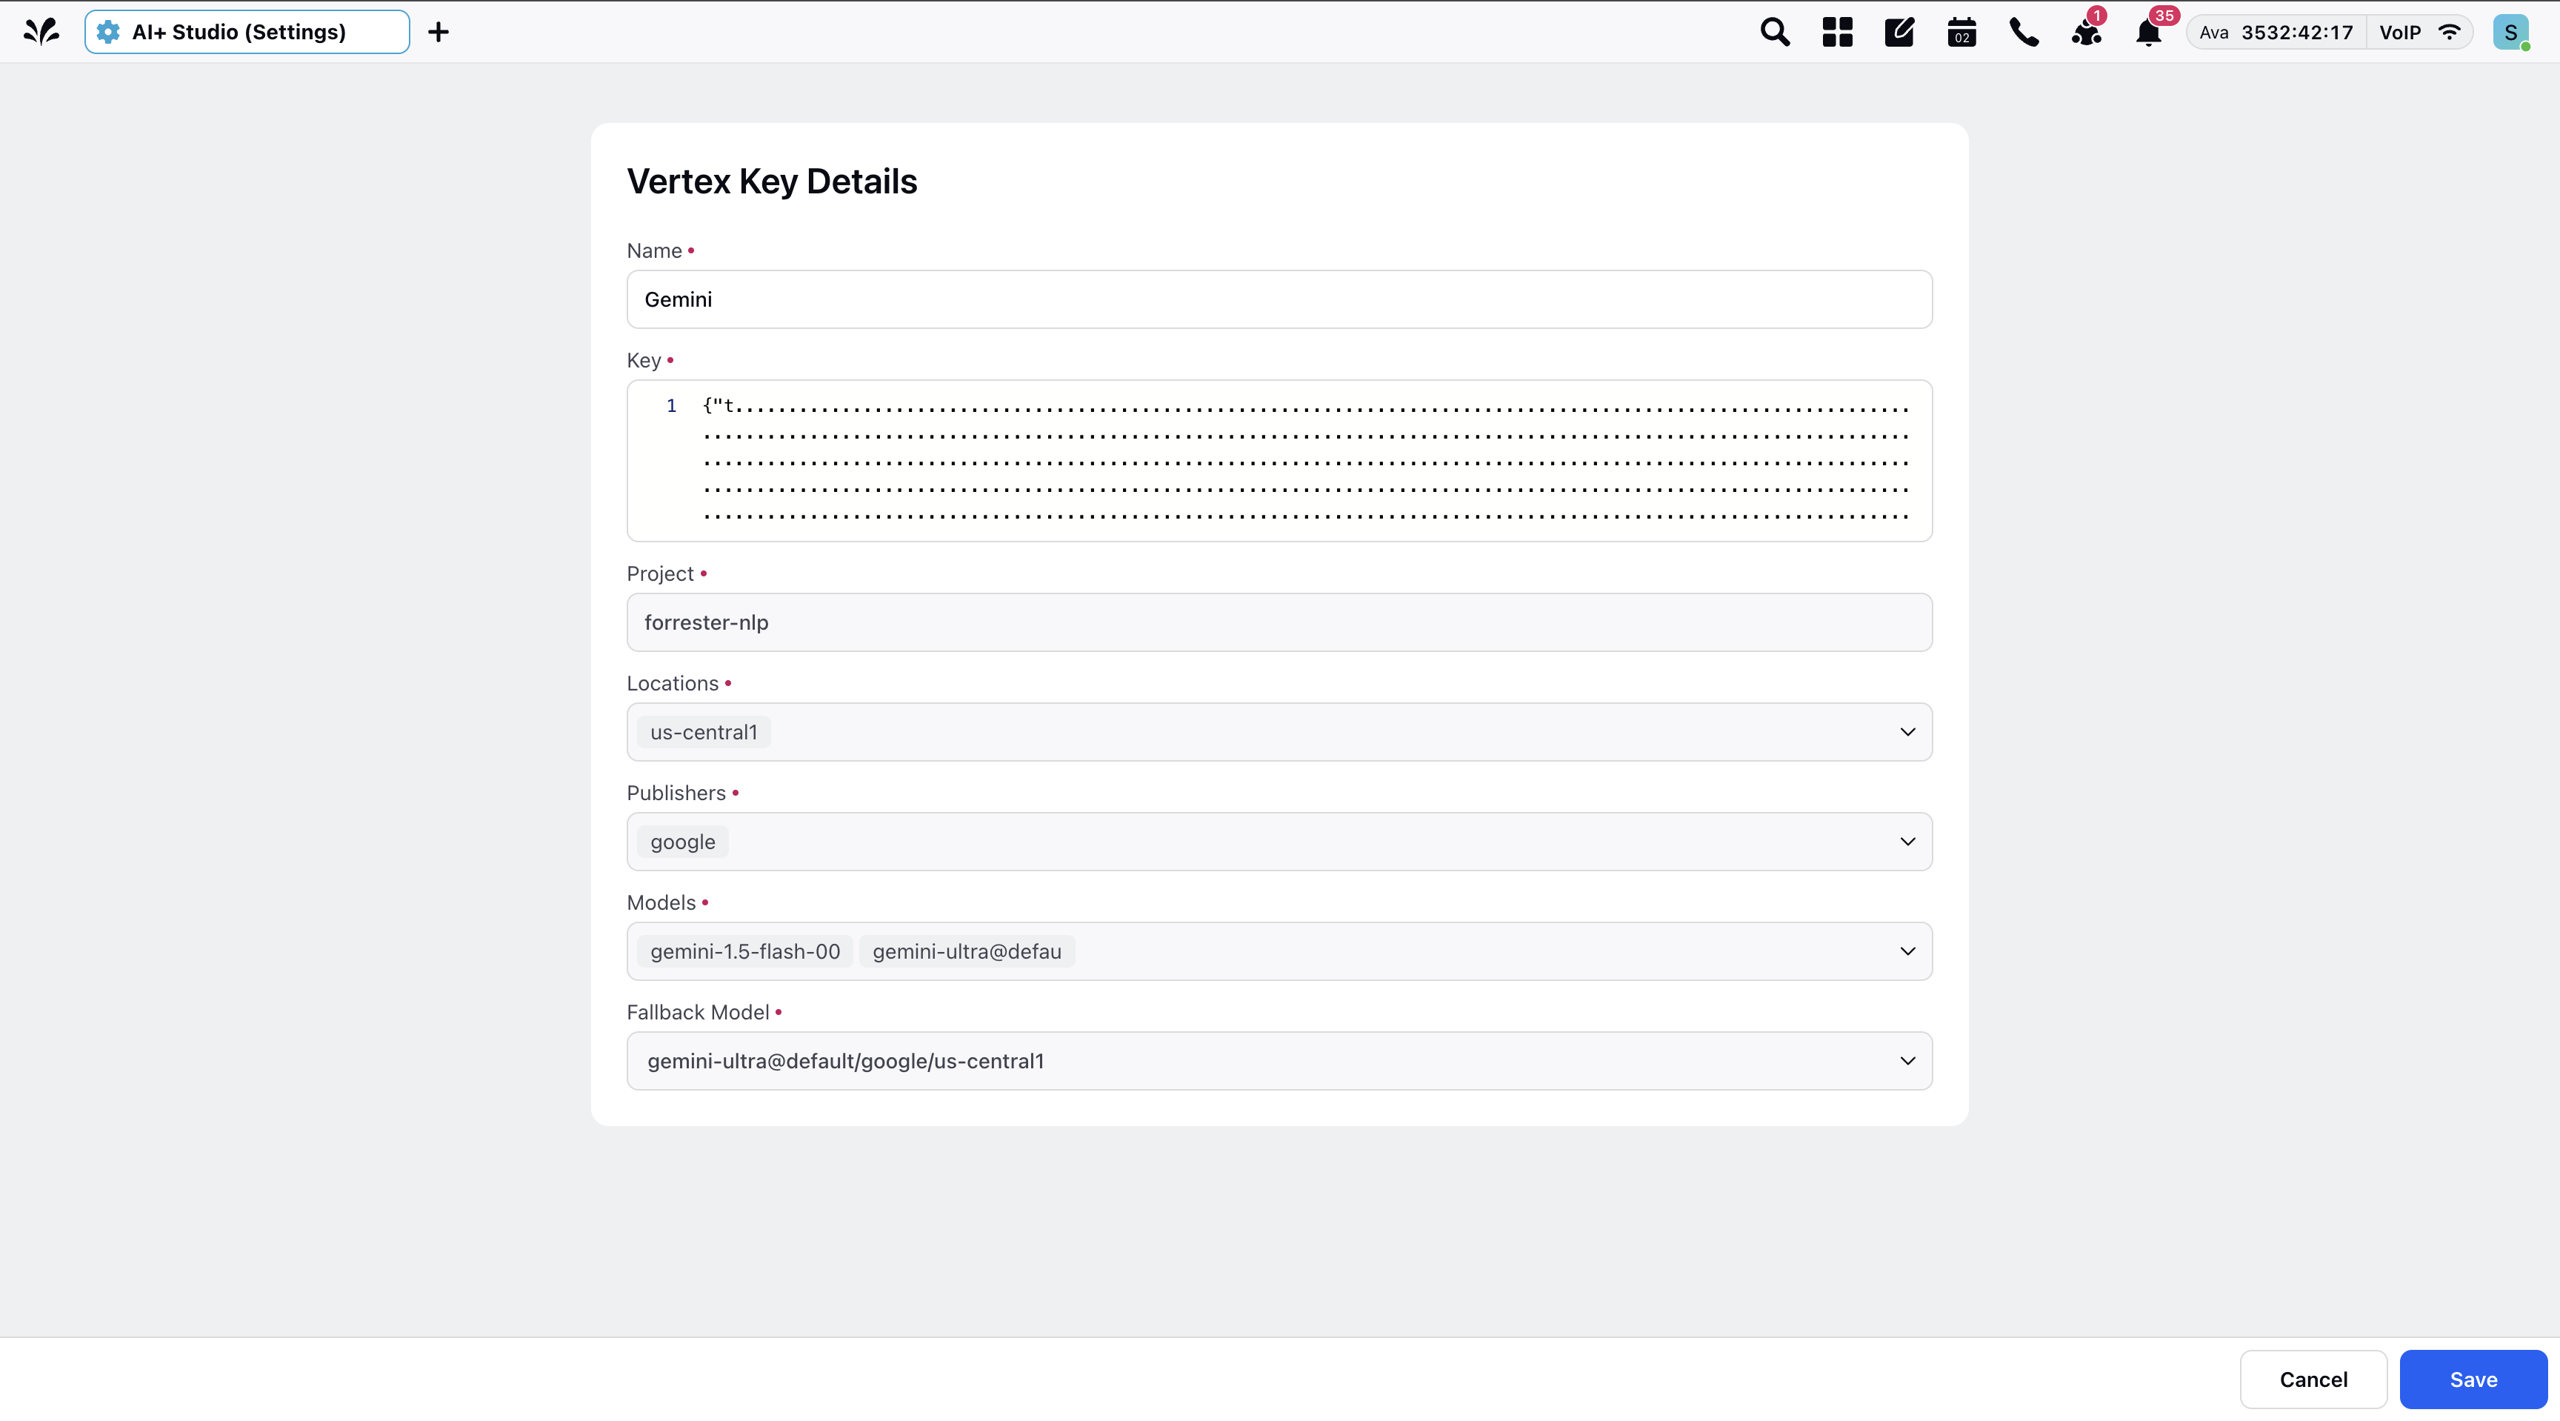
Select Provider and Model to perform the provider and model configuration. In most cases, common providers and models are already pre-configured and available for use.

Click + Add Provider to add an AI provider (example, OpenAI, Anthropic, Google) in AI+ Studio. The Select Generative AI Provider dialog is displayed.
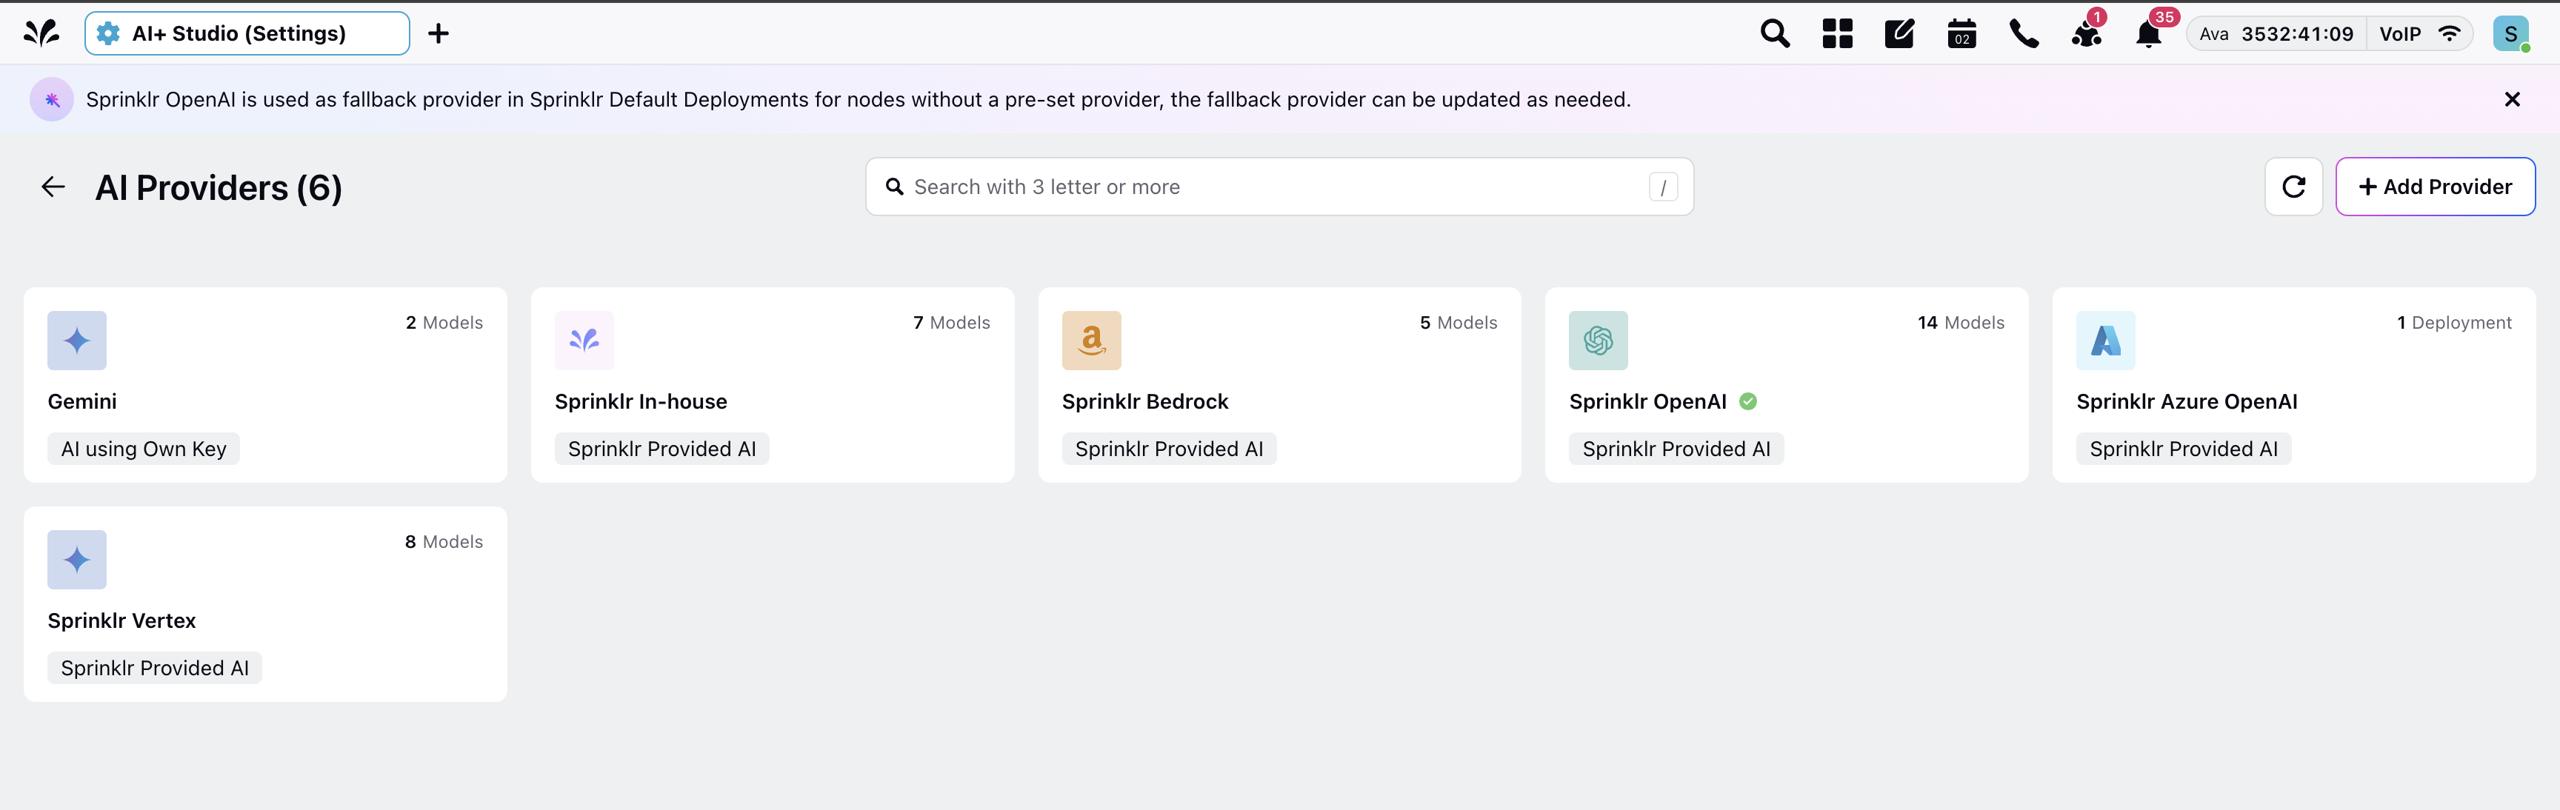
Select the AI Provider from the Generative AI Provider dropdown and then click Next.
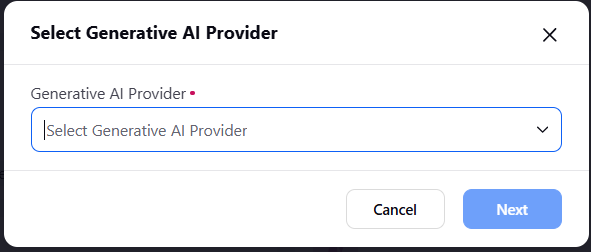
Configure keys and credentials for the selected provider. Add details for appropriate model (for example, GPT-4, Claude, PaLM).
Note: If you require further assistance or have edge-case scenarios, contact the AI+ Studio team for guidance.
2. Configure Deployment in AI+ Studio
Open ACW Pre-fill usecase in AI+ Studio
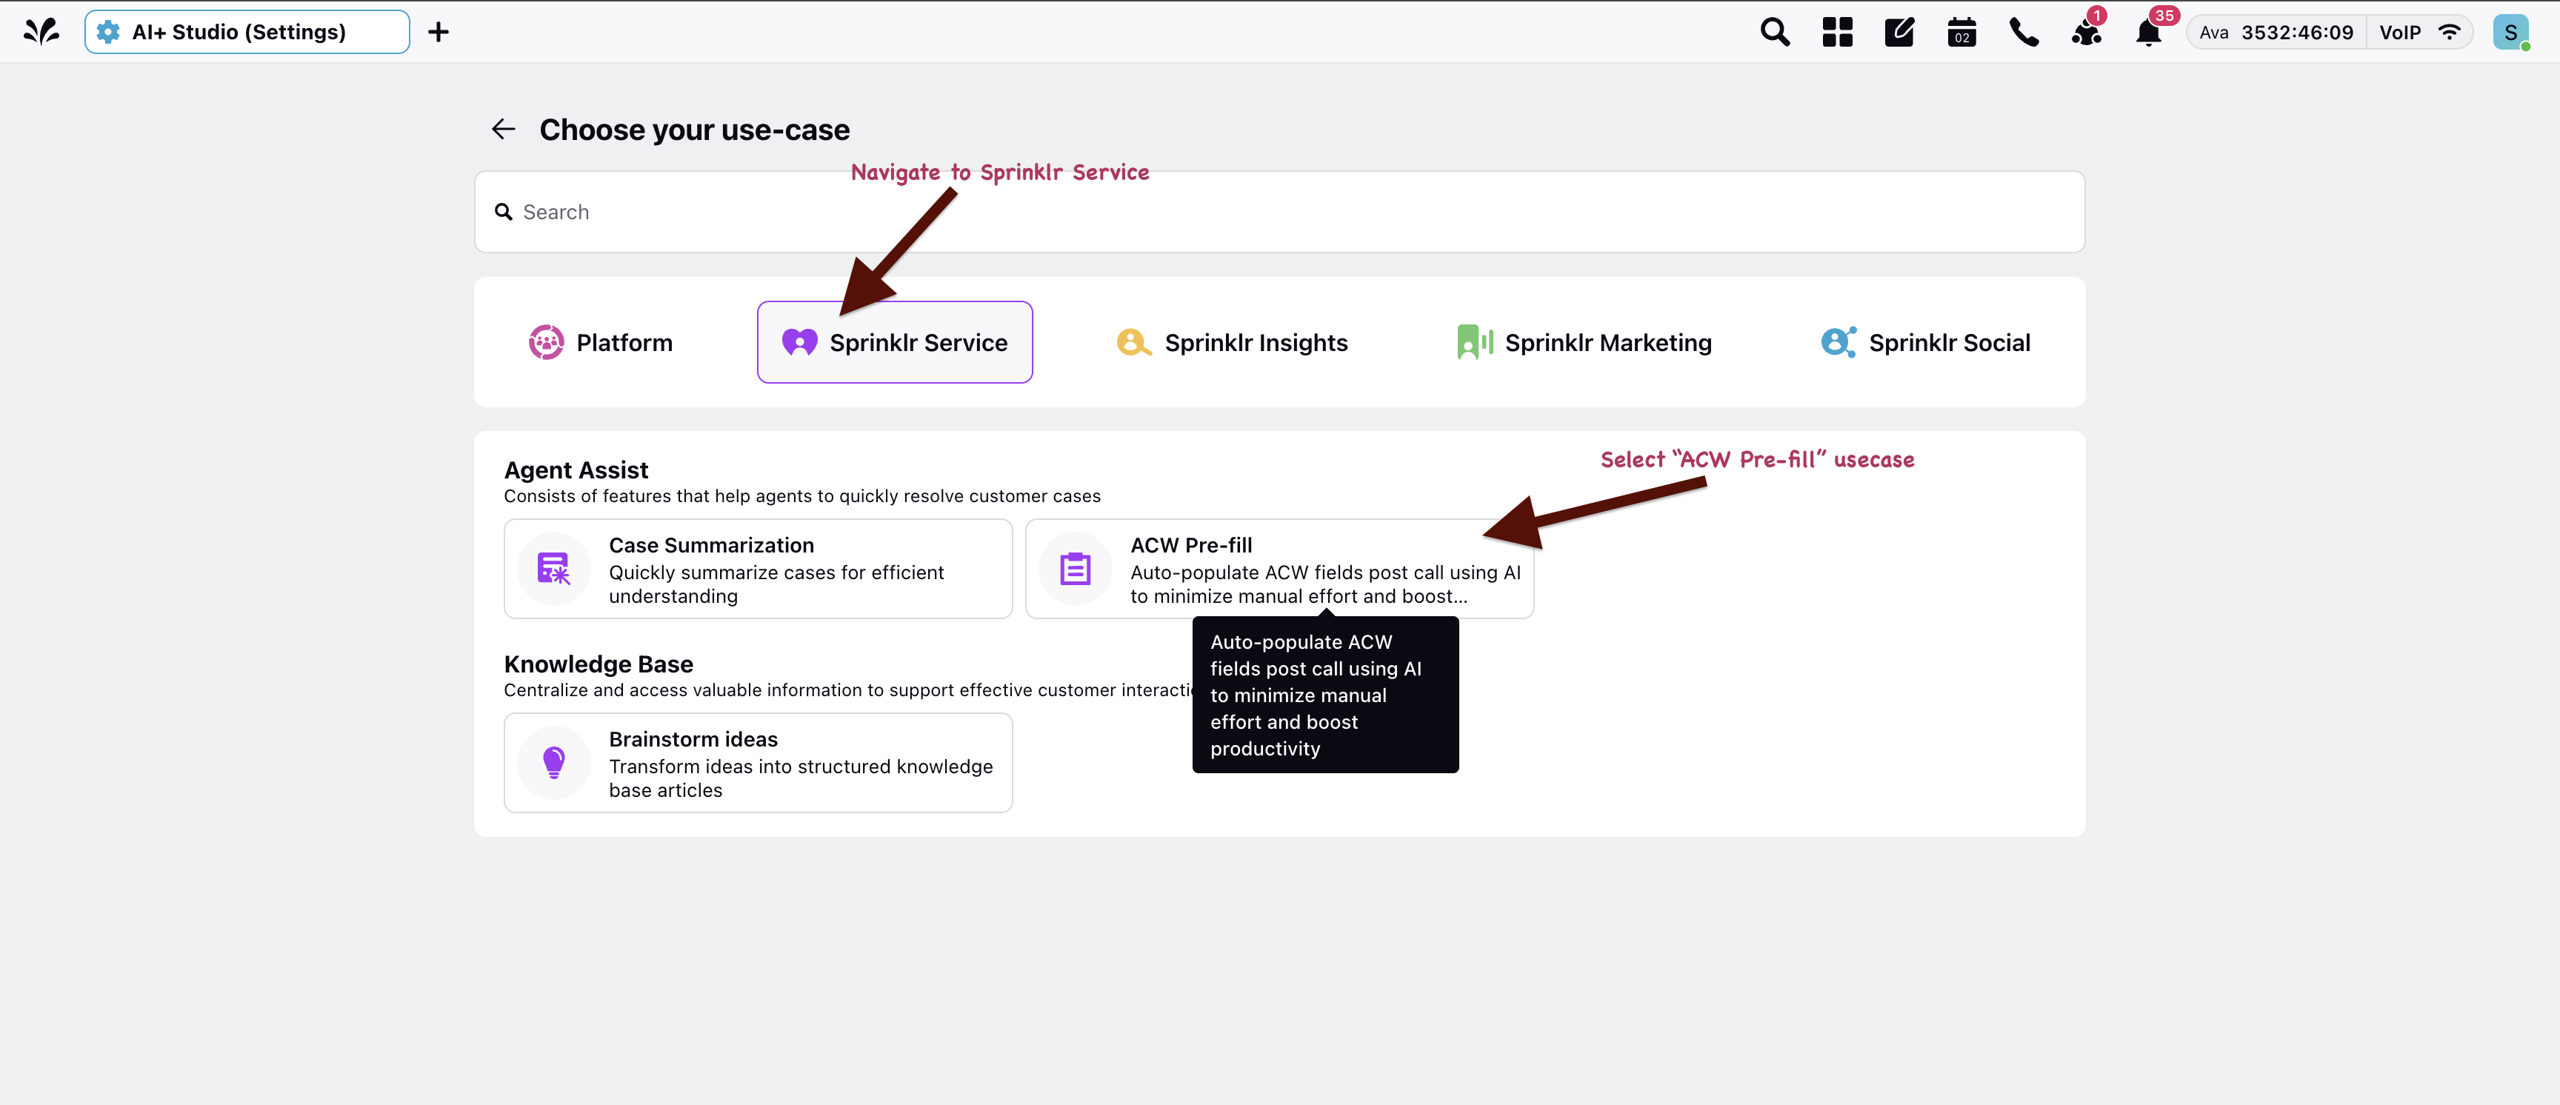
From AI+ Studio page, navigate to AI Use-Cases.

Navigate to Sprinklr Service and then open ACW Pre-fill usecase. The Deployment page appears.
Configure Deployment in AI+ Studio
There are two ways to configure AI-powered ACW Prefill:
- Use the default (recommended) deployment
- Create a custom deployment
Option 1. Use the Default Deployment (Recommended)
Sprinklr provides a default deployment that is optimized for most use cases.
We recommend that you use the default deployment first, as it is designed to meet the majority of business requirements without additional configuration.
Note: The default deployment reduces setup effort and ensures you benefit from the latest enhancements without additional configuration.
Always start with the default deployment and evaluate its performance for your use case. Create a custom deployment only if the default deployment does not provide the desired results.
To use the default deployment:
- On the Deployment page, locate the Sprinklr Default Deployment.
- Ensure the deployment is active.
- Adjust the priority of the deployment if multiple deployments exist (Optional).
- Test the setup to validate that the prefill suggestions meet your requirements.
Note: You cannot modify the configuration of the default deployment. If your requirements are not met, consider creating a custom deployment.
Option 2: Create a Custom Deployment
If the default deployment does not meet your specific requirements, you can create a custom deployment.
Use this option only when you need additional control or customization beyond what the default deployment provides.
To create a custom deployment:
Click + Deployment and add deployment details such as Name, Priority, Description, and so on
Apply filters (For example, User ID filters) to control where the deployment applies. Enable Deploy on all records toggle If you want to deploy on all records. When this toggle is on, the Filters section does not appear on the screen.
Manage the sharing of this deployment.
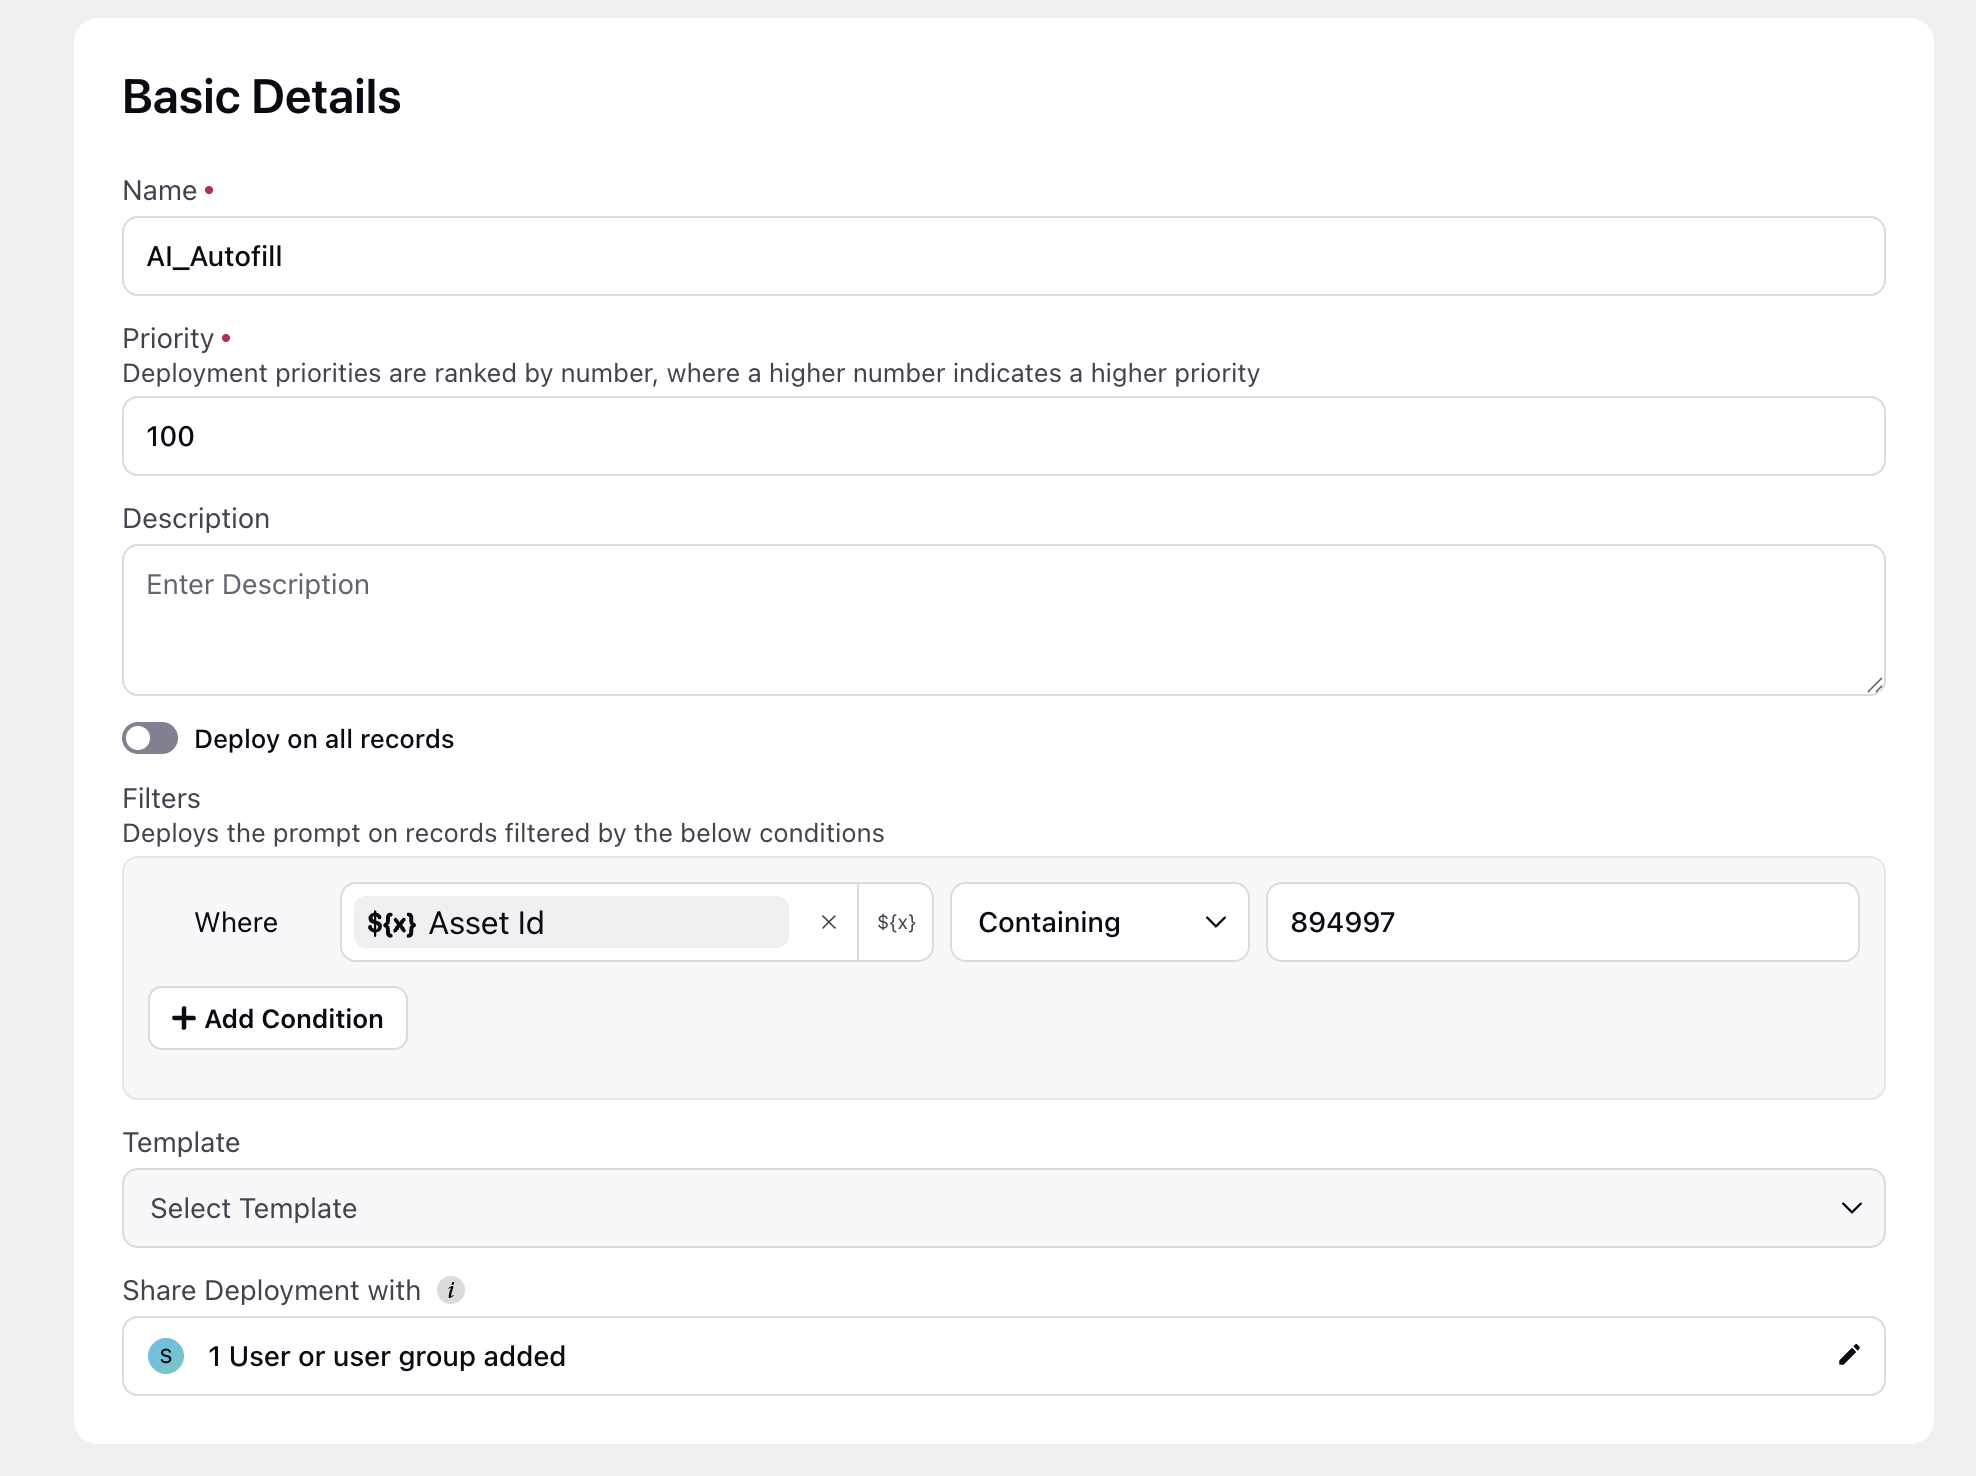
Once added, a logic pipeline will open up.
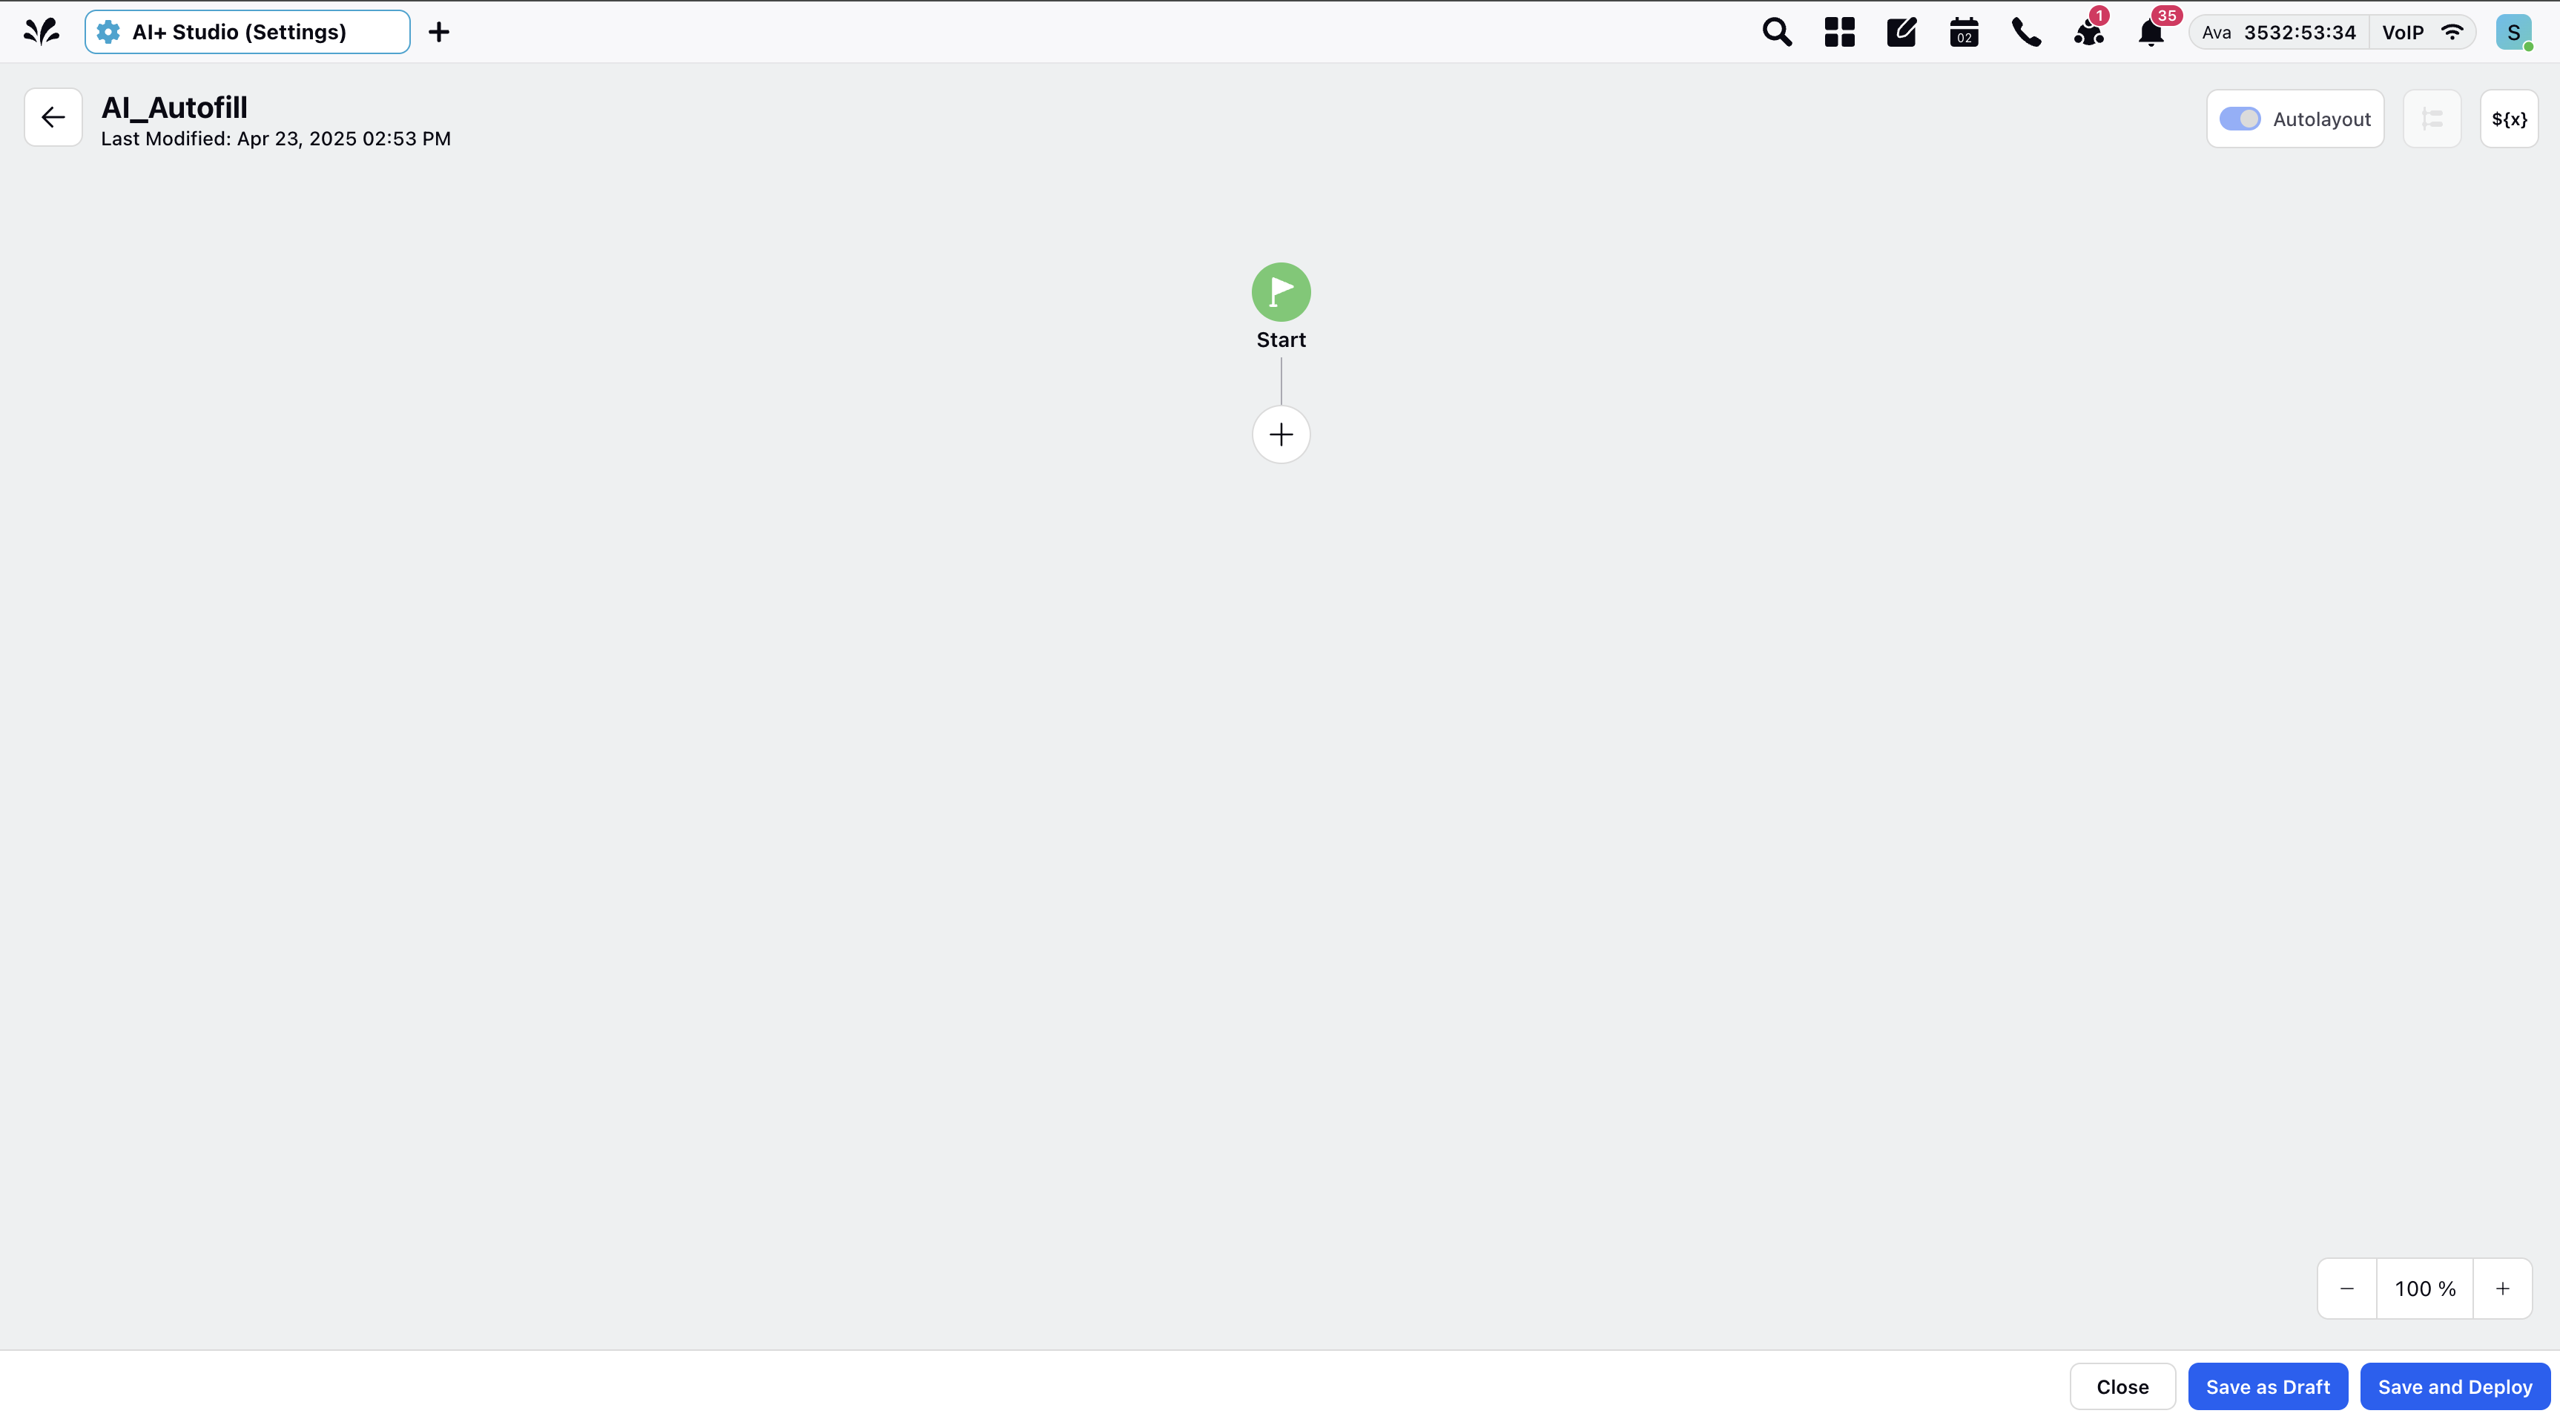
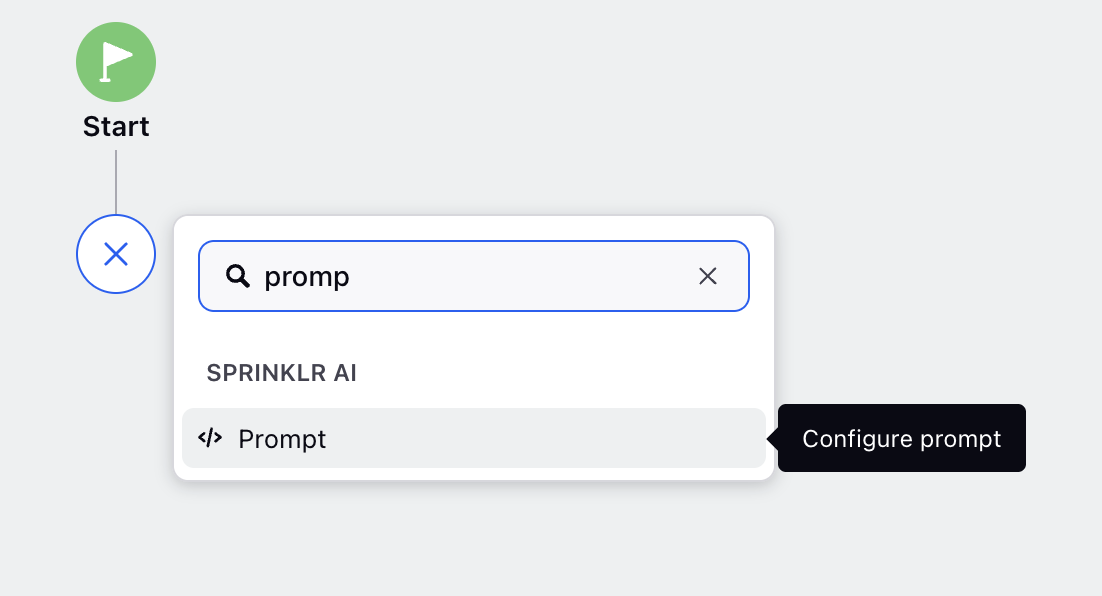
In the logic pipeline, Add a Prompt Node.
Set additional parameters (For example, temperature).
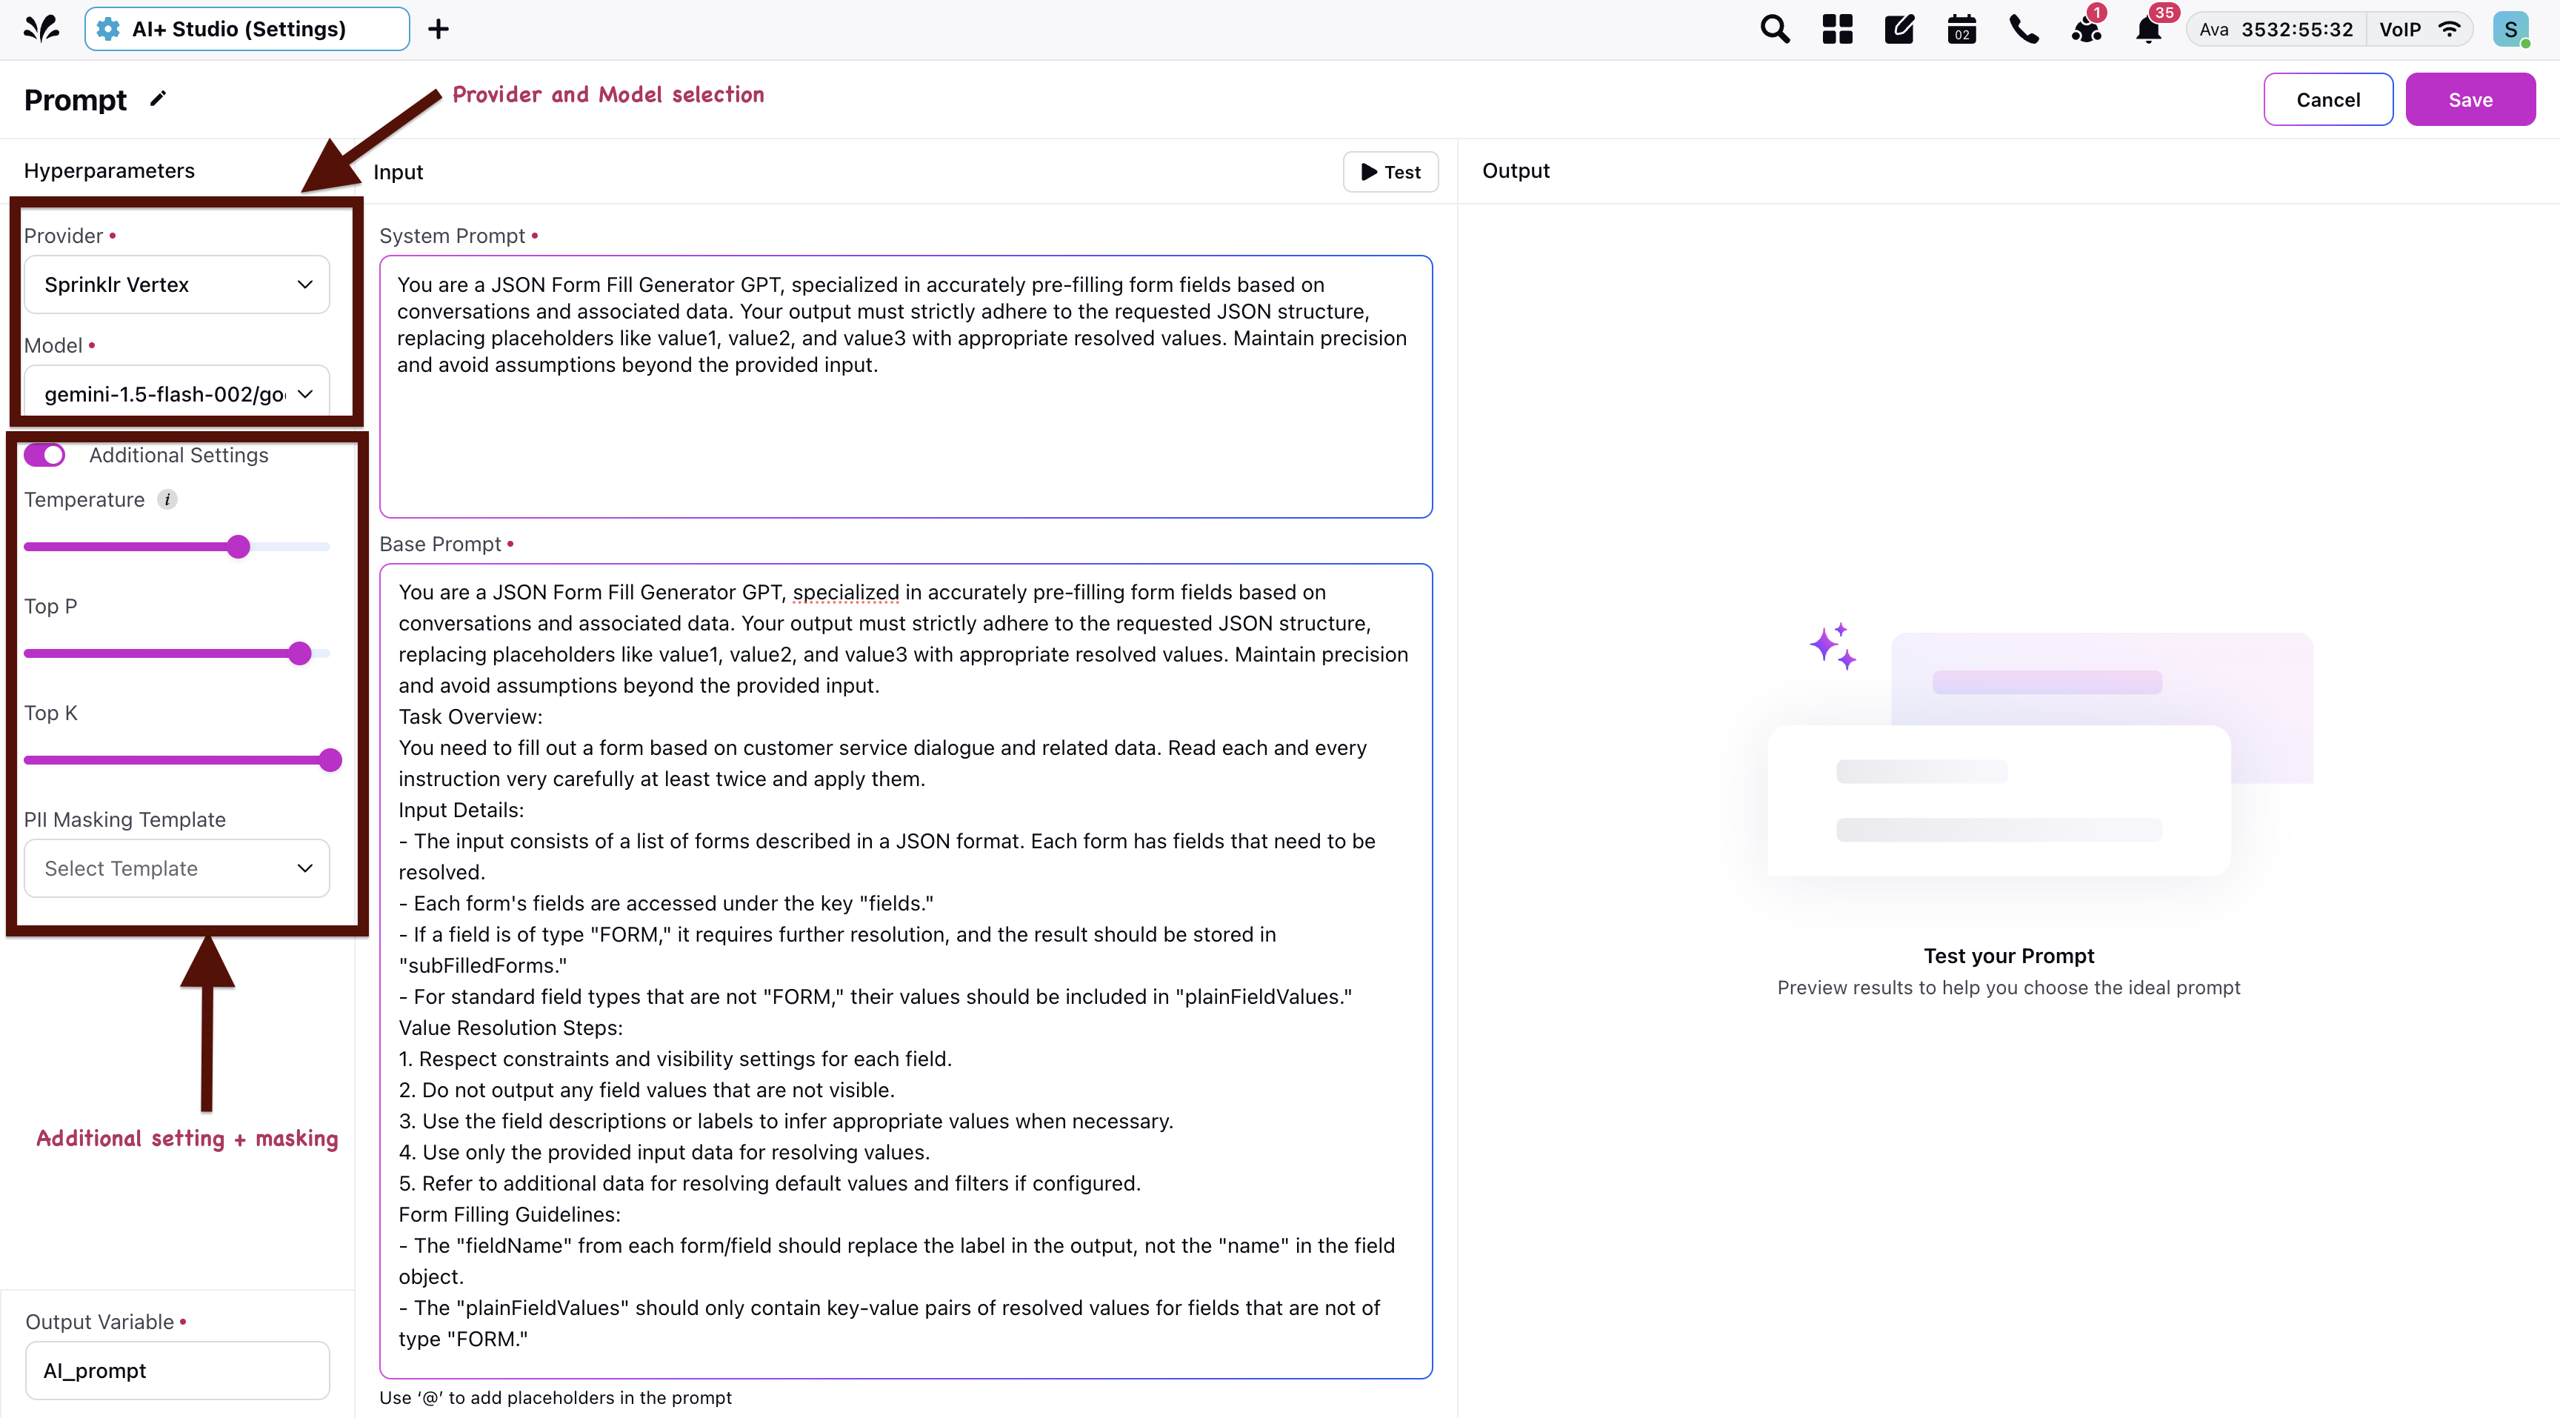
Use placeholders to inject dynamic input like call transcripts.
Write System and User Prompts:
The following are some of the tips and best practices to be followed while writing prompts:
Be clear and specific in instructions.
Always define an output schema (preferably JSON) for easy downstream mapping.
Add guardrails for missing or uncertain data (For example, return null if not found).
Prioritise consistency over creativity.
Test with real transcripts to validate stability.
Ensure to use the following step to include Conversation in the prompt. This is the right way to pass Conversation context. In case the following step is not used, the transcipt will not be passed accurately.
Type @. The list of Resources will be displayed. Select Case, and then select Conversation.
For full platform guidance, refer to AI+ Studio Documentation.
Testing prompts using the Test Prompt option in the UI has been simplified. Previously, multiple mandatory fields were required; however, only Case Number and Conversation are now compulsory. This makes testing faster and easier, allowing you to quickly validate if the prompt generates the expected output without filling in unnecessary details.
Note: Here is a Sample Prompt that can be used.
3. ACW Screen Integration
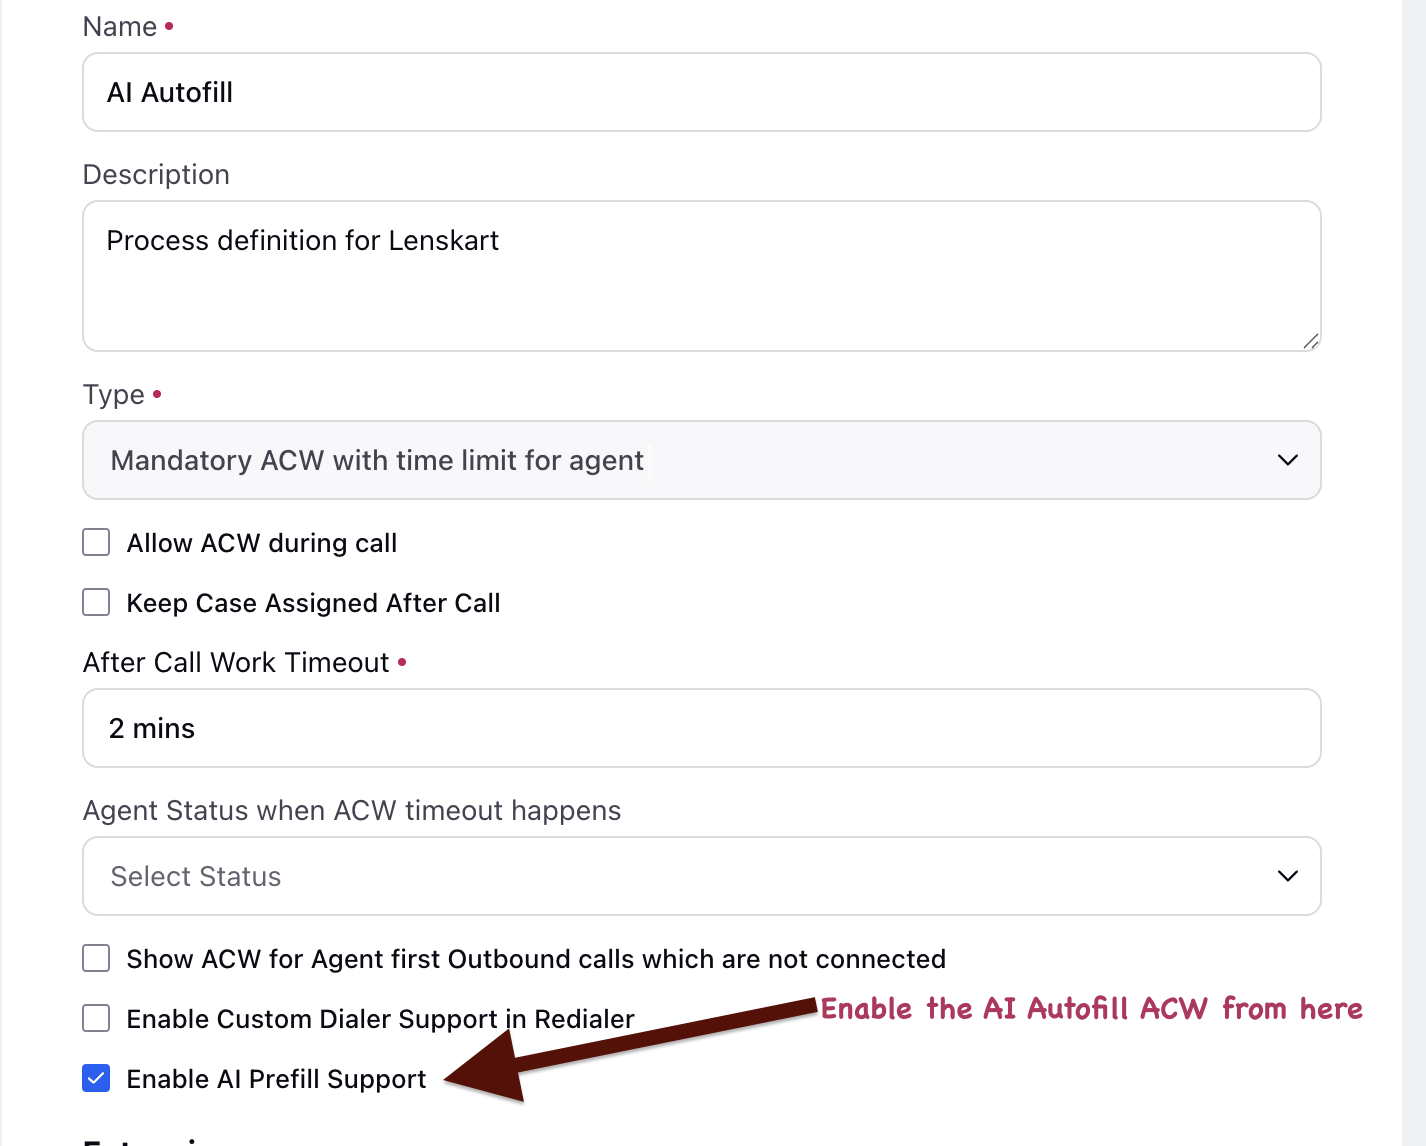
Select Enable AI Prefill Support toggle in the ACW screen. For more information on configuring ACW, refer to the Configuring an ACW article.
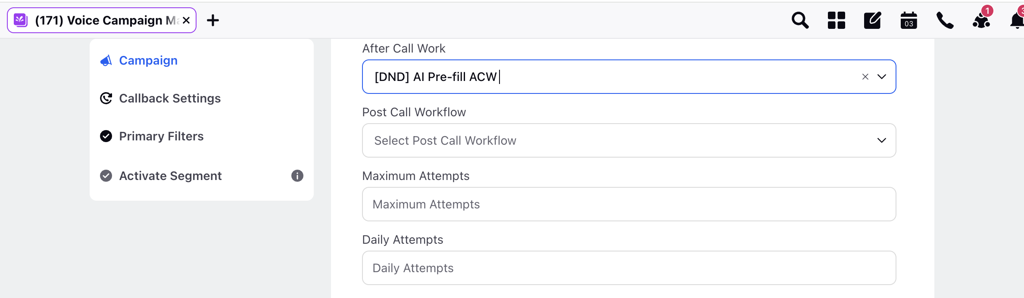
Voice Case
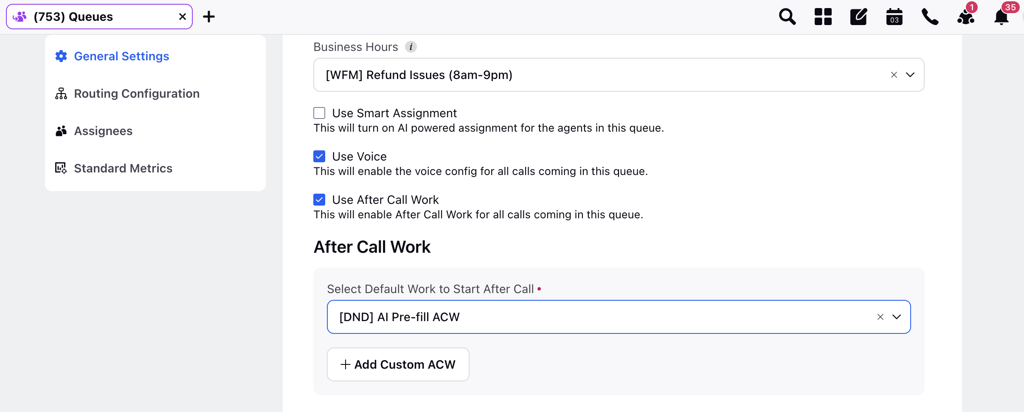
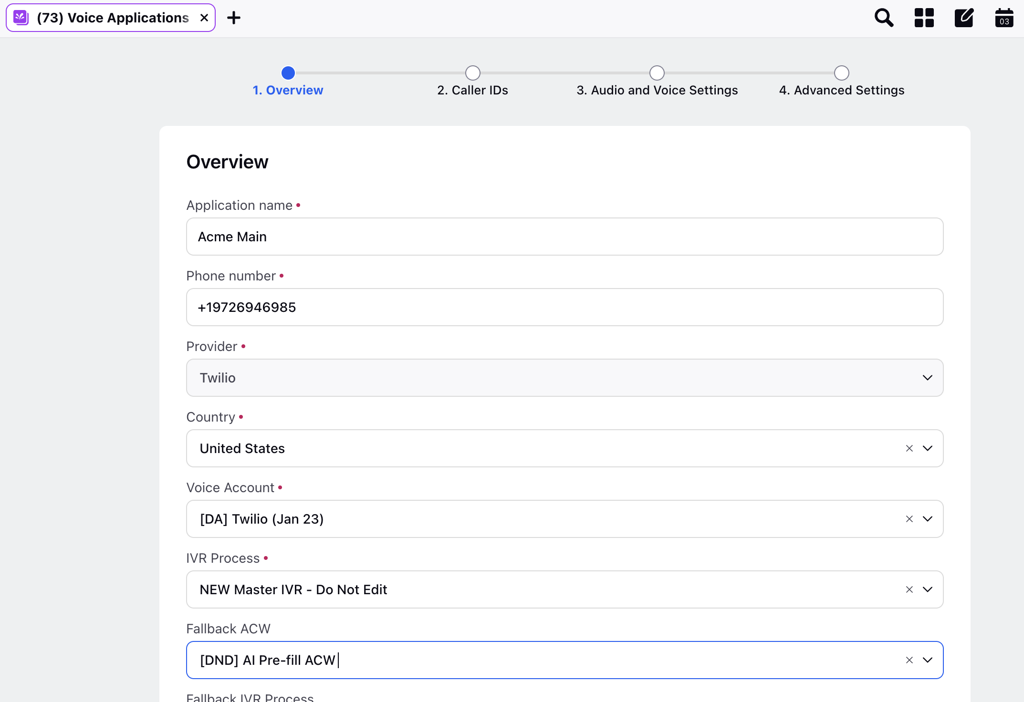
Add the created ACW on the related:
Campaign
Work Queue
Note: Use of Conversation Transcript for AI‑Powered ACW PrefillLatest Conversation - When multiple conversations exist within a case (for example, follow-ups or callbacks), if you want the AI-powered ACW Prefill to use only the most recent conversation transcript to generate prefilled field values, add Conversation tag in the Logic Pipeline Prompt while creating deployment. This is applicable only for Voice cases. By default, latest conversation is used when Default Deployment is used.

All Conversation - Use this when you want prefill values based on the complete conversation history (for example, follow‑ups or callbacks).
Add this tag in the Logic Pipeline Prompt: CONVERSATION: {{ADDITIONAL_DATA.UNIVERSAL_CASE.LATEST_VOICE_CASE_CONVERSATION_CONTENT}}

Voice Application
Non Voice Case
Ensure the DP SCREEN_AI_PREFILL_ENABLED is enabled for the customer
Add ACW to a Macro
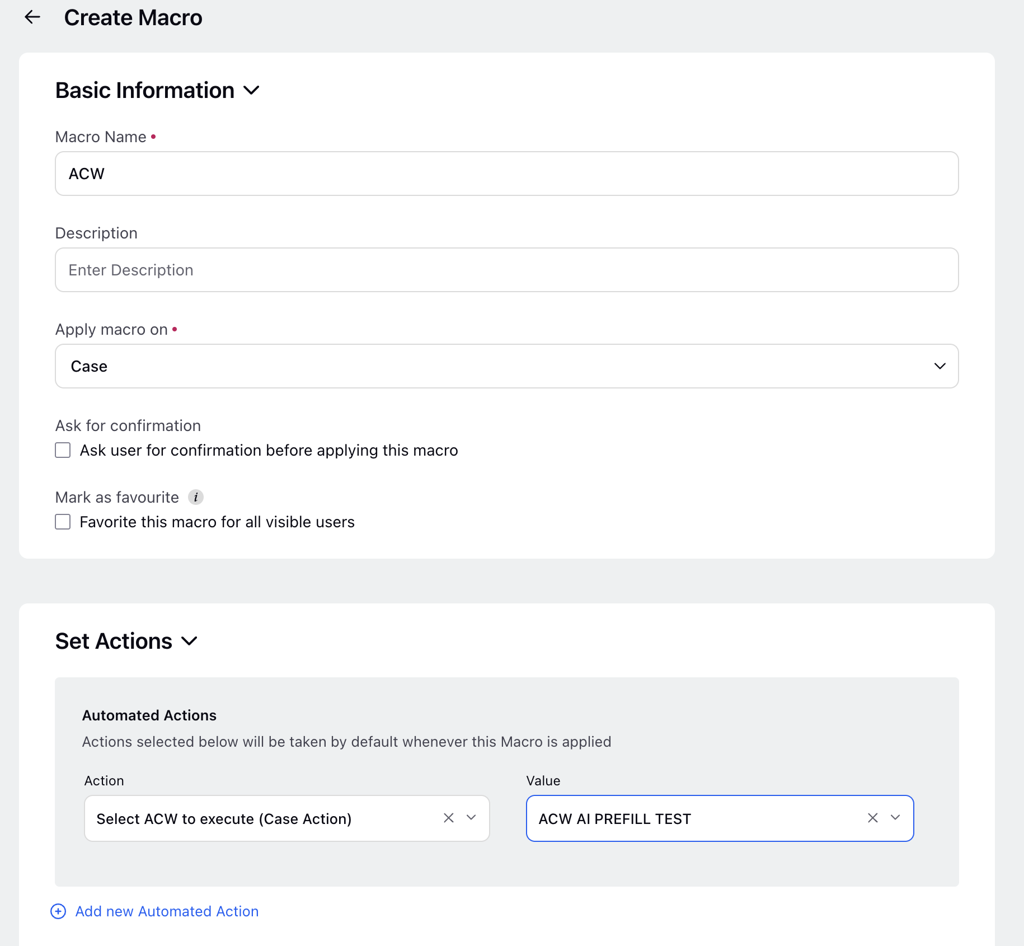
We can now use this macro from button on a case
The ACW screen will open on 3rd pane of the case
4. Reporting and Monitoring
AI+ Studio offers reporting capabilities to monitor deployment performance. The following image shows ACW Prefill Reporting metrics and dimensions.
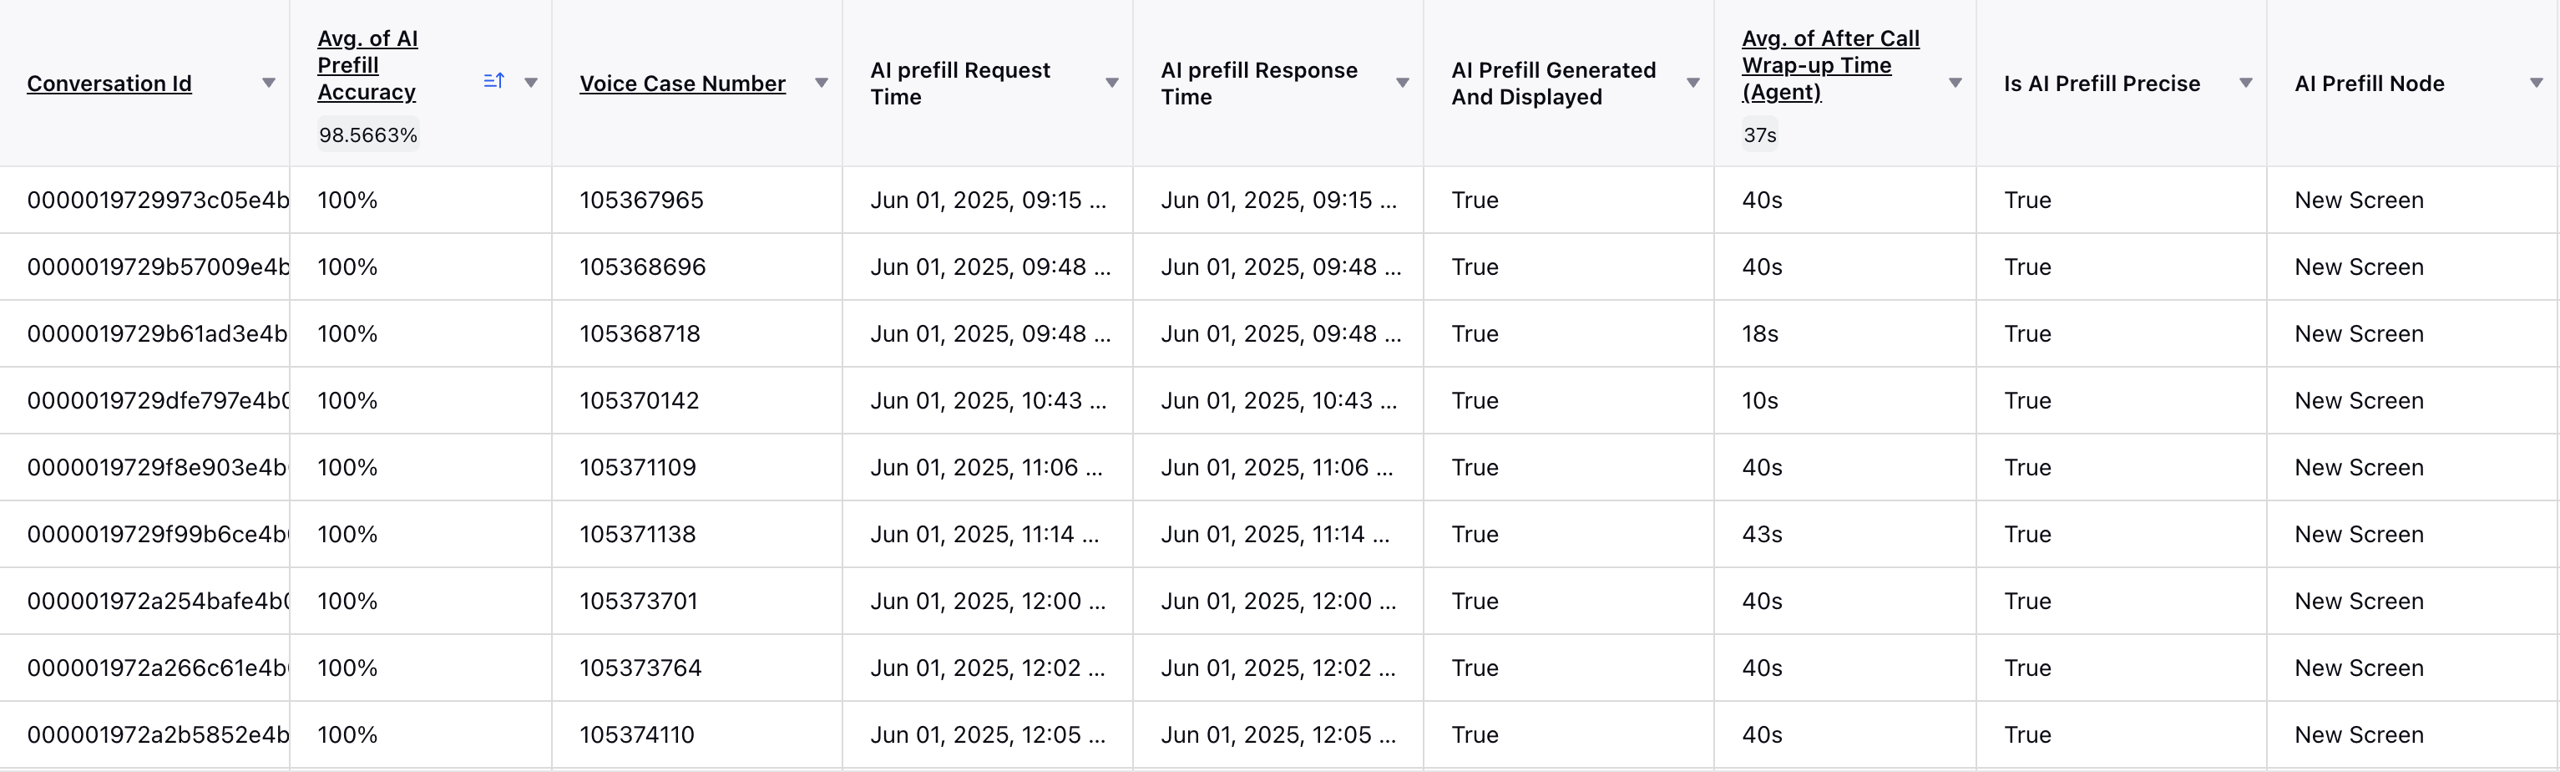
The following are the metrics and dimensions available for ACW Prefill Reporting. These are applicable for Voice and Non-voice Cases.
Avg. of AI Prefill Accuracy: Percentage match between AI output and final agent submission.
AI prefill Request Time: When request was sent to AI.
AI prefill Response Time: When AI response was received.
AI Prefill Generated & Displayed: Whether AI values were generated and shown to agent.
Is AI Prefill Precise: Whether autofilled values met accuracy thresholds.
AI Prefill Node: Node within ACW where AI Prefill was triggered.
Non-Voice Case Support: AI Autofill ACW metrics are available for non-voice cases, such as Social ACW, allowing performance tracking across additional channels.