Customize Grouped Queues Dashboard Using Record Manager
Updated
The Supervisor Console enables monitoring of grouped work queues, organized by predefined criteria such as department, date, or user group. You can configure and manage the Grouped Queues Monitoring dashboard through the Record Managers screen within Supervisor Settings.
This screen allows you to create a record manager for the grouped queue dashboard, customized to your specific monitoring requirements. Record managers allow you to customize the elements of a screen within a persona app.
![]() Note: This feature is currently in Limited Availability. To enable this feature in your environment, reach out to your Success Manager. Alternatively, you can submit a request at tickets@sprinklr.com.
Note: This feature is currently in Limited Availability. To enable this feature in your environment, reach out to your Success Manager. Alternatively, you can submit a request at tickets@sprinklr.com.
Record Manager Key Features
On the Record Manager, you can do the following:
Define grouping levels: Set the hierarchy or levels (for example, by department, then by user) to organize work queues.
Select metrics columns: Choose the specific performance indicators to display for each work queue.
Configure row-level actions: Customize actions accessible through the three-dots menu on each row.
Set header-level actions: Define global actions available at the top of the dashboard.
Apply filters: Configure upfront, default, or locked filters to streamline data views.
Add global actions: Include quick-access actions for common tasks.
Translating labels: Provide multilingual support by adding translations for fields and label names.
Edit JSON: Fine-tune the configuration by directly modifying the underlying JSON structure.
Permissions
To access Supervisor Settings, the following requirements must be met:
Permission Requirement: You must have the Supervisor Settings permission enabled.
To check your permissions:
1. Click your user profile in the top‑right corner of the Sprinklr platform.
2. Go to the Permissions tab.
3. Search for Supervisor Settings to verify access.
.png)
Persona App Setup: Ensure that Supervisor Settings is added as a menu item in your Persona App.

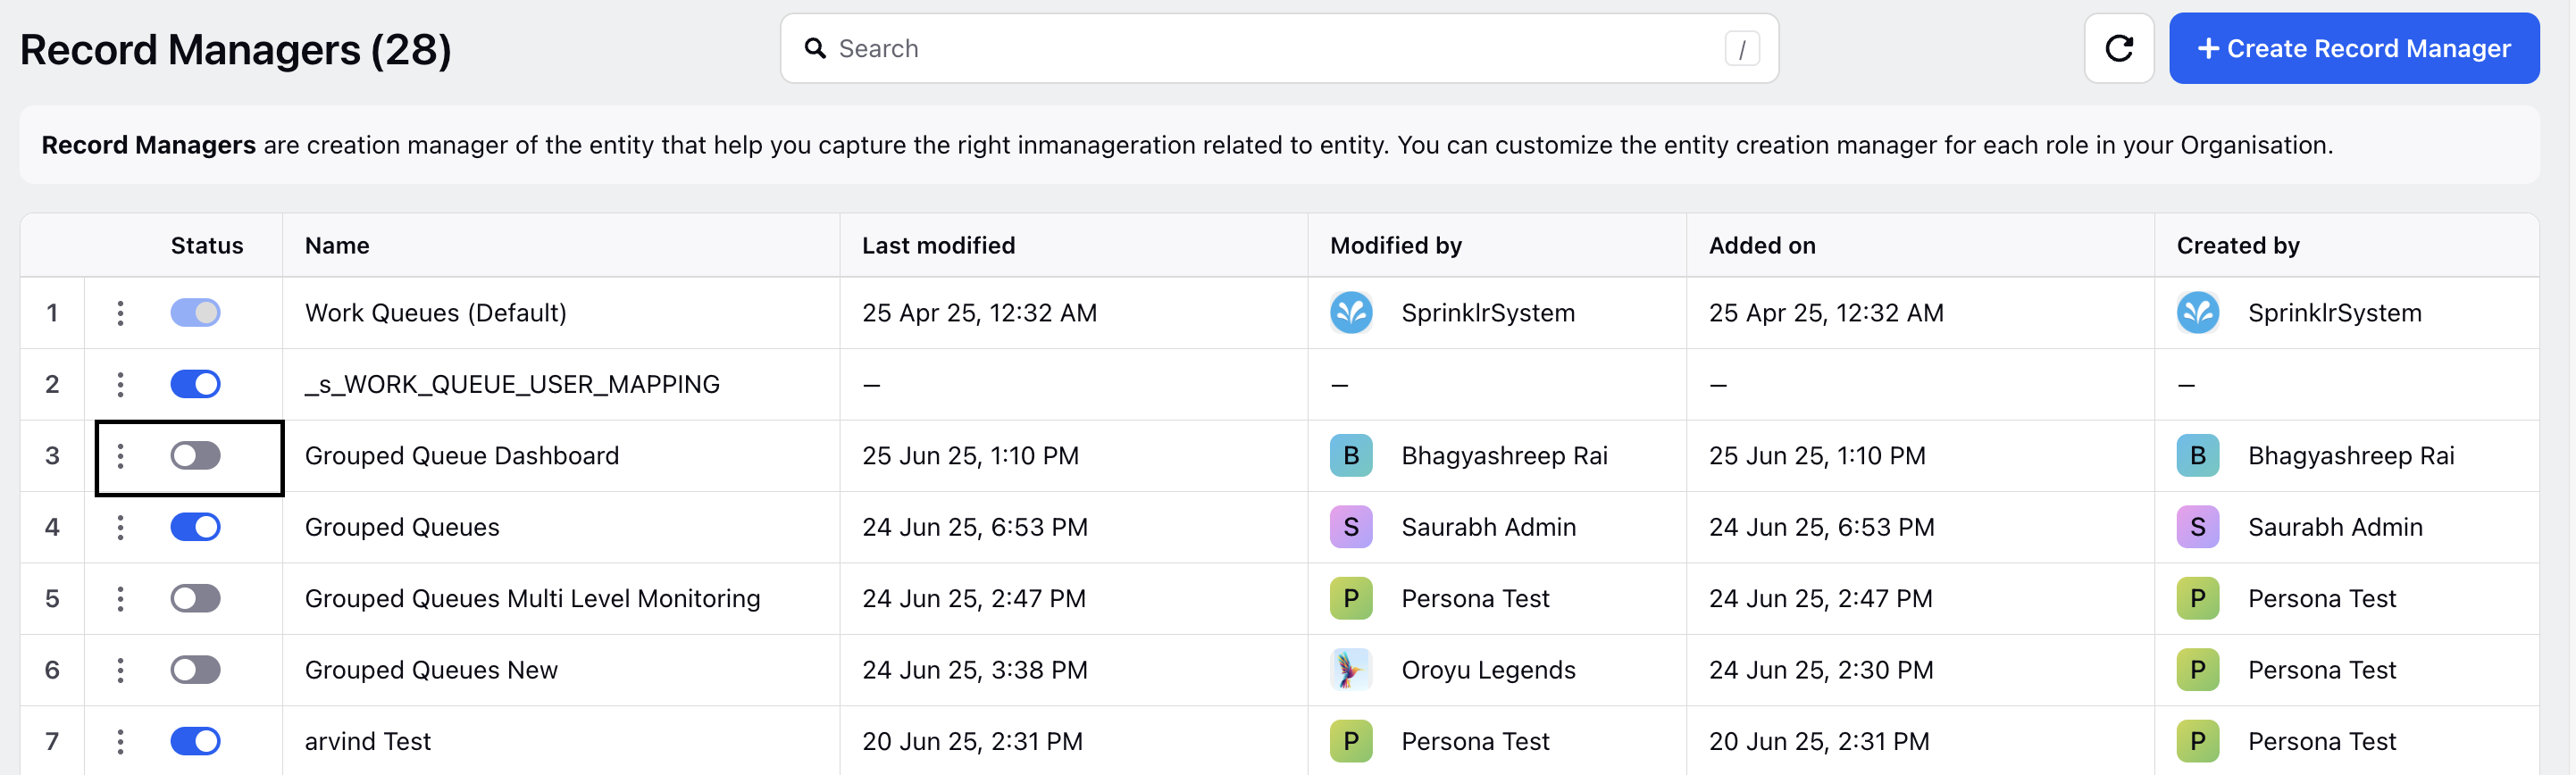
Access Record Managers
To access the Record Managers screen, follow these steps:
To access the Record Managers screen, follow these steps:
1. Open the Supervisor Console persona app from Launchpad.
2. In the left navigation pane, click Supervisor Settings.
3. Hover over the User row, and click View.

The Record Managers screen will open.
Create Grouped Queue Record Manager
To create a grouped queue record manager, follow these steps:
On the Record Managers screen, click Create Record Manager.
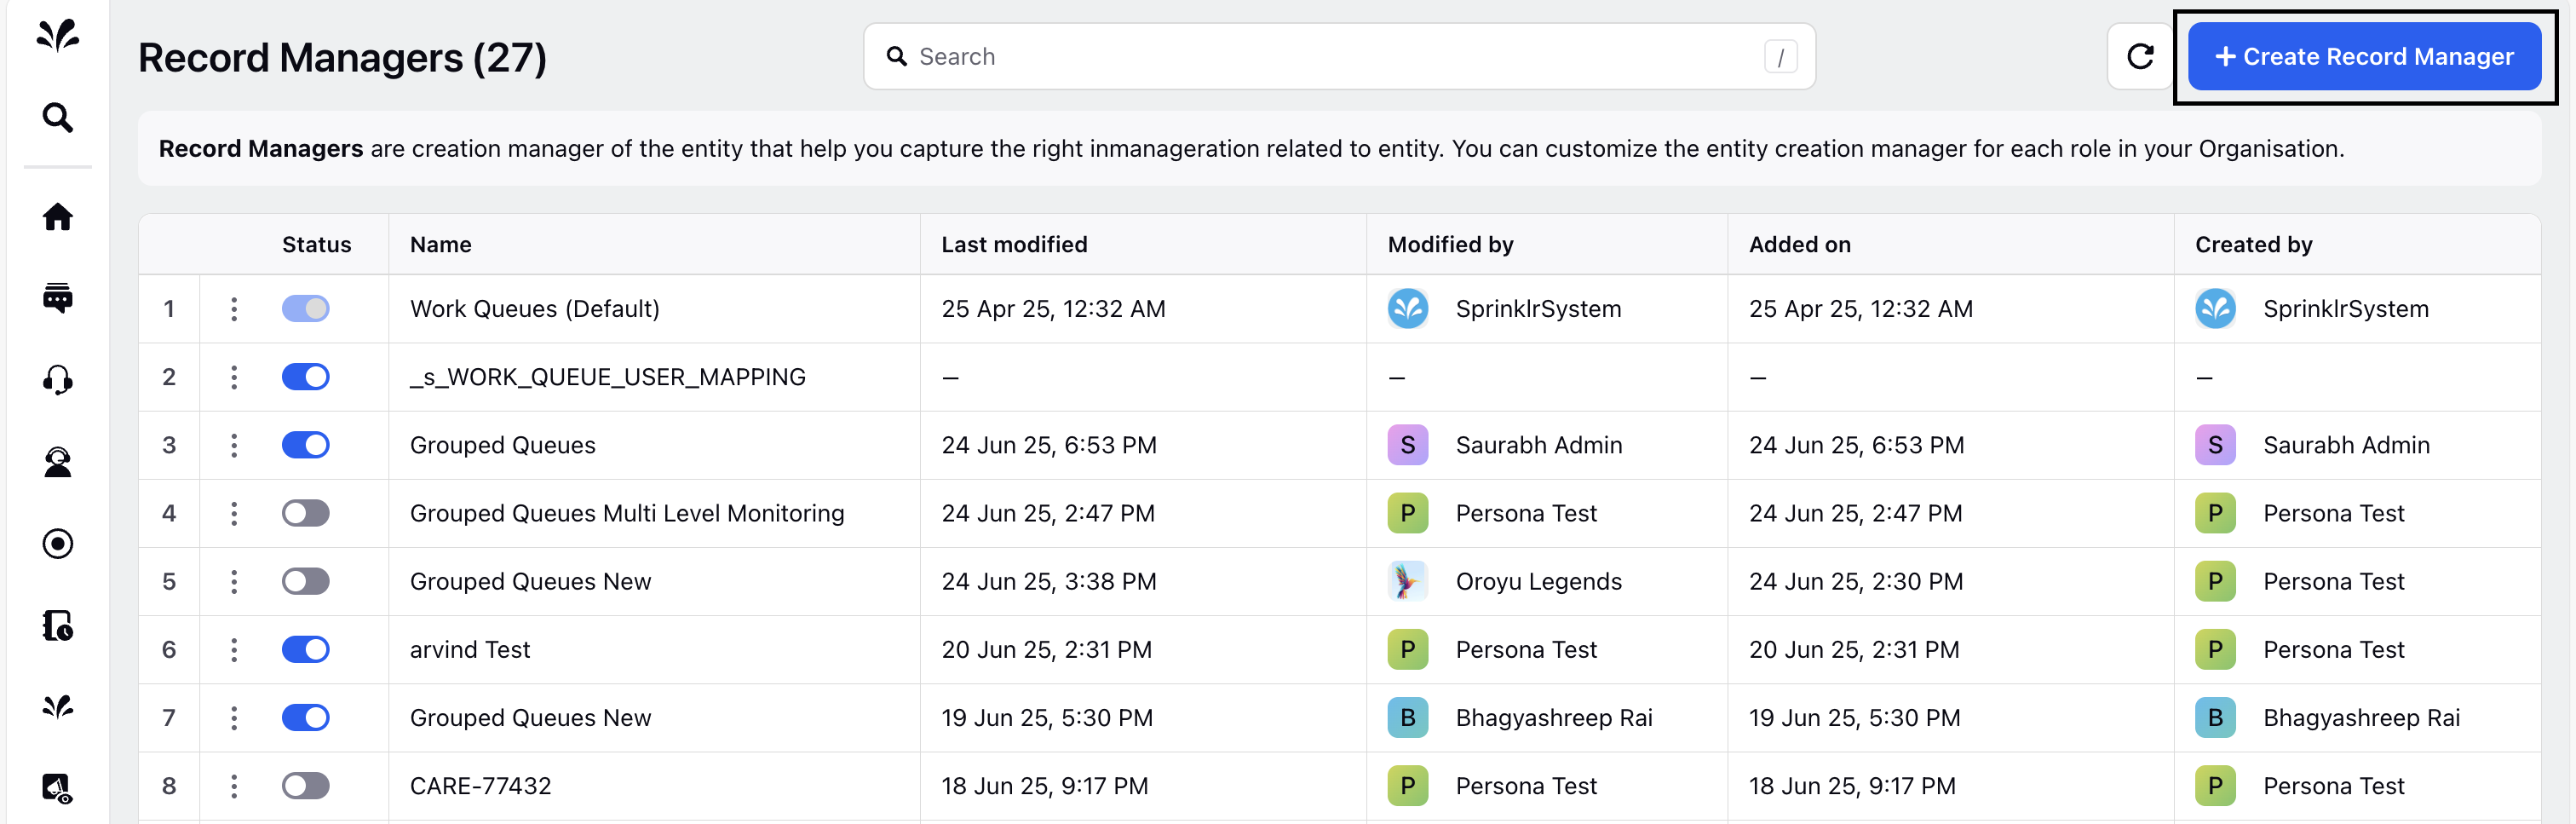
The Record Manager Creation screen appears with three configuration tabs:
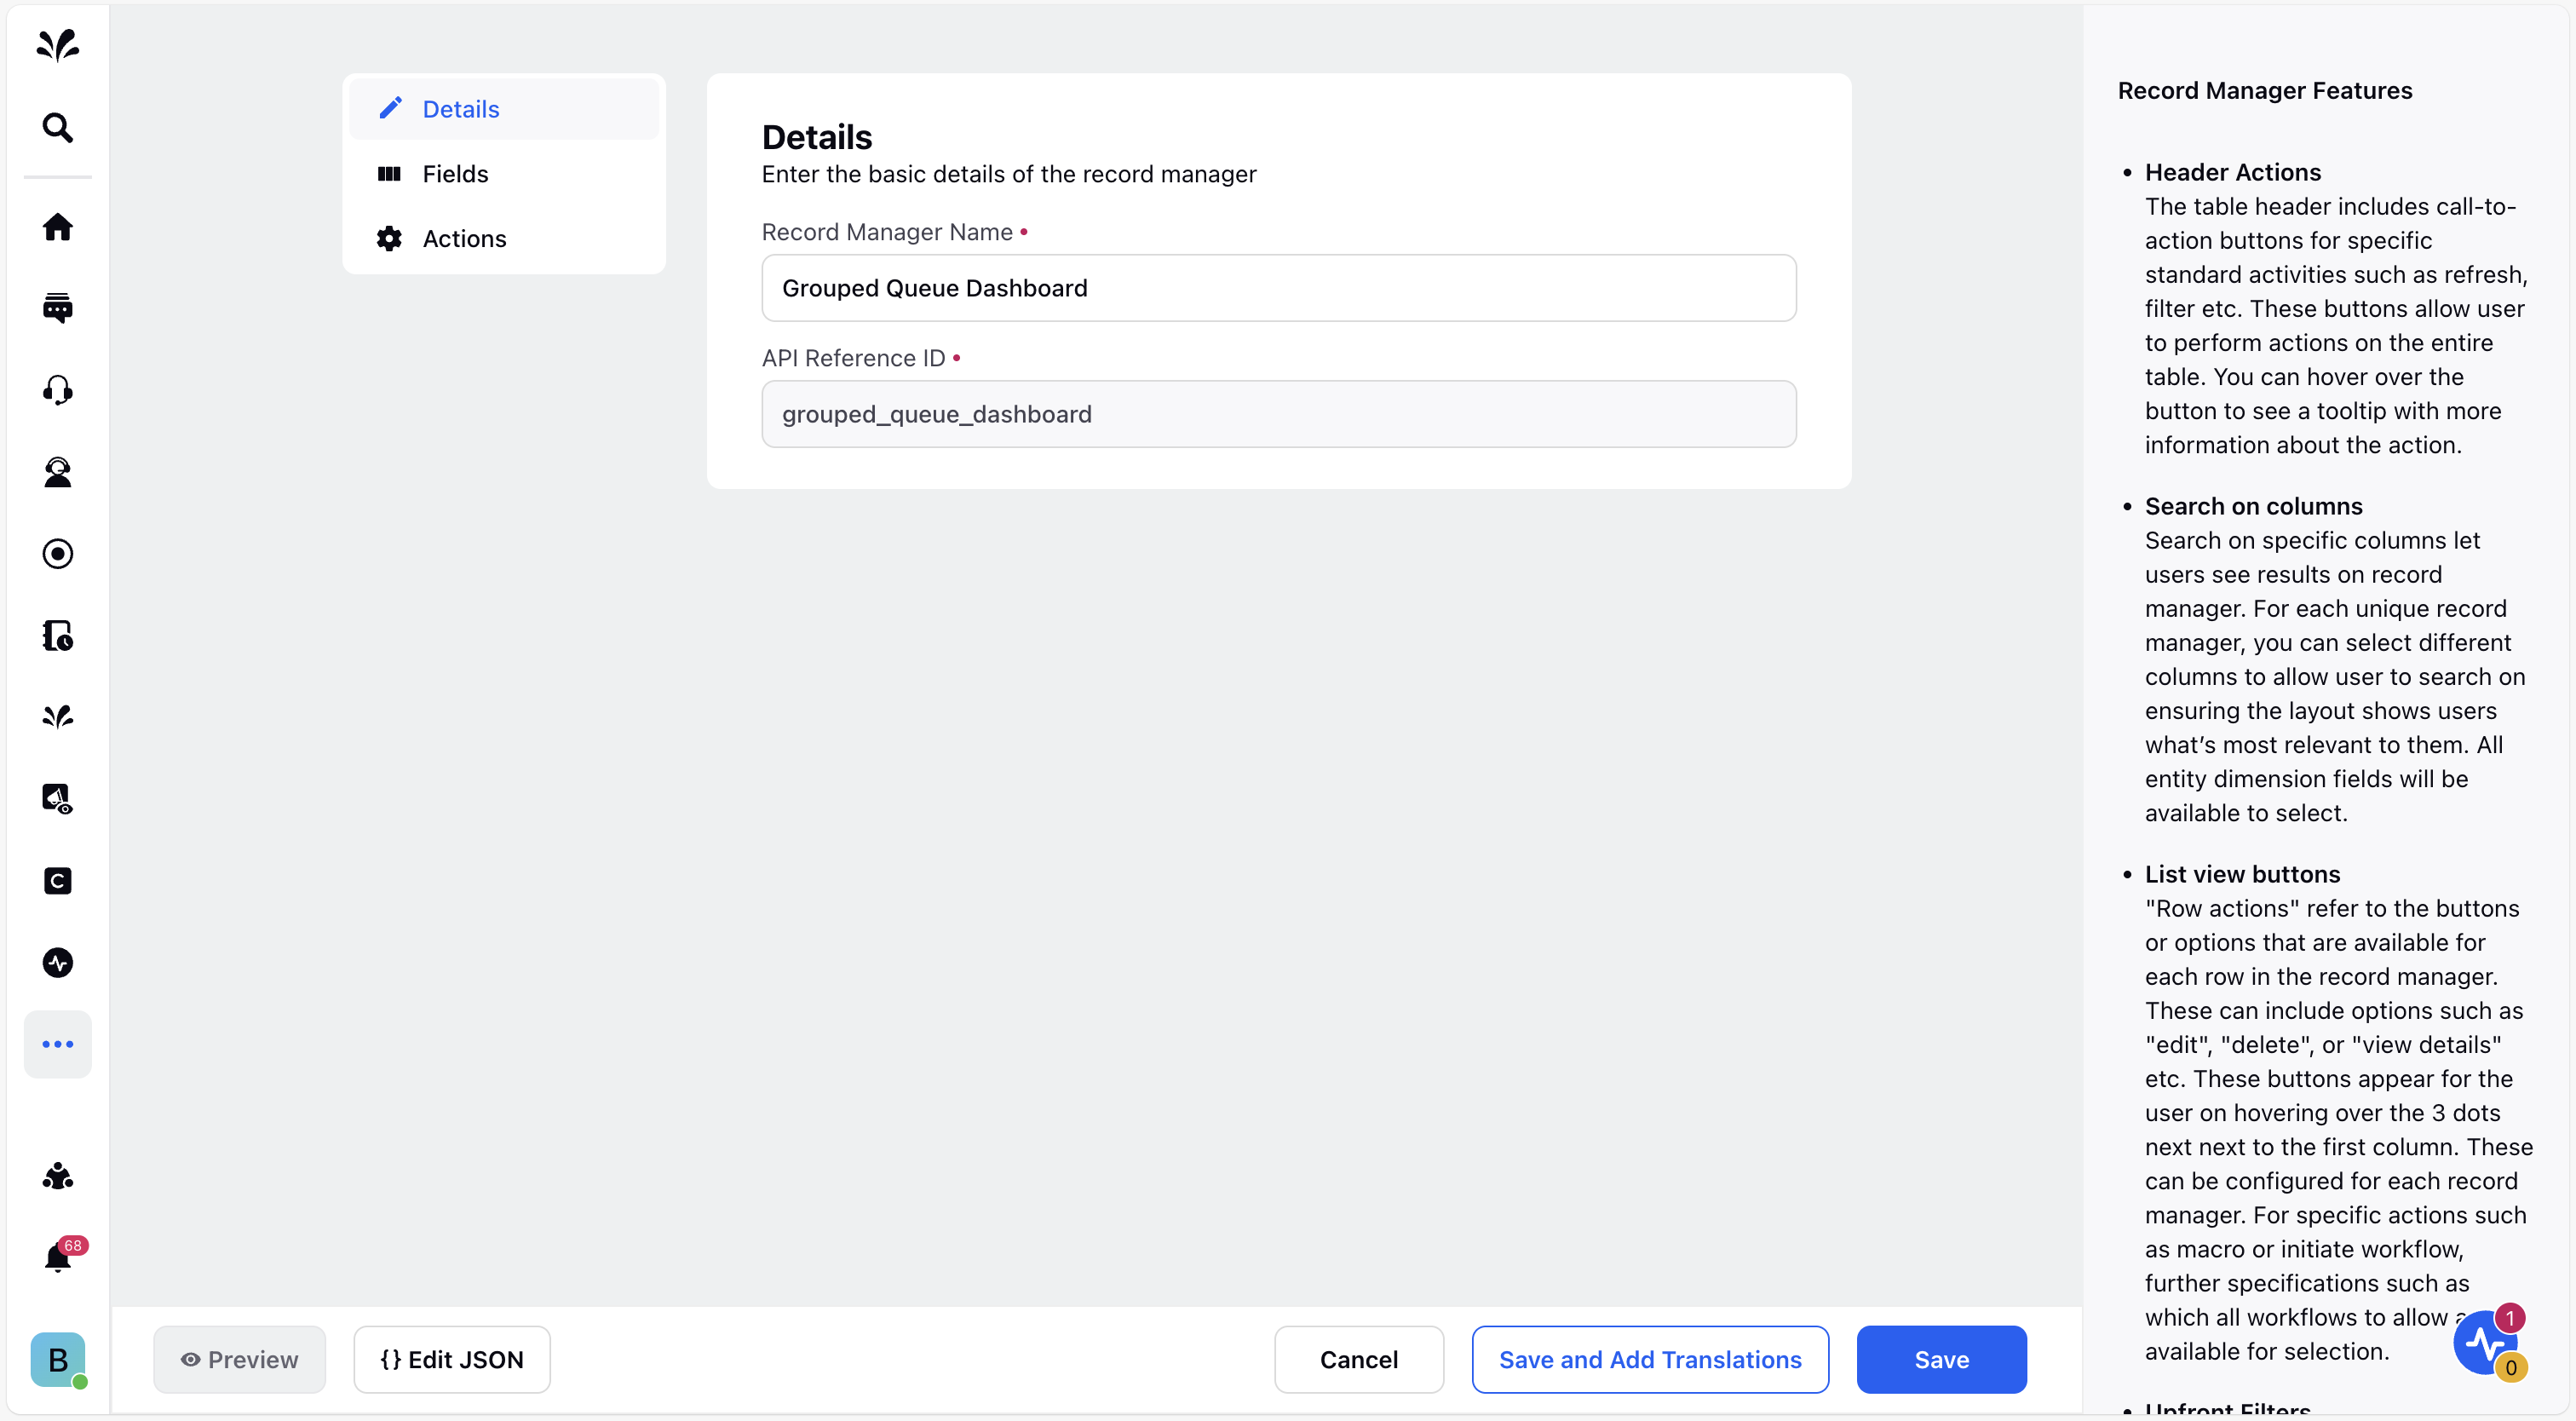
Details Tab
In the Details tab, enter the basic details of the record manager.
Field | Description |
Record Manager Name | Enter a name for the record manager. |
API Reference ID | Keep the auto-generated value. This is the unique identifier for this record manager. It is used to enable the record manager in the persona apps. |
Details tab:
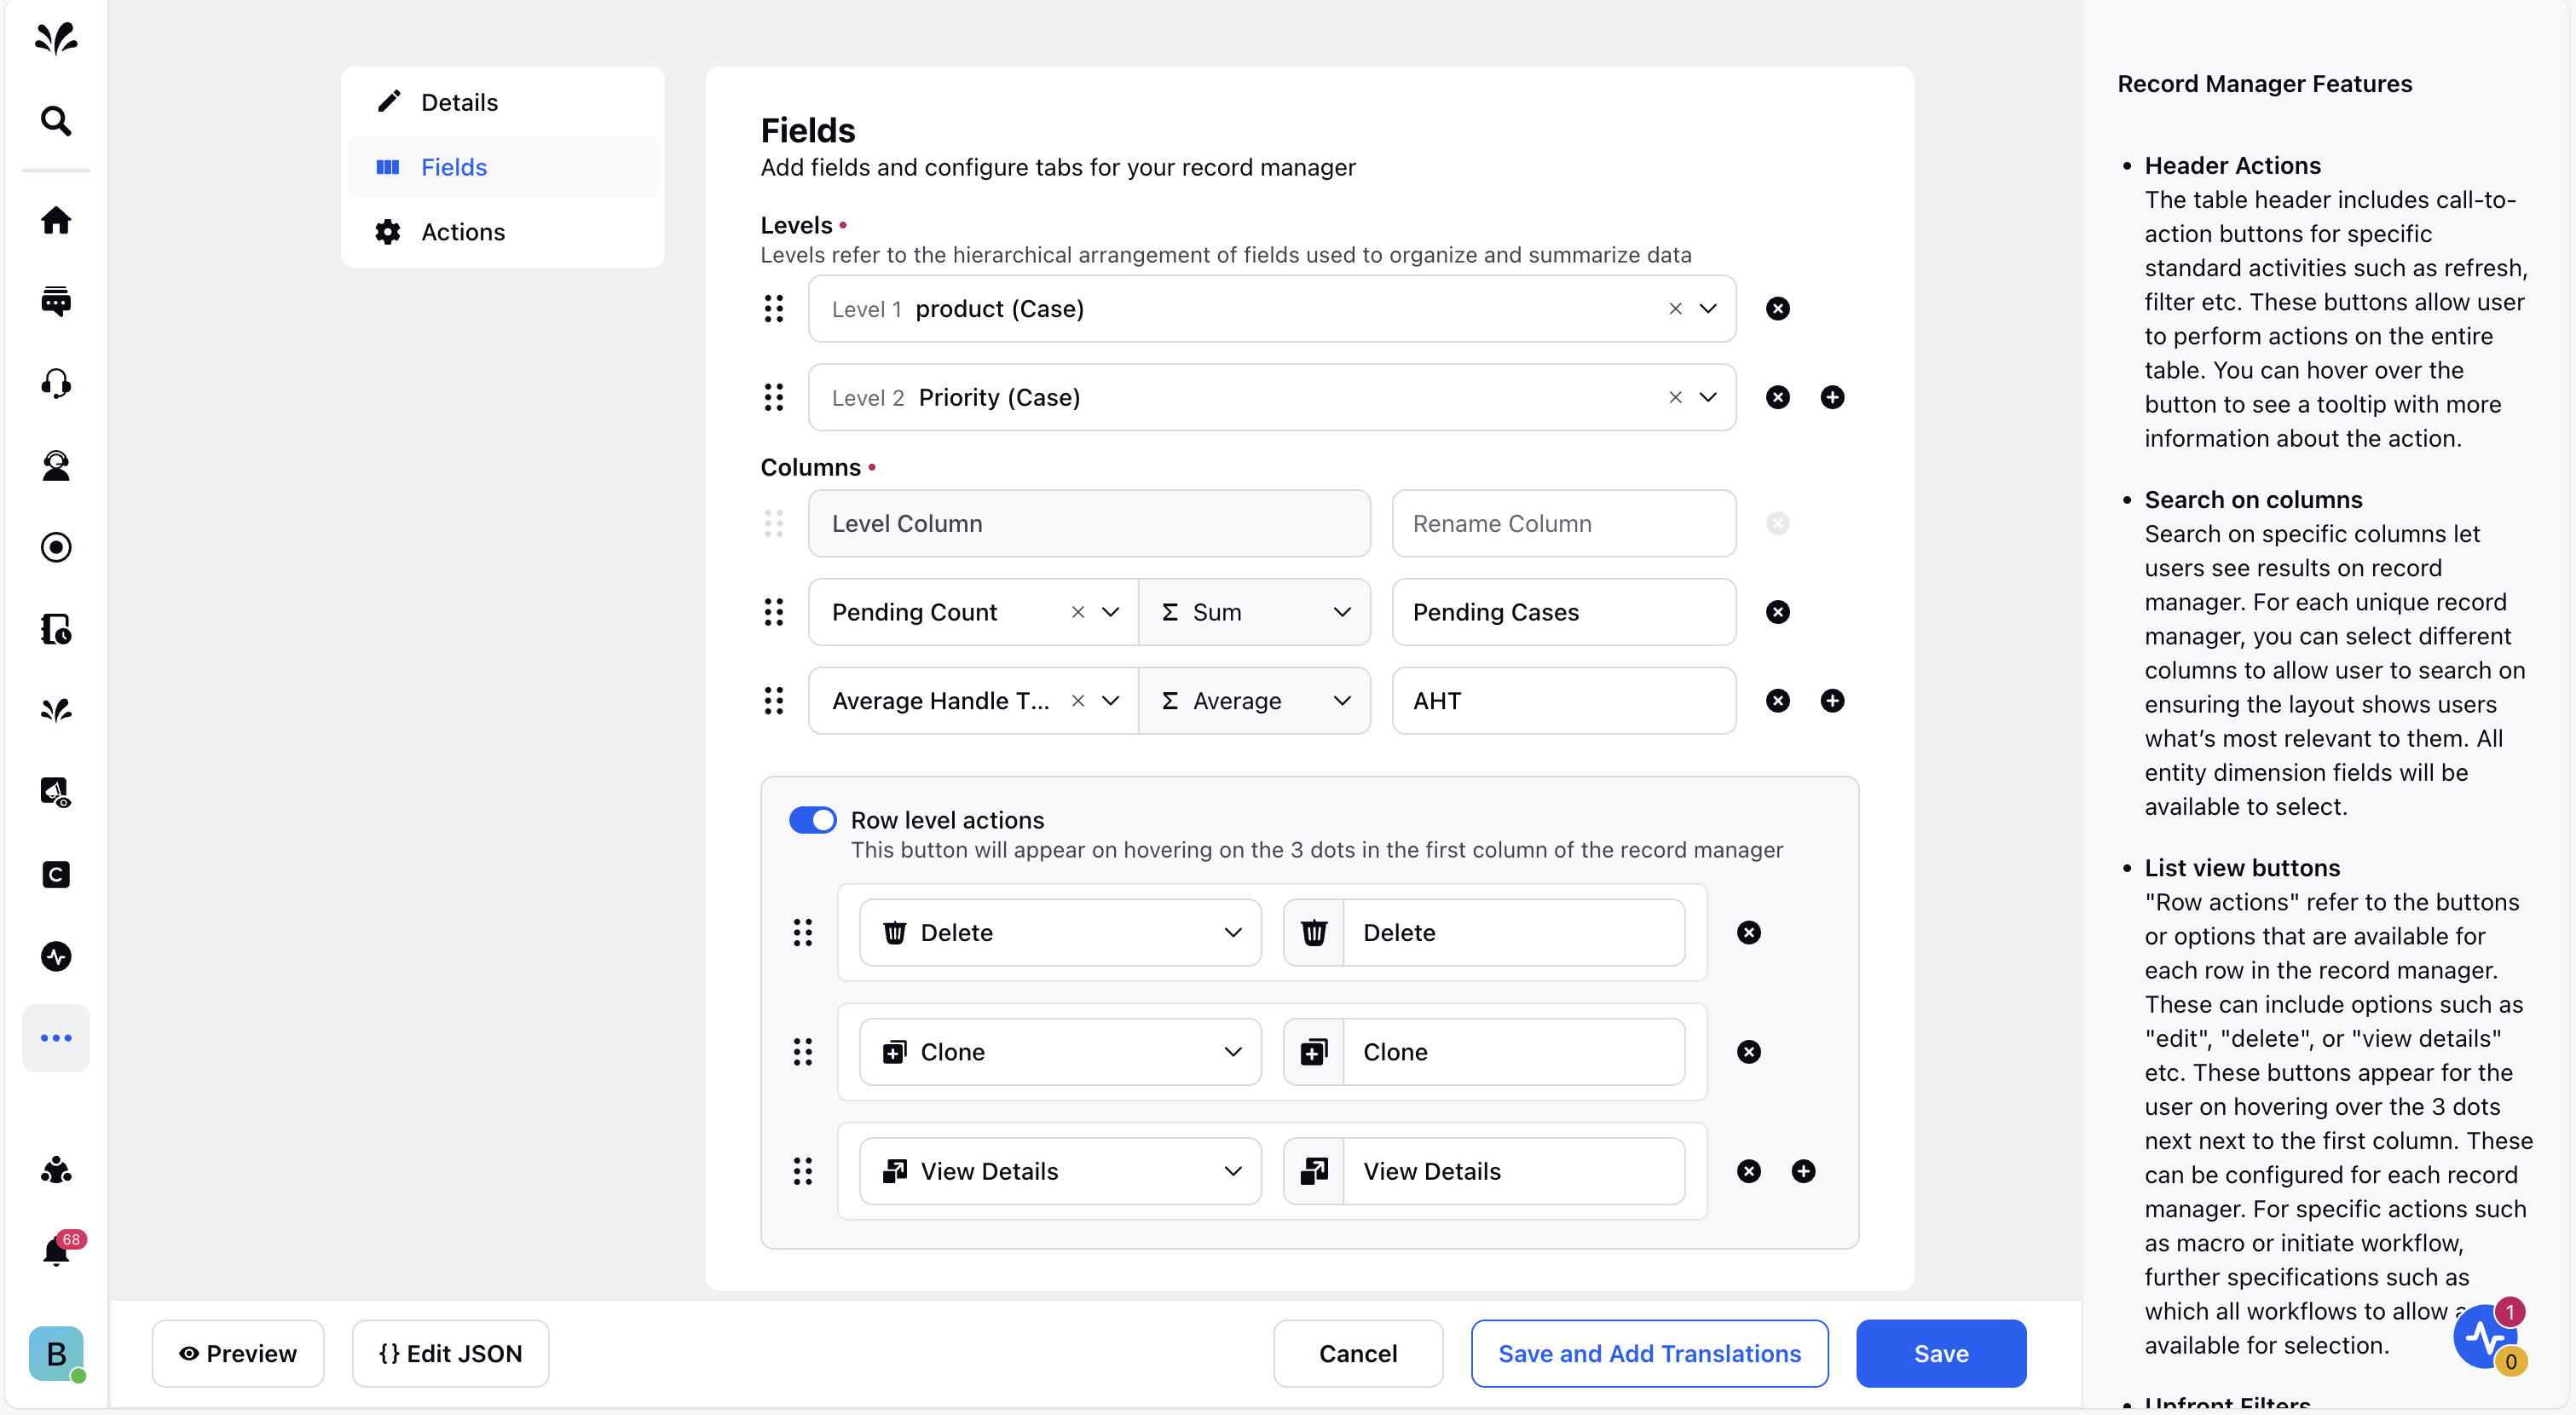
Fields Configuration Tab
In the Fields tab, define the levels and dimensions used to group the queues. You can also specify row-level actions.
Field | Description |
Levels | Use this section to define how work queues are grouped hierarchically. You can set multiple grouping levels and select a dimension for each level. For example, at Level 1, group work queues by product such as Phone, Laptop, or Chargers. Then, at Level 2, organize each product group by assigned priority like High, Medium, or Low. This structure helps you categorize issues by product first and then assess their urgency. As a result, you can quickly identify which products face the most critical problems and prioritize your responses effectively. |
Columns | In this section, you can define the columns that are displayed on the Grouped Queues and Grouped Queue Monitoring screen.
Access to this feature is controlled by a dynamic property (DP). To enable this feature in your environment, reach out to your Success Manager. Alternatively, you can submit a request at tickets@sprinklr.com.
Add Column Drilldown You can add a drilldown lens to individual columns. This allows supervisors to click on specific metrics within a column to access detailed trend data. It enables quick investigation of anomalies or performance issues directly from the monitoring screen. To add a column drilldown, click the three-dot icon next to the column. From the dropdown, select the appropriate drilldown lens that defines the detailed data to display when the metric is clicked.
Click Confirm to apply the drilldown lens. |
Row level actions | You can configure the row-level actions that appear when the user hovers over the three-dot icon alongside the queue name. In the left drop-down, select the action and in the right drop-down, enter the button text and select the icon. Actions that you can configure are:
|


Fields tab:
Actions Tab
In the Actions tab, you can configure the global actions that are visible upfront in the header of your record manager.
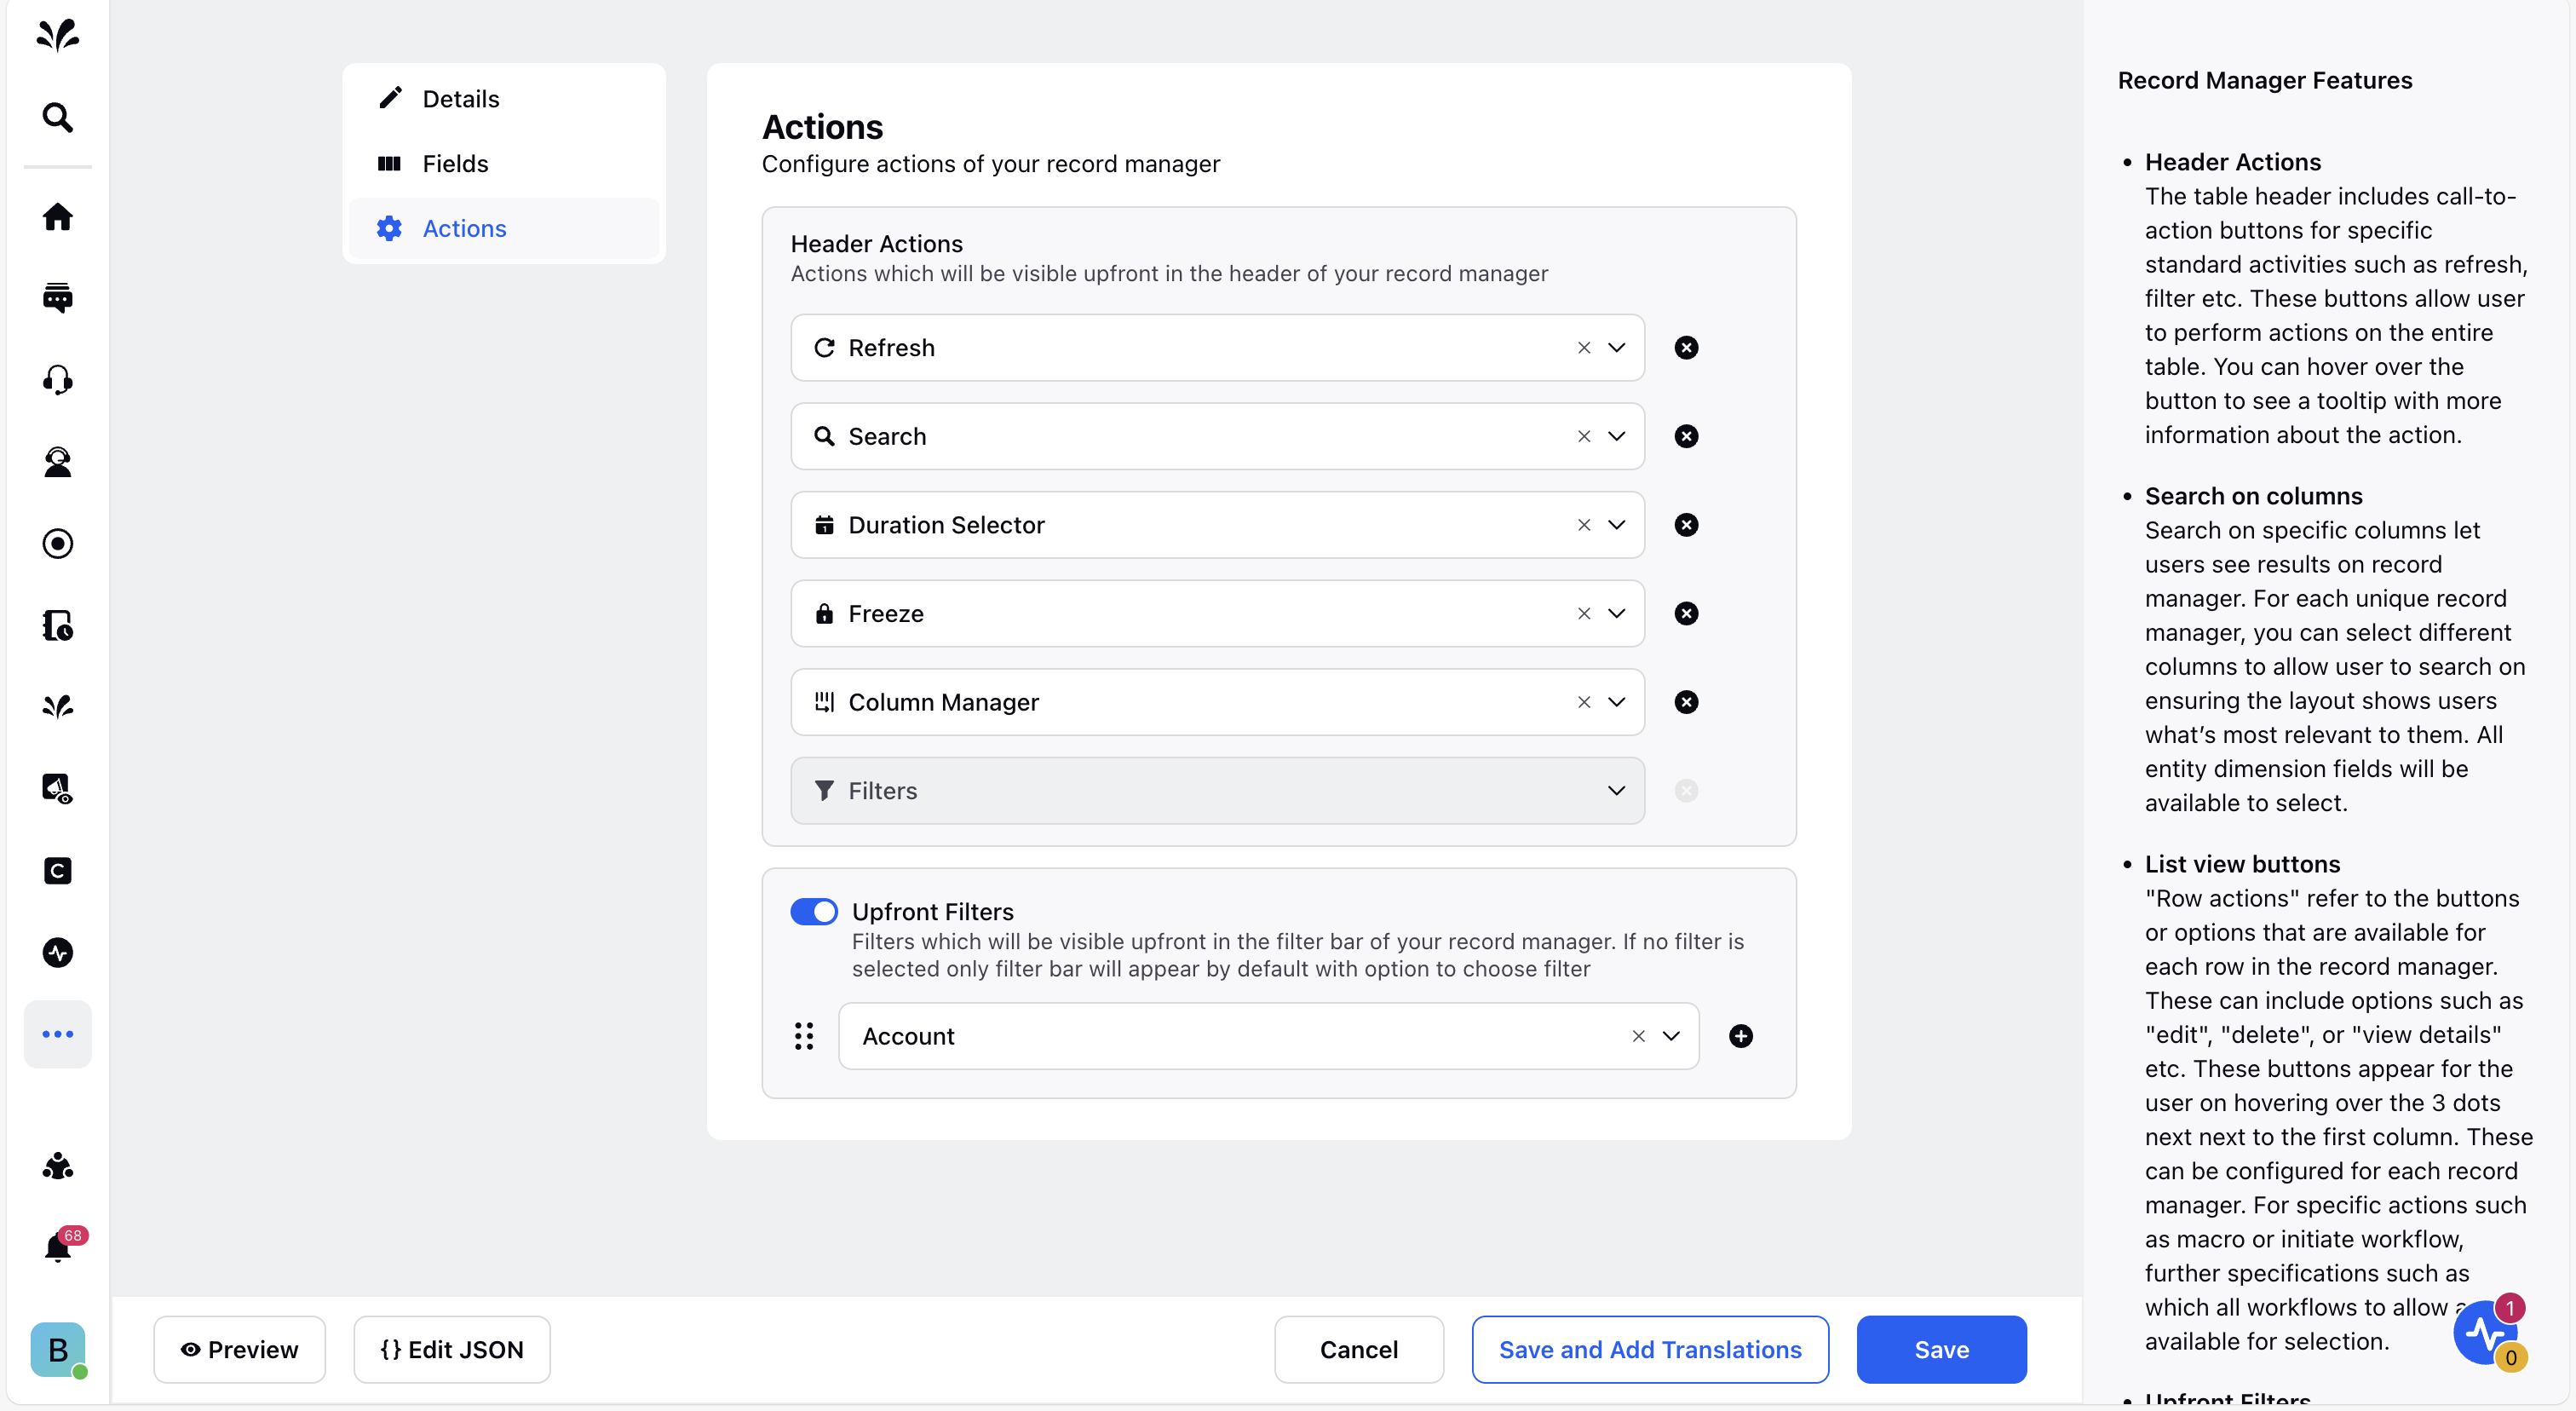
Header Actions
Action | Description |
Search | Find specific cases or information by entering keywords or case IDs. |
Filters | Narrow down the displayed cases based on selected criteria such as status or agent. |
Duration Selector | Select a time range to view cases or activities within a particular period. |
Freeze | Lock selected columns in place so they remain visible while you scroll through other data. |
Column Manager | Show or hide columns to focus on relevant case details.
|
Refresh | Reload the dashboard to display the most current case data and status updates. |
Upfront Filters
Select the filters you want to display upfront in the filter bar of your Record Manager. If no filters are selected, only the filter bar will appear by default, allowing users to choose filters manually.
Filter | Description |
Date | Filters cases based on specific dates or date ranges to focus on cases created or updated within that timeframe. |
Case | Filters cases by case Ids. |
User | Filters cases assigned to or handled by specific agents. |
Account | Filters cases related to specific accounts. |
Day of Week | Filters cases based on the day of the week they were created or updated (for example, Monday, Friday). |
Time of Day | Filters cases based on the time they were created or last updated, allowing focus on specific time periods. |
Once you’ve completed all customizations, you can use the options at the bottom of the screen to proceed:
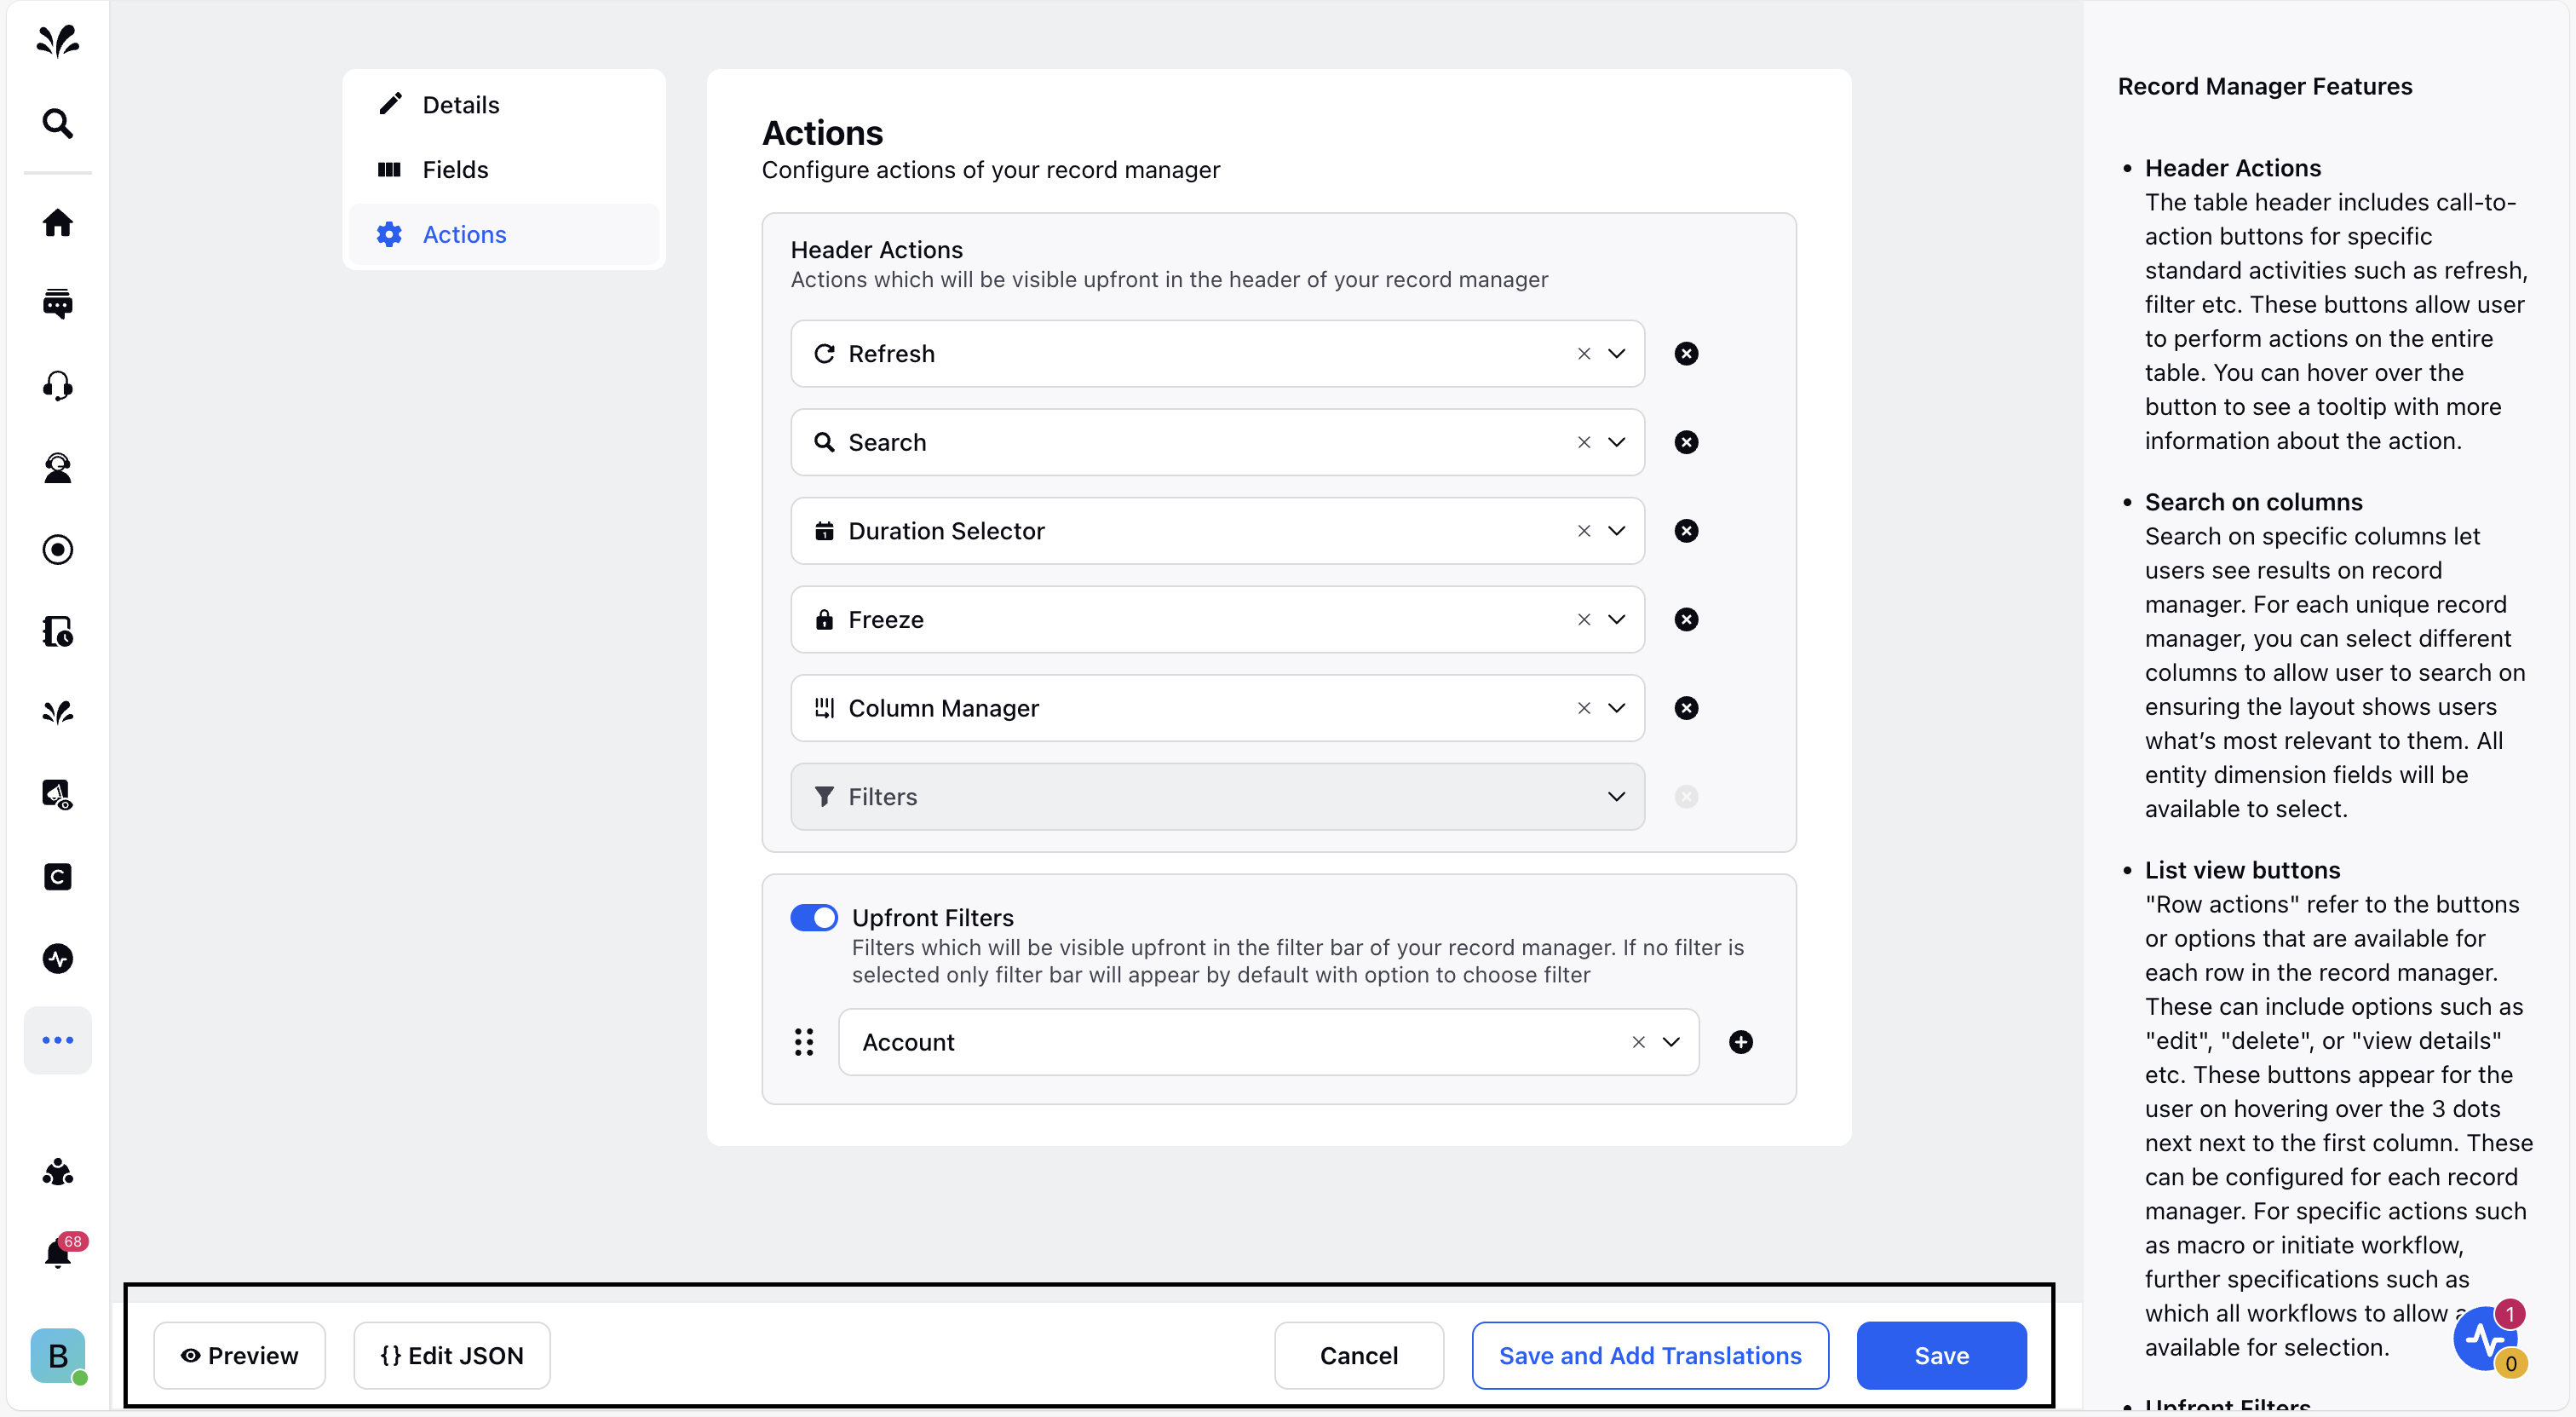
Preview: Shows the preview of the record manager before saving your changes.
Edit JSON: The UI automatically generates a corresponding JSON configuration. You can manually edit this JSON to meet specific requirements.
Cancel: Discards all changes and closes the Record Manager.
Save and Add Translations: Saves your changes and allows you to add additional languages or edit translations.
Save: Saves all changes made to the record.
After saving, the record manager is created, and you’ll be redirected to the Record Managers page.
Activate Grouped Queue record manager
To make a record manager accessible, you must activate it. Activation is the process of publishing the record manager, so it becomes accessible in the selected persona apps, workspaces, and to specific users, roles, or user groups. Until a page is activated, it remains in a draft or inactive state.
![]() Note: Activating a record manager does not automatically enable it for the selected entity (such as persona apps, users, roles, or user groups). It must be enabled using the API Reference ID.
Note: Activating a record manager does not automatically enable it for the selected entity (such as persona apps, users, roles, or user groups). It must be enabled using the API Reference ID.
To enable this feature in your environment, reach out to your Success Manager. Alternatively, you can submit a request at tickets@sprinklr.com.
To activate a record manager, follow these steps:
1. On the Record Managers page, find the page you want to activate.
2. Click the toggle switch next to the page name to initiate the activation process.
3. In the Grants dropdown, select the users, user groups, roles, persona apps, or workspaces that should have access to the page.
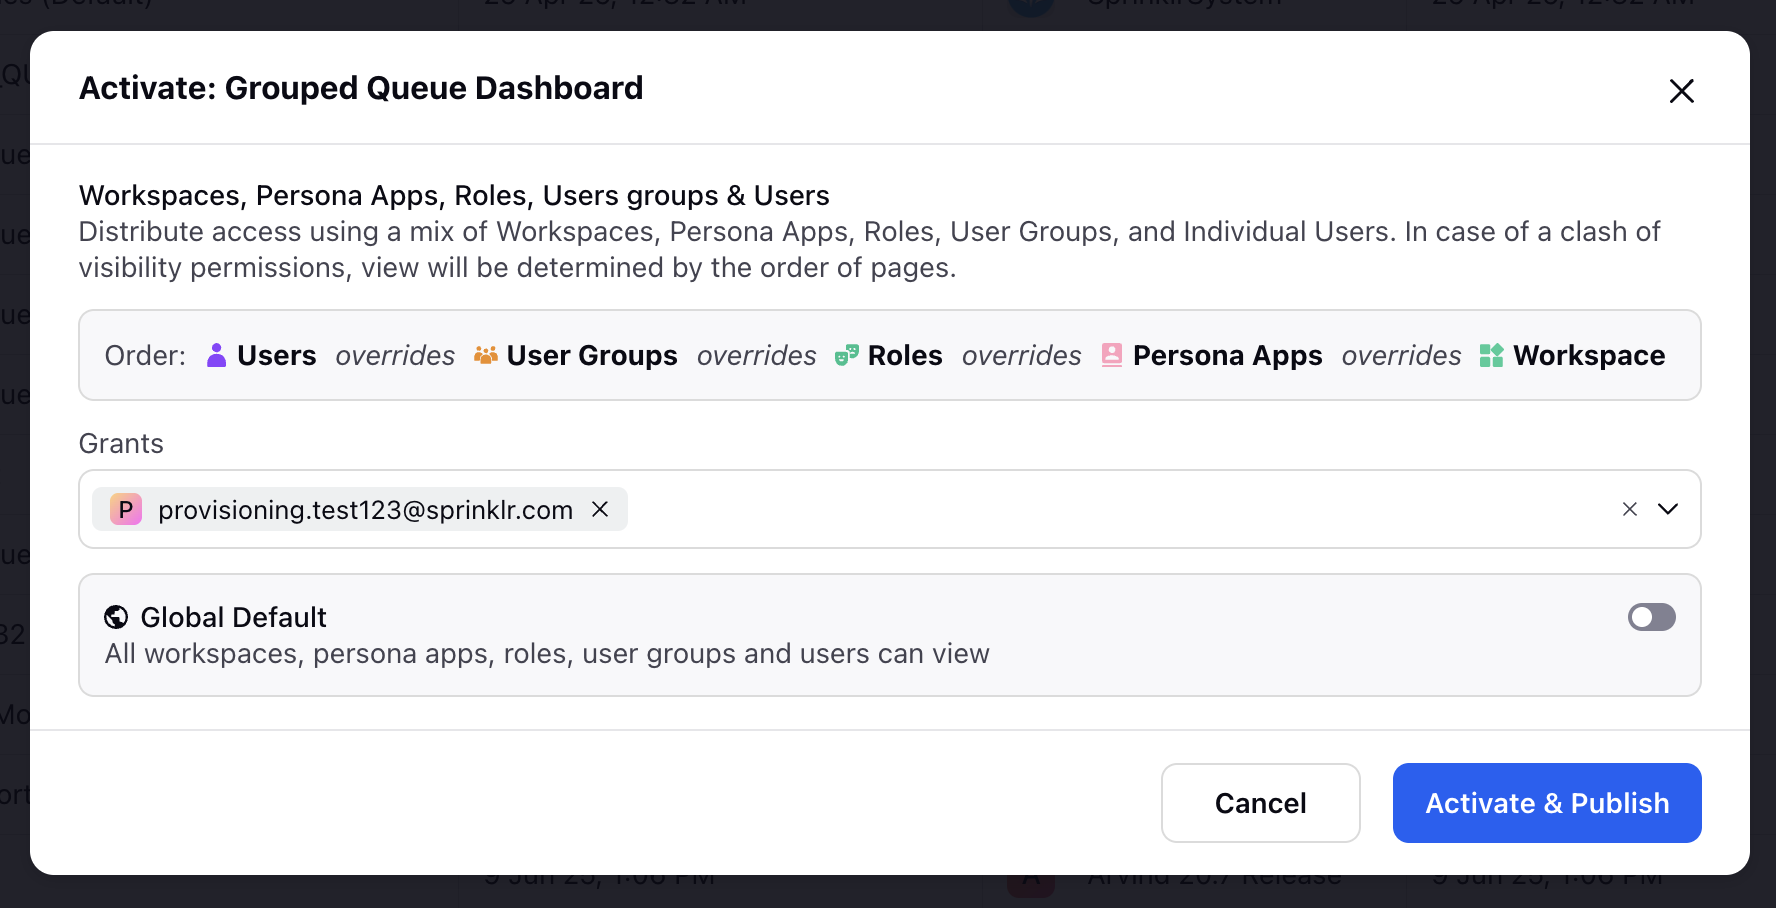
4. (Optional) Enable Global Default to make this the default record manager for all users across the system.
5. Click Activate & Publish to finalize and activate the configuration.
The record manager has been successfully activated. This record manager will now be accessible to the users, roles, or user groups you’ve shared it with for editing.
Enable record manager in a Persona App
To enable this record manager in your Supervisor Console persona app, contact Sprinklr Support at tickets@sprinklr.com.