Agent Management Dashboard
Updated
The Agent Management dashboard gives Workforce Managers a comprehensive view of agents’ user properties. This includes the policies assigned to each agent, their duration (if applicable), and details of any user-level Custom Fields. From this dashboard, you can also assign new policies to agents.
All agent-level Custom Fields are displayed on this dashboard, providing complete visibility into user configurations. You can edit these Custom Fields directly from the dashboard.
This centralized view helps managers quickly review and manage agent information for effective workforce planning and scheduling.
Understanding the Agent Management Dashboard
Follow these steps to navigate to the agent management dashboard:

Go to the Workforce Manager Persona App on the Launchpad.
Select Agents from the Left Pane and then select Agent Management from the Left Drawer to open the agent management dashboard.
Manage Columns
The Agent Management dashboard includes multiple columns that you can hide or rearrange based on your needs. Agent-level custom fields available in the environment can also be added as columns through the column manager. You can search for agents by name or filter the view by agent groups to display only the selected group(s).
The following standard columns are available on the agent management dashboard:
Column Name | Description |
Agent | Shows the name of agents. |
User Current Status | Shows the current availability status of the agents. |
Time Off Policy | Shows the Time Off Policy assigned to the agent, if any. |
Time Off Policy Start Time | Shows the date from which the Time Off Policy, if assigned, has been active for the agent. |
Time Off Policy End Time | Shows the date till which the Time Off Policy, if assigned, will be active for the agent. |
Work Contract | Shows the Work Contract-type Schedule Policy assigned to the agent, if any. |
Work Contract Start Time | Shows the date from which the Work Contract-type Schedule Policy, if assigned, has been active for the agent. |
Work Contract End Time | Shows the date till which the Work Contract-type Schedule Policy, if assigned, will be active for the agent. |
Day Off Policy | Shows the Day Off-type Schedule Policy assigned to the agent, if any. |
Day Off Policy Start Time | Shows the date from which the Day Off-type Schedule Policy, if assigned, has been active for the agent. |
Day Off Policy End Time | Shows the date till which the Day Off-type Schedule Policy, if assigned, will be active for the agent. |
Assignment Policy | Shows the Assignment-type Schedule Policy assigned to the agent, if any. |
Assignment Policy Start Time | Shows the date from which the Assignment-type Schedule Policy, if assigned, has been active for the agent. |
Assignment Policy End Time | Shows the date till which the Assignment-type Schedule Policy, if assigned, will be active for the agent. |
Shift Trade Policy | Shows the Shift Trade Policy assigned to the agent, if any. |
Shift Trade Policy Start Time | Shows the date from which the Shift Trade Policy, if assigned, has been active for the agent. |
Shift Trade Policy End Time | Shows the date till which the Shift Trade Policy, if assigned, will be active for the agent. |
User Date of Joining | Shows the date on which the agent joined the organization, as specified in the agent creation workflow. |
User Automatic Activation Date | Shows the date on which the agent's account will be activated. |
User Automatic Deactivation Date | Shows the date on which the agent's account will be deactivated. |
Available Filters
The Agent Management dashboard can be customized to show agents using available filters. Below are the filters that can applied to sort the information:
All Agents: Show all agents and their details.
My Team: Shows the details of agents who report to you only.
My Reportees: Shows the details of agents who report to you.
You can also filters agents based on any agent-level Custom Field.
Export Agent Management Dashboard
The Agent Management dashboard can be exported to save and analyze data outside the system. Once exported, the data can be used for further analysis, reporting, or sharing with stakeholders. Only the data of agents displayed on the dashboard, based on the applied filters, will be exported.
Follow these steps to export the Agent Management dashboard data:
Navigate to the Agent Management dashboard.
Click the More Actions button at the top right of the dashboard and then select export from the list. This will open the Export dialog box.
Enter the name of the export file in the File Name field.
Click the Export button to submit the export request.
After some time, you will receive a notification containing the link to download the export file. This completes the process of exporting Agent Management dashboard data.
Assign Schedule Policies to Agents
Schedule Policies can be assigned to or modified for users individually or in bulk from the Agent Performance dashboard.
Prerequisites for assigning Schedule Policies to agents:
Sprinklr WFM should be enabled for the environment.
You must have access to the Workforce Manager Persona App.
Existing Schedule Policy and the required Policy Type(s).
Follow these steps to assign Schedule Policies to agents:

Go to the Workforce Manager Persona App on the Launchpad. Alternatively, search for 'Workforce Manager' on the Launchpad search bar.
Select Agents from the Left Pane to open the Agent Performance dashboard.

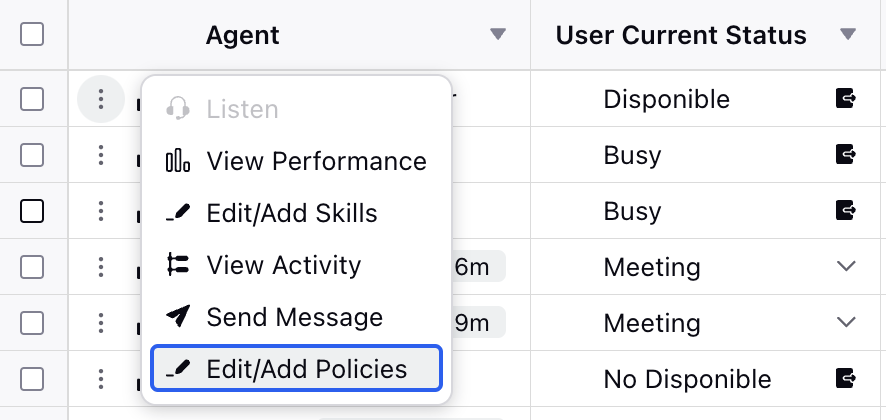
Hover over the vertical ellipsis (⋮) icon corresponding to the agent you want to assign the Schedule Policies to. This will show a list of options.
Click the Edit/Add Policies option and then select Schedule Policies to open the Policy Assignment page. This will also show the existing Schedule Policies assigned to the agent.

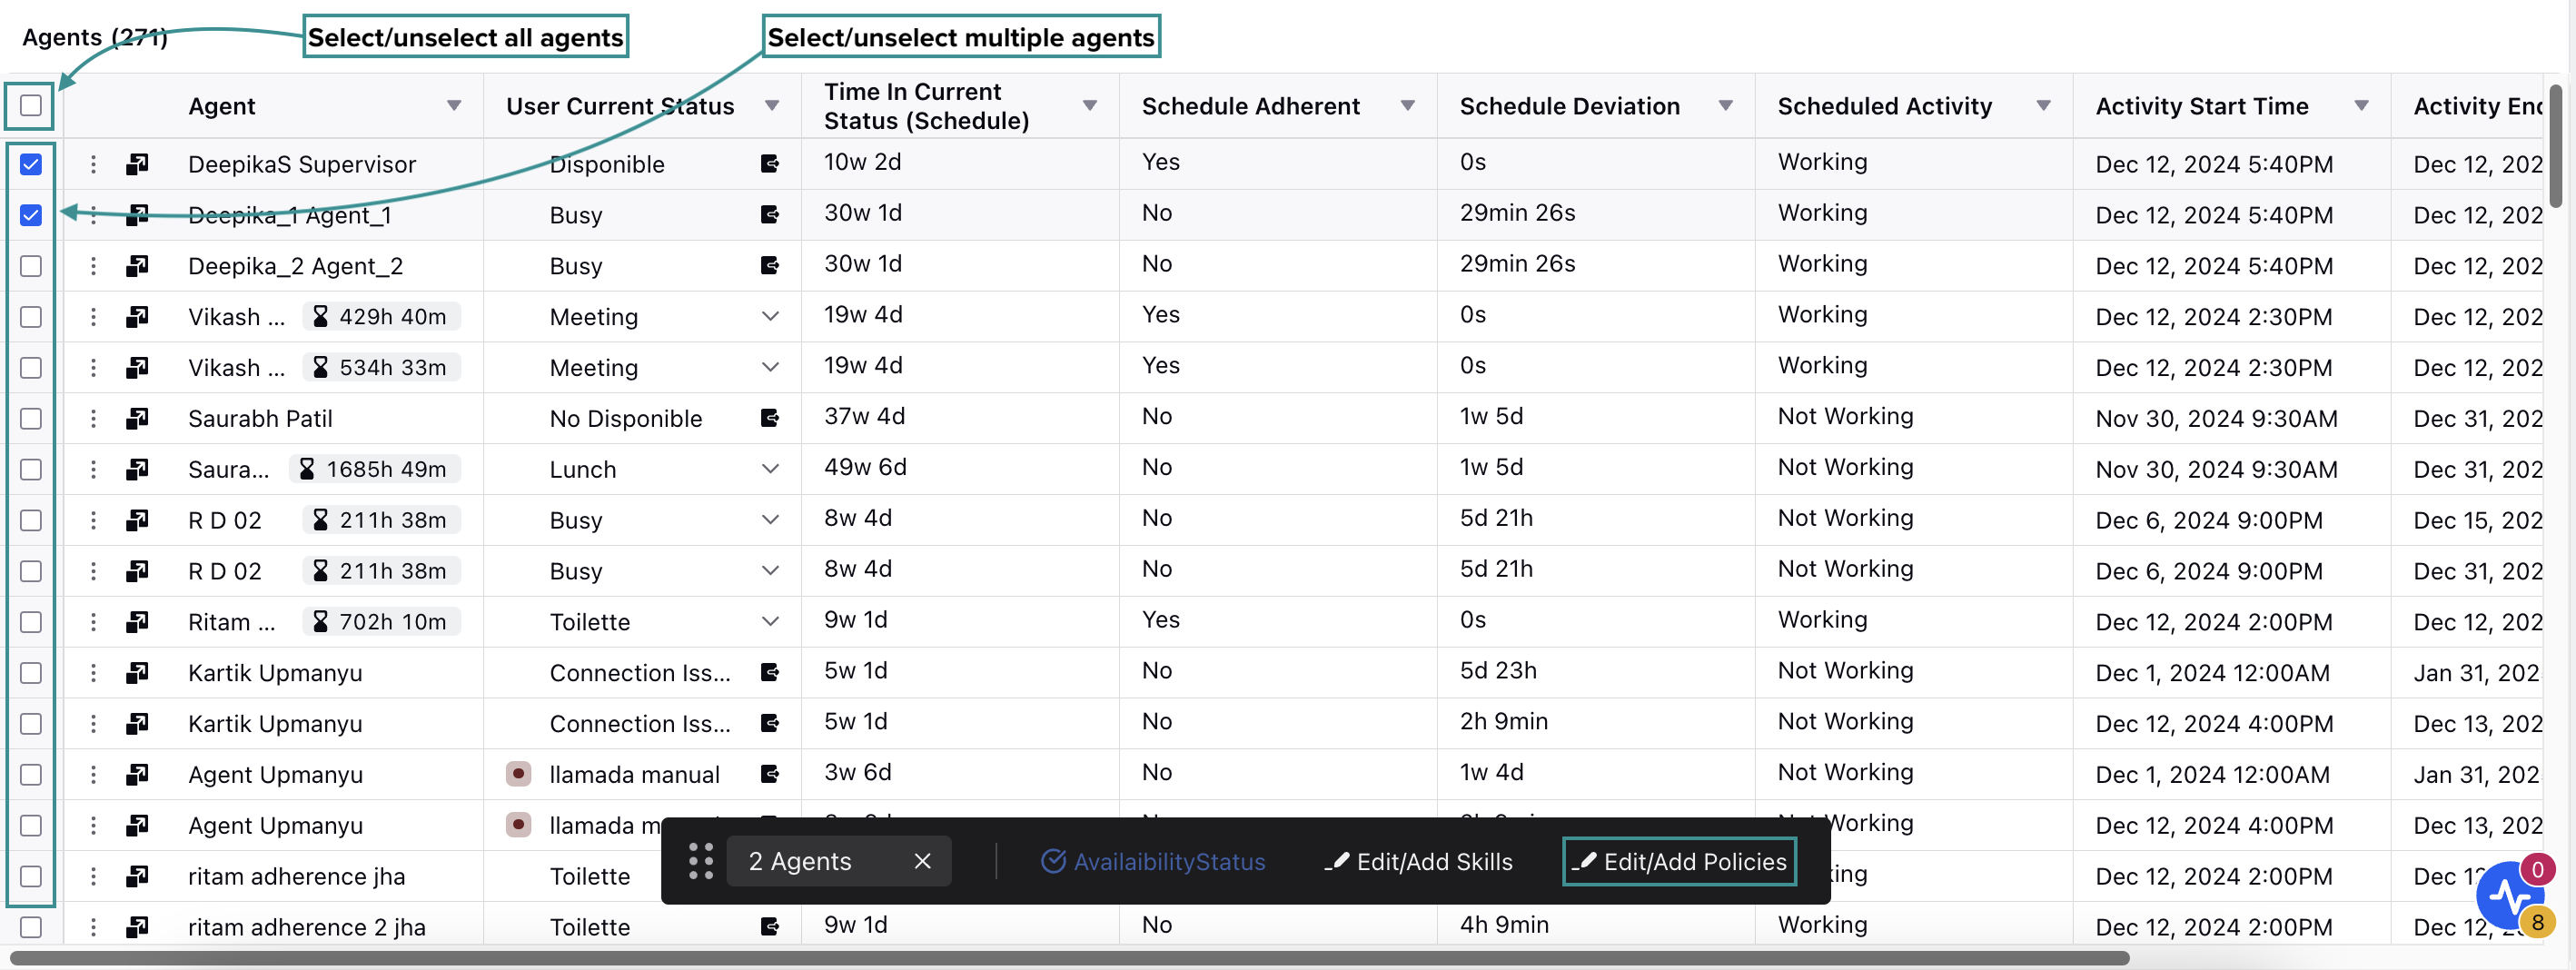
Alternatively, select the agent(s) to whom you want to assign the Schedule Policies by clicking the checkbox next to their names. To select all agents on the dashboard, click the top checkbox. Selecting the checkbox will display a toolbar at the bottom of the page. Select Edit/Add Policies from the toolbar to open the Policy Assignment page.

The Policy Assignment page is divided into Work Contract, Assignment, Day Off, and Shift sections. Each section is designated for the types of Schedule Policies and has the following fields:
Policy Name: Select the existing Schedule Policy from the list where the required Policy Type is configured. Multiple policies can be assigned by clicking the "+Policy" button.
Note: For each Schedule Policy type, an agent can have only one policy assigned for a given date range.
Agents: This field shows the agents to whom the selected Schedule Policy and the corresponding Policy Type will be assigned. If multiple agents are selected, you can add or remove agents from the list as needed.
Start Date: Enter the date from which the Schedule Policy will be applied to the selected agent(s).
End Date: Enter the date after which the Schedule Policy will not be applicable to the selected agent(s).
After selecting the required Schedule Policies and Policy Types and configuring their start and end dates, click the Save button at the bottom right of the page to save your selections.
This completes the process of assigning Schedule Policies to agents.
Assign Time Off Policies to Agents
Prerequisites for assigning Schedule Policies to agents:
Sprinklr WFM should be enabled for the environment.
You must have access to the Workforce Manager Persona App.
Existing Policy and the required Policy Type(s).
Follow these steps to assign Schedule Policies to agents from the agent monitoring dashboard:

Go to the Workforce Manager Persona App on the Launchpad. Alternatively, search for 'Workforce Manager' on the Launchpad search bar.

Select Agents from the Left Pane to open the Agent Monitoring dashboard.

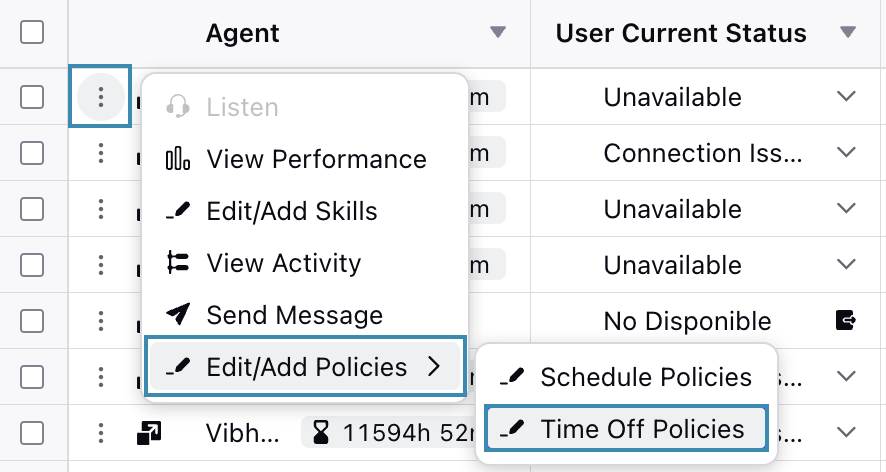
Hover over the vertical ellipsis (⋮) icon corresponding to the agent you want to assign the Time Off Policies to. This will show a list of options.
Hover over the Edit/Add Policies option and then select Time Off Policies to open the Policy Assignment page. This will also show the existing Time Off Policies assigned to the agent.

Alternatively, select the agent(s) to whom you want to assign the policies by clicking the checkbox next to their names. To select all agents on the dashboard, click the top checkbox. Selecting the checkbox will display a toolbar at the bottom of the page. Select Edit/Add Policies from the toolbar and then select Time Off Policies to open the Policy Assignment page.

The Policy Assignment page is divided into Static Policies and Dynamic Policies sections. Each section is designated for the types of Time Off Policies and has the following fields:
Static Policies Section
Policy Name: Select the existing Time Off Policy from the list. Multiple policies can be assigned by clicking the "+Policy" button.
Note: An agent can have only one policy assigned for a given date range.
Agents: This field shows the agents to whom the selected Time Off Policy will be assigned. If multiple agents are selected, you can add or remove agents from the list as needed.
Start Date: Enter the date from which the Time Off Policy will be applied to the selected agent(s).
End Date: Enter the date after which the Time Off Policy will not be applicable to the selected agent(s).
Note: End Date should be greater than Start Date.
Dynamic Policies Section
Policy Name: Select the existing Time Off Policy from the list. Multiple policies can be assigned by clicking the "+Policy" button.
Note: An agent can have only one policy assigned for a given date range.
Agents: This field shows the agents to whom the selected Time Off Policy will be assigned. If multiple agents are selected, you can add or remove agents from the list as needed.
Custom Field: Select from the available Custom Field option (User Date of Joining or User Date of Birth).
After selecting the required Time Off Policies and configuring their start and end dates, click the Save button at the bottom right of the page to save your selections.
This completes the process of assigning Time Off Policies to agents.
Assign Shift Change Policies to Agents
Prerequisites for assigning Shift Change Policies to agents:
Workforce Management should be enabled for the environment.
You must have access to the Workforce Manager Persona App.
Existing Policy.
Follow these steps to assign Shift Change Policy to agents:
Go to the Workforce Manager Persona App on the Launchpad.
Select Agents from the Left Pane to open the Agent Performance dashboard.
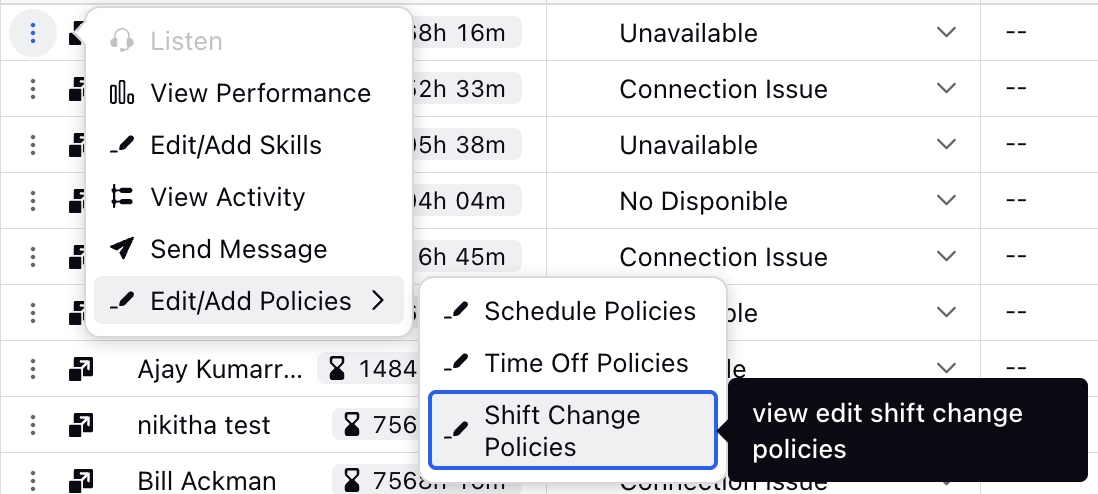
Hover over the vertical ellipsis (⋮) icon corresponding to the agent you want to assign the Shift Change Policies to. This will show a list of options.

Hover over the Edit/Add Policies option and then select Shift Change Policies to open the Modify Shift Change Policies dialog box. This will also show the existing Shift Change Policies assigned to the agent.

Alternatively, select the agent(s) to whom you want to assign the Shift Change Policies by clicking the checkbox next to their names. To select all agents on the dashboard, click the top checkbox. Selecting the checkbox will display a toolbar at the bottom of the page.
Select Edit/Add Policies from the toolbar to open the Modify Shift Change Policies dialog box.
Fill in the required fields on the Modify Shift Change Policies dialog box. Below are the descriptions of the fields in this dialog box:
Policy Name: Select the existing Shift Change Policy from the list. Only one option can be selected at a time.
Agents: This field shows the agents to whom the selected Shift Change Policy will be assigned. If multiple agents are selected, you can add or remove agents from the list as needed.
After selecting the required Shift Change Policies, click the Save button.
This completes the process of assigning Shift Change Policies to agents. Now the assigned agents can raise Shift Change requests based on the policy configuration.