Agent’s Override Settings
Updated
User group settings include assignment setups that individuals inherit from their respective user groups. These settings apply to all members of the group. Whenever a user is added to or removed from a group, their assignment settings automatically adjust according to the group's settings.
If an admin needs to assign different settings to specific users than those received from their user group, they can simply edit the settings for that particular agent on the agent's page. At the agent level, any overridden properties take precedence over those obtained from user groups. Even if a user switches user groups, all properties from the previous group are lost, but overridden properties remain intact.
When the User Group Settings feature is enabled, admins and supervisors can override assignment settings by selecting multiple agents from the Unified Routing Agents page and the Supervisor Persona Queue and Agent Monitoring pages.
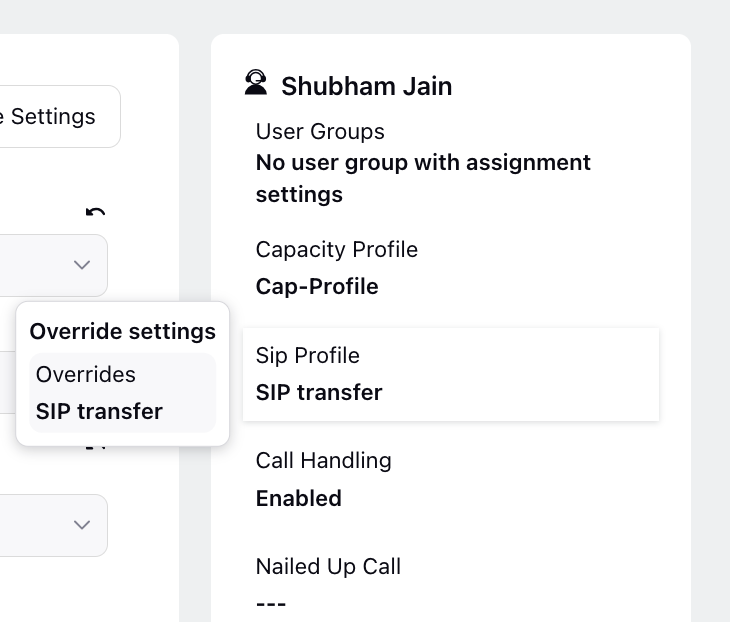
To Override an Agent’s Assignment Settings
Hover over the Options icon next to the agent whose settings you want to override.

 Note: On the Agents page, you can apply filters to sort agents based on various criteria such as user, call handling, dynamic group, skills, user groups, and user attributes. Additionally, the Select All functionality allows you to check a box next to a user's name to select all agents, facilitating bulk actions. You can also easily deselect specific agents as needed.

Click Override Settings located at the top right corner to access the agent’s settings for editing.

Once you have finished modifying the override settings, click Save at the bottom.
A confirmation modal will appear, displaying the modifications you have made in a before-and-after format. After reviewing the changes, click Submit to confirm them.

The final assignment settings for the agent will be displayed on the right side.

Managing User Skills and Settings via File Import and Export
The User Governance page provides options to import and export user details, including skills and other configurable settings. This functionality simplifies onboarding and managing large user groups efficiently.
Adding Skills through File Import
You can upload users in bulk using the Import Users feature. The import sheet allows you to define agent-specific skills and other settings, which are automatically applied and stored under Agent Override Settings.
![]() Note: Apart from skills, users will not inherit the capacity configuration or auto‑answer values configured at the user‑group level; instead, the values specified in the Excel sheet will be applied as override settings, and if users want those settings to inherit from the user group, they must reset the agent settings using the three‑dot menu after the import is completed.
Note: Apart from skills, users will not inherit the capacity configuration or auto‑answer values configured at the user‑group level; instead, the values specified in the Excel sheet will be applied as override settings, and if users want those settings to inherit from the user group, they must reset the agent settings using the three‑dot menu after the import is completed.

Why Use This Feature?
Ideal for onboarding a large number of users.
Useful when setting up a new environment for partners.
Steps to Import Users with Skills
Navigate to the User Governance page.
Click Import Users.
In the import sheet, define the following settings:
Skills
Capacity
Auto Answer Timeout (in seconds)
Upload the completed sheet to apply the settings.
Exporting User Details
The Export Users feature allows you to download user-specific override settings for review or backup.
Steps to Export Users
Go to the Governance page and click Export Users.
In the Export Users
window:
Select All Workspaces or Select Workspaces.
If selecting specific workspaces, use the Workspaces dropdown.
Optionally, enter a Time Period (in days) to include login counts.

Click Export to download the file.
![]() Note:
Note:
The export file includes only override settings (values explicitly assigned via import or manual configuration).
Skills or settings inherited from User Groups are not exported.
![]() Note: Use the import feature for bulk onboarding and the export feature for auditing user-specific configurations.
Note: Use the import feature for bulk onboarding and the export feature for auditing user-specific configurations.
Actions Available on Agent’s Assignment Settings Page
You'll find the following actions after clicking the Override Settings button.
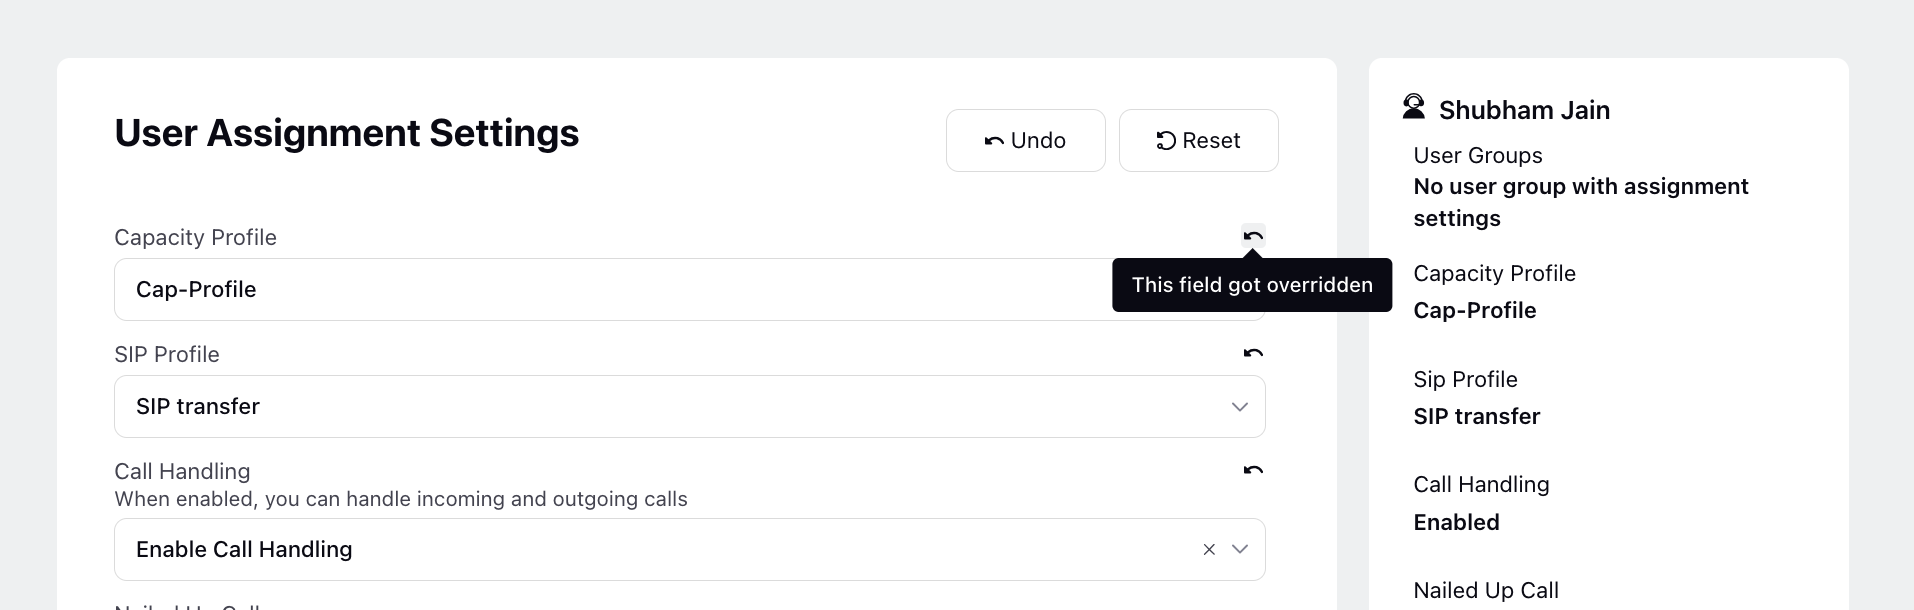
Undo: The "Undo" button allows users to revert all current changes being made. For instance, if changes were made to the capacity profile and other fields, clicking "Undo" restores their original values.

Reset: Clicking the "Reset" button will reset all overrides. Upon saving, a confirmation modal will appear, indicating which fields have been reset to their default values.

Indicators Available on Agent’s Assignment Settings Page
User Group Icon: After clicking on "Override Settings," if the agent is inheriting a value from a user group and that value hasn't been overridden, a user group icon will appear on the field.

Override Icon: When you override and save values for an agent, those overridden values will be marked with an override icon, indicating that they have been modified from the inherited settings.
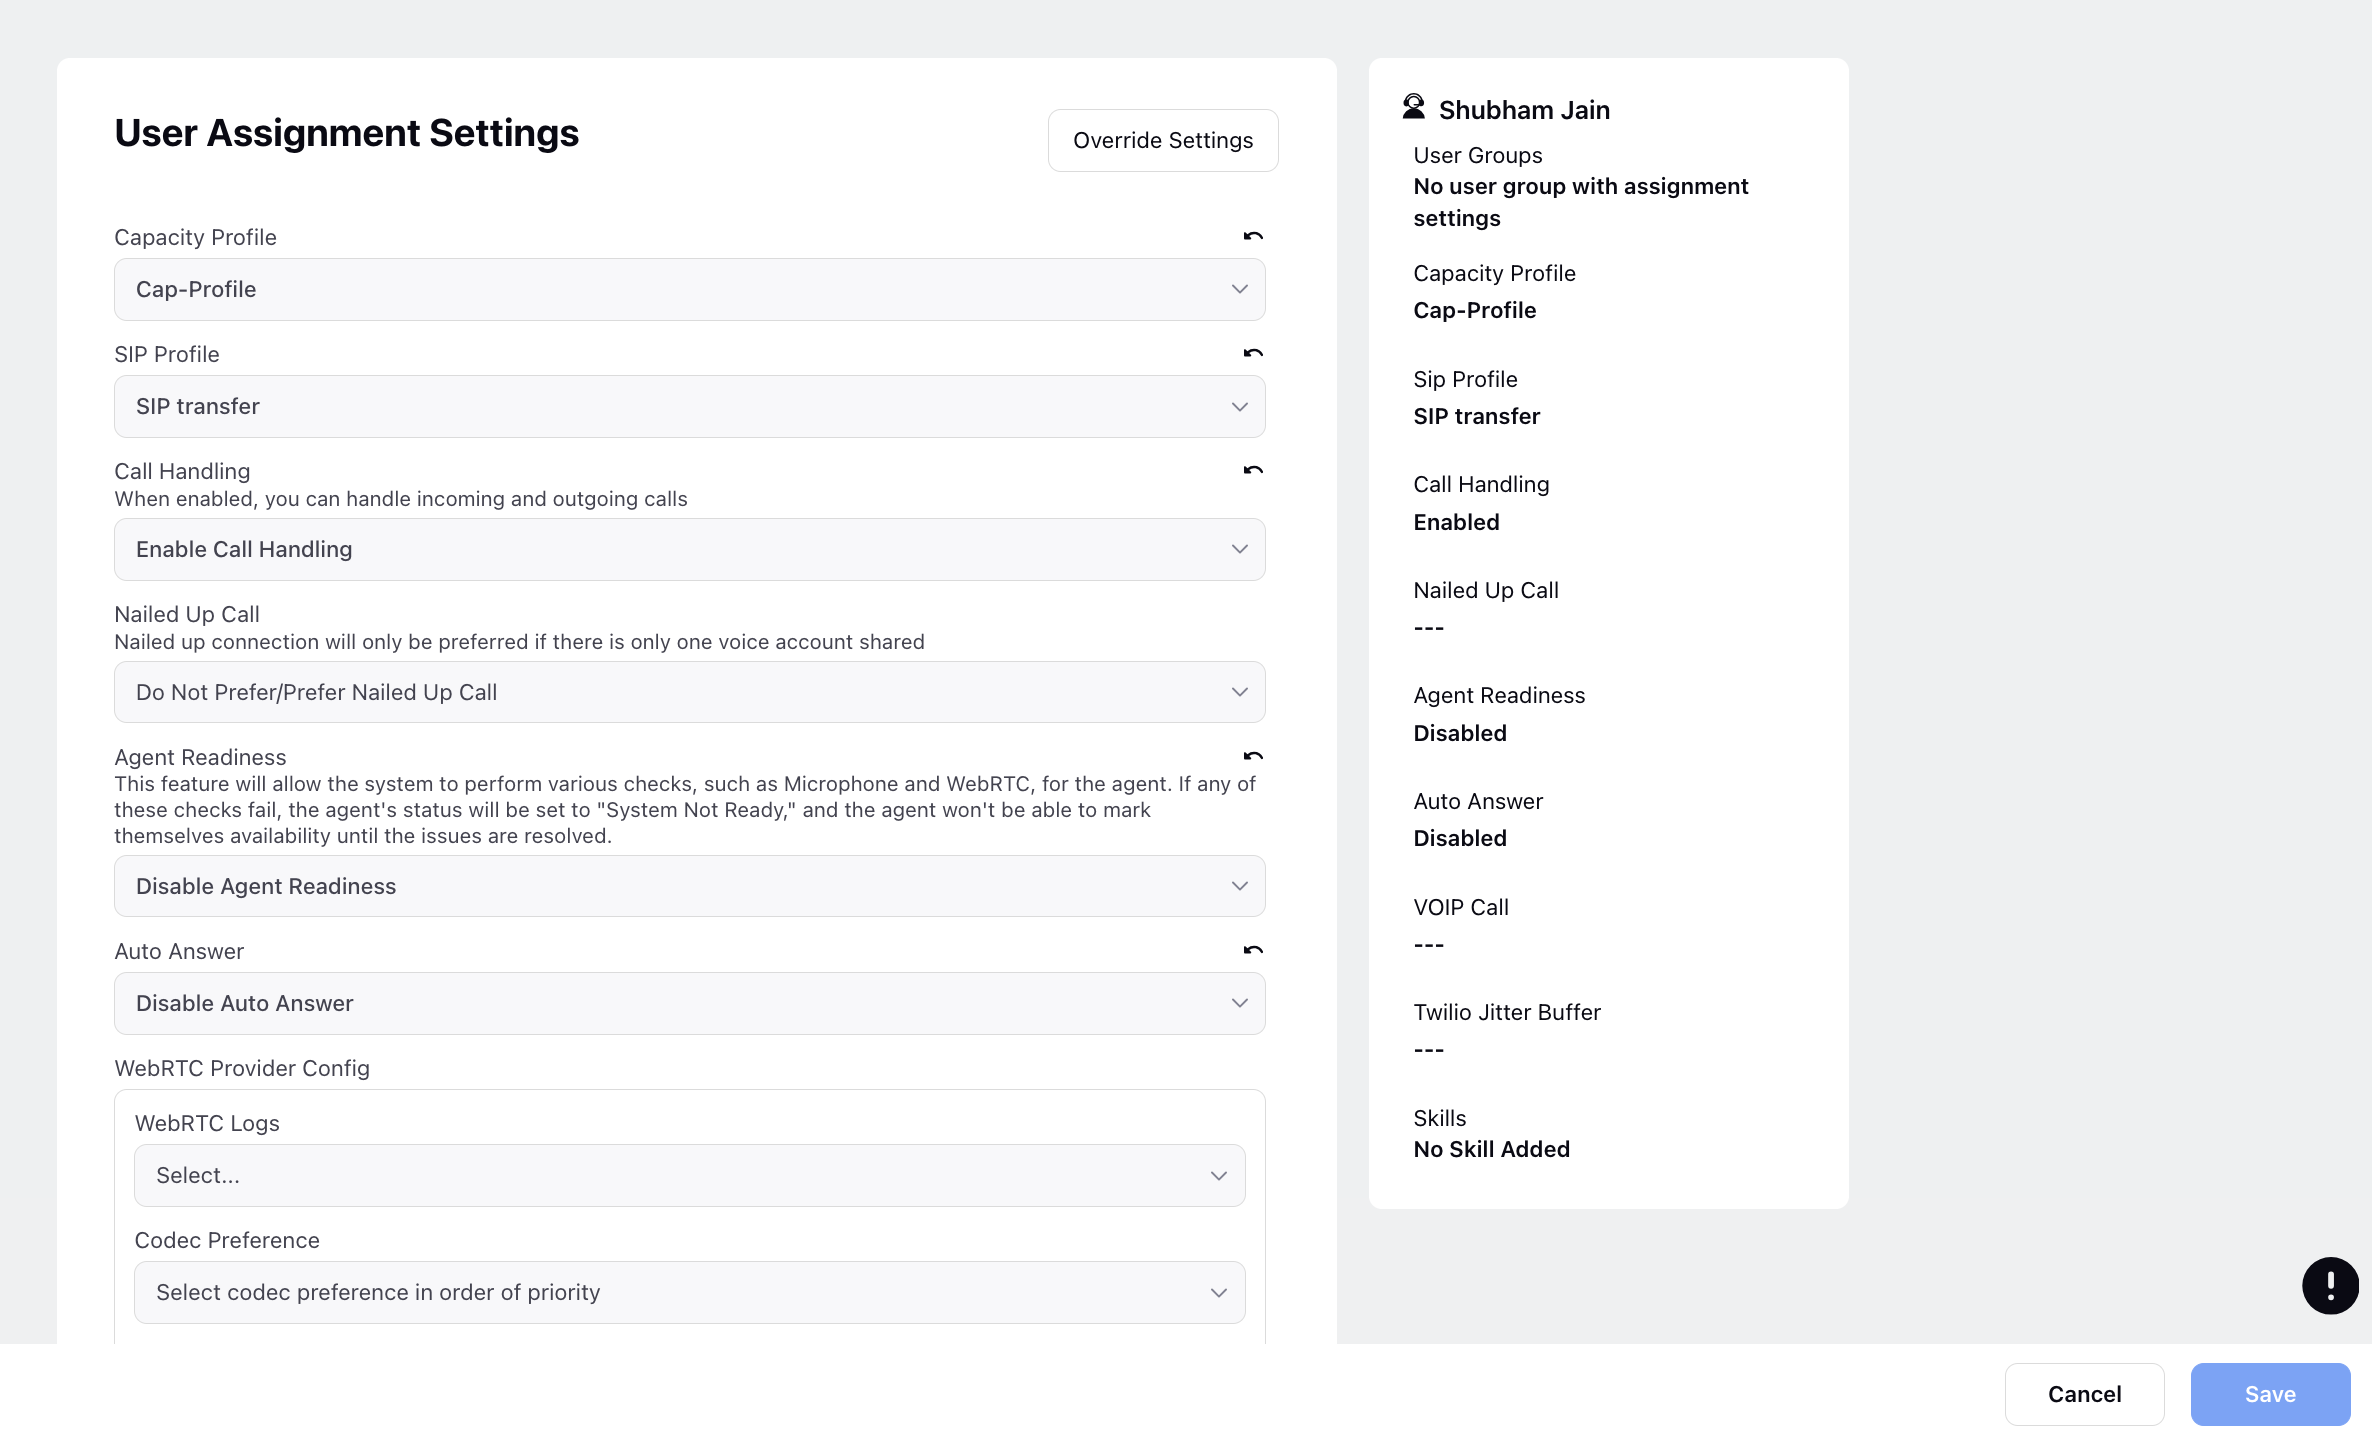
Final Agent Assignment Settings View
The final settings page displays the agent's final settings on the right side. The summary fields on this side offer a hover action, revealing the source of each value. This functionality helps identify whether properties originate from user groups or have been overridden.
User Groups: This section lists all the user groups to which the agent belongs or from which they receive assignment settings. For other fields, it displays the final value assigned to that field for the agent.
When hovering over any field:
When hovering over a field, it displays the initial value, the user group from which the property was inherited, and any applied overriding value.

If a field was not inheriting any value from user groups, it simply displays the overridden value without additional information about user groups.