Creating a Website Creative
Updated
Website Distribution enables companies to implement surveys through a variety of creative formats. These formats include Pop-up, Positioned Pop-up, and Feedback Button. Each type is customizable, offering the flexibility to gather your feedback in diverse ways while preserving the interactivity of the website. You can adjust the design, look, and functionality of these formats to meet the requirements of their site and target audience, thereby maximizing survey participation.
The following types of creative content are supported for website distribution:
Pop-up: The survey pop-up appears at the center of the webpage as an overlay.
Positioned pop-up: The survey pop-up can be placed at a custom position on the webpage, keeping the rest of the website interactive.
Feedback button: A button is displayed on the webpage, and the survey opens when the button is clicked.

Business Use Cases
Improving User Engagement: It allows businesses to present surveys using various display formats, such as Pop-up, Positioned Pop-up, and Feedback Button, to boost user interaction while maintaining a seamless website experience.
Customizable Survey Display: By offering completely customizable features, companies can create surveys that match their website's look and branding, thereby improving both response rates and the quality of feedback.
Website Distribution offers flexible display options with multiple creative formats that capture feedback without disrupting the user experience. With full customization control, businesses can tailor each format’s appearance, position, and behavior to align with their website’s design and user journey. Additionally, the system is optimized for different devices, offering mobile overrides and custom mobile views to ensure surveys are responsive and effective across all screen sizes.
Prerequisites
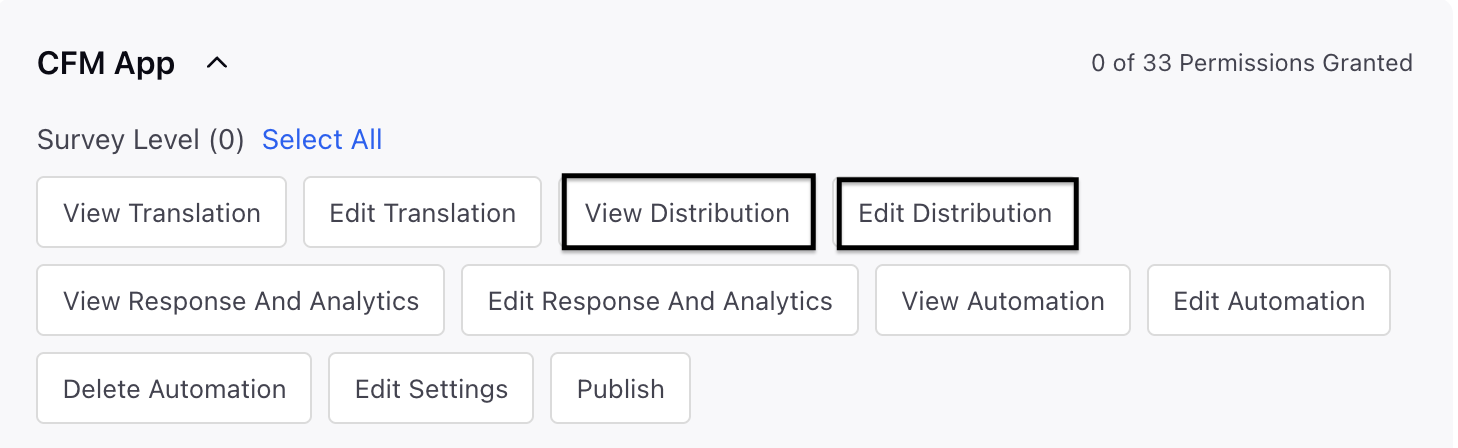
In order to access the Website Distribution, you must have the following View and Edit Distribution permissions at the Survey Level.
Setting up a Creative
Navigate to Creative Library in the left pane and select + Creative and select Website from the drop-down.
Navigate to the "Choose Template" page and pick a template from the three options provided and click Next.

Popup: Forms that are presented immediately, covering the entire screen.
Positioned Popup: Forms designed to appear at a user-specified location on the screen.
Feedback Button: Gain insights from posts and mentions pertaining to the Executive and significant competitors.
Setting Up Pop Creative
Navigate to Website Creative and select the Popup Creative and in the Add Creative page fill in the details:

Creative Name: Enter creative name.
Description: Add a meaningful description to the creative.
Direct Display: Select the 'Direct Display' option. When enabled, this option will present the survey content directly on the website instead of the creative content.
Creative Permissions: Access Creative Permissions to manage user access rights, allowing you to assign editing and viewing privileges and click Next.
Navigate to Creative Content page and fill in the details:
Navigate to Creative Content section:

Logo: You can upload a logo and are also given the choice to either modify or remove it.
Headline: Provide a relevant title for this content.
Content Description: Provide a relevant description for the content.
 Note:
Note: You can add profile standard and custom field placeholders within website creatives (popups and feedback buttons) for dynamic personalization.
Support for response, survey, and distribution metadata placeholders is removed, limiting usage to profile-level fields only.
Placeholders resolve automatically when data is available and remain blank if data is missing.
LiveChat creatives support enhanced formatting options, including bold, italics, underline, font style, size, type, color, and alignment.
These capabilities are available across Positioned Popups (headline, message content, button text) and Feedback creatives (button text), with custom styles supported via the asset library.
Go to Target Button section and add a relevant Primary Button text and add a Secondary Button text by clicking + Secondary Button.
Navigate to Styling section:


Logo: Go to Logo section and adjust the size and vertical padding.
Overlay: You can adjust the colour and opacity to control the appearance of the background layer.
Popup Display: Style the pop-up display by setting background and border colors, and adjusting the padding.
Background: Style the pop-up display by setting background colours.
Border: Style the pop-up display by by selecting the border colors.
Sides: Slide to adjust the sides.
Vertical Padding: You can adjust the vertical padding.
Opacity: Modify the transparency of the pop-up window.
Radius: Modify the border radius of the display.
Shadow Colour: Incorporate shadow effects.
Shadow X Offset: Incorporate shadow effects around the border.
Shadow Y Offset: Incorporate shadow effects around the border.
Shadow Blurr Radius: Helps soften or blur the shadow radius for a smoother, more subtle visual effect.
Shadow Spread Radius: Slide to increase or decrease the shadow of the radius.
Header Text: Customize headline fonts, including size, weight, and style
Description Text: Customize headline fonts, including size, weight, and style.
Footer: The footer is the bottom section of the creative, where the action buttons are located.
Enable sticky footer: This option keeps the footer sticky when the description text is long.
Top Padding: You can slide to adust the padding.
Mobile Overrides: You can switch to mobile view to observe the changes. Review the mobile overrides to ensure the design adjusts correctly for mobile devices.
Overlay:
Vertical Padding: You can adjust the padding by sliding from left to right.
To add or modify translations, please proceed to the Translation section and complete all required fields within the creative content area.
Click Create.
Set Up Positioned Pop-Up Creative
Navigate to Website Creative and select the Positioned Pop Up Creative and in the Add Creative page fill in the details:

Creative Name: Enter creative name.
Description: Add a meaningful description to the creative.
Direct Display: Select the 'Direct Display' option. When enabled, this option will present the survey content directly on the website instead of the creative content.
Creative Permissions: Access Creative Permissions to manage user access rights, allowing you to assign editing and viewing privileges and click Next.
Navigate to Creative Content page and fill in the details:
Navigate to Creative Content section:
Logo: You can upload a logo and are also given the choice to either modify or remove it.
Headline: Provide a relevant title for this content.
Content Description: Provide a relevant description for the content.
Go to Target Button section and add a relevant Primary Button text and add a Secondary Button text by clicking + Secondary Button.
Navigate to Styling section:

Set up the width of the pop up as required
Position the pop up by selecting the positions and spacing from top and bottom
Adjust logo size and modify the vertical padding around the logo.
Customize the overlay color and opacity to control the appearance of the background layer.
Style the pop-up display by setting background and border colors, and adjusting the padding.
Add shadow effects and modify the border radius and spread radius to enhance the visual depth.
Customize headline and description fonts, including size, weight, and style.
Configure primary and secondary buttons by adjusting colors, borders, padding, radius, and text properties.
Enable or disable the sticky footer and adjust the top padding for the footer.
Check mobile overrides to ensure the design adapts properly for mobile devices.
Click the Mobile icon above the preview to switch to the mobile view for adjustments.
To add or modify translations, please proceed to the Translation section and complete all required fields within the creative content area.
Feedback Button
Navigate to Website Creative and select the Feedback Button Creative and in the Add Creative page fill in the details:
Creative Name: Enter creative name.
Description: Add a meaningful description to the creative.
Direct Display: Select the 'Direct Display' option. When enabled, this option will present the survey content directly on the website instead of the creative content.
Creative Permissions: Access Creative Permissions to manage user access rights, allowing you to assign editing and viewing privileges and click Next.
Go to Creative Content, add the Button Content, and you can customize its appearance.
Go to Styling section where you can:
Adjust Button Primary Color and border Color.
Adjust Button Width, Height & Radius.
Adjust Button Position.
Richtext Adjustment for Button text including Font Type, Font Size & Font Alignment.
Note:
You must select creative while creating a website distribution.
You should be able to add and manage translations for creatives across all key touchpoints, while creating a new creative, in the Creative Library, and during distribution setup. You can view existing survey languages, update translatable fields such as the image (inherited by default), title, description, and CTA, and set up RTL languages. You can auto‑translate using base‑language content, preview each translated version, and ensure that all required base‑creative fields are also completed in every translated variant.
Preview
Click full page preview to view the creative on the full page.

Best Practices
Check Mobile Compatibility: Always check and confirm that the survey functions properly on both desktop and mobile devices to guarantee the best user experience.
Use Direct Display for Immediate Interaction: Think about implementing direct display for quick feedback gathering without the need for extra clicks while also ensuring a good user experience. You may include it inline in the earlier part of the “How It Works” section.