Configure Live Chat Messenger
Updated
Sprinklr Live Chat Messenger provides various methods to help you update user details, capture conversation context, customize the chat experience, and more.
The following sections describe these methods in detail, along with their syntax and required parameters:
Update User
Use the updateUser method to authenticate the user and update their details such as user Id, first name, last name, and more.
Syntax
import MessengerClient from '@sprinklrjs/chat-native-client'MessengerClient.updateUser({userId: '12345',firstName: 'John',lastName: 'Doe',phoneNo: '9876543210',email: 'John.Doe@example.com',profileImageUrl: 'https://example.com/profilePic.jpg',hash: 'f30c3b0835ecd378a134c74bce8cea866df8c5b6e12a8c219c9bb288f7270e22',hashCreationTime: 17388892 // in EPOCH and should be the same one that is used for generating the hash})
Parameters
Parameter | Description | Required/Optional |
userId | Unique identifier of the user. | Required |
firstName | First name of the user. | Optional |
lastName | Last name of the user. | Optional |
phoneNo | Phone number of the user. | Optional |
Email ID of the user. | Optional | |
profileImageUrl | URL to the profile image of the user. | Optional |
hash | Hash should be generated for every change in user object. For the steps to generate hash, see How to Generate User Hash?
| Required |
hashCreationTime | Hash Creation Time should be the same one that is used for generating the hash For the steps to generate hash, see How to Generate User Hash? | Required |
Update Custom User
Use the updateCustomUser method to authenticate the user and update details of a custom user.
![]() Note: If you want to implement a custom user authentication flow, contact the Sprinklr Support team at tickets@sprinklr.com.
Note: If you want to implement a custom user authentication flow, contact the Sprinklr Support team at tickets@sprinklr.com.
Syntax
import MessengerClient from '@sprinklrjs/chat-native-client'MessengerClient.updateCustomUser({customAttribute1: ‘value1',customAttribute2: ‘value2’,hash: 'f30c3b0835ecd378a134c74bce8cea866df8c5b6e12a8c219c9bb288f7270e22',hashCreationTime: 17388892 // in EPOCH and should be the same one that is used for generating the hash})
Parameters
Parameter | Description | Required/Optional |
Custom Attribute | This is a custom attribute that could be defined by you. You can define multiple custom attributes. | Required |
hash | A new hash should be generated whenever the user object is modified. For the steps to generate hash, see How to Generate User Hash? | Required |
hashCreationTime | Hash Creation Time should be the same one that is used for generating the hash For the steps to generate hash, see How to Generate User Hash? | Required |
Update Locale
Use the updateLocale method to update the language in which Live Chat will be displayed.
Syntax
import MessengerClient from '@sprinklrjs/chat-native-client'MessengerClient.updateLocale(locale)
Capture Customer Context when Starting a New Conversation from Custom View
When a user opens Live Chat with a custom view, you might want to capture additional context on the conversation/case.
For example, consider a button called Know More about this laptop next to a laptop product. When this button is clicked, you want to open a chat with a predefined contextual welcome message: Hi there! It looks like you are interested in buying a laptop. Also, you want to set the case custom fields “product category: laptop” and “case type: inquiry”.
To achieve this, follow these steps:
1. Create case custom fields. For steps to create a custom field, see Add a Custom Field.
2. Copy the field names of the custom fields you created.
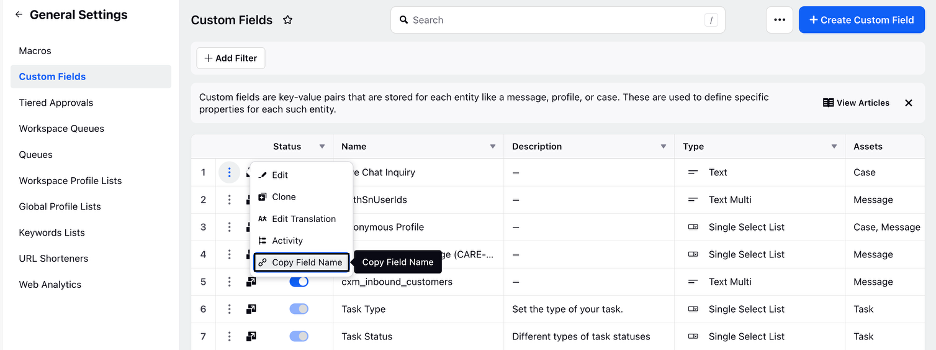
You can copy the field names from the Sprinklr UI by navigating to Custom Fields. Then, locate the desired custom field and click the three-dot menu icon. On the menu, click Copy Field Name.
In this example, these are the custom field names: 5ea7fa9e87651f356209878f and 5eb7fa9e87651f356219348e.
3. Pass the conversationContext object with these custom fields to chatInitialisationContext when a new conversation is opened directly.
const chatInitialisationContext = {...restFieldsconversationContext: {"5ea7fa9e87651f356209878f": ['laptop'],"5eb7fa9e87651f356219348e": ['inquiry']}}
Parameters
Parameter | Description | Required/Optional |
conversationContext | Object containing the key-value pairs of custom field names and their values. You can copy the custom field from the Sprinklr UI. | Required |
Capture Customer Context on All Cases of the User
When a user starts a new conversation, you might want to pass some contextual information in case custom fields.
To achieve this, follow these steps:
1. Create case custom fields. For steps to create a custom field, see Add a Custom Field.
2. Copy the field names of the custom fields you created.
You can copy the field names from the Sprinklr UI by navigating to Custom Fields. Then, locate the desired custom field and click the three-dot menu icon. On the menu, click Copy Field Name.
3. Pass or update context. You can pass context in two ways:
Pass Context When the Chat Is Initiated
You can pass these values in clientContext in the takeOff method. In this example, the custom field name is 5e281d040844e435b.
import MessengerClient from '@sprinklrjs/chat-native-client'MessengerClient.takeOff({...restSettings,clientContext: {"5e281d040844e435b": ["Custom Field Value"]}})
Parameters
Parameter | Description | Required/Optional |
clientContext | Object containing the key-value pairs of custom field names and their values. You can copy the custom field from the Sprinklr UI. | Required |
Update Context at Runtime
You can update the client context in runtime by calling the following method:
import MessengerClient from '@sprinklrjs/chat-native-client'MessengerClient.updateClientContext({"5e281d040844e435b": ["Custom Field Value"]})
Parameters
Parameter | Description | Required/Optional |
Custom Field Name with its values | Object containing the key-value pairs of custom field names and their values. You can copy the custom field from the Sprinklr UI. | Required |
Update Conversation Context on Demand
You might want to update case custom fields for an active conversation. For example, after a customer completes a purchase on the website, you can add the transaction amount or Id to the case for reporting purposes. This allows you to attribute sales to specific conversations or cases.
To achieve this, follow these steps:
1. Create case custom fields. For steps to create a custom field, see Add a Custom Field.
2. Copy the field names of the custom fields you created.
You can copy the field names from the Sprinklr UI by navigating to Custom Fields. Then, locate the desired custom field and click the three-dot menu icon. On the menu, click Copy Field Name.
In this example, the custom field name is 5e291d040844e435b.
3. Update conversation context.
Based on Latest and Active Case
If you want to update the custom fields for the latest and active case, use the following code:
MessengerClient.updateConversationContext({context: { '5e291d040844e435b': ['Custom Field Value'] },});
Parameters
Parameter | Description | Required/Optional |
context | Object containing the key-value pairs of custom field names and their values. You can copy the custom field from the Sprinklr UI. | Required |
Based on Conversation ID
If you want to update case custom fields by the conversation Id, use the following code:
MessengerClient.updateConversationContext({conversationId: 'CONVERSATION_ID',context: { '5e291d040844e435b': ['Custom Field Value'] },});
Parameters
Parameter | Description | Required/Optional |
conversationId | Id of the conversation. | Required |
context | Object containing the key-value pairs of custom field names and their values. You can copy the custom field from the Sprinklr UI. | Required |
Update the Profile Context within Profile Custom Fields
When opening a chat from a custom button or hyperlink, you may want to capture relevant context about the user or profile for an active conversation.
To achieve this, follow these steps:
1. Create case custom fields. For steps to create a custom field, see Add a Custom Field.
2. Copy the field names of the custom fields you created.
You can copy the field names from the Sprinklr UI by navigating to Custom Fields. Then, locate the desired custom field and click the three-dot menu icon. On the menu, click Copy Field Name.
Whenever you want to update the profile custom field, call the following JavaScript function and pass the information for profile level custom fields.
This can be done via SDK for updating it on-demand.
import MessengerClient from '@sprinklrjs/chat-native-client'MessengerClient.updateUserContext({"5e281d040844e435b": ["Custom Field Value"]})
Parameters
Parameter | Description | Required/Optional |
Custom Field Name and its values | Object containing the key-value pairs of custom field names and their values. You can copy the custom field from the Sprinklr UI. | Required |
Get Number of Open Conversations
You might want to get the number of open conversations. You can use this information to hide the Live Chat widget based on the number of open conversations to prevent customers from starting more conversations unnecessarily.
To get the number of open conversations, follow these steps:
1. Call the following function to get the number of open conversations.
import MessengerClient from '@sprinklrjs/chat-native-client'// Call this function to fetch the number of open conversationsMessengerClient.getNumberOfOpenConversations()
2. Listen to the output of the above function to get the number of open conversations.
import MessengerClient from '@sprinklrjs/chat-native-client'// Register this callback to listen for the output of above functionMessengerClient.onNumberOfOpenConversations((count) => {// Write your implementation here})
3. If you want to stop listening to the function for number of open conversations, call the following function:
import MessengerClient from '@sprinklrjs/chat-native-client'// Call this function to stop listening for number of open conversations// This should mostly be called in componentWillUnmount function of your main appMessengerClient.offNumberOfOpenConversations()
Get Number of Unread Messages
You might want to be notified whenever there’s a change in the unread message count. This helps track the number of unread messages in real-time.
![]() Note: If the app is killed (which means, the user has completely closed the app and it is no longer running on their mobile device), you cannot fetch the number of unread messages.
Note: If the app is killed (which means, the user has completely closed the app and it is no longer running on their mobile device), you cannot fetch the number of unread messages.
If you want the unread message count to appear in the push notification payload, reach out to Sprinklr Support at tickets@sprinklr.com.
Syntax
Implement the following code to register a count handler:
import MessengerClient from '@sprinklrjs/chat-native-client';MessengerClient.registerUnreadMessagesCountHandler(this.unreadMessagesCountHandler);unreadMessagesCountHandler = (payload) => {// Success Payload:// success: true,// unreadMessagesCount// Failure Payload:// success: false,// error,};
Unregister unread messages count handler
To unregister unread messages count handler, use the following code:
// Call unregister to stop listening for unread countMessengerClient.unregisterUnreadMessagesCountHandler();
Add Delegate to Listen to External Events from Messenger
You can register a delegate to listen for external events emitted by the Live Chat SDK. These events act as a bridge between the chat interface and your mobile app, enabling your app to perform specific actions in response. This functionality allows for tighter integration between chat and app experiences. This helps brands deliver contextual interactions, streamline user flows, and drive deeper user engagement.
Common use cases include:
App Deeplinking: Trigger in-app navigation based on deep link instructions received via chat. For example, direct users to a payment screen when an agent shares a prompt.
Custom Brand Workflows: Configure external events within Sprinklr (for example, CUSTOM_REDIRECT, SHOW_PROMO_BANNER). This allows your mobile app to listen for these events and respond with tailored actions such as redirecting to a specific feature, displaying a modal, or logging analytics events.
Syntax
Implement the following function to register a delegate to listen to external events:
import MessengerClient from '@sprinklrjs/chat-native-client';MessengerClient.setMessengerActionHandler(this.messengerActionsHandler);messengerActionsHandler = (type, payload) => {};
Add Messenger Analytics Handler to Listen to Tracking Events and Screen
You can register a Messenger Analytics handler to connect your analytics system with the Live Chat SDK. This handler tracks user interactions and screen transitions within the chat interface.
Using this handler, brands can capture real-time insights such as screen views, conversation lifecycle events, call actions, and button clicks. These insights can then be forwarded to platforms like Firebase, Adobe Analytics, or internal dashboards.
By listening to both trackEvent and trackScreen callbacks, brands gain visibility into how users interact with the Live Chat experience and can measure engagement, optimize flows, or trigger follow-up actions based on in-app events.
Syntax
import MessengerClient from '@sprinklrjs/chat-native-client';MessengerClient.registerAnalyticsTracker({trackScreen: this.trackScreen,trackEvent: this.trackEvent,});trackScreen = (screenName) => {};trackEvent = ({ eventType, ...restPayload }) => {};
Configure Status Card
Status cards are used to indicate the health of a key resource to your customers. The key resource can be a tool or service that they interact with frequently.
By showing the status of this resource upfront, customers can stay informed without repeatedly contacting support. This enhances the customer experience while reducing agent workload.
![]() Note: To enable this capability, contact our support team at tickets@sprinklr.com and provide your Live Chat application ID. Status cards are available only for the modern skin version of the Live Chat widget.
Note: To enable this capability, contact our support team at tickets@sprinklr.com and provide your Live Chat application ID. Status cards are available only for the modern skin version of the Live Chat widget.
Syntax
Once the status card feature is enabled for your Live Chat widget, you can update the status card by using the following code:
import MessengerClient from '@sprinklrjs/chat-native-client’;MessengerClient.updateWidget({id: ‘WIDGET_ID’, // Same ID configured in the Live Chat builder must also be utilized heredetails: {title: ‘Your title, %%[status]’,description: ‘Your description, %%[updatedAt]’,status: ‘ALL_SYSTEMS_OPERATIONAL’,updatedAt: Date.now(),},})
Parameters
Parameter | Required/Optional | Description |
id | Required | The widget ID, which must match the ID configured in the Live Chat builder. |
details | Required | An object containing metadata about the status card displayed in the Live Chat widget. It allows customization of the widget’s title, description, status, and last updated timestamp. For more information, see the Details Object table below. |
Details Object Parameters
Parameters | Required/Optional | Description |
title | Required | The title displayed on the status card. |
description | Required | A brief description of the status update. |
status | Required | Indicates the current state of the resource. You can use the %%[status]placeholder for status. The supported statuses are mentioned in status table below. |
updatedAt | Required | Timestamp of the last status update. You can use the %%[updatedAt] placeholder to show when the status was last updated. |
On the status card, you can display the following status along with the following icons and values:
Disable Attachments for Customers
By default, users can attach files in chat. You can disable attachments in the chat widget to prevent customers from adding files such as images, videos, or documents. To do this, hide the attachment icon by passing disableAttachment: true to the takeOff() method.
Syntax
import MessengerClient from '@sprinklrjs/chat-native-client’;MessengerClient.takeOff({...restSettings,disableAttachment: true, // by default, attachments are enabled});
Parameters
Parameters | Description | Values |
disableAttachment | Enables or disables the attachment feature in Live Chat. | true | false Default value: false |
Integrate Your Brand's Custom Header in Live Chat
Instead of using Sprinklr’s default chat header, you can replace it with a custom header that aligns with your brand identity. This will help create a consistent and seamless experience for your customers.
Syntax
import { MessengerView } from '@sprinklrjs/chat-native-client';function SPRMessenger(launchOptions = {}, onDismiss) {const chatInitialisationContext = {disableHeader: false, // Default: false. To disable Sprinklr's header, set to trueisRenderedAsFullView: true // Default: true. If set to false, the brand must manage device top insets};return (<MessengerViewlaunchOptions={launchOptions}onDismiss={onDismiss}chatInitialisationContext={chatInitialisationContext}/>);}
Parameters
Parameter | Description | Values |
disableHeader | Enables or disables the Sprinklr default header. | true | false Default: false |
isRenderedAsFullView | Determines whether the Live Chat window is rendered in full view. | true | false Default: false |
Implement Back Button Handling to Control Hardware Back Button
You can use the MessengerClient.goBack() function to manage the hardware back button behavior in your Live Chat application. This allows users to seamlessly navigate back to the previous screen when they press the back button on their device, enhancing the overall user experience with intuitive and efficient navigation.
import MessengerClient from '@sprinklrjs/chat-native-client';MessengerClient.goBack();
Close Conversation
You can use the MessengerClient.closeConversation() method to close an active conversation in Live Chat. This helps brands manage conversation endings efficiently, ensuring control over when and how interactions end. For a seamless user experience, apply this method only on the conversation screen when the case is open.
import MessengerClient from '@sprinklrjs/chat-native-client';MessengerClient.closeConversation();
Close All Conversations
You can use the MessengerClient.closeAllConversations() method to close all conversations in Live Chat at once. The option to close all conversations is only visible to users with open cases. If there are no open cases or if all existing cases are already closed, this option will not be available to the user.
import MessengerClient from '@sprinklrjs/chat-native-client'; MessengerClient.closeAllConversations();Delete Conversation
You can use the MessengerClient.deleteConversation() method to permanently delete a conversation in Live Chat. This feature gives brands control over removing interactions when necessary. To ensure proper management, apply this method only on the conversation screen.
import MessengerClient from '@sprinklrjs/chat-native-client'; MessengerClient.deleteConversation();Delete All Conversations
You can use the MessengerClient.deleteAllConversations() method to delete all the conversations in Live Chat. This feature allows brands to efficiently remove interactions as needed, providing control over conversation deletions. Apply this method only on the home screen to manage deletions effectively.
import MessengerClient from '@sprinklrjs/chat-native-client'; MessengerClient.deleteAllConversations();Clear User Session
You can use the MessengerClient.clearSession() method to enable users to clear their session details. Once a user clears their session, any new conversation is treated as if it’s from a new user. This method is particularly useful for users interacting with your brand in public spaces or over a public network.
import MessengerClient from '@sprinklrjs/chat-native-client';MessengerClient.clearSession();
Use a Custom Font
You can use a custom font in your Live Chat app to ensure consistent branding across your applications.
To use a custom font in Live Chat, follow these steps:
1. Link your custom font files in your iOS and Android projects natively, such that the fonts are available throughout the project. For steps, see iOS and Android documentation.
2. Open a Sprinklr support ticket at tickets@sprinklr.com. In the support ticket, mention the font file names and the supported font weights for the texts. Refer to the following table for the supported font weights.
![]() Note: Ensure you provide at least one of the supported font weights in the support ticket.
Note: Ensure you provide at least one of the supported font weights in the support ticket.
If you provide a single font weight, it will be applied throughout the app, overriding all the other font weights. Similarly, if any of the font weights are not mentioned in the support ticket, the font weight closest to the non-mentioned font weight will be applied in the app.
Supported Font Weights
The following table lists the supported font weights:
Font Weight | Description |
Light | The light font weight is for subtle accents, secondary text, and areas where minimal emphasis is required. |
Regular | The standard font weight for most text elements. |
Medium | Medium is used for subheadings, labels, or emphasis on certain text sections without the bold impact. |
Semibold | Works well for headings, button labels, or any text that needs more attention but doesn’t require bold styling. |
Bold | Bold is designed for titles, primary headings, and call-to-action elements. |
Regular Italics | This font is used to subtly emphasize specific words or phrases within a message. |
Bold Italics | This font combines both bold and italic styles to strongly emphasize words or phrases. Ideal for highlighting key points or important actions within a chat conversation. |
Enabling Sentry for Crash Monitoring
You can enable Sentry in your application to monitor crash logs in mobile apps.
![]() Note: To enable Sentry, raise a support ticket at tickets@sprinklr.com with the following information:
Note: To enable Sentry, raise a support ticket at tickets@sprinklr.com with the following information:
Live Chat App Id: ID of the Live Chat app. You can get this from the Sprinklr UI. For more information, see Manage your Live Chat application.
Partner Id
Environment: Sprinklr environment (for example, prod1, prod2)
Configure Keyboard Send/Enter Button Behavior
The behavior of the Send/Enter key on mobile keyboards can be configured to control how it functions.
This configuration is set at the app level, with the following two options:
Send on Enter: Pressing the Enter key sends the message directly.
Insert New Line: Pressing the Enter key inserts a new line within the message input field.
![]() Note: To configure the Send/Enter button behavior for Sprinklr Live Chat, contact Sprinklr Support at tickets@sprinklr.com.
Note: To configure the Send/Enter button behavior for Sprinklr Live Chat, contact Sprinklr Support at tickets@sprinklr.com.
Next Steps
Based on your requirements, you can now configure the following features:
Additional Resources