How to Use Agent Monitoring?
Updated
The Agent Monitoring screen provides supervisors with a comprehensive view of their team's status and activity. Supervisors can monitor their agents' availability, current cases, and activities in real-time, allowing them to proactively manage and support their team.
Supervisors can monitor agents from the following screens:
Home: Provides an overview of the team's availability.
Agents: Offers detailed monitoring and allows supervisors to take various actions.
Monitoring using the Home page
The My Team Status section on the Home page gives aggregated view of status of the team. It shows the status and the number of agents in that particular status. Supervisors can click Show All to view the detailed view of team availability.

In the Team Availability screen, supervisors can search the name of the agent whose status they want to view. They can also filter the list by status.

Monitoring Using the Agents Screen
The Agents screen provide a complete, real-time overview of the agents status and activities. It enables supervisors to effortlessly track agent availability, ongoing cases, and current tasks, allowing for proactive team management and support.
From this screen supervisors can see the overall availability of teams and the team states (the actual activity being performed by them). At the same time, they can monitor relevant KPIs for individual agents.
Access Agents Screen
To access the Agents screen for agent monitoring, follow these steps:
1. Open the Supervisor Console persona app from the Launchpad.
2. In the left pane, click Agents.

Agents Screen Components
The Agents screen includes the following components:
Agent Status
The Agent Status widget shows the aggregated summary of the agent availability status, such as Available, Unavailable, Lunch, Tea break, Connection issue, among others. This value comes from the status set in the User Availability Status custom field.
You can get the desired value set to show as the status whenever an agent is in productive state (on call, call ringing, call hold, ACW).
![]() Note: Access to this feature is controlled by the dynamic property: USER_AVAILABILITY_STATUS_TO_UPDATE_ON_ASSIGNMENT. To enable this feature in your environment, reach out to your Success Manager. Alternatively, you can submit a request at tickets@sprinklr.com.
Note: Access to this feature is controlled by the dynamic property: USER_AVAILABILITY_STATUS_TO_UPDATE_ON_ASSIGNMENT. To enable this feature in your environment, reach out to your Success Manager. Alternatively, you can submit a request at tickets@sprinklr.com.
Agent State
The Agent State widget shows the aggregated summary of agents' current states such as On Outbound Call, On Inbound Call, Call Ringing, Idle, Working on a Case, among others. It helps supervisors understand the live activity being performed by the agent.
![]() Note: Supervisors can view a smart summary of active cases agents are handling, generated by Sprinklr AI+. This option appears when an agent is in the Working on Case state and provides key context details before supervisors join the live interaction.
Note: Supervisors can view a smart summary of active cases agents are handling, generated by Sprinklr AI+. This option appears when an agent is in the Working on Case state and provides key context details before supervisors join the live interaction.
This feature requires backend configuration. To enable this feature in your environment, contact Sprinklr Support at tickets@sprinklr.com.
.png)
The Smart Summary includes details such as case number, customer predicted CSAT, case duration, reason for contact, and agent actions taken. By having this information upfront, supervisors can make faster, more informed interventions, leading to improved resolution times and more effective case management.
You can click the desired status in the Agent Status section. This will show the corresponding states in the Agent State and the table will be filtered based on the selection. Further, on clicking the state, an additional filter will be applied which will show data based on the selection of agent status and state.
Agents List
The Agents section lists the agents name, their current status, current state, and more. The agent's current state is displayed next to the agent name indicating the activity being performed by the agent.
The following agent states are displayed, along with a timer, to monitor live agent activities:
Agent State | Description |
On Outbound Call | This indicates that the agent is on an outbound call. An outbound call refers to the call initiated by the agent. |
On Inbound Call | This indicates that the agent is on an inbound call. An inbound call refers to the call initiated by the customer. |
Call Ringing | This indicates that the call is ringing. |
On ACW | This indicates that the agent is filling After Call Work (ACW). A new version of On ACW has been introduced to accurately reflect agent availability when ACW is assigned but not actively open in front of the agent (for example, if they have navigated back to the homepage while ACW capacity is still consumed).
|
Working on a Case | This indicates that the agent is working on a case. |
Call on Hold | This indicates that the customer call is on hold. |
Idle | This indicates that the agent is idle.
The agent can be idle even if case is assigned to the agent. It works based on the screen which is open in front of the agent. For example, if an agent is assigned After Call Work (ACW) but is currently on a different screen, such as the home page, their state will be idle. Access to this feature is controlled by the dynamic property: USER_CURRENT_STATE_AVAILABLE_STATES_FOR_IDLE. To enable this feature in your environment, reach out to your Success Manager. Alternatively, you can submit a request at tickets@sprinklr.com. |
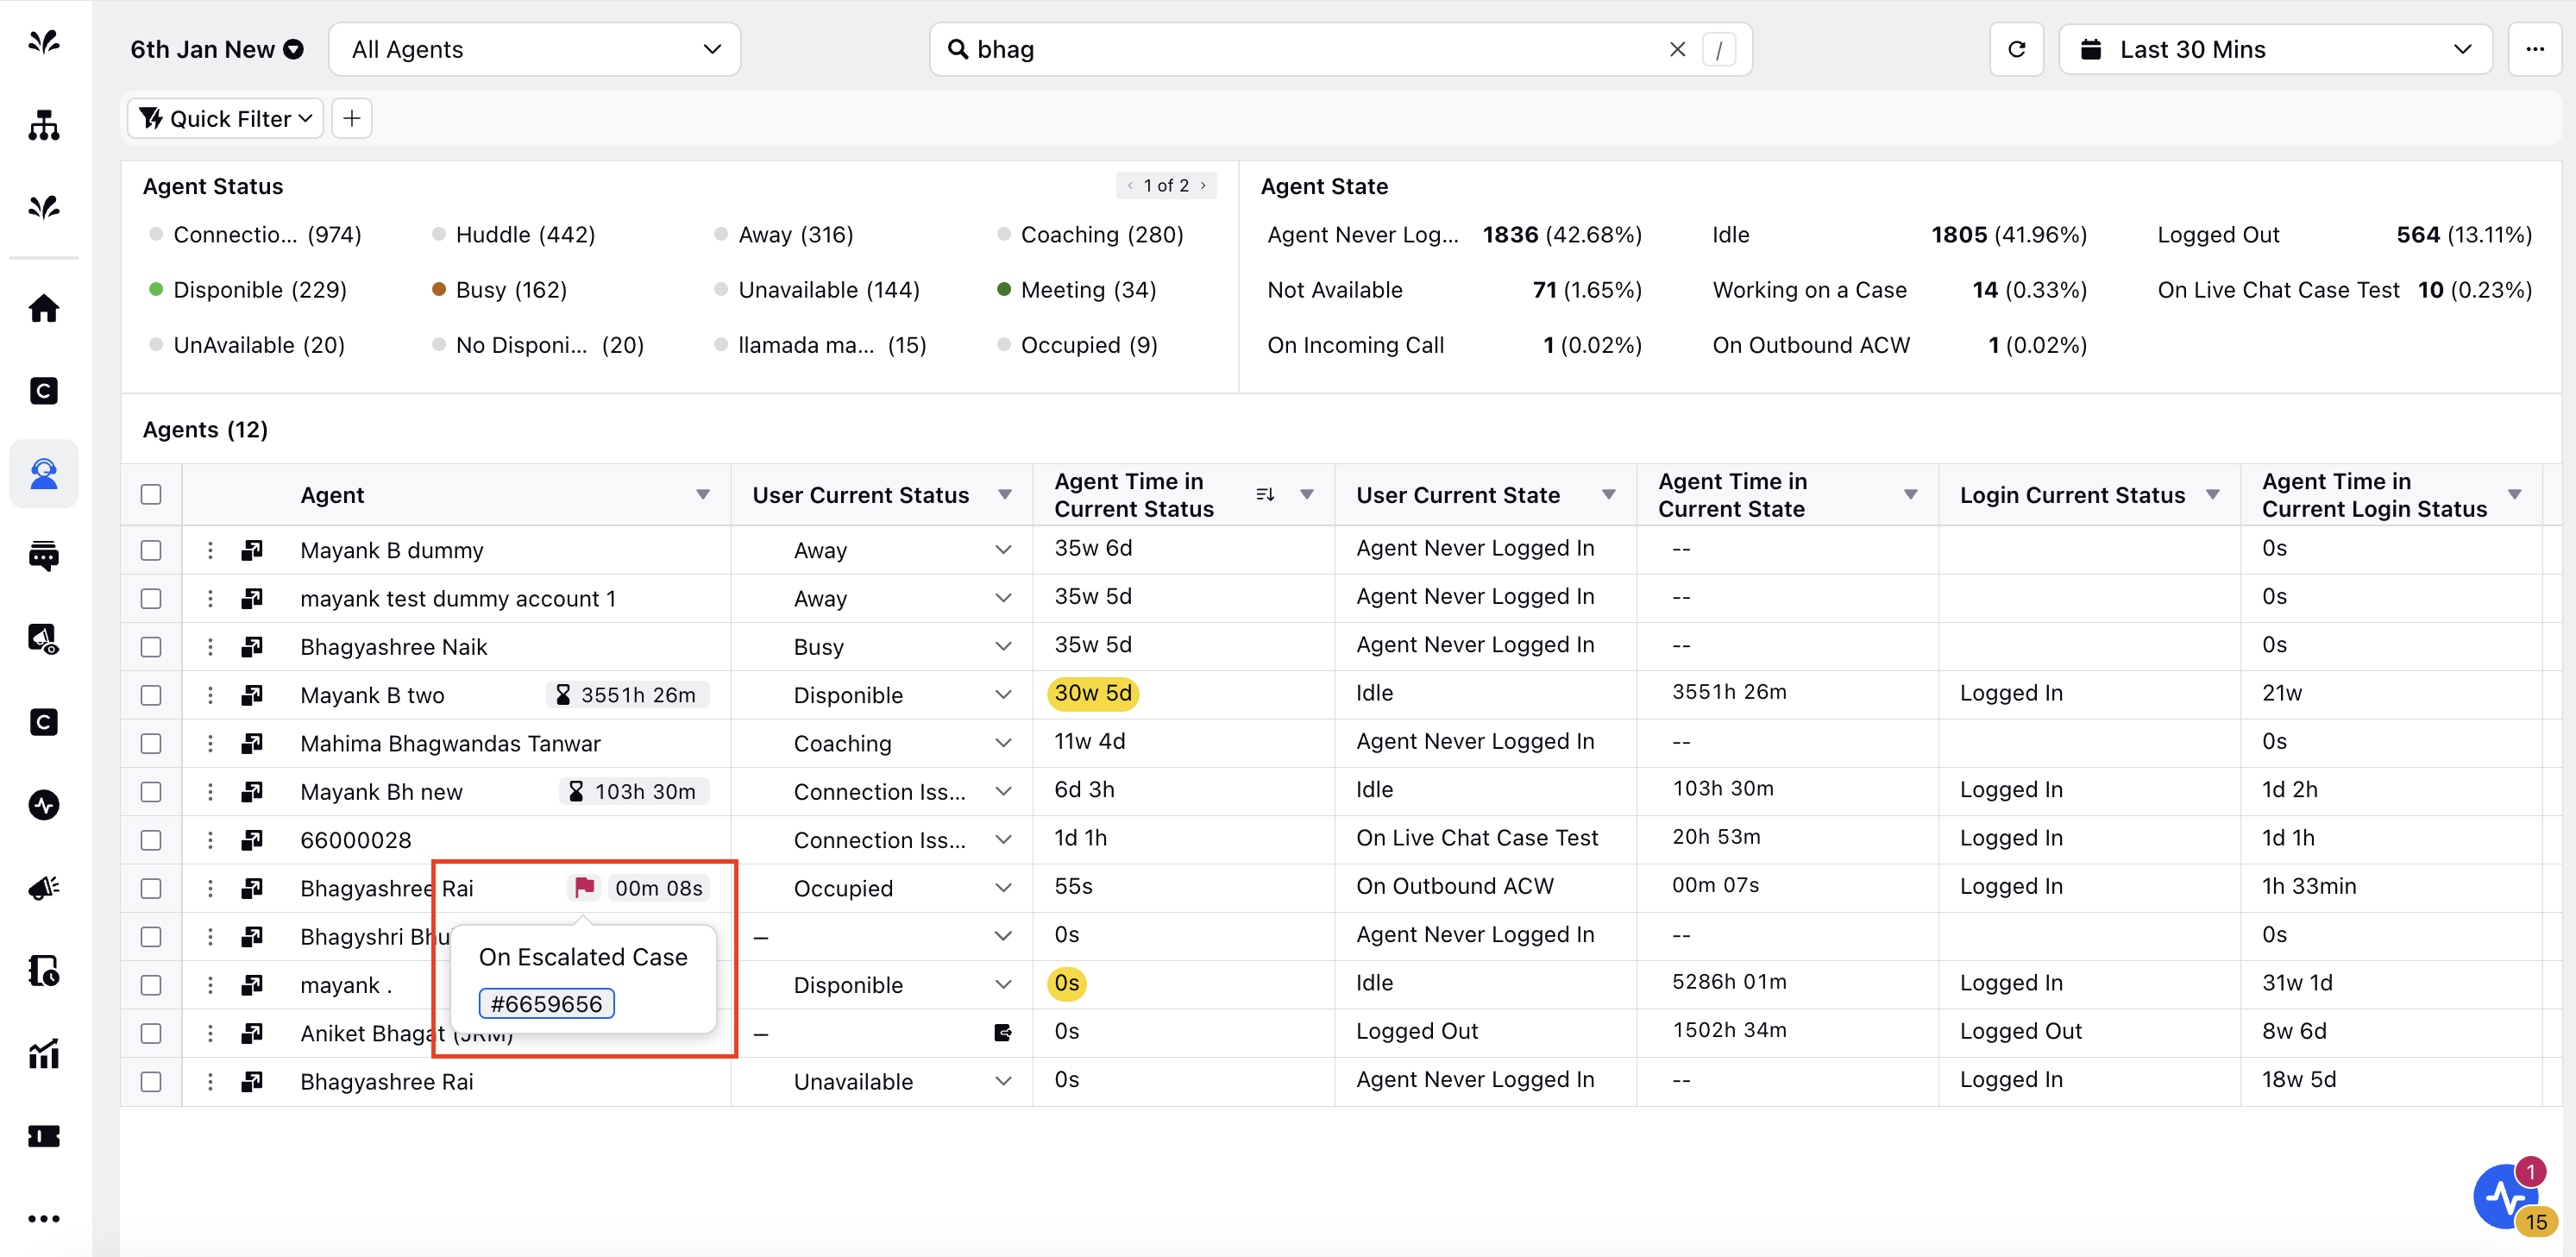
On Escalated Case | This indicates that the agent is working on an escalated case triggered by nudges or keywords. |
Pin Agents for Focused Monitoring
Supervisors can pin selected agents in the Agent Monitoring screen to keep them visible for prioritized monitoring. This helps supervisors closely track specific agents such as new hires, underperforming agents, or agents under review, while still monitoring the overall team.
To pin an agent:
In the Detailed View, locate the agent in the Agent column.
Hover over the agent name to display the pin icon (
 ).
).Click the pin icon to pin the agent.

Once pinned, the agent row remains fixed and stays visible when you scroll. To unpin the agent, click the pin icon again.
Agent Working on an Escalated Case
Supervisors can easily identify agents working on escalated cases by the red flag icon (![]() ) displayed next to the agent's name on the Agents screen. Cases may be escalated using Agent Nudges, triggered by criteria such as the intent model or specific keywords. For more information about Agent Nudges, see Escalation Management.
) displayed next to the agent's name on the Agents screen. Cases may be escalated using Agent Nudges, triggered by criteria such as the intent model or specific keywords. For more information about Agent Nudges, see Escalation Management.
Listen to Escalated Voice Cases from Case Third Pane
Supervisors can listen to escalated voice cases directly from the Case Third Pane. This option is available while the call is ongoing and follows the same flow as the live monitoring Listen option.
This enhancement allows supervisors to monitor escalated calls in real time without leaving the case view, enabling faster intervention and better support for agents during critical conversations.

Video Call States
The following table describes the video call states:
Agent State | Description |
Agent initiating video call | Agent initiating a video call to customer. |
Video call in progress | Agent is in a video call with customer. |
Incoming user video cal | Inbound video call to agent. |
Setting up video call for participants |
Current Working Case/Call
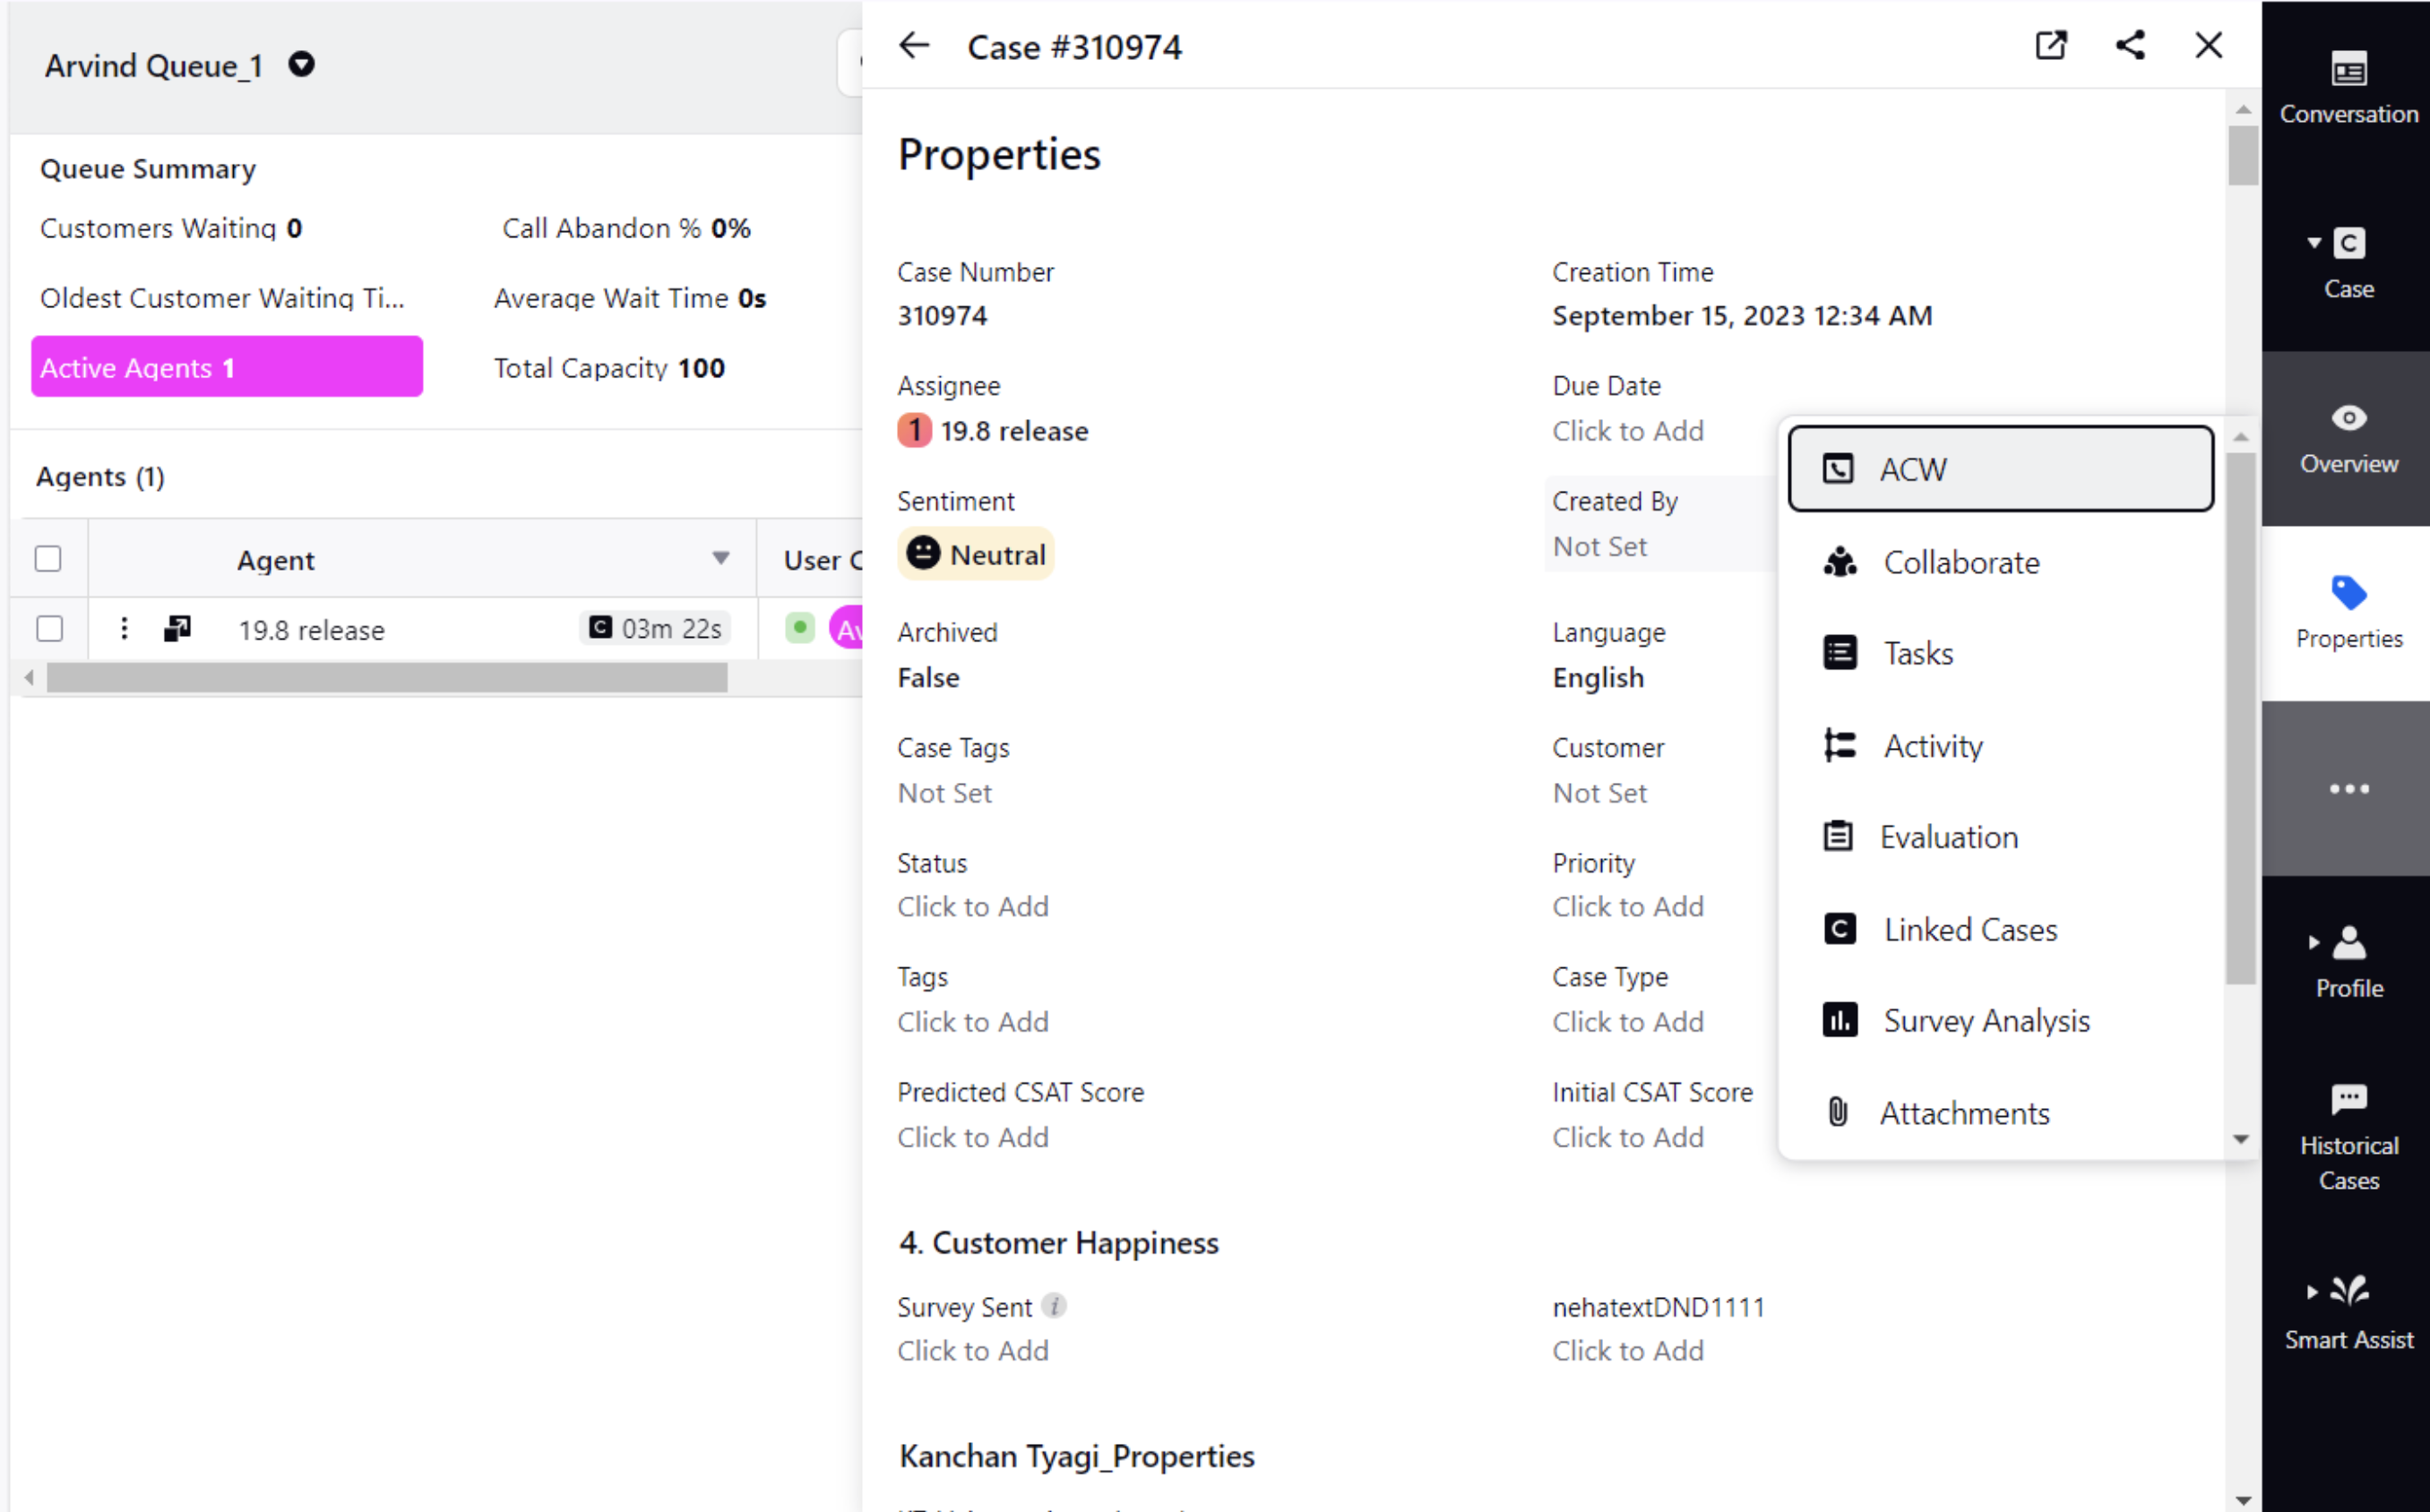
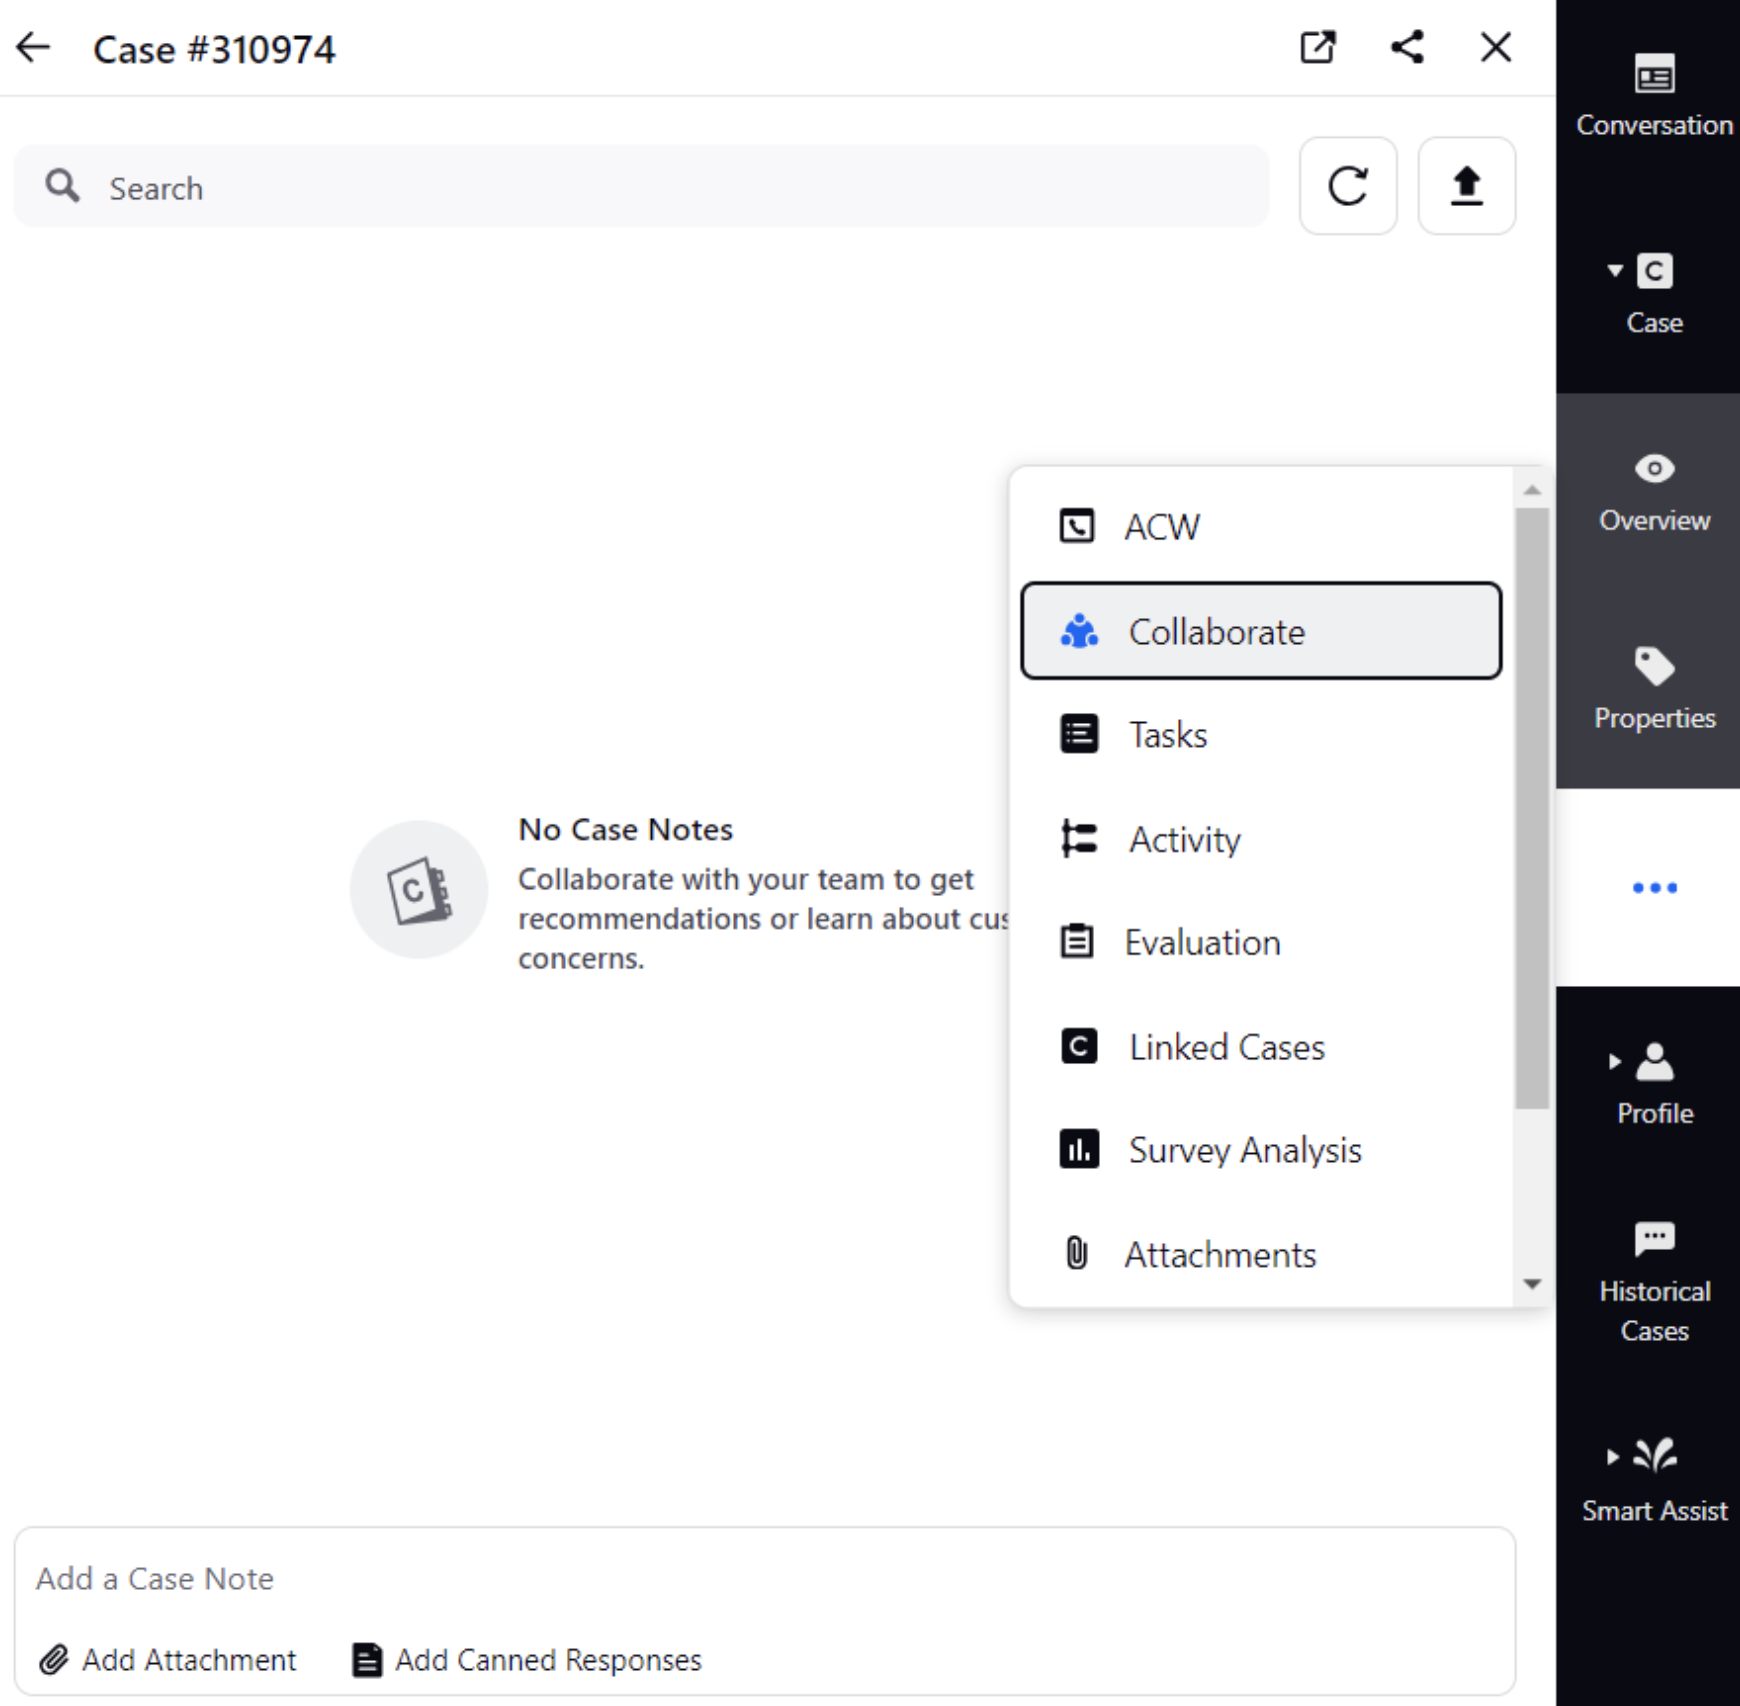
When you click user current state such as on-call, the case number will pop up on a case as shown below:
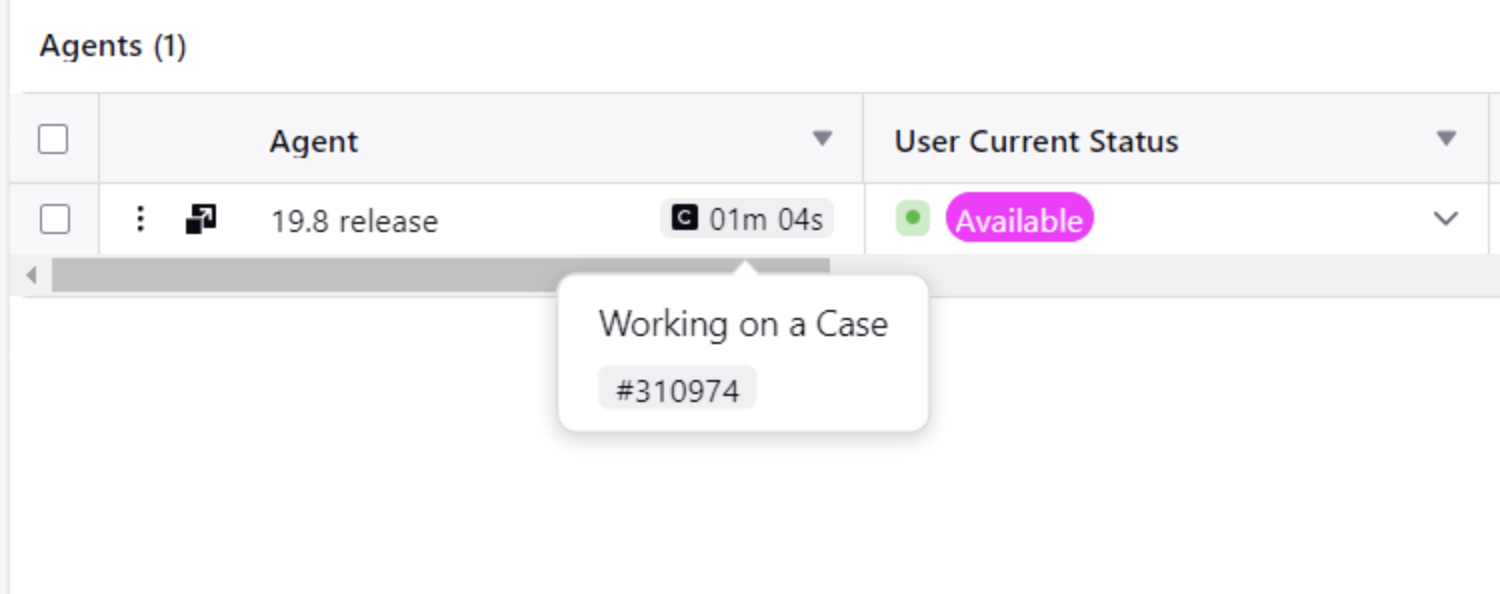
The pop-up will show the case number on which the agent is working. After clicking on this case number, a third pane view will appear showing the detailed view of that case.
The third pane of the current working case consists of tabs such as Case, Properties, Collaborate, Tasks, Historical Cases, and Smart Assist. From the third-pane view, supervisors can view the case details, conversation, collaborate with the agent to provide guidance. They can view the case properties like channel, custom priority, customer sentiment and other critical case related metrics.
Case/Call Actions
Supervisors can take various actions on the case or call an agent is working on to provide timely guidance whenever required.
To access these case/call actions, supervisors must have the respective Call Controls permissions.

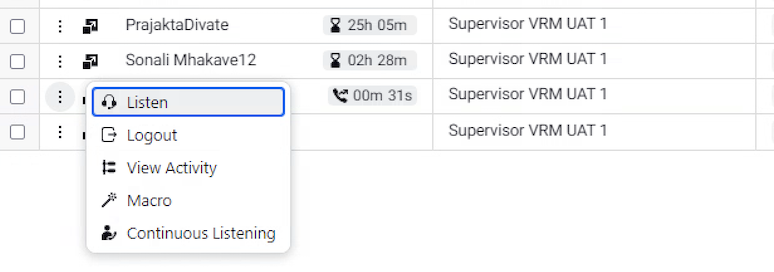
Listen
The Listen feature helps supervisors get the contextual clarity about the conversation between the agent and the customer. Listening on a call means that neither the agent nor the customer is aware of the supervisor listening in on the call. For a non-voice case, listening means opening the case conversation view and from there, the supervisor can add notes (whisper) or barge in (reply).
Whisper
For Voice - When an agent is on a call, the supervisor can whisper to the agent. Whispering entails speaking to the agent where only the agent can hear that and not the customer. The supervisor can give suggestions while listening to the call or the supervisor can whisper without listening to the call and let the agent know about something that is not related to the current call, like “You are lagging behind your quota for today”.
For Digital - Whispering in digital is the same as adding notes in case collaboration widget.
Barge In
Supervisors can use the Barge In feature to directly join a call, which means that the supervisor joins the “conference call” with the customer and the agent. This allows the supervisor to take control of the conversation if the agent is unable to resolve the customer's query.
Continuous Listening
The Continuous Listening feature enables supervisors to maintain uninterrupted monitoring of calls made by agents, even in the event of a call disconnection. When an agent is not actively engaged in a call, the supervisor remains in a muted state, alone on the call.
The advantage of Continuous Listening is that supervisors do not need to restart the listening process if a call is disconnected. They can seamlessly maintain supervision without the need for manual intervention to resume monitoring.
![]() Note: To enable this capability, submit a support ticket by contacting tickets@sprinklr.com.
Note: To enable this capability, submit a support ticket by contacting tickets@sprinklr.com.
Click the arrow icon on the minimized call window to open the case conversation view. From there, the supervisor can add notes (whisper) or barge in (reply).

![]() Note: You can define a customer consent workflow for Listen, Whisper, Barge-in capabilities. To learn more about getting this capability enabled, please work with your Success Manager.
Note: You can define a customer consent workflow for Listen, Whisper, Barge-in capabilities. To learn more about getting this capability enabled, please work with your Success Manager.
Using a guided workflow, you can request customer consent for these actions.

The obtained consent status is then used to update the allowedSupervisorActions property in Sprinklr, reflecting the customer's approval or denial.

Consequently, the Supervisor Console adapts dynamically based on the customer's consent. If consent is granted, the options for Listen, Whisper, Barge-in capabilities become visible, empowering supervisors to actively monitor and intervene in calls as necessary. This structured approach ensures transparency and responsiveness to customer preferences.
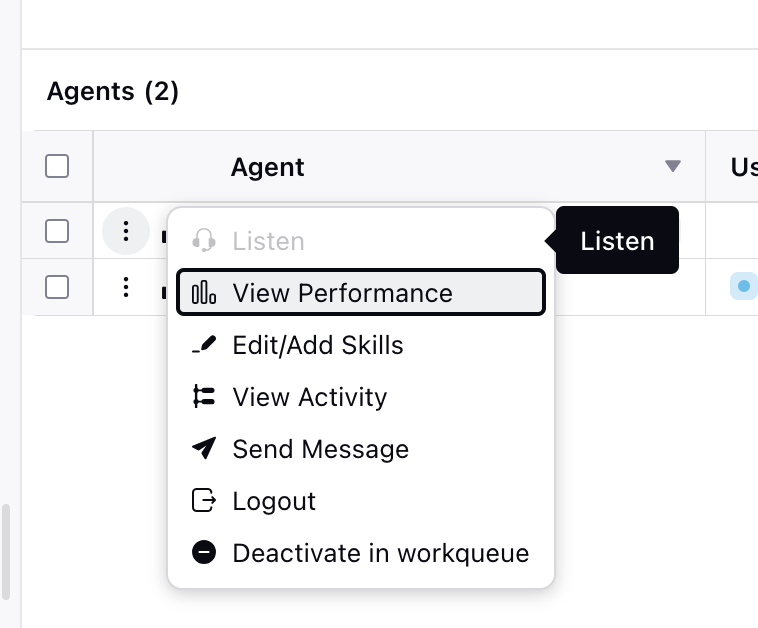
Agent Actions
Supervisors can take various actions related to agent status and activities:
Change Agents Current Status and Login Current Status
The Supervisor can change the User Current Status and Login Current Status.
![]() Note: To enable the capability where supervisors cannot change the status when an agent is logged out, reach out to your Success Manager.
Note: To enable the capability where supervisors cannot change the status when an agent is logged out, reach out to your Success Manager.
Logout
Select to logout the agent.
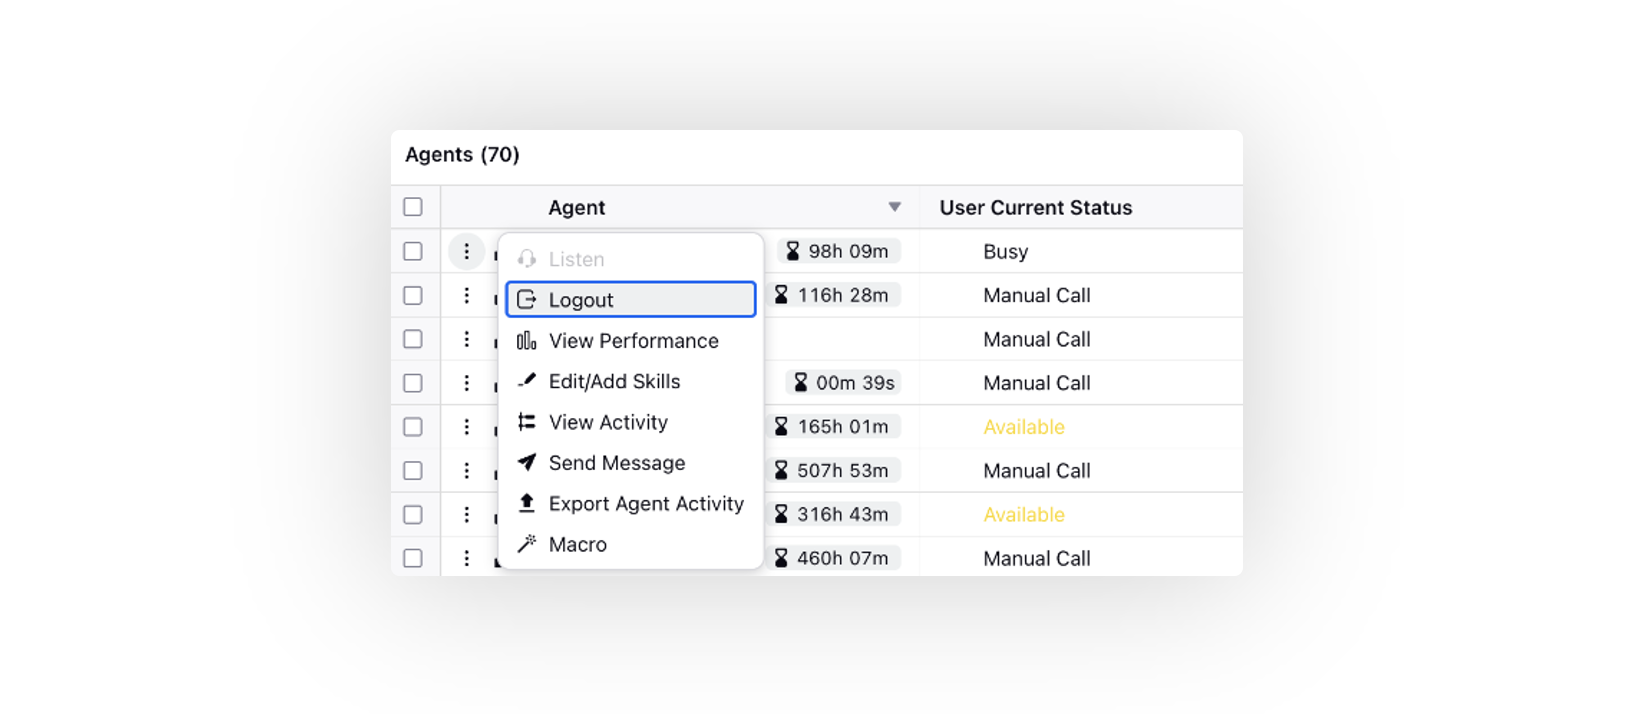
View Performance
Supervisor can click on View Performance to monitor the customized monitoring dashboard for the agent.
View Agent Activity
In the Agents list, click the three-dot icon located before the agent's name. From the menu, select View Activity to open the Activity window in the third pane.
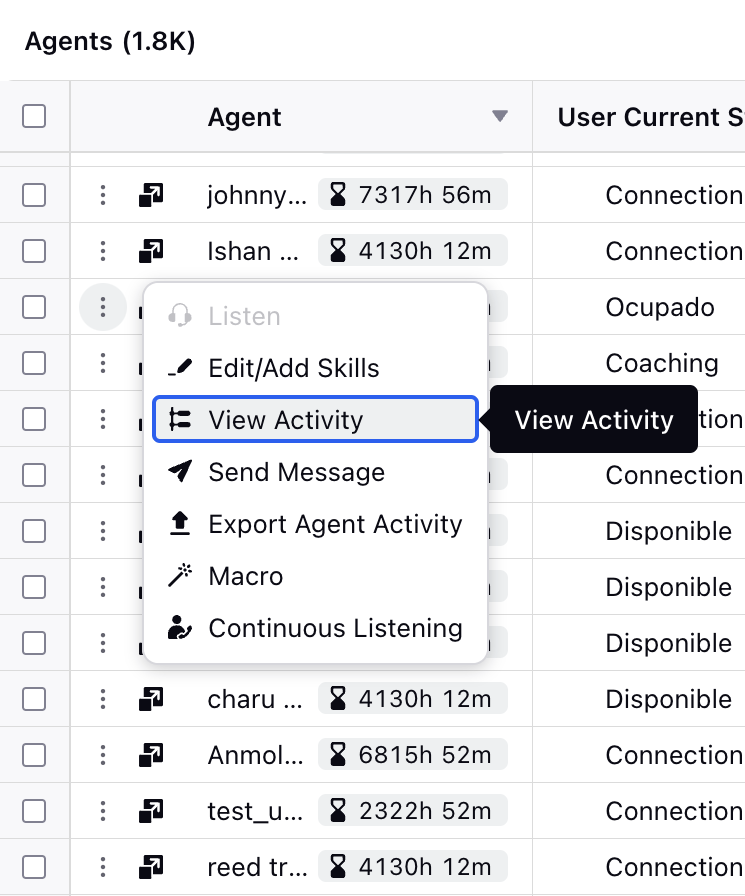
The Activity window displays all agent activities associated with a case. Supervisors can filter these activities using a date range selector, allowing them to view agent activity within a specified period. By selecting a start and end date, supervisors can focus on the relevant activity history for more precise monitoring and review.

Control Visibility of User Activity, Audit Logs and Custom Fields for Anonymized Users
Supervisor Console can be configured to limit the visibility of user activity, audit logs, and custom fields for anonymized users, in alignment with Entity Visibility rules.
This update ensures that for anonymized users, information such as audit logs (for example, role assignments, group memberships), user activity (for example, agent logins and logouts), and custom fields is properly controlled and displayed according to the defined visibility settings.
![]() Note: Access to this feature is controlled by a dynamic property (DP). To enable this feature in your environment, reach out to your Success Manager. Alternatively, you can submit a request at tickets@sprinklr.com.
Note: Access to this feature is controlled by a dynamic property (DP). To enable this feature in your environment, reach out to your Success Manager. Alternatively, you can submit a request at tickets@sprinklr.com.

Filter Activity Log
In the User field, you can select the Agent or Admin. Depending on the user type you select, the activitiy log shows the relevant actions:
Agent: Select Agent to view the activity log of the agent. This shows the actions taken by the agent.
Admin: Select the Admin option from to view the activity log of the agent in which the actions are taken on the agent by an administrator or a supervisor.
To filter the activity log, you can use the Activity Type field. Click the Activity Type field to show a list of existing activities. Select one or more activities of your interest and the activity log will be filtered accordingly.
This helps the supervisor to view and monitor the agents’ activity stream within Supervisor Console which includes:
Logged In
Logged Out
Answered/Declined call
Receiving warm/blind transfer call
Connect back
Attended/Initiated conference
Scheduled Call back
Call back happened
Filled ACW
ACW Timer reached
Macro applied by
Case assigned to / unassigned from
Notes added by the user on cases/messages
Macro run on cases/messages
Likes on cases/messages
Profile Comments (Enhance Add comment)
Assignment and un-assignment of cases/messages
Agent Status Change Trails
View Status Change Reason
The activity log records the agent's status changes, the reasons behind them, and the timestamp of each change. For instance, if a supervisor changes an agent's login status, the log will clearly indicate that the change was made by the supervisor, along with the time it occurred. Similarly, if a status change is triggered by a rule (such as automatic logout due to inactivity), the log will capture this and specify the reason for the change.

![]() Note: Access to this feature is controlled by the dynamic property: LOGIN_LOGOUT_AUDIT_ENABLED. To enable this feature in your environment, reach out to your Success Manager. Alternatively, you can submit a request at tickets@sprinklr.com.
Note: Access to this feature is controlled by the dynamic property: LOGIN_LOGOUT_AUDIT_ENABLED. To enable this feature in your environment, reach out to your Success Manager. Alternatively, you can submit a request at tickets@sprinklr.com.
Export Agent Activity
Supervisors can export the agent activity report of one agent or of multiple agents. The exported file will include details such as activity performed, case number, activity time, and more.
Follow these steps to export the report:
1. In the Activity pane, click the Export icon in the top-right corner.

2. On the Export screen, enter the export details:
File Name: The file name is pre-filled as Agent Activity. You can modify it according to your requirement.
Format: Select the file format (Excel or CSV file).
Timeline: Select the period for which you want to export the agent activity.
Timezone: Choose the geographic timezone for the export.

3. Click Export to generate the report.
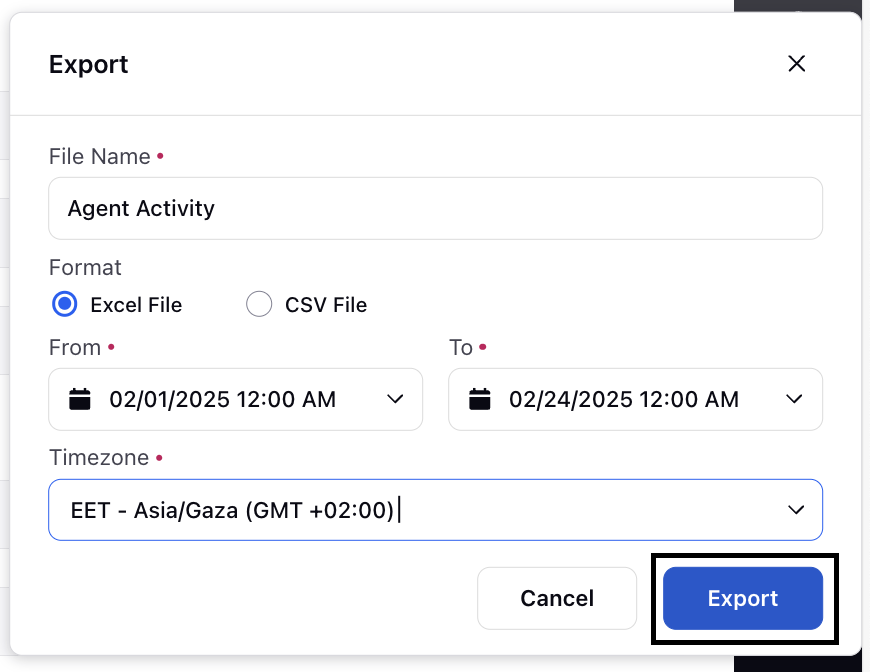
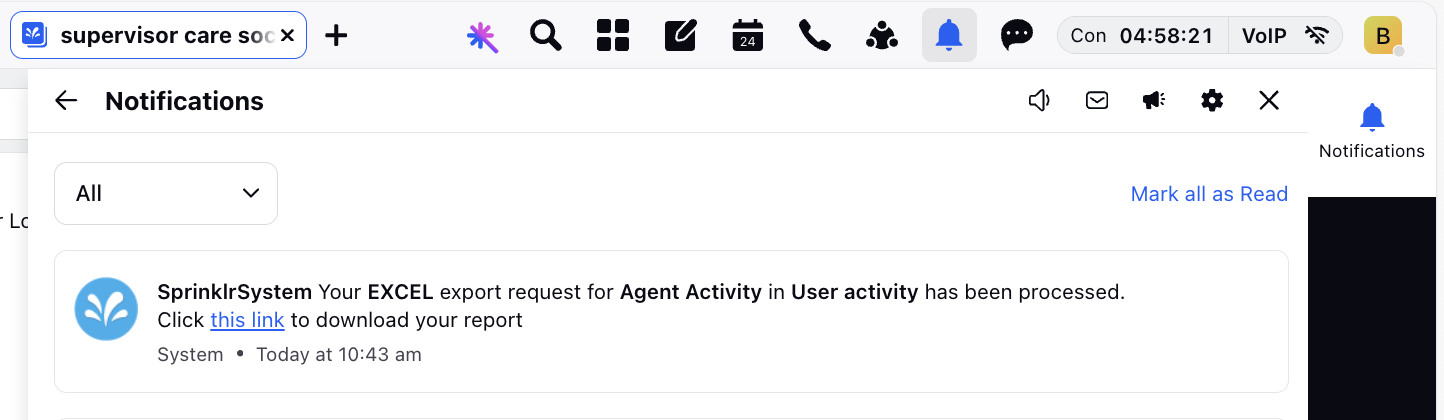
4. Once the export is complete, the supervisor will receive a notification with a download link for the exported zipped file.
To export activity data for multiple agents at once, select the desired agents from the agents list. Then, from the menu located at the bottom of the page, click Export Agent Activity. Then, follow the same steps for exporting the agent activity of a single agent.

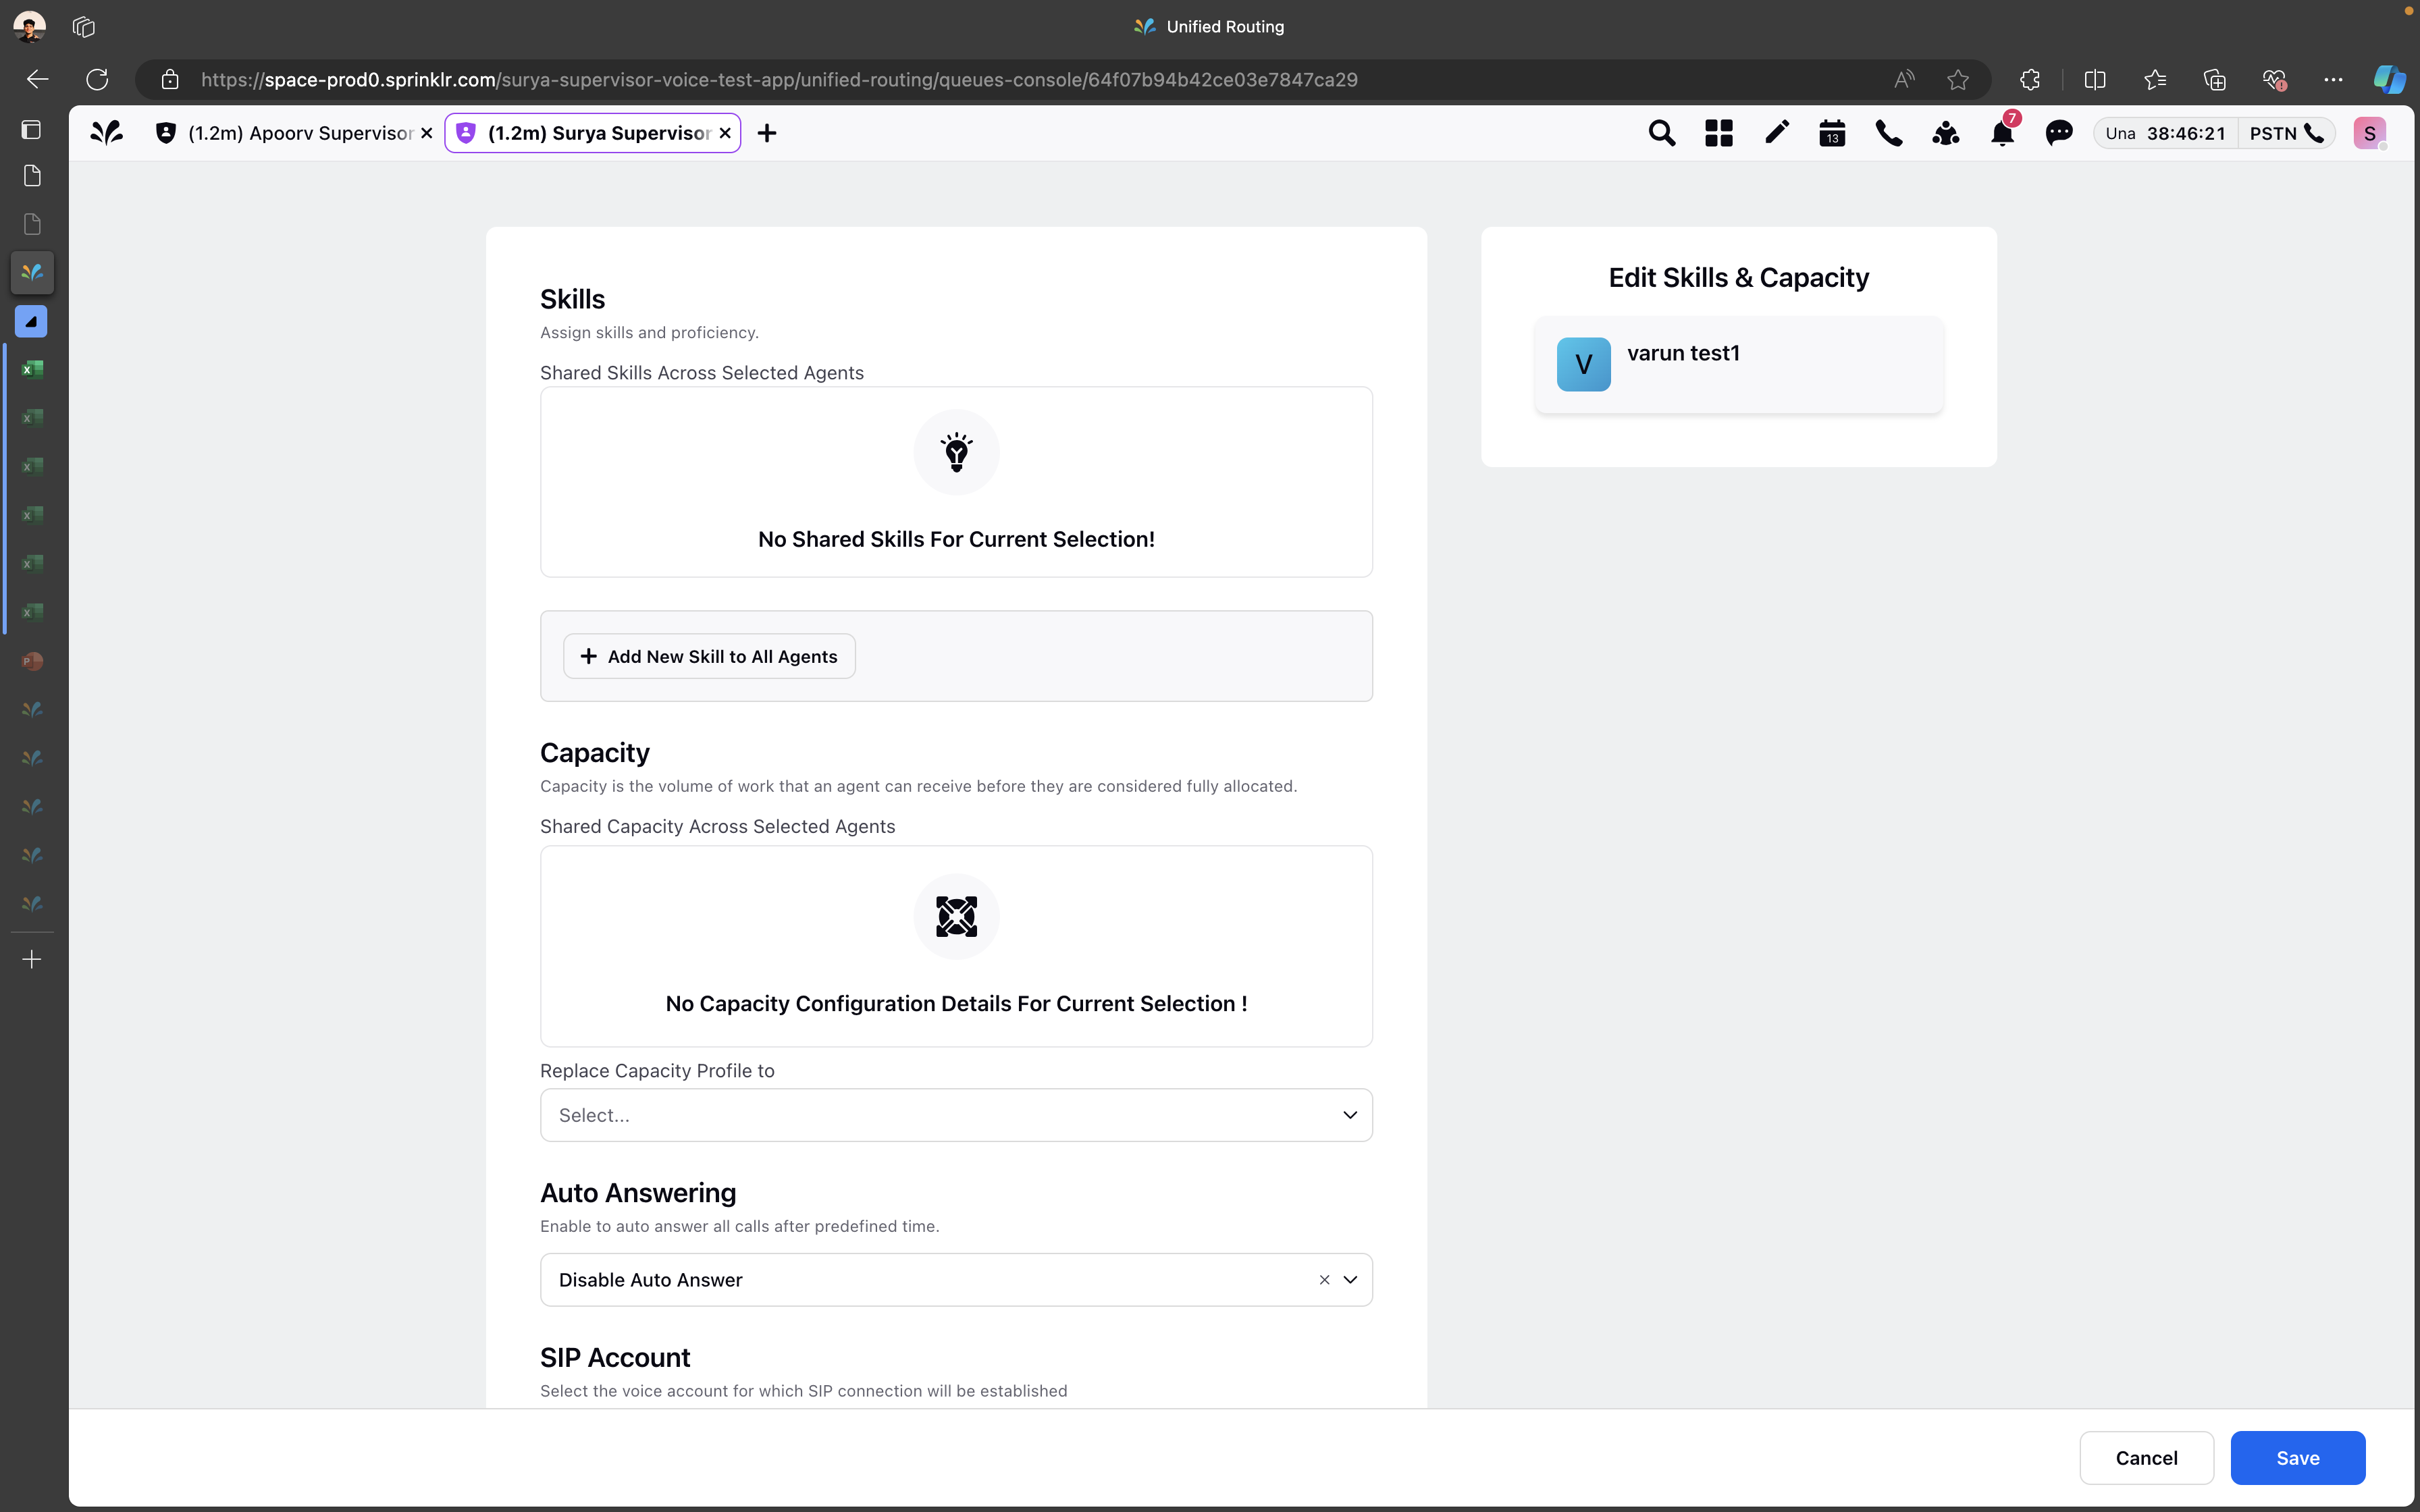
Edit/Add Skills
Supervisors can add a skill, increase or decrease the proficiency level of the skill or delete the skill of the agent. Based on these changes, only cases that match the agent’s updated skills will be assigned to them.
Macro
Apply the desired macro. Additionally, you can choose multiple agents and apply the macro action at the bottom to execute it in bulk.
![]() Note: To get this capability enabled, reach out to our support team at tickets@sprinklr.com.
Note: To get this capability enabled, reach out to our support team at tickets@sprinklr.com.
Agent Third Pane
Click the View Details icon to open the Agent third pane customized for each agent. The Supervisors can switch between Overview, Properties, Activity and Quality Analytics tabs. Quality Analytics tab enables them analyze different metrics such as Total AI Evaluations, Average Quality Score, Average Predicted CSAT Score, etc.
To edit properties, supervisors must have the Edit (User) permission under Setup.

Dashboard Actions
Supervisors can perform various actions on the dashboard, including applying filters, exporting data, managing columns, and more. These options allow them to customize the view to meet their requirements and access the most relevant information.
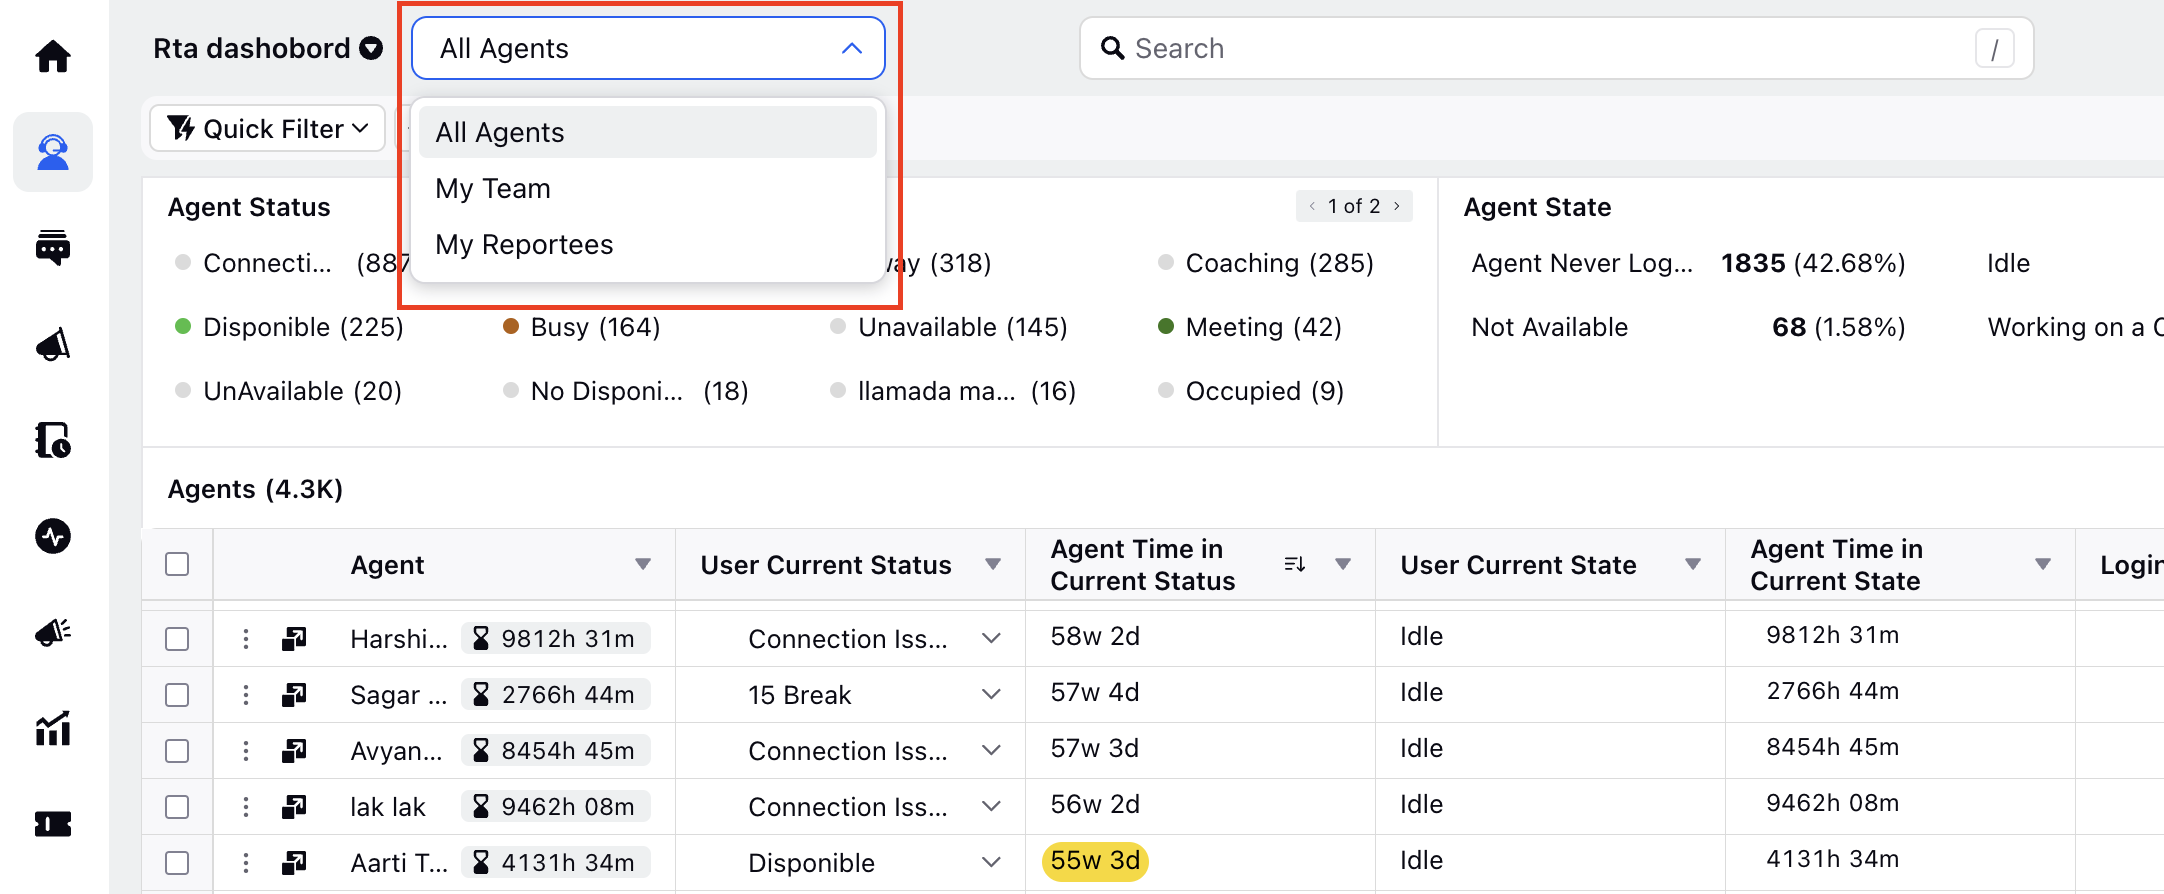
Team Filters
Click the User Filter dropdown in the top left corner of the Agents page to change the team filter.
The following table describes each filter:
Filters | Description |
All Agents | Apply this filter to view all agents.
|
My Team | Apply this filter to view your direct and indirect reportees. This includes the reportees of reportees and so forth. The mapping of agents with their managers can be defined from the Users page. To open this page, go to All Settings > Manage Workspace > Users page. On the user creation page, you can update the Manager field for each user. For more information about the Users page, see Manage Users. |
My Reportees | Apply this filter to view all agents that directly report to you. The mapping of agents with their managers can be defined from the Users page. To open this page, go to All Settings > Manage Workspace > Users page. On the user creation page, you can update the Manager field for each user. For more information about the Users page, see Manage Users. |
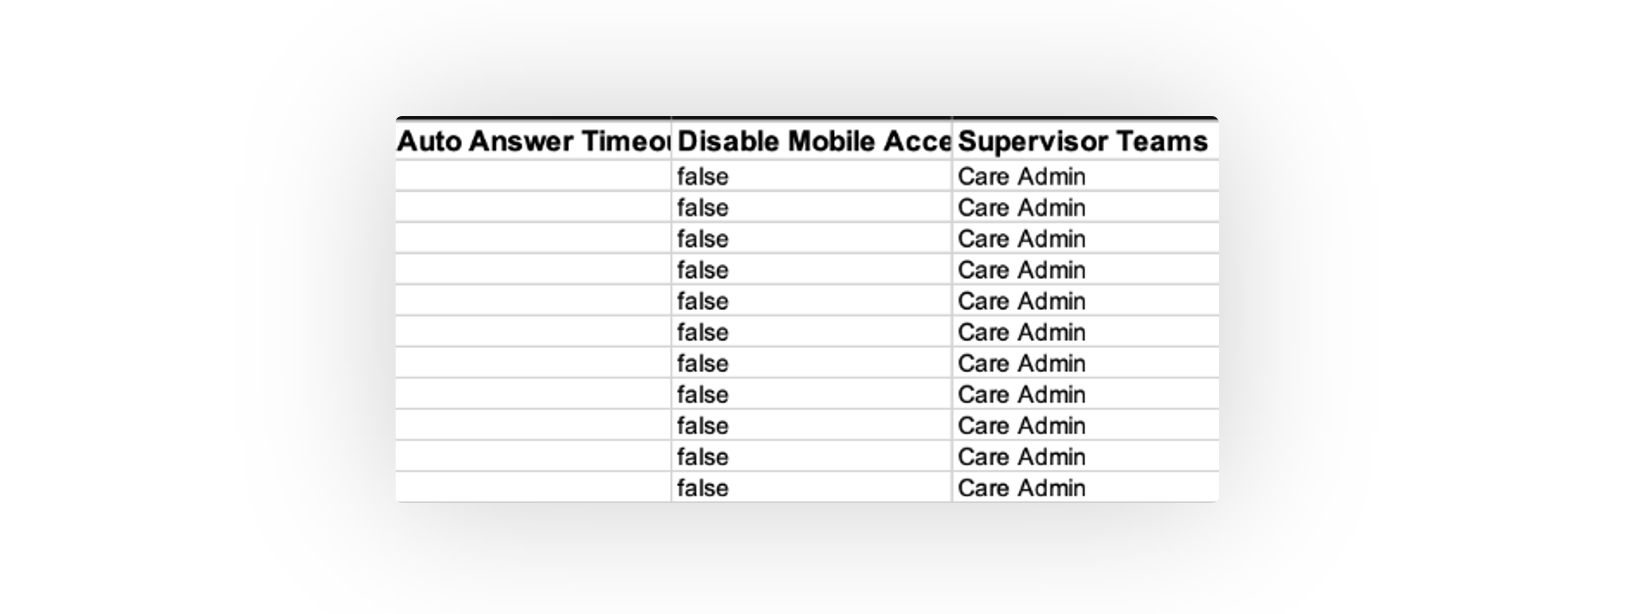
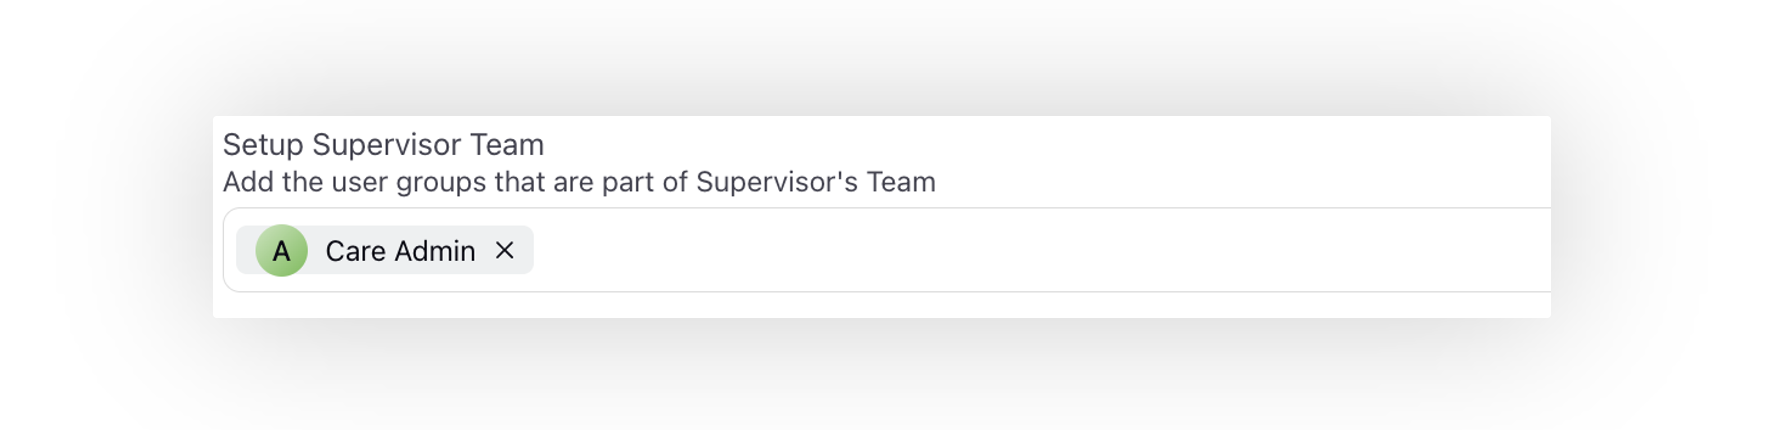
My Team Groups | Apply this filter to view all agent groups linked to the Setup Supervisor Team field in the user creation window. You can also add the supervisor team user groups to the users in bulk using the export/import feature. Export the users' file and specify the desired supervisor user groups, separated by commas, in the designated column of the export file. Upon importing this file, the user groups will be seamlessly added to the users in the Setup Supervisor Team field.
These groups can be categorized by various factors, such as agents' skills. |
Dashboard Management
Supervisors can perform various actions on the dashboard, such as creating, cloning, editing, deleting, and more. To access these options, click the three-dot icon in the top-right corner to open the More Actions menu.

The following table describes the various actions that supervisors can take on the Agents dashboard:
Action | Description |
Create Dashboard | Use this option to create a new dashboard. On the Add Dashboard window, enter Name, Tags, and Starter Dashboard. After entering these details, a standard dashboard will be generated. More columns can be added by clicking Manage Columns.
To switch to the new different dashboard, click the chevron icon in the top-left corner and select the desired dashboard from the list.
|
Edit Dashboard | Edit the name and tags of the dashboard. |
Delete Dashboard | Delete the dashboard. |
Clone Dashboard | Create a copy of the dashboard. |
Share Dashboard | Share the dashboard by selecting the workspaces and users/users groups. |


Export the Agent dashboard in Excel/CSV
Supervisors can export the Agents dashboard in Excel or CSV format. To do that, click the three-dot icon at the top-right corner. In the More Actions menu, click Export.

In the Export window, enter the desired details such as file format (Excel File or CSV File) and date range for which the agent dashboard report should be exported. The file name is filled by default. Once done, click Export.

Filters
Supervisor can add the desired custom filters on any Agent dashboard based on Login Current Status, User Current Status, User Current State, or User Skill (lookup).
Some of the supported filters include:
User Group
Skill
Capacity Profile
Call Handling Enabled
Assignment Settings Schedule Start Date
Assignment Settings Schedule End Date
Scheduled Capacity Configuration
Scheduled Skill
User Custom Property

Refresh
Use the Refresh icon in the top-right corner to view any updated changes on the Agents page.

Sort By
Use the Sort By icon in the top-right corner to sort the dashboard by a specific column, either in ascending or descending order.

Time Range and Time Zone Filter
Select the Time Zone and the Time Range from the top right to view the data insights for that duration.

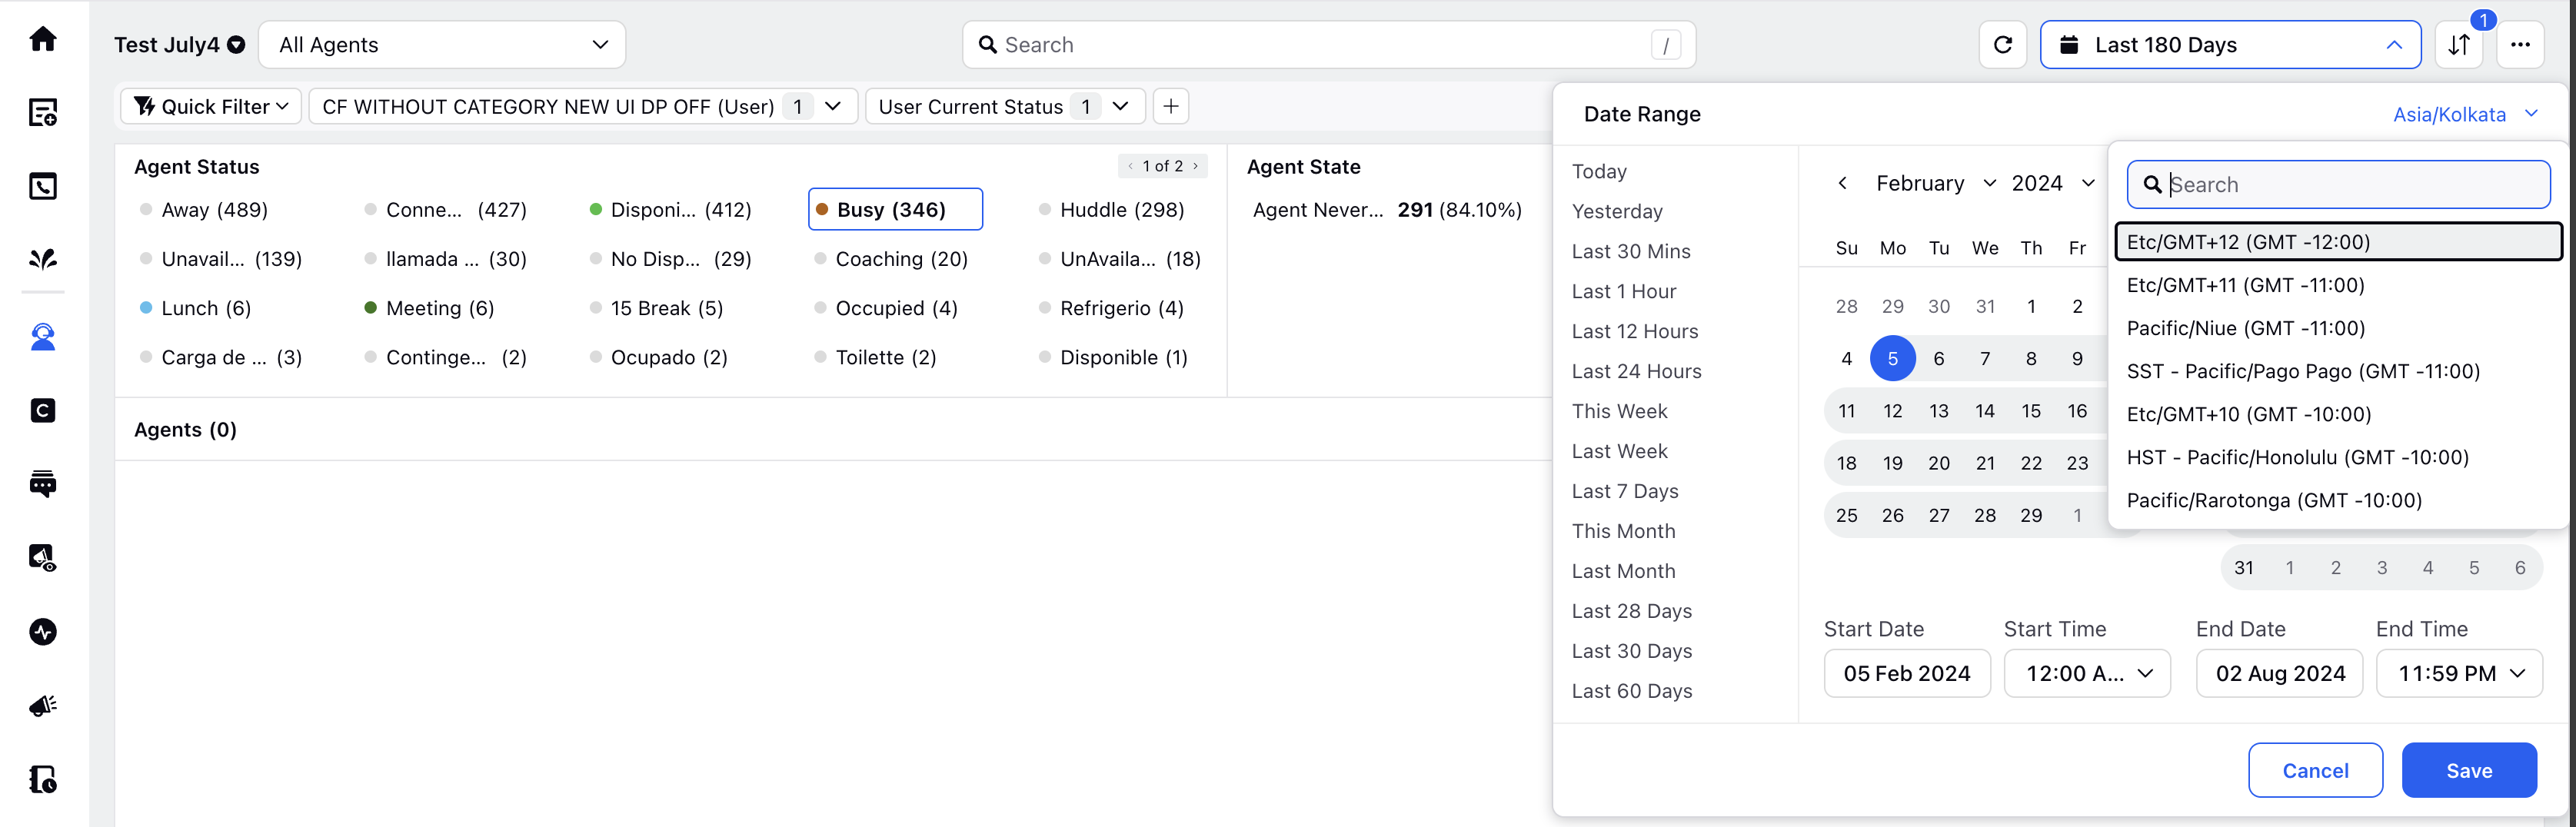
The supervisor can provide the desired Start Date and End Date for which they want the Agent dashboard data to be populated. Click Save at the bottom after selecting the time zone and the time range.
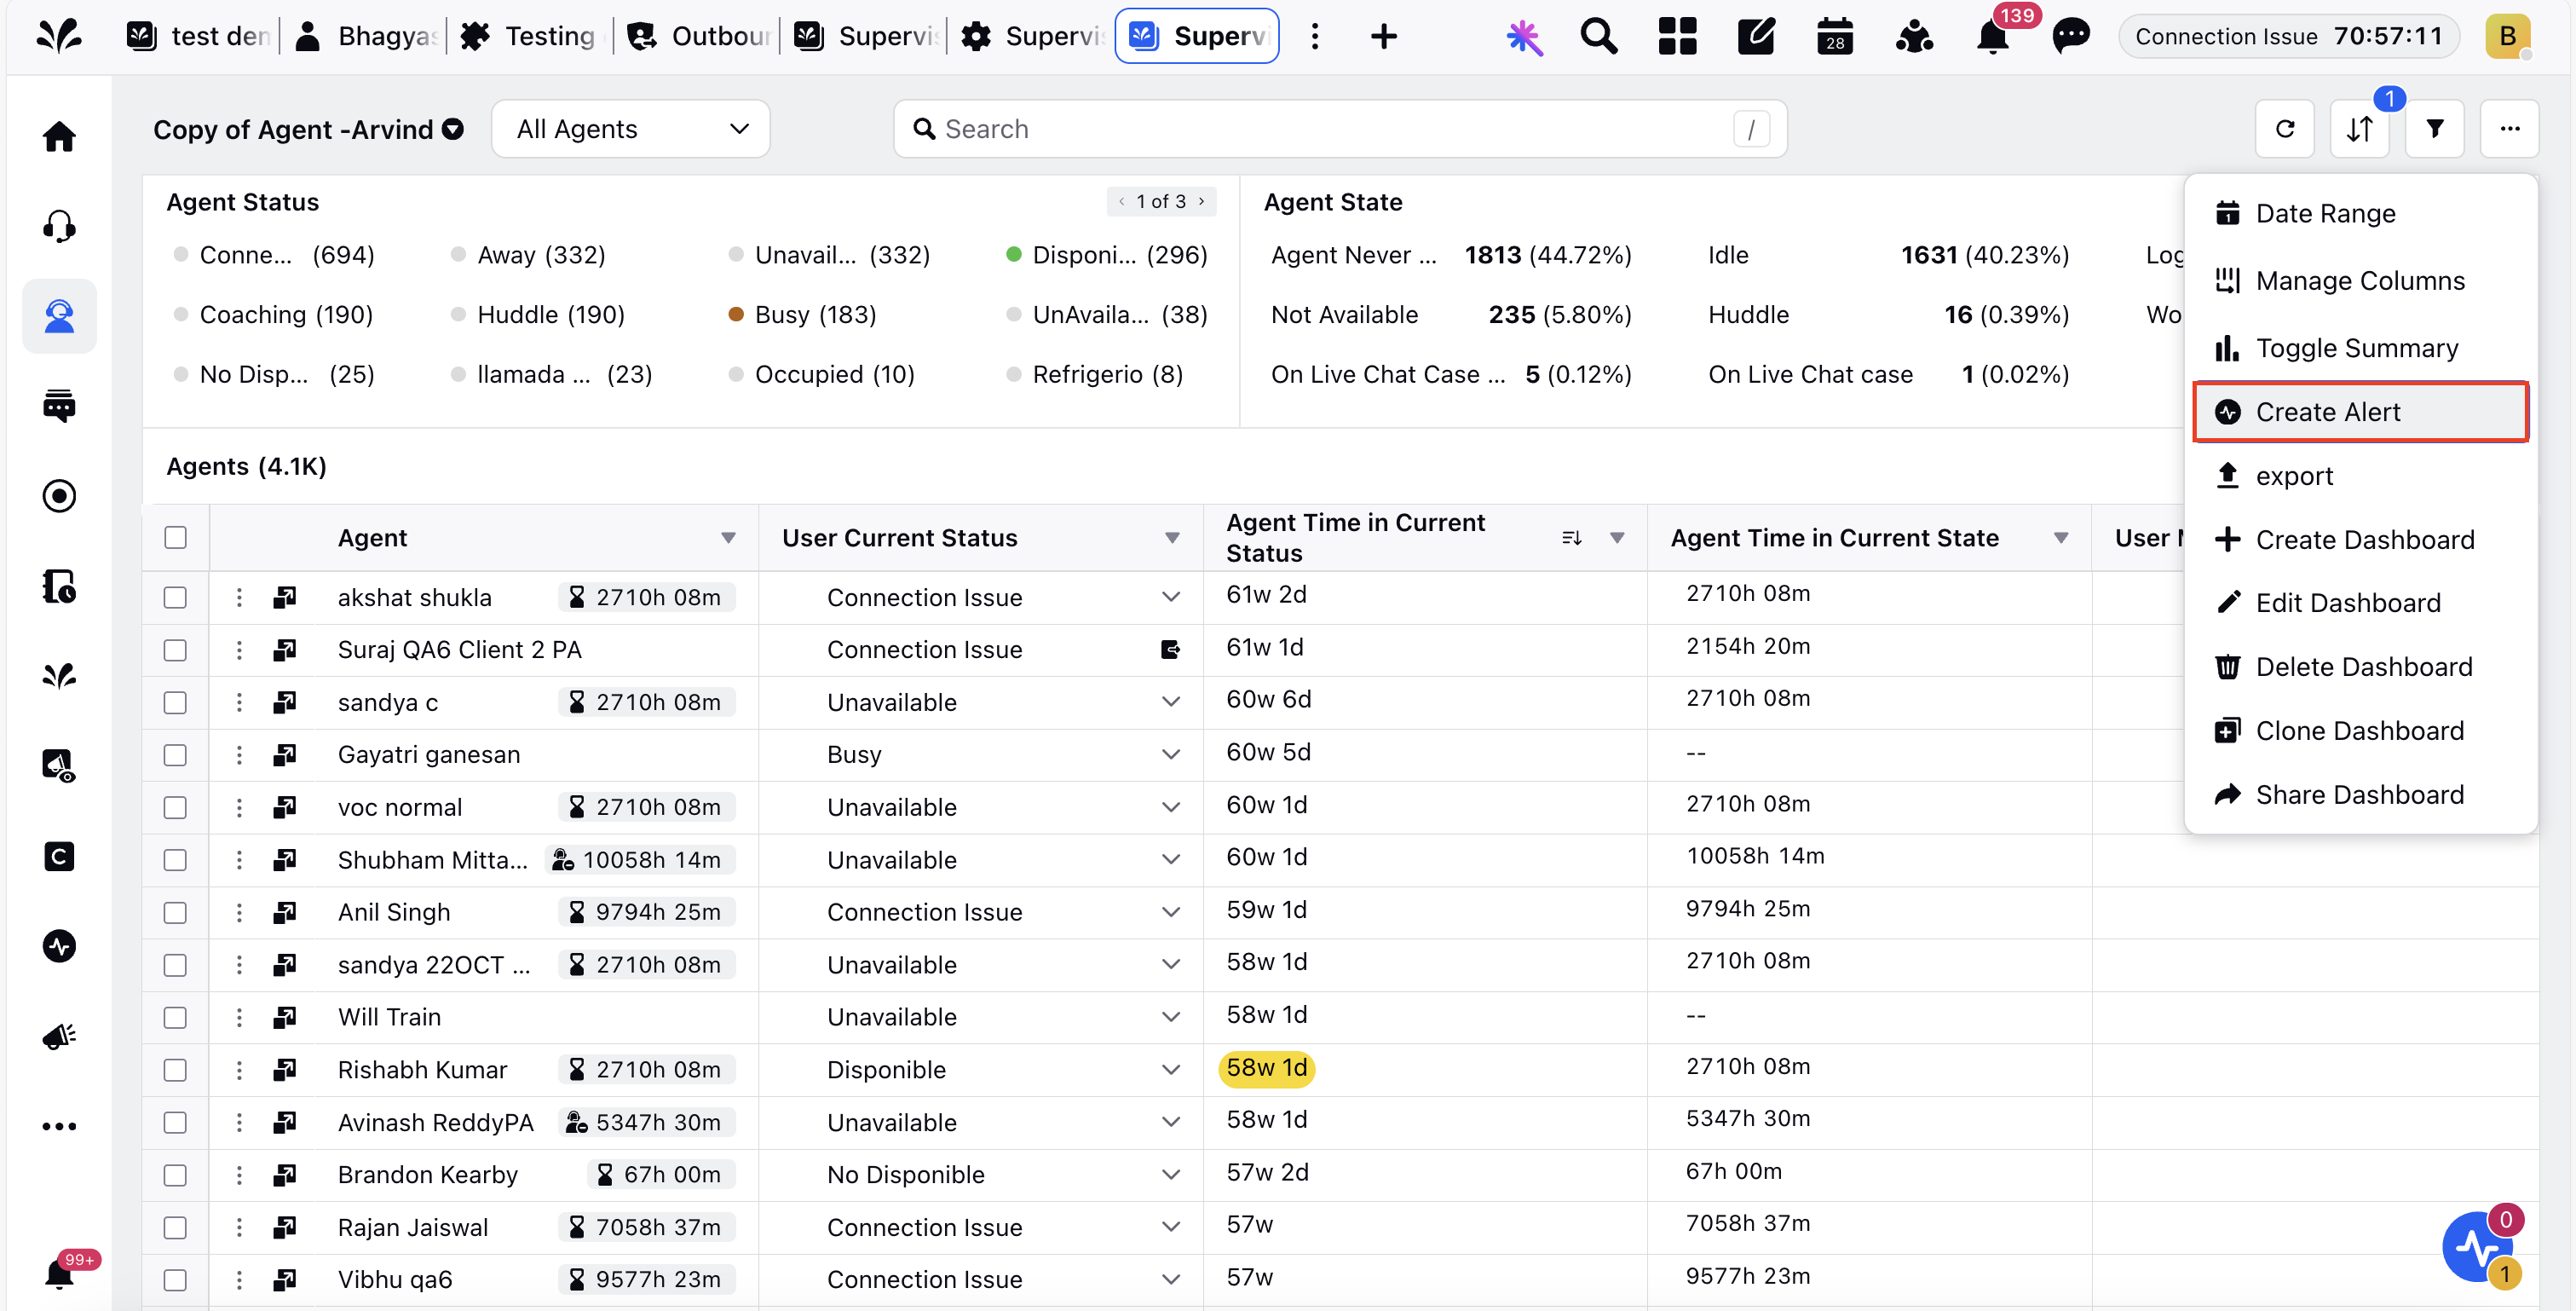
Create Alert
Supervisors can create agent-level alerts directly from the Agent Monitoring screen. This feature enables supervisors to set alerts based on real-time agent activity, SLA breaches, or custom performance criteria without leaving the monitoring dashboard. Alerts can be set for specific agent groups to address issues promptly and efficiently.
To create an alert from the Agent Monitoring screen, follow these steps:
1. Open the Supervisor Console persona app from Launchpad.
2. In the left pane, click Agents.
3. On the Agents screen, click the three-dot icon in the top-right corner.
4. Click Create Alert. The Create Alert window opens.
5. On the Create Alert window, enter the alert details.
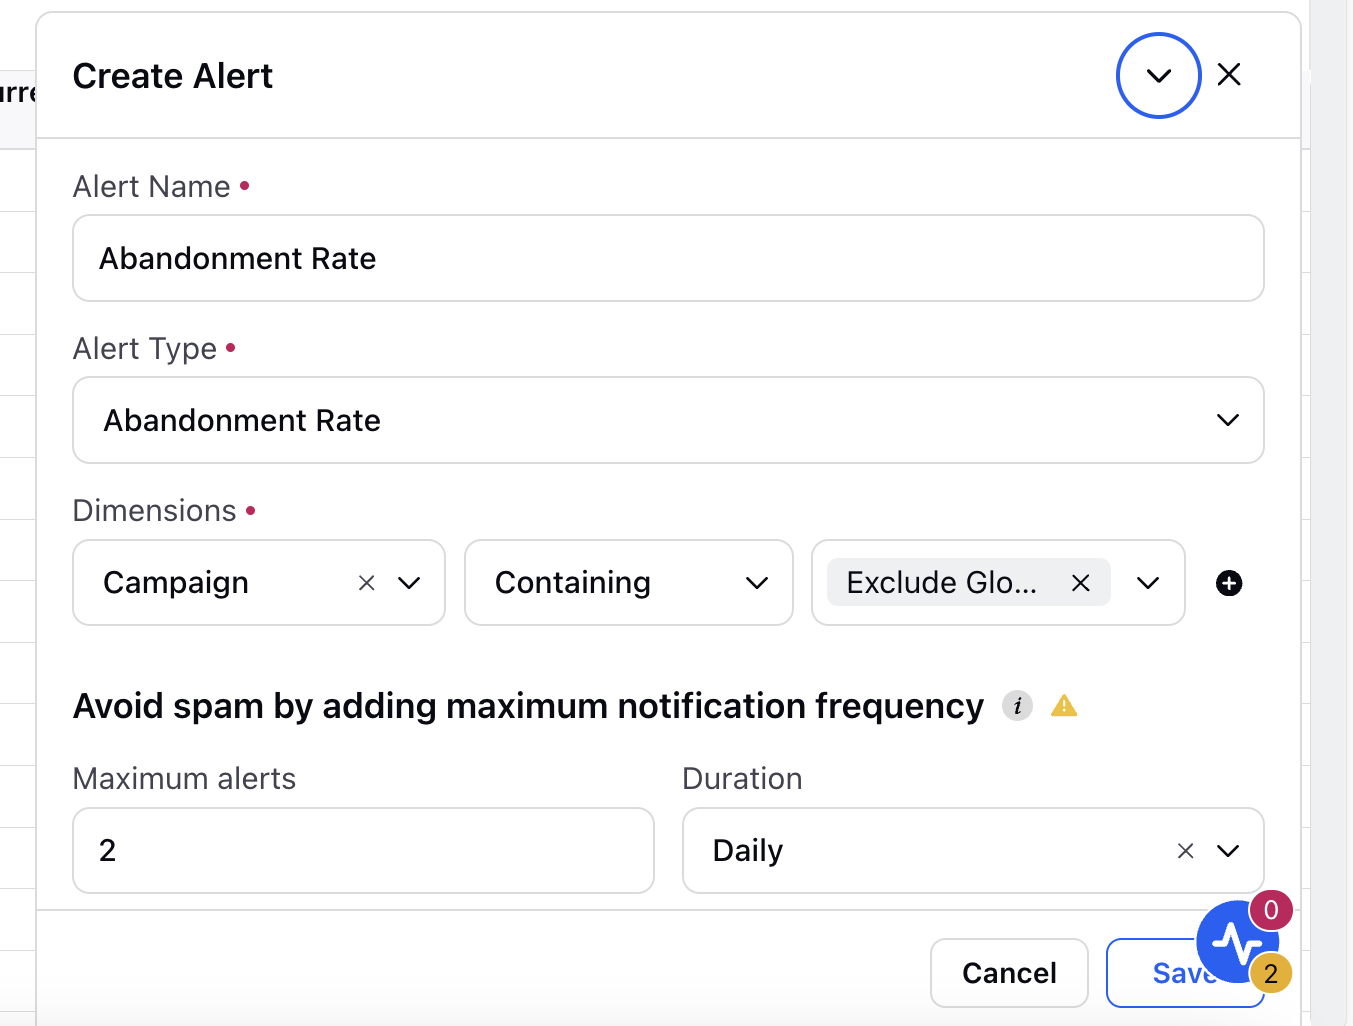
The following table describes the fields on the Create Alert window:
Field | Description |
Alert Name | Provide a name for the alert. |
Alert Type | Select the type of alert. |
Dimensions | Select the dimensions to apply. |
Maximum alerts | Set the maximum number of alerts to be sent to agents. |
Duration | Define the time period during which the alert must be triggered. |
Alerts When Condition Are Met | Specify the condition values and operators (for example, greater than, less than, and more). |
Alert Timeline | Select the timeline for the alert. |
6. Click Save to create the alert.
When the alert conditions are met, the alert is triggered and sent to the agent. You can also manage and edit the alert from the Alert Monitoring screen.
Supervisor Console Metric Adjustments
Hover over the dropdown icon next to the column name to access the list of metric adjustments. You can use these metric adjustments to adjust the value of the columns according to your requirements.
Supervisor Console supports customizing aggregation at the metric level. Each metric comes with a default aggregation and can be adjusted to other types such as sum, minimum, maximum, or average. When enabled, supervisors can choose the most relevant aggregation directly from the live monitoring screens.
![]() Note: Access to metric‑level aggregation customization is controlled by a dynamic property (DP). To enable this capability in your environment, reach out to your Success Manager. Alternatively, you can submit a request at tickets@sprinklr.com.
Note: Access to metric‑level aggregation customization is controlled by a dynamic property (DP). To enable this capability in your environment, reach out to your Success Manager. Alternatively, you can submit a request at tickets@sprinklr.com.

The following table describes the metric adjustments:
Metric Adjustments | Description |
Sort ascending | This option sorts the column data from the smallest to the largest value. The values will depend on the column data. For example, for the Agent column, this option will sort the data in ascending alphabetical order. For Agent Time in Current Status, it will arrange the data from the least time spent by an agent to the highest time spent in a particular status. |
Sort descending | This option sorts the column data from the largest to the smallest value. The values will depend on the column data. For example, for the Agent column, this option will sort the data in descending alphabetical order. For Agent Time in Current Status, it will arrange the data from the highest time spent by an agent to the least time spent in a particular status. |
Aggregate by Sum | This will give the collective amount of time the agent has spent in a particular status. |
Aggregate by Average | This will give the central/average value of the time spent by the agent in the status. |
Aggregate by Minimum | This will give the value of the minimum amount of time spent by the agent in the particular status. |
Aggregate by Max | This will give the value of the maximum amount of time spent by the agent in the particular status. |
Aggregate by % | This will sort the list by taking the value of one user with all other users to calculate the time of status. For example: There are a total of 5 users and each user spent 1 hour in their respective current status. So by taking the value of one user against the remaining 4 users you would get the aggregate value in percentage ⅕ = 20% |
Aggregate by % change | This will give you the aggregate value in percentage by taking up the status value of the current time range with the previous time range. |
Aggregate by change | This is same as above but it will give you the aggregate value in number and not in percentage. |
Pivot Column | It means the primary column and all details in other columns will be dependent on the primary column. |
Freeze Column | You can freeze the column to pin it in the same place and see it when you scroll. |
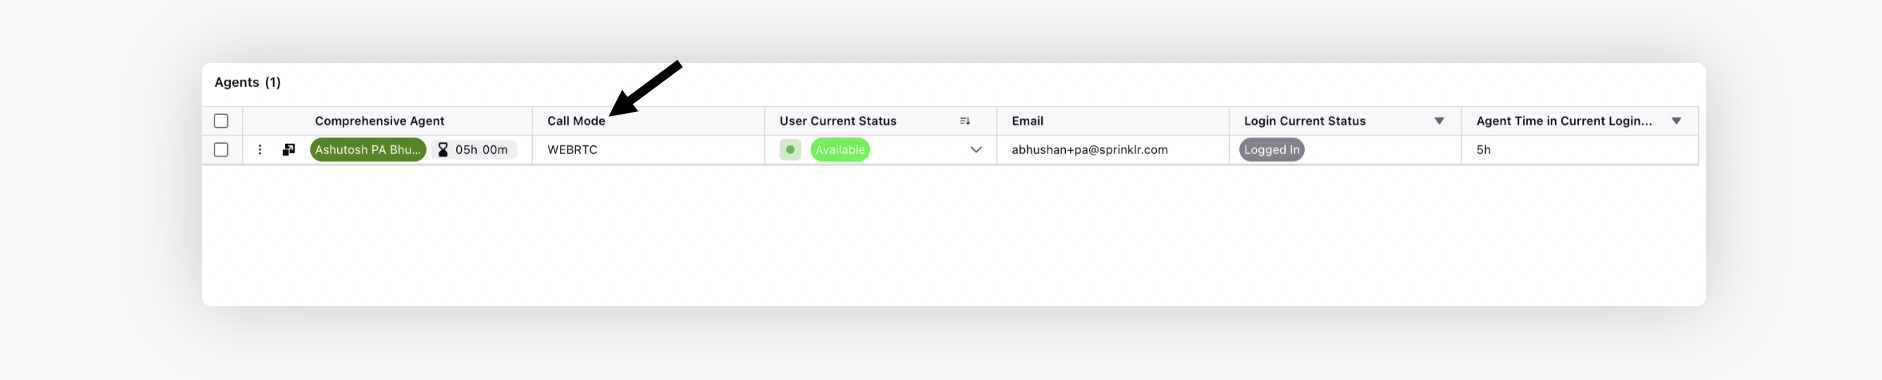
Call Mode Column
Supervisors can view whether an agent is taking calls via PSTN Mode or WebRTC Mode. It helps supervisors track whether calls are being made through the phone or the web.
![]() Note: This feature is available only for clients using Ozonetel as their Telephony Provider.
Note: This feature is available only for clients using Ozonetel as their Telephony Provider.
Access to this feature is controlled by the dynamic property: VOICE_OZONETEL_CALL_MODE_ENABLED. To enable this feature in your environment, reach out to your Success Manager. Alternatively, you can submit a request at tickets@sprinklr.com.
Drill-Down Case Related Metrics
Double-click the desired case-related count metric to open the Case Details third pane. Again, double-click the case card to open the Case third pane.

User Accesibility Filters
The user accessibility filters are applied based on the user type logged into the persona. With these filers, you will able to see the filtered view of agents based on the workspace they are in. To learn more about getting this capability enabled in your environment, please work with your Success Manager.
After enabling this capability, users will be able to do the following:
Global Admin (GA) can access all users of all clients.
Global User (GU) can access WA, WU, GU of that particular client.
Workspace Admin (WA) can access WA, WU of that particular client.
Workspace User (WU) can access WU of that particular client.