Android
Updated
This article walks you through the step-by-step process of integrating Sprinklr Live Chat into your WebView application.
Step 1 - Getting Started
1. Creating WebView and Adding Live Chat URL
Before you begin:
WebView URL: http://prod-live-chat.sprinklr.com/page?appId=65afb12b62317d2d4a58bfad_app_1866548&device=MOBILE&enableClose=true&zoom
In the above URL:
appId=60c1d169c96beb5bf5a326f3_app_950954: Indicates the Live Chat application ID. Reach out to the Sprinklr Services team at tickets@sprinklr.com to get the correct App ID.
device=MOBILE: Indicates that the page is mobile responsive.
enableClose=true: Indicates a close button has been added to Live Chat, on pressing that close button onClose sdk will be called. You will need to set enableClose to true before you try to access it.
zoom=false: Indicates that zoom has been disabled inside the WebView.
![]() Note: To identify the environment where your Sprinklr instance is deployed (for example, prod, prod2, prod4), contact your Success Manager or reach out to Sprinklr Support at tickets@sprinklr.com.
Note: To identify the environment where your Sprinklr instance is deployed (for example, prod, prod2, prod4), contact your Success Manager or reach out to Sprinklr Support at tickets@sprinklr.com.
In your WebView Activity, add the following code snippet.
![]() Note: See Example Projects.
Note: See Example Projects.
Define a private WebView Instance:
private WebView myWebView;private String liveChatUrl = "http://prod-live-chat.sprinklr.com/page?appId=60c1d169c96beb5bf5a326f3_app_950954&device=MOBILE&enableClose=true&zoom=false"; // example URL, use the one provided by Sprinklr
Initialize it in activity’s onCreate method:
@Overrideprotected void onCreate(Bundle savedInstanceState) {super.onCreate(savedInstanceState);setContentView(R.layout.activity_webview); // Webview content view namemyWebView = (WebView) findViewById(R.id.webview); // Webview id inside content viewWebSettings settings = myWebView.getSettings();settings.setDomStorageEnabled(true);settings.setJavaScriptEnabled(true);myWebView.loadUrl(liveChatUrl);}
2. Adding Back Button Handling to Control Hardware Back Button Inside the WebView
Clicking the back button will take you back to the last page within the Live Chat WebView.
private String backHandler = "(function() {"+"window.sprChat('goBack', (canGoBack) => {"+"if(!canGoBack) {"+"AndroidInterface.GoBack && AndroidInterface.GoBack('');"+"}"+"});"+"})();";
@RequiresApi(api = Build.VERSION_CODES.KITKAT)@Overridepublic void onBackPressed() {myWebView.evaluateJavascript(backHandler, new ValueCallback<String>() {@Overridepublic void onReceiveValue(String s) { }});}
![]() Note: To provide the best user experience, it is recommended to hide and show the WebView rather than completely destroying it. Additionally, the WebView should be preloaded in the background so that users do not see a loading state when accessing it for the first time.
Note: To provide the best user experience, it is recommended to hide and show the WebView rather than completely destroying it. Additionally, the WebView should be preloaded in the background so that users do not see a loading state when accessing it for the first time.
3. Adding Support to Allow Users to Add Media Inside WebView
Define variables and in your onCreate method add WebChromeClient and add file choose support.
private ValueCallback<Uri> mUploadMessage;private ValueCallback<Uri[]> mUploadMessageArray;private Uri fileUri;private Uri videoUri;
@Overrideprotected void onCreate(Bundle savedInstanceState) {// Rest of the code added abovemyWebView.setWebChromeClient(new WebChromeClient() {//The undocumented magic method override//Eclipse will swear at you if you try to put @Override here// For Android 3.0+public void openFileChooser(ValueCallback<Uri> uploadMsg) {mUploadMessage = uploadMsg;Intent i = new Intent(Intent.ACTION_GET_CONTENT);i.addCategory(Intent.CATEGORY_OPENABLE);i.setType("image/*");startActivityForResult(Intent.createChooser(i, "File Chooser"), FILECHOOSER_RESULTCODE);}// For Android 3.0+public void openFileChooser(ValueCallback uploadMsg, String acceptType) {mUploadMessage = uploadMsg;Intent i = new Intent(Intent.ACTION_GET_CONTENT);i.addCategory(Intent.CATEGORY_OPENABLE);i.setType("*/*");startActivityForResult(Intent.createChooser(i, "File Browser"),FILECHOOSER_RESULTCODE);}//For Android 4.1public void openFileChooser(ValueCallback<Uri> uploadMsg, String acceptType, String capture) {mUploadMessage = uploadMsg;Intent i = new Intent(Intent.ACTION_GET_CONTENT);i.addCategory(Intent.CATEGORY_OPENABLE);i.setType("image/*");startActivityForResult(Intent.createChooser(i, "File Chooser"), FILECHOOSER_RESULTCODE);}//For Android 5.0+public boolean onShowFileChooser(WebView webView, ValueCallback<Uri[]> filePathCallback,FileChooserParams fileChooserParams) {if (mUploadMessageArray != null) {mUploadMessageArray.onReceiveValue(null);}mUploadMessageArray = filePathCallback;List<Intent> intentList = new ArrayList<Intent>();fileUri = null;videoUri = null;// For photoIntent takePhotoIntent = new Intent(MediaStore.ACTION_IMAGE_CAPTURE);fileUri = getOutputFilename(MediaStore.ACTION_IMAGE_CAPTURE);takePhotoIntent.putExtra(MediaStore.EXTRA_OUTPUT, fileUri);intentList.add(takePhotoIntent);// For videoIntent takeVideoIntent = new Intent(MediaStore.ACTION_VIDEO_CAPTURE);videoUri = getOutputFilename(MediaStore.ACTION_VIDEO_CAPTURE);takeVideoIntent.putExtra(MediaStore.EXTRA_OUTPUT, videoUri);intentList.add(takeVideoIntent);Intent contentSelectionIntent;if (Build.VERSION.SDK_INT >= 21) {final boolean allowMultiple = fileChooserParams.getMode() == FileChooserParams.MODE_OPEN_MULTIPLE;contentSelectionIntent = fileChooserParams.createIntent();contentSelectionIntent.putExtra(Intent.EXTRA_ALLOW_MULTIPLE, allowMultiple);} else {contentSelectionIntent = new Intent(Intent.ACTION_GET_CONTENT);contentSelectionIntent.addCategory(Intent.CATEGORY_OPENABLE);contentSelectionIntent.setType("*/*");}Intent[] intentArray = intentList.toArray(new Intent[intentList.size()]);Intent chooserIntent = new Intent(Intent.ACTION_CHOOSER);chooserIntent.putExtra(Intent.EXTRA_INTENT, contentSelectionIntent);chooserIntent.putExtra(Intent.EXTRA_INITIAL_INTENTS, intentArray);startActivityForResult(chooserIntent, FILECHOOSER_RESULTCODE);return true;}});}private Uri getOutputFilename(String intentType) {String prefix = "";String suffix = "";if (intentType == MediaStore.ACTION_IMAGE_CAPTURE) {prefix = "image-";suffix = ".jpg";} else if (intentType == MediaStore.ACTION_VIDEO_CAPTURE) {prefix = "video-";suffix = ".mp4";}String packageName = this.getPackageName();File capturedFile = null;try {capturedFile = createCapturedFile(prefix, suffix);} catch (IOException e) {e.printStackTrace();}return FileProvider.getUriForFile(this, packageName + ".fileprovider", capturedFile);}private File createCapturedFile(String prefix, String suffix) throws IOException {String timeStamp = new SimpleDateFormat("yyyyMMdd_HHmmss").format(new Date());String imageFileName = prefix + "_" + timeStamp;File storageDir = this.getExternalFilesDir(null);return File.createTempFile(imageFileName, suffix, storageDir);}@Overridepublic void onActivityResult(int i, int i1, Intent intent) {super.onActivityResult(i, i1, intent);handleResult(i, i1, intent);}public boolean handleResult(int requestCode, int resultCode, Intent intent) {boolean handled = false;if (Build.VERSION.SDK_INT >= 21) {if (requestCode == FILECHOOSER_RESULTCODE) {Uri[] results = null;if (resultCode == Activity.RESULT_OK) {if (fileUri != null && getFileSize(fileUri) > 0) {results = new Uri[]{fileUri};} else if (videoUri != null && getFileSize(videoUri) > 0) {results = new Uri[]{videoUri};} else if (intent != null) {results = getSelectedFiles(intent);}}if (mUploadMessageArray != null) {mUploadMessageArray.onReceiveValue(results);mUploadMessageArray = null;}handled = true;}} else {if (requestCode == FILECHOOSER_RESULTCODE) {Uri result = null;if (resultCode == RESULT_OK && intent != null) {result = intent.getData();}if (mUploadMessage != null) {mUploadMessage.onReceiveValue(result);mUploadMessage = null;}handled = true;}}return handled;}private long getFileSize(Uri fileUri) {Cursor returnCursor = getContentResolver().query(fileUri, null, null, null, null);returnCursor.moveToFirst();int sizeIndex = returnCursor.getColumnIndex(OpenableColumns.SIZE);return returnCursor.getLong(sizeIndex);}private Uri[] getSelectedFiles(Intent data) {// we have one files selectedif (data.getData() != null) {String dataString = data.getDataString();if (dataString != null) {return new Uri[]{Uri.parse(dataString)};}}// we have multiple files selectedif (data.getClipData() != null) {final int numSelectedFiles = data.getClipData().getItemCount();Uri[] result = new Uri[numSelectedFiles];for (int i = 0; i < numSelectedFiles; i++) {result[i] = data.getClipData().getItemAt(i).getUri();}return result;}return null;}
4. Initialize Messenger
Sprinklr Messenger can be initialized for both unauthenticated (anonymous) and authenticated users:
For Anonymous Users
If a user is not logged into your mobile app, you can open Live Chat without passing user information. The profile created into sprinklr will be an anonymous user.
For Authenticated Users
If a user is already logged into your mobile app, you can pass the authenticated details securely to the chat to authenticate the user on the chat itself. This process is called pre-authentication. In pre-authentication you can pass following information securely from the mobile app to the chat.
Webview URL (Without Hash Expiry)
URL Parameters:
user_id="pass required value": Indicates the ID that is passed to the user’s profile.
user_firstName="pass required value": Indicates the first name that is passed to the user’s profile.
user_lastName="pass required value": Indicates the last name that is passed to the user’s profile.
user_profileImageUrl="pass required value": Indicates the profile image URL that is passed to the user’s profile.
user_email="pass required value": Indicates the email ID that is passed to the user’s profile.
user_phoneNo="pass required value": Indicates the phone number that is passed to the user’s profile.
user_hash="pass required value": Indicates the hash generated for the user’s profile.
![]() Note: If you want to pass more values, use user context i.e. scenario 3.
Note: If you want to pass more values, use user context i.e. scenario 3.
To know the procedure of how to generate hash, see the How to Generate userHash section below.
Webview URL (With Hash Expiry)
URL Parameters:
user_id="pass required value": Indicates the ID that is passed to the user’s profile.
user_firstName="pass required value": Indicates the first name that is passed to the user’s profile.
user_lastName="pass required value": Indicates the last name that is passed to the user’s profile.
user_profileImageUrl="pass required value": Indicates the profile image URL that is passed to the user’s profile.
user_email="pass required value": Indicates the email ID that is passed to the user’s profile.
user_phoneNo="pass required value": Indicates the phone number that is passed to the user’s profile.
user_hash="pass required value": Indicates the hash generated for the user’s profile.
user_hashCreatedOn=1753948229000: It indicates the timestamp (in epoch milliseconds) when the hash was generated. The hash will only be valid within the configured expiry window (default: ±1 minute), after which it will be considered invalid.
To know the procedure of how to generate hash, see the How to Generate userHash section below.
How to Generate userHash?
The userHash is a generated HMAC (Hash-based Message Authentication Code). Sprinklr uses the sha256 hash function for HMAC generation. To create the userHash, you need to generate an HMAC for a concatenated string of user details, with each detail separated by an underscore (_).
You can generate either a userHash without expiry or a userHash that expires after a specified time.
User Details Without Hash Expiry
userId_firstName_lastName_profileImageUrl_phoneNo_emailExample String (Without Hash Expiry):
12345_John_Doe_https://example.com/profilePic.jpg_9876543210_John.Doe@example.comUser Details With Hash Expiry
For a userHash with expiry, include an additional timestamp (hashCreatedOn) indicating when the hash was created:
userId_firstName_lastName_profileImageUrl_phoneNo_email_hashCreatedOnExample String (With Hash Expiry):
12345_John_Doe_https://example.com/profilePic.jpg_9876543210_shane.warne@gmail.com_1753948567000Sample code for generating the HMAC is available for the following languages:
![]() Note: Consider the following points:
Note: Consider the following points:
firstName, hash and one of email or phoneNumber are mandatory
User details are supposed to be concatenated to form a string, separated by underscore as shown below:
userId_firstName_lastName_profileImageUrl_phoneNo_email
If you don’t have a few values, you need not send anything but keep the underscores as is. For example, let’s say you don’t have profileimageUrl, there will be 2 underscores after lastName. The string will be as shown below:
userId_firstName_lastName__phoneNo_email
Step 2 - Configurations
1. Localization Support
To achieve localization in Live Chat via WebView approach, you can pass certain “locale” string in query parameters of URL; this will be in addition to ones discussed in Step 1.
In the above URL:
locale = en: Indicates the locale which you want to send for this app ID.
2. Opening Live Chat with Different Landing Screen
To open live chat in different states at different locations, you can use pass the relevant string in the query parameters of URL; this will be in addition to ones discussed in Step 1.
Scenario 1: Directly landing on the home screen
Scenario 2: Directly landing on the new conversation screen
In the above URL:
scope=CONVERSATION: Indicates the the scope of live chat is limited to conversation screen.
landingScreen=NEW_CONVERSATION: Indicates the landing screen i.e. new conversation is opened.
Scenario 3: Directly landing on the last conversation screen
In the above URL:
scope=CONVERSATION: Indicates that the scope of Live Chat is limited to the conversation screen.
landingScreen=LAST_CONVERSATION: Indicates that the landing screen. This opens the last active conversation.
![]() Note: Setting landingScreen to LAST_CONVERSATION allows brands to get users to land the customer on the last interacted open conversation. If there are no open conversations, the customer lands on a new conversation window.
Note: Setting landingScreen to LAST_CONVERSATION allows brands to get users to land the customer on the last interacted open conversation. If there are no open conversations, the customer lands on a new conversation window.
3. Passing Contextual Information of Users to Live Chat from Mobile
Scenario 1: Capture customer context from the mobile app on all cases of the user
Sometimes you might want to pass some contextual information in case custom fields for all conversations started by the user. (clientContext)
In the above URL,
context_fieldId=“pass required value”: Indicates the context which is passed to all cases of user.
Scenario 2: Update the profile context from mobile app on profile of user
Sometimes you might want to capture some context on the profile/user during the conversation or after the conversation. (userContext)
In the above URL,
userContext_fieldId=“pass required value”: Indicates the context which is passed to profile of user.
4. Adding Javascript Interface to Listen to WebView Events
WebAppInterface.java
import android.app.Activity;import android.content.Context;import android.util.Log;import android.webkit.JavascriptInterface;public class WebAppInterface {Context mContext;// Instantiate the interface and set the contextWebAppInterface(Context c) {mContext = c;}// Show a toast from the web page@JavascriptInterfacepublic void Close(String close) {((Activity) mContext).finish(); //Instead of closing the webview, it is recommended to hide webview for best user experience}@JavascriptInterfacepublic void GoBack(String goBack) {((Activity) mContext).finish(); //Instead of closing the webview, it is recommended to hide webview for best user experience}@JavascriptInterfacepublic void OnUnreadCountChange(String count) {// You can show the notification count using this}@JavascriptInterfacepublic void OnLoadError(String error) {// You can show some ui error}@JavascriptInterfacepublic void OnExternalEventReceived(String event) {// Handle the event here}}
Adding JavaScript channels to your WebView. This should also be done inside onCreate.
myWebView.addJavascriptInterface(new WebAppInterface(this), "AndroidInterface");
Injecting JavaScript
private String jsChannels = "(function() {" +"window.sprChat('onLoad', (error) => {"+"if(!error) {"+"AndroidInterface.OnLoadError && AndroidInterface.OnLoadError('');"+"}"+"});"+"window.sprChat('onClose', () => {"+"AndroidInterface.Close && AndroidInterface.Close('');"+"});"+"window.sprChat('onUnreadCountChange', (count) => {" +"AndroidInterface.OnUnreadCountChange && AndroidInterface.OnUnreadCountChange(count.toString());"+"});"+"window.sprChat('onExternalEvent', (event) => {" +"AndroidInterface.OnExternalEventReceived && AndroidInterface.OnExternalEventReceived(JSON.stringify(event));"+"});"+"})();";
5. Blocking URLs Which Does Not Contain Live Chat URL Domain to Open it in the External Browser
Add WebView client to your WebView and override shouldOverrideUrlLoading to block all URLs that do not contain Live Chat URL domain inside the onCreate method.
private String[] domainsToWhiteList = {"prod-live-chat.sprinklr.com", "live-chat-static.sprinklr.com"}; // urls to whitelist, to ensure these are opened in app webview
myWebView.setWebViewClient(new WebViewClient() {@Overridepublic boolean shouldOverrideUrlLoading(WebView view, String url) {boolean isWhitelistUrl = false;for (String domain : domainsToWhiteList) {if(url.contains(domain)) {isWhitelistUrl = true;}}if(isWhitelistUrl) {view.loadUrl(url);} else {Intent i = new Intent(Intent.ACTION_VIEW, Uri.parse(url));startActivity(i);}return true;}});
6. Add Support to Download Attachment
When a user taps the Download button in Live Chat, they are redirected to a URL which contains the fileUrl and fileName parameters.
The URL can have the following formats:
livechat-app:url=${fileUrl}?fileName=${fileName}: When there are no query parameters present in fileUrl, add fileName as a new query parameter.
“livechat-app:url=${fileUrl}&fileName=${fileName}: When there are query parameters present in fileUrl already, add fileName as an extra query parameter.
You need to intercept the requests that have URLs starting with the livechat-app: prefix and parse these URLs to properly download the attachment. The steps to parse are:
Strip the livechat-app:url= prefix.
From the remaining URL, extract and remove the fileName query parameter. Use its value to name your file.
Using the remaining URL to fetch and download content.
![]() Note: While extracting the fileURL, remove the fileName query parameter from the original query. If it’s not removed, a signature mismatch may occur, resulting in a SignatureDoesNotMatch or BlobNotFound error.
Note: While extracting the fileURL, remove the fileName query parameter from the original query. If it’s not removed, a signature mismatch may occur, resulting in a SignatureDoesNotMatch or BlobNotFound error.
For example, when receiving a URL like “livechat-app:url= https://prod-sprcdn-assets.sprinklr.com/1234/sample.pdf?signature=XYZ&fileName=sample_name.pdf”, follow these steps.
Remove the prefix to get “https://prod-sprcdn-assets.sprinklr.com/1234/sample.pdf?signature=XYZ& fileName=sample_name.pdf”
Extract the fileName query parameter and name the file sample_name.pdf.
Use the remaining URL “https://prod-sprcdn-assets.sprinklr.com/1234/sample.pdf?signature=XYZ” to download the file.
@Overridepublic boolean shouldOverrideUrlLoading(WebView view, WebResourceRequest request) {boolean isWhitelistUrl = false;String url = request.getUrl().toString();if (url.contains("livechat-app:")) {String strippedUrl = url.replace("livechat-app:url=", "");URI uri = new URI(strippedUrl);String query = uri.getQuery();String fileName = null;String[] pairs = query.split("&");ArrayList < String > newQueryPairs = new ArrayList < > ();for (String pair: pairs) {int idx = pair.indexOf("=");String key = idx > 0 ? pair.substring(0, idx) : pair;String value = idx > 0 && pair.length() > idx + 1 ? pair.substring(idx + 1) : null;if ("fileName".equals(key)) {fileName = value;} else {newQueryPairs.add(pair);}}String newQuery = String.join("&", newQueryPairs);URI newUri = new URI(uri.getScheme(),uri.getAuthority(),uri.getPath(),newQuery,uri.getFragment());String cdnUrl = newUri.toString();//put your download logic here}else {Intent i = new Intent(Intent.ACTION_VIEW, Uri.parse(url));startActivity(i);}return true;}
Step 3 - Push Notifications
For more information on mobile push notifications, refer to Push Notifications in Mobile.
Prerequisite
Android: Google service.json file
iOS: APNS certificate (P12) along with its credentials
![]() Note: Consider the following points:
Note: Consider the following points:
Google service.json file can be different for staging/prod env
APNS certificate (P12) and its credentials must be different for staging/prod env
If you are testing the push notification setup on prod mobile application (iOS), ensure to use Test Flight build
If the Google service.json file is different for sandbox/prod env and you are testing the push notification setup on prod mobile application(Android), ensure to use test flight build
Configuration
To enable push notifications, raise a support ticket to tickets@sprinklr.com with the following information:
Google service.json file
APNS certificate (P12) along with its credentials
Live Chat AppID
Partner ID
Env
1) Register for Push Notifications
You can register the messenger for sending push notifications by providing push token received from fcm as below:
![]() Note: Registration must only be initiated after the load is complete.
Note: Registration must only be initiated after the load is complete.
Create a function in the following way and pass token, deviceId and deviceName as arguments to it to register your device for push notification.
private String getTokenRegistrationJSChannel(String token, String deviceId, String deviceName) {JSONObject obj=new JSONObject();try {obj.put("deviceId", deviceId);obj.put("deviceToken", token);obj.put("appVersion", 1);obj.put("deviceName", deviceName);obj.put("mobileClientType", "ANDROID");String stringifiedPayload = obj.toString();return"(function() {"+"window.sprChat('registerDevice'," + stringifiedPayload + ");"+"})();";} catch (JSONException e) {e.printStackTrace();return "";}}
myWebView.evaluateJavascript(getTokenRegistrationJSChannel("1234", "123", "android_device"), new ValueCallback<String>() {@Overridepublic void onReceiveValue(String s) { }});
2) Unregister for Push Notifications
If you ever want to stop receiving notifications, then you can deregister your device in the following way:
private String getTokenUnregistrationJSChannel(String deviceId, String deviceName) {JSONObject obj=new JSONObject();try {obj.put("deviceId", deviceId);obj.put("appVersion", 1);obj.put("deviceName", deviceName);obj.put("mobileClientType", "ANDROID");String stringifiedPayload = obj.toString();return"(function() {"+"window.sprChat('unregisterDevice'," + stringifiedPayload + ");"+"})();";} catch (JSONException e) {e.printStackTrace();return "";}}
myWebView.evaluateJavascript(getTokenUnregistrationJSChannel("123", "android_device"), new ValueCallback<String>() {@Overridepublic void onReceiveValue(String s) { }});
3) Handle Messenger Push Notifications
Once you have registered for messenger push notifications then you might receive notifications from your platform as well as messenger. To check if notification is messenger notification you can check as below:
![]() Note: When the user is on the Live Chat app, they will always receive the Live Chat messenger push notifications. However, you can define whether users should receive the messenger notifications when they are on the brand app and not the Live Chat app. That is, the brand app is in the foreground and the Live Chat app is running in the background.
Note: When the user is on the Live Chat app, they will always receive the Live Chat messenger push notifications. However, you can define whether users should receive the messenger notifications when they are on the brand app and not the Live Chat app. That is, the brand app is in the foreground and the Live Chat app is running in the background.
To do that, you can check whether the notification is a Live Chat notification and handle it according to brand requirements. For example, you can choose not to display Live Chat notifications when the user is on the brand app.
String et = notification.getString("et", "");Boolean isMessengerNotification = et.equals("LIVE_CHAT_MOBILE_NOTIFICATION");if (isMessengerNotification) {handleNotification(notification);}
Once you have identified if the notification is messenger notification you need open the messenger and call handle notification method as described below:
private void handleNotification(Bundle notification) {JSONObject json = new JSONObject();Set<String> keys = notification.keySet();for (String key : keys) {try {if (Build.VERSION.SDK_INT >= Build.VERSION_CODES.KITKAT) {json.put(key, JSONObject.wrap(notification.get(key)));}} catch(JSONException e) {//Handle exception here}}String stringifiedPayload = json.toString();String sdkFunction = "(function() {"+"window.sprChat('onNotification'," + stringifiedPayload + ");"+"})();";myWebView.evaluateJavascript(sdkFunction, new ValueCallback<String>() {@Overridepublic void onReceiveValue(String s) { }});}
Troubleshooting
This section lists the common issues and their resolutions:
Issue 1: Sprinklr WebView URL Not Working
Resolution:
Check network connection is establishing or not. To verify this, you can simply try to open google.com in your WebView.
Check whitelisting is done properly in Live Chat builder in Sprinklr platform.
Steps: Sprinklr Service → Live Chat Care → “ three dots” next to your Live chat Application → Edit → Application Configuration Screen
Check example URLs are loading like https://prod0-live-chat.sprinklr.com/page?appId=app_1000073145

Issue 2: Live Chat Not Showing Up While Passing Authenticated User Details
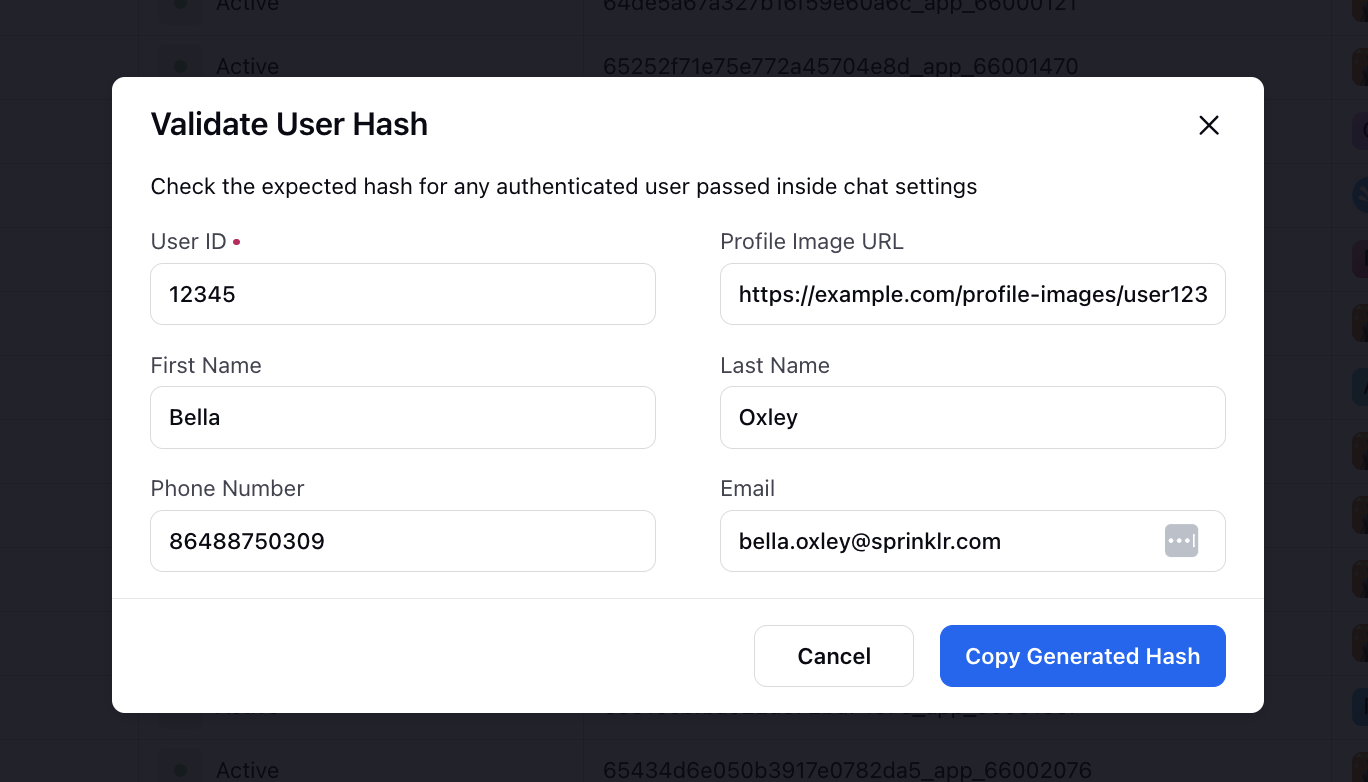
Check the expected hash for any authenticated user passed inside chat settings.
Hover over the Options icon alongside your Live Chat Application and select Validate User Hash.

On the Validate User Hash window, enter User ID, Profile Image URL, First Name, Last Name, Phone Number and Email. Click Copy Generated Hash and verify it with the hash generated by you.
Issue 3: Attachment Icon Not Working
Check whether the user has necessary permissions like storage and camera permissions
Check step 4
Issue 4: Reply Box is Not Showing with Keypad
Check and add this configuration in AndroidManifest.xml: android:windowSoftInputMode="adjustResize"
Refer here for more details: https://developer.android.com/develop/ui/views/touch-and-input/keyboard-input/visibility#Respond
Issue 5: No Sound During Audio/Video Calls
If you are unable to hear any sound in an audio/video call, make sure that you have added the following configuration to the WebView:
webView.getSettings().setMediaPlaybackRequiresUserGesture(false);