Flutter
Updated
This article walks you through the step-by-step process of integrating Sprinklr Live Chat into your Flutter WebView application.
Package Dependency
flutter_inappwebview: ^6.1.5Step 1 - Getting Started
To integrate Sprinklr Live Chat into your Flutter WebView application, you’ll first configure the WebView with the Live Chat URL. This URL acts as the entry point for the chat widget and includes parameters that define its behavior. Once the WebView is set up, you can enable JavaScript, DOM storage, and caching.
1. Creating WebView and Adding Live Chat URL
Before you begin, use the following WebView URL to initialize Sprinklr Live Chat in your Flutter application. This link defines the chat widget’s behavior through parameters such as app ID, device type, and UI options.
WebView URL:
http://prod-live-chat.sprinklr.com/page?appId=65afb12b62317d2d4a58bfad_app_1866548&device=MOBILE&enableClose=true&zoomParameters
The above WebView URL includes the following parameters:
Parameter | Example Usage | Description |
appId | appId=60c1d169c96beb5bf5a326f3_app_950954 | Indicates the Live Chat application ID. To get the app ID, reach out to Sprinklr Support at tickets@sprinklr.com. |
device | device=MOBILE | Indicates whether the page is mobile responsive. |
enableClose | enableClose=true | Indicates that a close button has been added to the Live Chat. When the user taps the close button, the onClose SDK callback will be triggered. You will need to set enableClose to true before you try to access it. |
zoom | zoom=false | Indicates zoom has been disabled inside the WebView. |
![]() Note: To identify the environment where your Sprinklr instance is deployed (for example, prod, prod2, prod4), contact your Success Manager or reach out to Sprinklr Support at tickets@sprinklr.com.
Note: To identify the environment where your Sprinklr instance is deployed (for example, prod, prod2, prod4), contact your Success Manager or reach out to Sprinklr Support at tickets@sprinklr.com.
In your Flutter WebView page, add the following code snippets.
2. Import InAppWebView
Import the required libraries, including the flutter_inappwebview package, and define the Live Chat URL constant in your Flutter project.
import 'dart:convert';import 'dart:io';import 'package:flutter/material.dart';import 'package:flutter_inappwebview/flutter_inappwebview.dart';const liveChatUrl ='http://prod-live-chat.sprinklr.com/page?appId=60c1d169c96beb5bf5a326f3_app_950954&device=MOBILE&enableClose=true&zoom=false&webview=true'; // example url, use one provided by Sprinklr
3. Render InAppWebView
Render the WebView and enable JavaScript, DOM storage, and caching.
class LiveChatWebView extends StatefulWidget {const LiveChatWebView({super.key});@overrideState<LiveChatWebView> createState() => _LiveChatWebViewState();}class _LiveChatWebViewState extends State<LiveChatWebView> {InAppWebViewController? _controller;bool _chatChannelsAdded = false;@overrideWidget build(BuildContext context) {return InAppWebView(initialUrlRequest: URLRequest(url: WebUri(liveChatUrl),),initialSettings: InAppWebViewSettings(javaScriptEnabled: true,domStorageEnabled: true,cacheEnabled: true,useShouldOverrideUrlLoading: true,regexToCancelSubFramesLoading: 'livechat-app.*',),onWebViewCreated: (controller) {_controller = controller;controller.addJavaScriptHandler(handlerName: 'chatHandler',callback: (args) {final raw = args.isEmpty ? '{}' : args.first.toString();final eventData = jsonDecode(raw) as Map<String, dynamic>;onLiveChatMessage(eventData);},);},);}void onLiveChatMessage(Map<String, dynamic> eventData) {// Handle Live Chat events here.}}
4. Adding Back Button Handling
Add logic to control the hardware back button inside the WebView. This ensures users can navigate backward within the Live Chat flow or gracefully exit when no further navigation is possible. Clicking the back button will take the user back to the last page within the Live Chat WebView.
const goBackJavascript = '''(function() {function notifyClosed() {if (window.flutter_inappwebview &&typeof window.flutter_inappwebview.callHandler === 'function') {window.flutter_inappwebview.callHandler('chatHandler',JSON.stringify({type: 'closed'}));return false;}return true;}if (typeof window.sprChat !== 'function') {return notifyClosed();}window.sprChat('goBack', function(canGoBack) {if (!canGoBack) {notifyClosed();}});return false;})();''';
Handle this event in the WebView JavaScript handler:
void onLiveChatMessage(Map<String, dynamic> eventData) {switch (eventData['type']) {// ... other casescase 'closed':// Instead of closing the WebView, it is recommended to hide WebView for best user experience.break;// ... other casesdefault:break;}}
5. Add Permissions
To support media uploads (camera, microphone, gallery), declare the required permissions in your Android and iOS project files.
Android
If you are supporting upload media functionality in messenger, include the following permissions in AndroidManifest.xml:
<uses-permission android:name="android.permission.READ_EXTERNAL_STORAGE" /><uses-permission android:name="android.permission.WRITE_EXTERNAL_STORAGE" /><uses-permission android:name="android.permission.CAMERA" /><uses-permission android:name="android.permission.RECORD_AUDIO" /><uses-permission android:name="android.permission.READ_MEDIA_IMAGES" /><uses-permission android:name="android.permission.READ_MEDIA_VIDEO" /><uses-permission android:name="android.permission.POST_NOTIFICATIONS" />
Permissions
Permission | Description | Required/Optional | Scope |
READ_EXTERNAL_STORAGE | Allows the app to read from external storage. | Required | Media Upload |
WRITE_EXTERNAL_STORAGE | Allows the app to write to external storage. | Required | Media Upload |
CAMERA | Grants access to the device camera. | Optional | Media Upload (photo/video capture) |
RECORD_AUDIO | Grants access to the microphone. | Optional | Media Upload (video/audio recording) |
READ_MEDIA_IMAGES | Allows the app to read image files from media storage. | Required | Media Upload |
READ_MEDIA_VIDEO | Allows the app to read video files from media storage. | Required | Media Upload |
POST_NOTIFICATIONS | Allows the app to send push notifications. | Optional | Notifications |
iOS
If you are supporting upload media functionality in messenger, include the following permissions in Info.plist file:
<key>NSCameraUsageDescription</key><string>Messenger app requires access to the camera to capture the photos.</string><key>NSMicrophoneUsageDescription</key><string>Messenger app requires access to the microphone to record video.</string><key>NSPhotoLibraryUsageDescription</key><string>Messenger app requires access to the photos library.</string>
Permissions
Permission | Description | Required/Optional | Scope |
NSCameraUsageDescription | Messenger app uses this permission to access the device camera for capturing photos or videos. | Optional (only needed if video call or media sharing is enabled in Live Chat) | Video Call, Media Upload |
NSMicrophoneUsageDescription | Messenger app uses this permission to access the microphone for recording audio or video. | Optional (only needed if video call or video sharing is enabled in Live Chat) | Video Call, Media Upload |
NSPhotoLibraryUsageDescription | Messenger app uses this permission to access the photos library for selecting and sharing media. | Optional (only needed if gallery sharing is enabled in Live Chat) | Media Upload |
5. Initialize Messenger
Live Chat can be initialized for different types of users depending on your application’s authentication flow. You can open chat sessions for anonymous users (unauthenticated, no user details passed), for authenticated users (pre‑authentication with secure user context), or for custom authenticated users (using specific attributes and hash values).
For Anonymous Users
If a user is not logged into your mobile app, you can open live chat without passing user information. The profile created into sprinklr will be an anonymous user.
WebView URL:
http://prod-live-chat.sprinklr.com/page?appId=65afb12b62317d2d4a58bfad_app_1866548&device=MOBILE&enableClose=true&zoomFor Authenticated Users
If a user is already logged into your mobile app, you can pass the authenticated details securely to the chat to authenticate the user on the chat itself. This process is called pre-authentication. In pre-authentication you can pass following information securely from the mobile app to the chat.
You can use two types of WebView URLs:
Without Hash Expiry: The hash does not expire.
With Hash Expiry: The hash expires after a certain period of time.
WebView URL (Without Hash Expiry):
http://prod-live-chat.sprinklr.com/page?appId=65afb12b62317d2d4a58bfad_app_1866548&device=MOBILE&enableClose=true&zoom&user_id=12345&user_firstName=John&user_lastName=Doe&user_profileImageUrl=https://example.com/profilePic.jpg&user_email=John.Doe@example.com&user_phoneNo=9876543210&user_hash=29862e418f58273af0f7fcd0f24652e11ec1ff6c2213b2db7f6e754e59778fc3 Parameters
Parameter | Example Usage | Description | Required/Optional |
appId | appId=65afb12b62317d2d4a58bfad_app_1866548 | Unique identifier of the Live Chat app. Provided by Sprinklr. | Required |
environment | env=PROD2 | Environment identifier. Provided by Sprinklr (e.g., PROD2). | Required |
locale | locale=en | Sets the language/locale for the messenger. Default: en. | Required |
user_id | user_id=12345 | Indicates the ID passed to the user profile. | Required |
user_firstName | user_firstName=John | Indicates the first name passed to the user profile. | Optional |
user_lastName | user_lastName=Doe | Indicates the last name passed to the user profile. | Optional |
user_profileImageUrl | user_profileImageUrl=https://example.com/profilePic.jpg | Indicates the profile image URL passed to the user profile. | Optional |
user_email | user_email=John.Doe@example.com | Indicates the email ID passed to the user profile. | Optional |
user_phoneNo | user_phoneNo=9876543210 | Indicates the phone number passed to the user profile. | Optional |
user_hash | user_hash=29862e418f58273af0f7fcd0f24652e11ec1ff6c2213b2db7f6e754e59778fc3 | Indicates the hash generated for the user profile. To know the procedure of how to generate hash, see the How to Generate userHash section below. | Required |
![]() Note: If you want to pass more values, use user context, that is, 2. Configuration Step 3.
Note: If you want to pass more values, use user context, that is, 2. Configuration Step 3.
WebView URL (With Hash Expiry):
https://live-chat-static.sprinklr.com/test-html/index.html?appId=65a90fd538dc261664c2435e_app_66003823&env=qa6&user_email=John.Doe@gmail.com&user_firstName=John&user_lastName=Doe&user_profileImageUrl=https://example.com/profilePic.jpg&user_phoneNo=9876543210&user_id=12345&user_hash=38a2383cab7249334021910b44a021c3c712e6ba401ecc2ed566c0cc2ba00d58&user_hashCreatedOn=1753948229000Parameters
Parameter | Example Usage | Description | Required/Optional |
appId | appId=65afb12b62317d2d4a58bfad_app_1866548 | Unique identifier of the Live Chat app. Provided by Sprinklr. | Required |
environment | env=PROD2 | Environment identifier. Provided by Sprinklr (e.g., PROD2). | Required |
locale | locale=en | Sets the language/locale for the messenger. Default: en. | Required |
user_id | user_id=12345 | Indicates the ID passed to the user profile. | Required |
user_firstName | user_firstName=John | Indicates the first name passed to the user profile. | Optional |
user_lastName | user_lastName=Doe | Indicates the last name passed to the user profile. | Optional |
user_profileImageUrl | user_profileImageUrl=https://example.com/profilePic.jpg | Indicates the profile image URL passed to the user profile. | Optional |
user_email | user_email=John.Doe@example.com | Indicates the email ID passed to the user profile. | Optional |
user_phoneNo | user_phoneNo=9876543210 | Indicates the phone number passed to the user profile. | Optional |
user_hash | user_hash=29862e418f58273af0f7fcd0f24652e11ec1ff6c2213b2db7f6e754e59778fc3 | Indicates the hash generated for the user profile. | Required |
user_hashCreatedOn | user_hashCreatedOn=1753948229000 | Timestamp (epoch ms) when the hash was generated. Valid only within the configured expiry window (default: ±1 minute). | Optional |
![]() Note: If you want to pass more values, use user context, that is, 2. Configuration Step 3.
Note: If you want to pass more values, use user context, that is, 2. Configuration Step 3.
To know the procedure of how to generate hash, see the How to Generate userHash section below.
For Authenticated Custom Users
This step is done to create a custom user using any custom or specific attributes. In other words, it involves creating user accounts with personalized details or characteristics.
Below is the example to initiate the process with custom attributes and Hash, where you can pass the attributes values:
Custom Attribute 1
Custom Attribute 2
Hash
WebView URL (Without Hash Expiry)
https://prod-live-chat.sprinklr.com/page?appId=6465dce790a15f43312fda6e_app_1702111&device=MOBILE&customUser_tokenA=12345&customUser_tokenB=54321&customUser_hash=4df78ed636fbd333269ebe063f013b47d8ec273f3051f99d4f7645a432f2d326![]() Note: If you want to implement a Custom User Authentication Flow, contact Sprinklr Support at tickets@sprinklr.com to initiate discussions about the implementation process.
Note: If you want to implement a Custom User Authentication Flow, contact Sprinklr Support at tickets@sprinklr.com to initiate discussions about the implementation process.
Parameters
Parameter | Example Usage | Description | Required/Optional |
appId | appId=6465dce790a15f43312fda6e_app_1702111 | Unique identifier of the Live Chat app. Provided by Sprinklr. | Required |
device | device=MOBILE | Specifies the device type (e.g., MOBILE, WEB). | Required |
customUser_tokenA | customUser_tokenA=12345 | Custom attribute token used to pass specific user attributes for custom authentication. Multiple tokens (customUser_tokenA, customUser_tokenB, etc.) can be added as needed. | Required (at least one) |
customUser_hash | customUser_hash=4df78ed636fbd333269ebe063f013b47d8ec273f3051f99d4f7645a432f2d326 | Hash generated for the custom user profile. Ensures secure validation. | Required |
WebView URL (With Hash Expiry):
https://prod-live-chat.sprinklr.com/page?appId=6465dce790a15f43312fda6e_app_1702111&device=MOBILE&customUser_tokenA=12345&customUser_tokenB=54321&customUser_hash=4df78ed636fbd333269ebe063f013b47d8ec273f3051f99d4f7645a432f2d326&customUser_hashCreatedOn=1753948229000Parameters
Parameter | Example Usage | Description | Required/Optional |
appId | appId=6465dce790a15f43312fda6e_app_1702111 | Unique identifier of the Live Chat app. Provided by Sprinklr. | Required |
device | device=MOBILE | Specifies the device type (e.g., MOBILE, WEB). | Required |
customUser_tokenA | customUser_tokenA=12345 | Custom attribute token used to pass specific user attributes for custom authentication. Multiple tokens (customUser_tokenA, customUser_tokenB, etc.) can be added as needed. | Required (at least one) |
customUser_hash | customUser_hash=4df78ed636fbd333269ebe063f013b47d8ec273f3051f99d4f7645a432f2d326 | Hash generated for the custom user profile. Ensures secure validation. | Required |
customUser_hashCreatedOn | customUser_hashCreatedOn=1753948229000 | Timestamp (epoch ms) when the hash was generated. Valid only within the configured expiry window (default: ±1 minute). | Optional |
How to Generate userHash?
The userHash is a generated HMAC (Hash-based Message Authentication Code). Sprinklr uses the sha256 hash function for HMAC generation. To create the userHash, you need to generate an HMAC for a concatenated string of user details, with each detail separated by an underscore (_).
You can generate either a userHash without expiry or a userHash that expires after a specified time.
User Details Without Hash Expiry
userId_firstName_lastName_profileImageUrl_phoneNo_emailExample String (Without Hash Expiry):
12345_John_Doe_https://example.com/profilePic.jpg_9876543210_John.Doe@example.com
User Details With Hash Expiry
For a userHash with expiry, include an additional timestamp (hashCreatedOn) indicating when the hash was created:
userId_firstName_lastName_profileImageUrl_phoneNo_email_hashCreatedOnExample String (With Hash Expiry):
12345_John_Doe_https://example.com/profilePic.jpg_9876543210_shane.warne@gmail.com_1753948567000Sample code for generating the HMAC is available for the following languages:
Note:
firstName, hash and one of email or phoneNumber are mandatory
User details are supposed to be concatenated to form a string, separated by underscore as shown below:
userId_firstName_lastName_profileImageUrl_phoneNo_emailIf you don’t have a few values, you need not send anything but keep the underscores as is. For example, let’s say you don’t have profileimageUrl, there will be 2 underscores after lastName. The string will be as shown below:
userId_firstName_lastName__phoneNo_emailStep 2 - Configurations
The Sprinklr Live Chat Messenger provides a set of methods that allow you to customize and control the chat experience beyond its initial launch. These configuration options enable you to update user details, manage conversation and profile contexts, adjust interface behavior.
Update User
User attributes can be updated by calling below sample configuration example:
Syntax
Future<void> updateUserSettings() async {final payload = {'id': id,'firstName': firstName,'lastName': lastName,'profileImageUrl': profileImageUrl,'email': email,'phoneNo': phoneNo,'hash': hash,// Add hashCreatedOn only if you are using time-based hash expiry.if (hashCreatedOn != null) 'hashCreatedOn': hashCreatedOn,};final userPayload = jsonEncode({'user': payload,});final javascriptCode = '''window.sprChat('updateUserSettings', $userPayload);''';await _controller?.evaluateJavascript(source: javascriptCode);}
Parameters
Parameter | Description | Required/Optional |
userId | Unique identifier of the user. | Required |
firstName | First name of the user. | Required |
hash | Hash must be generated for every change in the user object. For steps, see How to Generate User Hash. | Required |
Email ID of the user. | Required if phoneNo is not provided | |
phoneNo | Phone number of the user. | Required if email is not provided |
lastName | Last name of the user. | Optional |
profileImageUrl | URL to the profile image of the user. | Optional |
hashCreationTime | Hash creation time should match the one used during hash generation. Only needed if using time‑based hash expiry. | Optional |
Update Custom User
Custom User attributes can be updated by calling below sample configuration example:
Syntax
Future<void> updateCustomUserSettings() async {final payload = {'tokenA': tokenA,'tokenB': tokenB,'hash': hash,};final customUserPayload = jsonEncode({'customUser': payload,});final javascriptCode = '''window.sprChat('updateUserSettings', $customUserPayload);''';await _controller?.evaluateJavascript(source: javascriptCode);}
Parameters
Parameter | Description | Required/Optional |
Custom Attribute | This is a custom attribute that can be defined by you. Multiple custom attributes can be added. | Required |
hash | A new hash should be generated whenever the custom user object is modified. For steps, see How to Generate User Hash. | Required |
hashCreationTime | Hash creation time should match the one used during hash generation. Only needed if using time‑based hash expiry. | Optional |
Update Language
To update the user language use below function:
Syntax
Future<void> updateLocale(String locale) async {final javascriptCode = '''(function() {window.sprChat('updateLocale', '$locale');})();''';await _controller?.evaluateJavascript(source: javascriptCode);}
Update Locale
To update the user language use below function:
Syntax
Future<void> updateLocale(String locale) async {final javascriptCode = '''(function() {window.sprChat('updateLocale', '$locale');})();''';await _controller?.evaluateJavascript(source: javascriptCode);}
Parameters
Parameter | Description | Required/Optional |
locale | A locale identifier that sets the messenger’s language and regional formatting.
Examples: en-GB (English, United Kingdom), fr-CA (French, Canada). See Supported Languages. | Required |
Localization Support
To achieve localization in Live Chat via WebView approach, you can pass certain “locale” string in query parameters of URL; this will be in addition to ones discussed in Step 1.
WebView URL:
https://prod-live-chat.sprinklr.com/page?appId=60c1d169c96beb5bf5a326f3_app_950954&device=MOBILE&enableClose=true&zoom=false&locale=en
Parameters
Parameter | Description | Required/Optional |
locale | Indicates the locale which you want to send for this app ID..
Examples: en-GB (English, United Kingdom), fr-CA (French, Canada). | Required |
Open Live Chat with Different Landing Screen
To open Live Chat in different states at different locations, you can pass the relevant string in the query parameters of URL; this will be in addition to ones discussed in Step 1.
Scenario 1: Directly landing on the home screen
WebView URL:
By default, the Home screen opens.
Scenario 2: Directly landing on the new conversation screen
WebView URL:
https://prod-live-chat.sprinklr.com/page?appId=60c1d169c96beb5bf5a326f3_app_950954&device=MOBILE&enableClose=true&zoom=false&landingScreen=NEW_CONVERSATION&scope=CONVERSATIONIn the above URL:
scope=CONVERSATION: Indicates the scope of Live Chat is limited to conversation screen
landingScreen=NEW_CONVERSATION: Indicates the landing screen. This opens a new conversation.
Scenario 3: Directly landing on the last conversation screen
WebView URL:
https://prod-live-chat.sprinklr.com/page?appId=60c1d169c96beb5bf5a326f3_app_950954&device=MOBILE&enableClose=true&zoom=false&landingScreen=LAST_CONVERSATION&scope=CONVERSATION
In the above URL:
scope=CONVERSATION: Indicates the scope of Live Chat is limited to conversation screen.
landingScreen=LAST_CONVERSATION: Indicates the landing screen. This opens the last conversation.
![]() Note: Setting landingScreen to LAST_CONVERSATION allows brands to get users to land the customer on the last interacted open conversation. If there are no open conversations, the customer lands on a new conversation window.
Note: Setting landingScreen to LAST_CONVERSATION allows brands to get users to land the customer on the last interacted open conversation. If there are no open conversations, the customer lands on a new conversation window.
Passing Contextual Information of Users to Live Chat from Mobile
Scenario 1: Capture customer context from the mobile app on all cases of the user
Sometimes you might want to pass some contextual information in case custom fields for all conversations started by the user. (clientContext)
WebView URL:
In the above URL:
context_fieldId="pass required value”: Indicates the context which is passed to all cases of user.
Scenario 2: Update the profile context from mobile app on profile of user
Sometimes you might want to capture some context on the profile/user during the conversation or after the conversation. (userContext)
WebView URL:
In the above URL:
userContext_fieldId=“pass required value”: Indicates the context which is passed to profile of user.
Update Conversation Context (Case Custom Field) on Demand
You might want to update case custom fields for an active conversation. For example, after a customer completes a purchase on the website, you can add the transaction amount or Id to the case for reporting purposes. This allows you to attribute sales to specific conversations or cases.
To achieve this, follow these steps:
1. Create case custom fields. For steps to create a custom field, see Add a Custom Field.
2. Copy the field names of the custom fields you created.
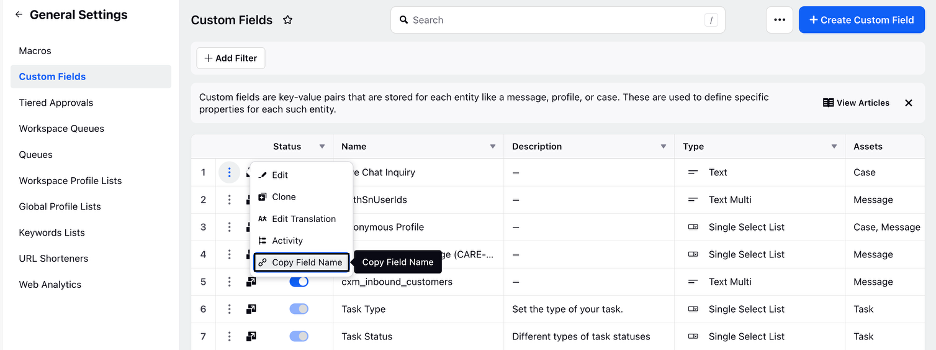
You can copy the field names from the Sprinklr UI by navigating to Custom Fields. Then, locate the desired custom field and click the three-dot menu icon. On the menu, click Copy Field Name.
Syntax
Future<void> updateConversationContext() async {final payload = jsonEncode({'context': {'5e291d040844e435b': ['450.32'],},});final javascriptCode = '''(function() {window.sprChat('updateConversationContext', $payload);})();''';await _controller?.evaluateJavascript(source: javascriptCode);}
Update Profile Context within Profile Custom Fields
When opening a chat from a custom button or hyperlink, you may want to capture relevant context about the user or profile for an active conversation.
To achieve this, follow these steps:
1. Create case custom fields. For steps to create a custom field, see Add a Custom Field.
2. Copy the field names of the custom fields you created.
You can copy the field names from the Sprinklr UI by navigating to Custom Fields. Then, locate the desired custom field and click the three-dot menu icon. On the menu, click Copy Field Name.
Syntax
Future<void> updateUserContext() async {final payload = jsonEncode({'_c_5e291d040844e435b': ['450.32'],});final javascriptCode = '''(function() {window.sprChat('updateUserContext', $payload);})();''';await _controller?.evaluateJavascript(source: javascriptCode);}
Handling Non‑Live Chat URLs
You can block non‑Live Chat URLs, meaning any links that do not contain the Live Chat domain, and open them in an external browser. To achieve this, add URL interception to your InAppWebView, block all URLs that do not contain the Live Chat domain, and ensure those external URLs are opened in the system browser.
const allowedLiveChatHosts = {'prod-live-chat.sprinklr.com','live-chat-static.sprinklr.com',};Future<NavigationActionPolicy> shouldOverrideLiveChatUrl(NavigationAction navigationAction,) async {final uri = navigationAction.request.url;if (uri == null) {return NavigationActionPolicy.CANCEL;}if (!allowedLiveChatHosts.contains(uri.host)) {await InAppBrowser.openWithSystemBrowser(url: uri);return NavigationActionPolicy.CANCEL;}return NavigationActionPolicy.ALLOW;}
Listening to WebView Events
In this snippet, the JavaScript code sends messages to Flutter whenever an event occurs inside the WebView. For each event, it uses window.flutter_inappwebview.callHandler() to pass relevant data back to the Flutter app.
void onLiveChatMessage(Map<String, dynamic> eventData) {switch (eventData['type']) {case 'loadError':// You can show some UI error.break;case 'onLoad':// You can call your JS methods after that.break;case 'closed':// Instead of closing the WebView, it is recommended to hide WebView for best user experience.break;case 'onUnreadCountChange':final params = eventData['params'];// You can show the notification count using this.break;case 'onExternalEvent':final params = eventData['params'];// Handle the event here.break;default:break;}}
Add JavaScript Channels to Your WebView
Call addJSChannels() after the Live Chat page finishes loading:
bool _chatChannelsAdded = false;onLoadStop: (controller, url) async {if (!_chatChannelsAdded) {_chatChannelsAdded = true;await addJSChannels();}},
Inject JavaScript
The addJSChannels() function injects JavaScript into the WebView to capture Live Chat events and forward them to Flutter:
Future<void> addJSChannels() async {const javascriptCode = '''(function() {if (typeof window.sprChat !== 'function') {return;}function postToFlutter(payload) {if (window.flutter_inappwebview &&typeof window.flutter_inappwebview.callHandler === 'function') {window.flutter_inappwebview.callHandler('chatHandler',JSON.stringify(payload));}}window.sprChat('onLoad', (error) => {postToFlutter({type: error ? 'loadError' : 'onLoad'});});window.sprChat('onClose', () => {postToFlutter({type: 'closed'});});window.sprChat('onUnreadCountChange', (params) => {postToFlutter({type: 'onUnreadCountChange', params});});window.sprChat('onExternalEvent', (params) => {postToFlutter({type: 'onExternalEvent', params});});})();''';await _controller?.evaluateJavascript(source: javascriptCode);}
Disable Attachments for Customer
You can prevent customers from adding attachments in the chat by hiding the attachment icon from the chat widget.
To do this, you can pass disableAttachment=true in the WebView URL.
WebView URL:
Parameters
Parameter | Example Usage | Description | Required/Optional |
appId | appId=65afb12b62317d2d4a58bfad_app_1866548 | Unique identifier of the Live Chat app. Provided by Sprinklr. | Required |
device | device=MOBILE | Specifies the device type. | Required |
enableClose | enableClose=true | Enables the close button in the Live Chat UI. | Optional |
zoom | zoom or zoom=false | Controls zoom behavior in the WebView. | Optional |
disableAttachment | disableAttachment=true | Disables file attachment functionality in Live Chat. | Optional |
Update Theme Mode for User on Demand
You can update the theme mode on demand using the updateThemeMode method.
Future<void> updateThemeMode(String mode) async {final javascriptCode = '''(function() {window.sprChat('updateThemeMode', '$mode');})();''';await _controller?.evaluateJavascript(source: javascriptCode);}
Parameters
Parameter | Description | Required/Optional |
$mode | Specifies the theme mode to apply. Supported Values:
| Required |
![]() Note: Upon invoking the updateThemeMode() method, a confirmation alert will prompt the user to reload the app for the theme changes to take effect. In addition, the parent application must send the updated theme within the configuration during chat initialization.
Note: Upon invoking the updateThemeMode() method, a confirmation alert will prompt the user to reload the app for the theme changes to take effect. In addition, the parent application must send the updated theme within the configuration during chat initialization.
Configure Status Card
Status cards are used to indicate the health of a key resource to your customers. The key resource can be a tool or service that they interact with frequently. By showing the status of this resource upfront, customers can stay informed without repeatedly contacting support. This enhances the customer experience while reducing agent workload.
![]() Note: To enable this capability, contact our support team at tickets@sprinklr.com and provide your Live Chat application ID. Status cards are available only for the modern skin version of the Live Chat widget.
Note: To enable this capability, contact our support team at tickets@sprinklr.com and provide your Live Chat application ID. Status cards are available only for the modern skin version of the Live Chat widget.
Once status card is enabled for your Live Chat widget, you can update the status card by using the following:
Future<void> updateWidget() async {final payload = {'id': 'status_card_1','details': {'title': 'Status: %%[status]','description': 'Updated At %%[updatedAt]','status': 'SERVICE_UNDER_MAINTENANCE','updatedAt': 1668161693545,'langVsTranslatedFieldValues': {'ar': {'title': '%%[status] : حالة ','description': ' %%[updatedAt] : تم التحديث في',},'es': {'title': 'Estado : %%[status]','description': 'Actualizado en: %%[updatedAt]',},},},};final stringifiedPayload = jsonEncode(payload);final javascriptCode = '''(function() {window.sprChat('updateWidget', $stringifiedPayload);})();''';await _controller?.evaluateJavascript(source: javascriptCode);}
Parameters
Parameter | Description | Required/Optional |
id | The widget ID, which must match the ID configured in the Live Chat builder. | Required |
details | An object containing metadata about the status card displayed in the Live Chat widget. It allows customization of the widget’s title, description, status, and last updated timestamp. For more information, see the details Object Parameters table below. | Required |
details Object Parameters
Parameter | Description | Required/Optional |
title | The title displayed on the status card. | Required |
description | A brief description of the status update. | Required |
status | Indicates the current state of the resource. You can use the %%[status] placeholder for status. The supported statuses are mentioned in the status table below. | Required |
updatedAt | Timestamp of the last status update. You can use the %%[updatedAt] placeholder to show when the status was last updated. | Required |
On the status card, you can display the following statuses along with their icons and values:
Add Support to Download Attachment
You can enable attachment downloads for users in Live Chat by intercepting special download URLs and handling them within your application. When a user taps the Download button, the chat generates a custom URL containing both the file link (fileUrl) and the filename (fileName).
URL Formats
The generated URL can have two formats:
"livechat-app:url=${fileUrl}?fileName=${fileName}": When there are no query parameters present in the fileUrl, fileName is added as a new query parameter.
"livechat-app:url=${fileUrl}&fileName=${fileName}": When there are query parameters present in the fileUrl already, fileName is added as an extra query parameter.
Steps to Handle Downloads
1. Intercept download URLs: Intercept the requests that have URLs starting with the livechat-app: prefix. Use shouldOverrideLiveChatUrl to intercept download URLs:
Future<NavigationActionPolicy> shouldOverrideLiveChatUrl(NavigationAction navigationAction,) async {final uri = navigationAction.request.url;// other conditionsif (uri.toString().startsWith('livechat-app:')) {await handleLiveChatDownload(uri.toString());return NavigationActionPolicy.CANCEL;}return NavigationActionPolicy.ALLOW;}
3. Remove the Prefix: Strip the livechat-app:url= prefix to obtain the actual CDN URL.
4. Extract the fileName: From the remaining URL, extract and remove the fileName query parameter. Use its value to name your file.
5. Clean the URL: Use the remaining URL to fetch and download content.
![]() Note: While extracting the fileURL, remove the fileName query parameter from the original query. If it's not removed, a signature mismatch may occur, resulting in a SignatureDoesNotMatch or BlobNotFound error.
Note: While extracting the fileURL, remove the fileName query parameter from the original query. If it's not removed, a signature mismatch may occur, resulting in a SignatureDoesNotMatch or BlobNotFound error.
Example
Received URL
"livechat-app:url=https://prod-sprcdn-assets.sprinklr.com/1234/sample.pdf?signature=XYZ&fileName=sample_name.pdf"Steps
Remove the prefix to get "https://prod-sprcdn-assets.sprinklr.com/1234/sample.pdf?signature=XYZ&fileName=sample_name.pdf".
Extract the fileName query parameter and name the file sample_name.pdf.
Use the remaining URL "https://prod-sprcdn-assets.sprinklr.com/1234/sample.pdf?signature=XYZ" to download the file.
Step 3 - Push Notifications
Push notifications allow users to receive real-time updates from the Live Chat Messenger, ensuring seamless communication even when the app is running in the background or closed. For more information, see Push Notifications in Mobile.
Prerequisites
Android: Google service.json file
iOS: APNS certificate (P12) along with its credentials
![]() Note: Consider the following points:
Note: Consider the following points:
Google service.json file can be different for staging/prod env
APNS certificate (P12) and its credentials must be different for staging/prod env
If you are testing the push notification setup on prod mobile application(iOS), ensure to use test flight build
If the Google service.json file is different for sandbox/prod env and you are testing the push notification setup on prod mobile application(Android), ensure to use test flight build
Configuration
To enable push notifications, raise a support ticket to tickets@sprinklr.com with the following information:
Google service.json file
APNS certificate (P12) and credentials
Live Chat App ID
Partner ID
Target Environment
1. Register for Push Notifications
![]() Note: Registration must only be initiated after the load is complete.
Note: Registration must only be initiated after the load is complete.
You can register the messenger for sending push notifications by providing push token received from FCM. Create a function in the following way and pass token, deviceId and deviceName as arguments to it to register your device for push notification.
String getTokenRegistrationJSChannel({required String token,required String deviceId,required String deviceName,}) {final payload = {'deviceId': deviceId,'deviceToken': token,'appVersion': 1, // App version should be a numeric value.'deviceName': deviceName,'mobileClientType': Platform.isAndroid ? 'ANDROID' : 'IPHONE',};final stringifiedPayload = jsonEncode(payload);return '''(function() {window.sprChat('registerDevice', $stringifiedPayload);})();''';}Future<void> registerPushNotifications({required String token,required String deviceId,required String deviceName,}) async {final payload = {'deviceId': deviceId,'deviceToken': token,'appVersion': 1, // App version should be a numeric value.'deviceName': deviceName,'mobileClientType': Platform.isAndroid ? 'ANDROID' : 'IPHONE',};final stringifiedPayload = jsonEncode(payload);String registerDeviceJavaScript = '''(function() {window.sprChat('registerDevice', $stringifiedPayload);})();''';await _controller?.evaluateJavascript(source: registerDeviceJavaScript);}
2. Unregister for Push Notifications
To stop receiving notifications, deregister your device as shown below:
Future<void> unRegisterPushNotifications({required String token,required String deviceId,required String deviceName,}) async {final payload = {'deviceId': deviceId,'deviceToken': token,'appVersion': 1, // App version should be a numeric value.'deviceName': deviceName,'mobileClientType': Platform.isAndroid ? 'ANDROID' : 'IPHONE',};final stringifiedPayload = jsonEncode(payload);String unregisterDeviceJavaScript '''(function() {window.sprChat('unregisterDevice', $stringifiedPayload);})();''';await _controller?.evaluateJavascript(source: unregisterDeviceJavaScript);}
3. Handle Messenger Push Notifications
Once you have registered for messenger push notifications then you might receive notifications from your platform as well as messenger. To check if notification is messenger notification you can check as below:
![]() Note: When the user is on the Live Chat app, they will always receive the Live Chat messenger push notifications. However, you can define whether users should receive the messenger notifications when they are on the brand app and not the Live Chat app. That is, the brand app is in the foreground and the Live Chat app is running in the background.
Note: When the user is on the Live Chat app, they will always receive the Live Chat messenger push notifications. However, you can define whether users should receive the messenger notifications when they are on the brand app and not the Live Chat app. That is, the brand app is in the foreground and the Live Chat app is running in the background.
To do that, you can check whether the notification is a Live Chat notification and handle it according to brand requirements. For example, you can choose not to display Live Chat notifications when the user is on the brand app.
bool isMessengerNotification(Map<String, dynamic> notification) {final et = notification['et'] ?? '';return et == 'LIVE_CHAT_MOBILE_NOTIFICATION';}if (isMessengerNotification(notification)) {await handleNotification(notification);}
Once you have identified if the notification is messenger notification you need open the messenger and call handle notification method as described below:
Future<void> handleNotification(Map<String, dynamic> notification) async {final stringifiedPayload = jsonEncode(notification);final sdkFunction = '''(function() {window.sprChat('onNotification', $stringifiedPayload);})();''';await _controller?.evaluateJavascript(source: sdkFunction);}