View Schedule Scenarios
Updated
Schedule Scenarios provide a flexible way to plan, review, and adjust agent schedules before finalizing them. By viewing a Schedule Scenario, Workforce Managers can analyze shift assignments, time off, and coverage across different days and agents. The interface supports both Intraday and Multiday views, allowing for detailed or broader schedule insights. This helps ensure that staffing decisions are aligned with business needs while maintaining compliance with scheduling policies.
Prerequisites for viewing Schedule Scenarios:
Sprinklr WFM should be enabled for the environment.
You must have access to the Workforce Manager Persona App.
View permission under the Scheduling section in the Workforce Management module.
Follow these steps to view a Schedule Scenario:

Go to the Workforce Manager Persona App.

Select Scheduling from the Left Pane to open the Schedules Record Manager.
Click the View Schedule (eye icon) button corresponding to the Schedule Scenario to be viewed. This will open a detailed view of the Schedule Scenario.
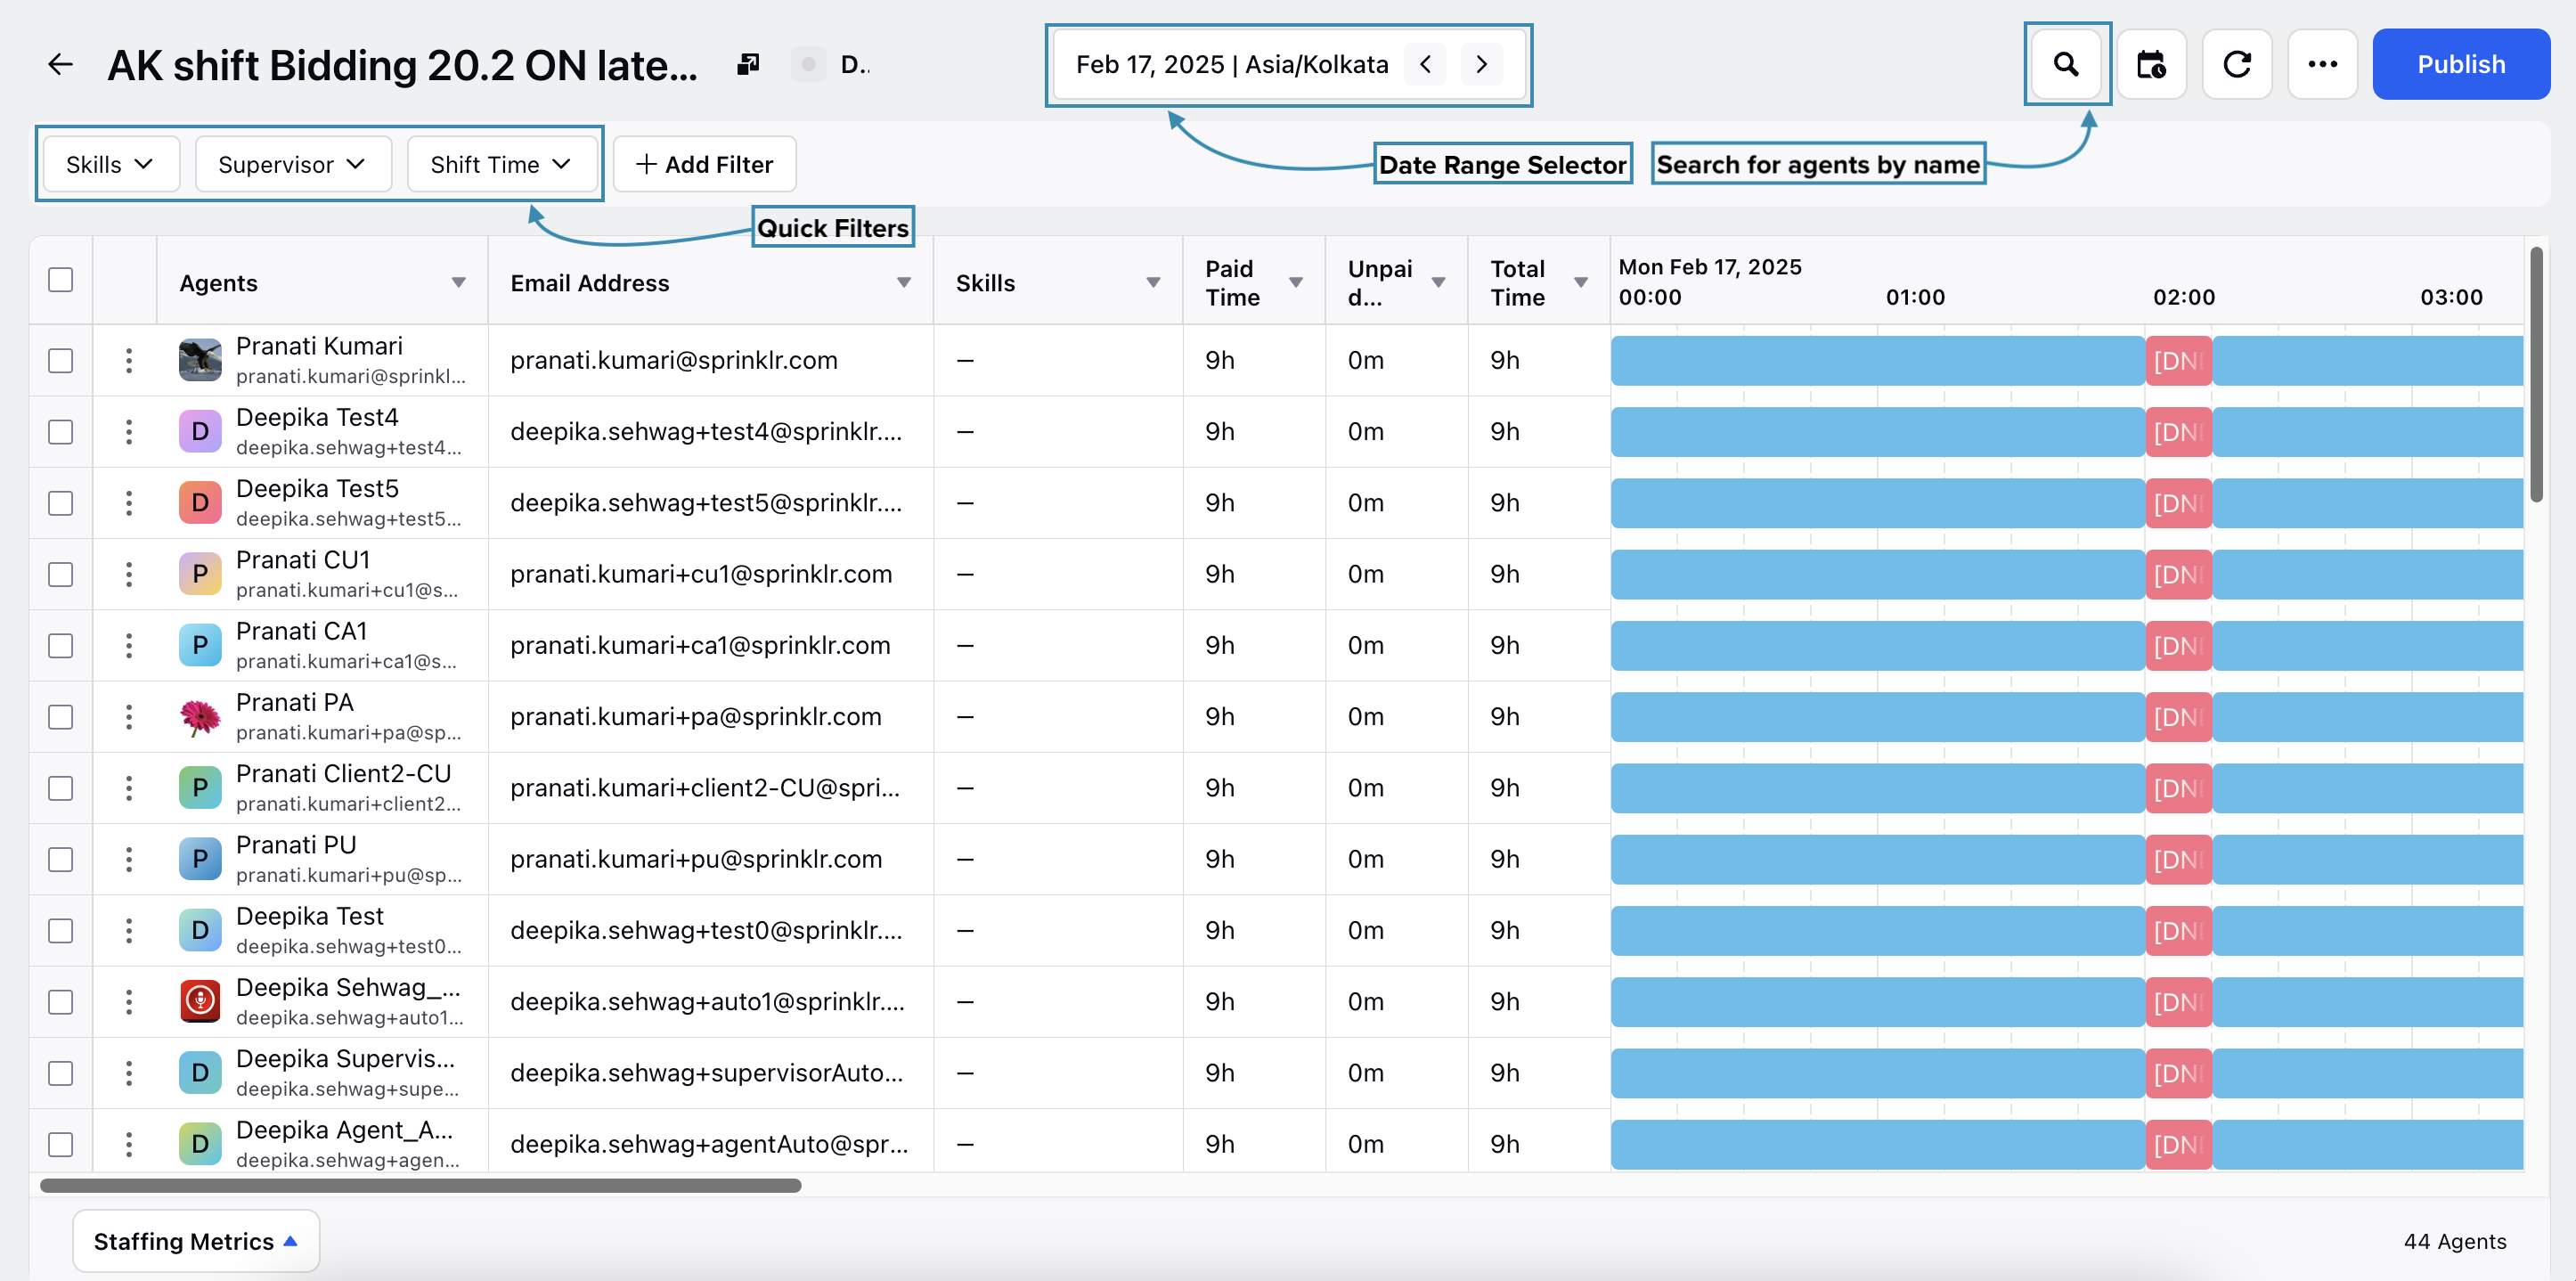
The Schedule Scenario details page has multiple columns that can be hidden depending on your requirements. The following columns are available while viewing Schedule Scenarios:
Column Name | Description |
Agents | This column lists the names of the agents. |
Email Address | This column contains the email addresses of the agents. |
Skills | This column displays the skills of each agent. |
Paid Time | This column shows the amount of time for which agents are compensated, such as hours worked or paid leave. |
Unpaid Time | This column indicates the amount of time for which agents are not compensated, such as unpaid leave or breaks. |
Total Time | This column provides the total amount of time recorded for each agent, combining both paid and unpaid time. |
Preference Status | This column shows if the agent's Preferences have been accomodated or not in the Schedule Scenario. |
You can search for agents on the Schedule Scenario details page by name or filter them based on associated skill, supervisor, shift time, or other filters.
Schedule Scenario Viewing Modes
Schedule Scenarios can be viewed in two ways: Intraday View, which shows data for a single day, and Multiday View, where you can select a specific date range for the data. When you view a Schedule Scenario, Intraday View is selected by default, and you can select the date for which data should be displayed.
Note: You can only view the data of Schedule Scenarios for dates that fall within the specified date range of the Schedule Scenario.
Intraday View
When Intraday View is selected, the Schedule Scenario details page displays data for the selected date. The page shows the agents’ total time, paid time, and unpaid time for the day.

You can quickly view the data from the next day or the previous day by clicking the Next or Prev button in the data range selector.
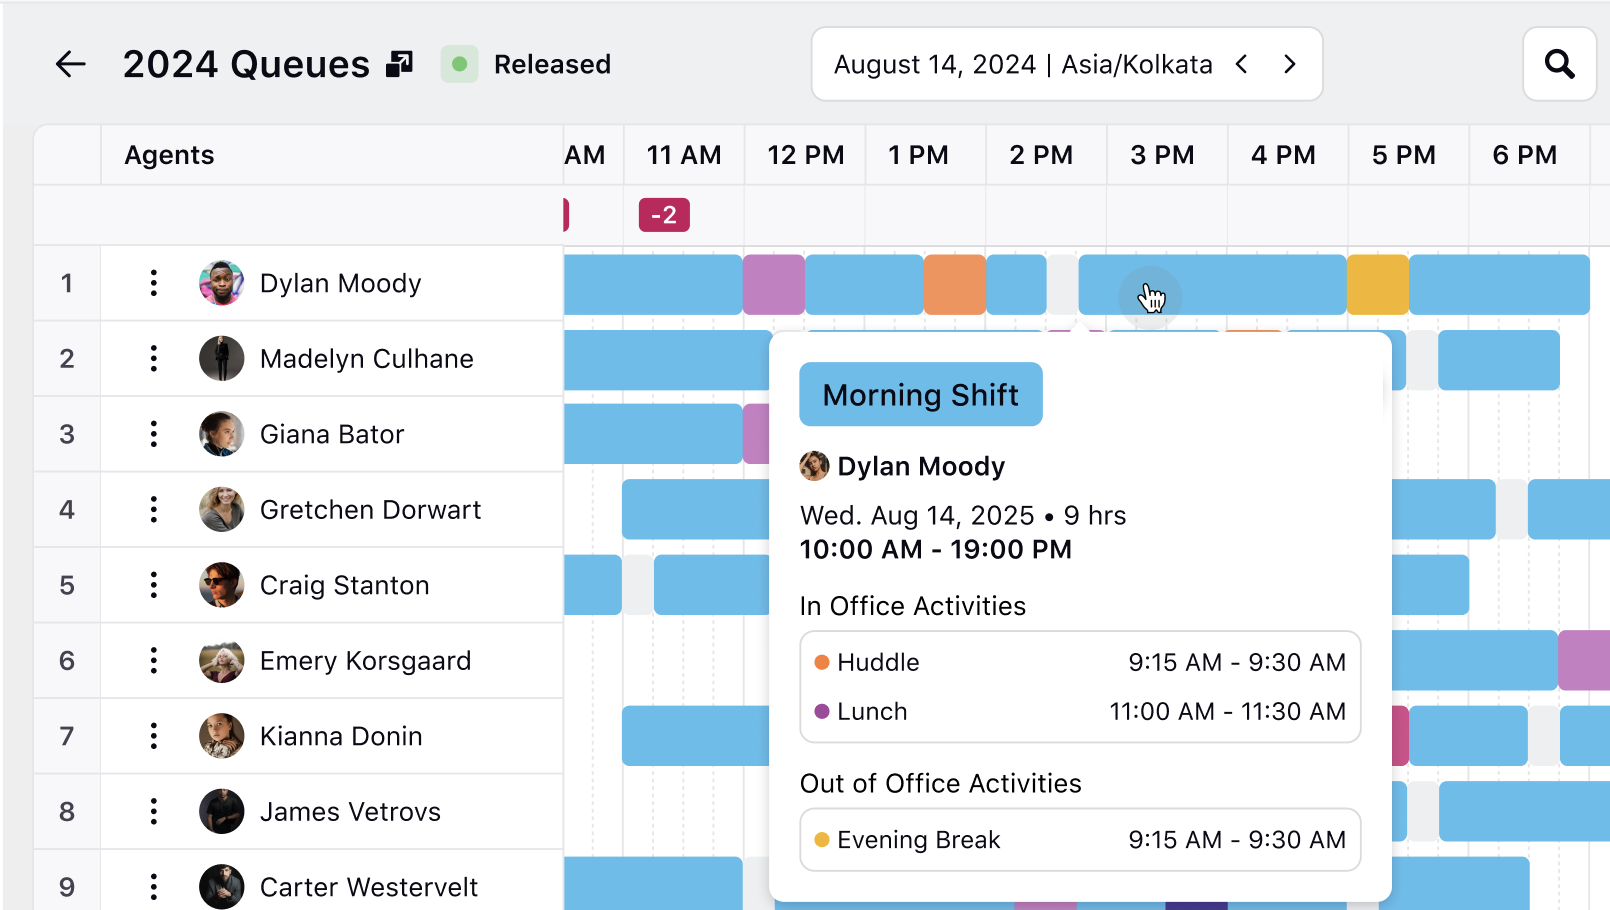
If agents have partial Time Off or Out-of-Office Activities, this information will be visible when you hover over their schedule.
Traded shifts are displayed with slanted lines across them to distinguish them from regular shifts.

Multiday View
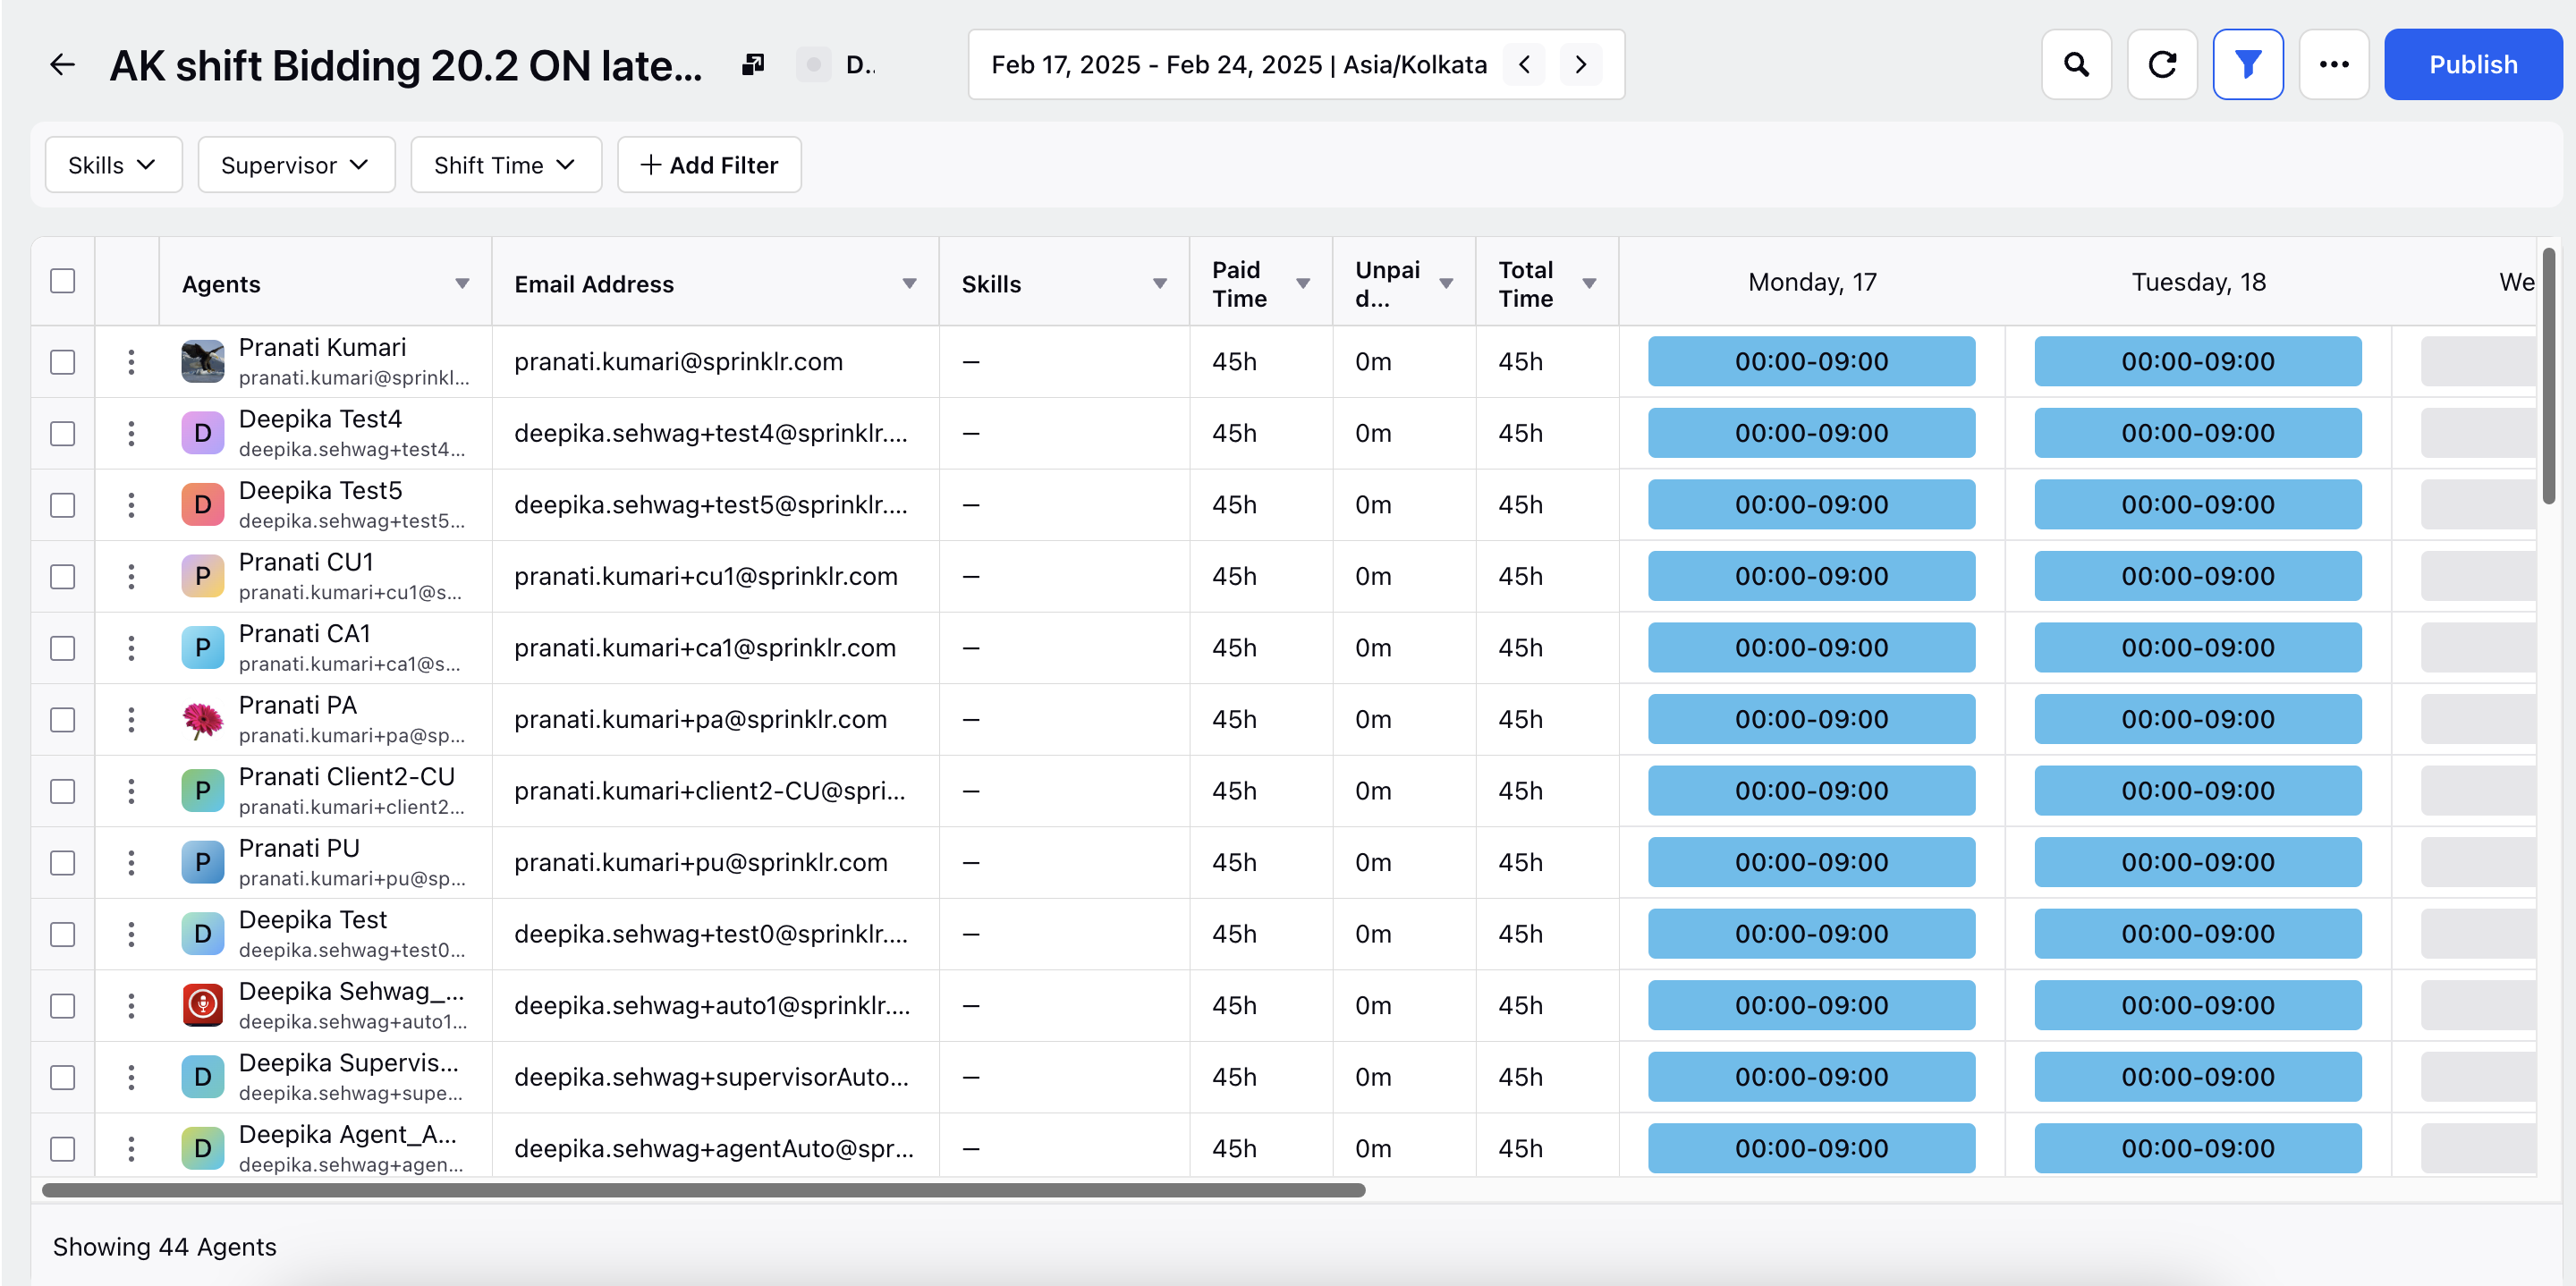
When Multiday View is selected, the Schedule Scenario details page displays data for the chosen date range. This page shows the agents' total time, paid time, and unpaid time for the specified period.

For example, if you select 11 February 2025 to 19 February 2025 in Multiday View, the data for agents' total time, paid time, and unpaid time will be shown for the entire selected date range.
Hover over an agent’s Shift on any day to view the following details:
Total Shift duration and timings, including Split Shifts.
Office Activities with their timings and duration.
Work location (office or home).
Preference accommodation status.
Traded Shift, if applicable.
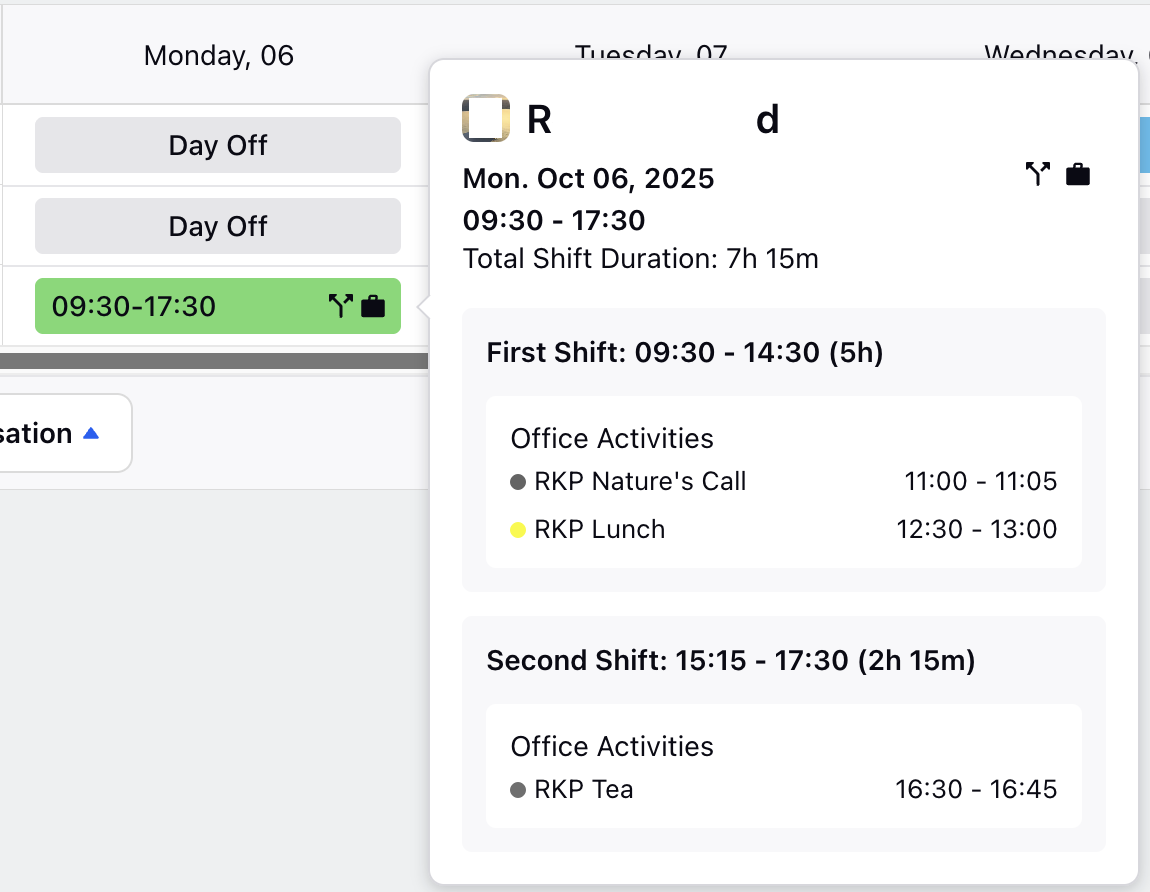
If the agent has a Split Shift, the hover card will display separate sections for each Shift (such as First Shift and Second Shift) along with their respective timings and durations.
If agents have a full-day time off, it will be displayed prominently in the Multiday View.

Traded shifts are displayed with slanted lines across them to distinguish them from regular shifts.

Agent Sorting
You can sort the agents while viewing Schedule Scenarios to quickly locate specific agents. This makes it easier to scan the list and find the agents you need. Access the sorting option by clicking the More Actions (...) button at the top right of the page and then selecting Sort By from the list.

You can sort agents by their names in alphabetical order, Shift Start Time, and Shift End Time in ascending and descending order. These sorting options can also be applied simultaneously, depending on your requirements. Click the Apply button once you have selected the sorting options to sort agents based on the selection.
Note: Shift Start Time and Shift End Time sorting options are available only when viewing the Schedule Scenario in Intra-day View.
Rolling Date Range
While in the Intraday or Multiday View, you can configure a rolling date range for the Schedule Scenario. This creates a dynamic date range for tracking schedules where the start date and end date are automatically updated on a rolling basis.
Rolling End Date: Enable this toggle to automatically extend the end date by one day every day.
Rolling Start Date: Enable this toggle to automatically extend the start date by one day every day.
Note: The Rolling Start Date toggle can be enabled only when the Rolling End Date is enabled.
Note: When Rolling Date Range is enabled, the end date will not extend beyond the last date for which a Schedule Scenario has been created.
Rolling Date Range Behavior
The Rolling Date Range behavior is governed by the Rolling End Date and Rolling Start Date toggles. Let us understand the behavior in detail.
Both Rolling Start Date and Rolling End Date toggles are OFF
The selected date range remains fixed and does not update automatically. For example, if you select April 6 to April 13, the range stays the same every day.
Both Rolling Start Date and Rolling End Date toggles are ON
The entire date range shifts forward by one day every day. For example, if the initial range is April 6 to April 13, it will update to April 7 to April 14 the next day and continue rolling forward daily.
Rolling Start Date is OFF and Rolling End Date is ON
The start date remains fixed, while the end date moves forward by one day every day. For example, if the initial range is April 6 to April 13, the next day it becomes April 6 to April 14, then April 6 to April 15, and so on.
Staffing Metrics
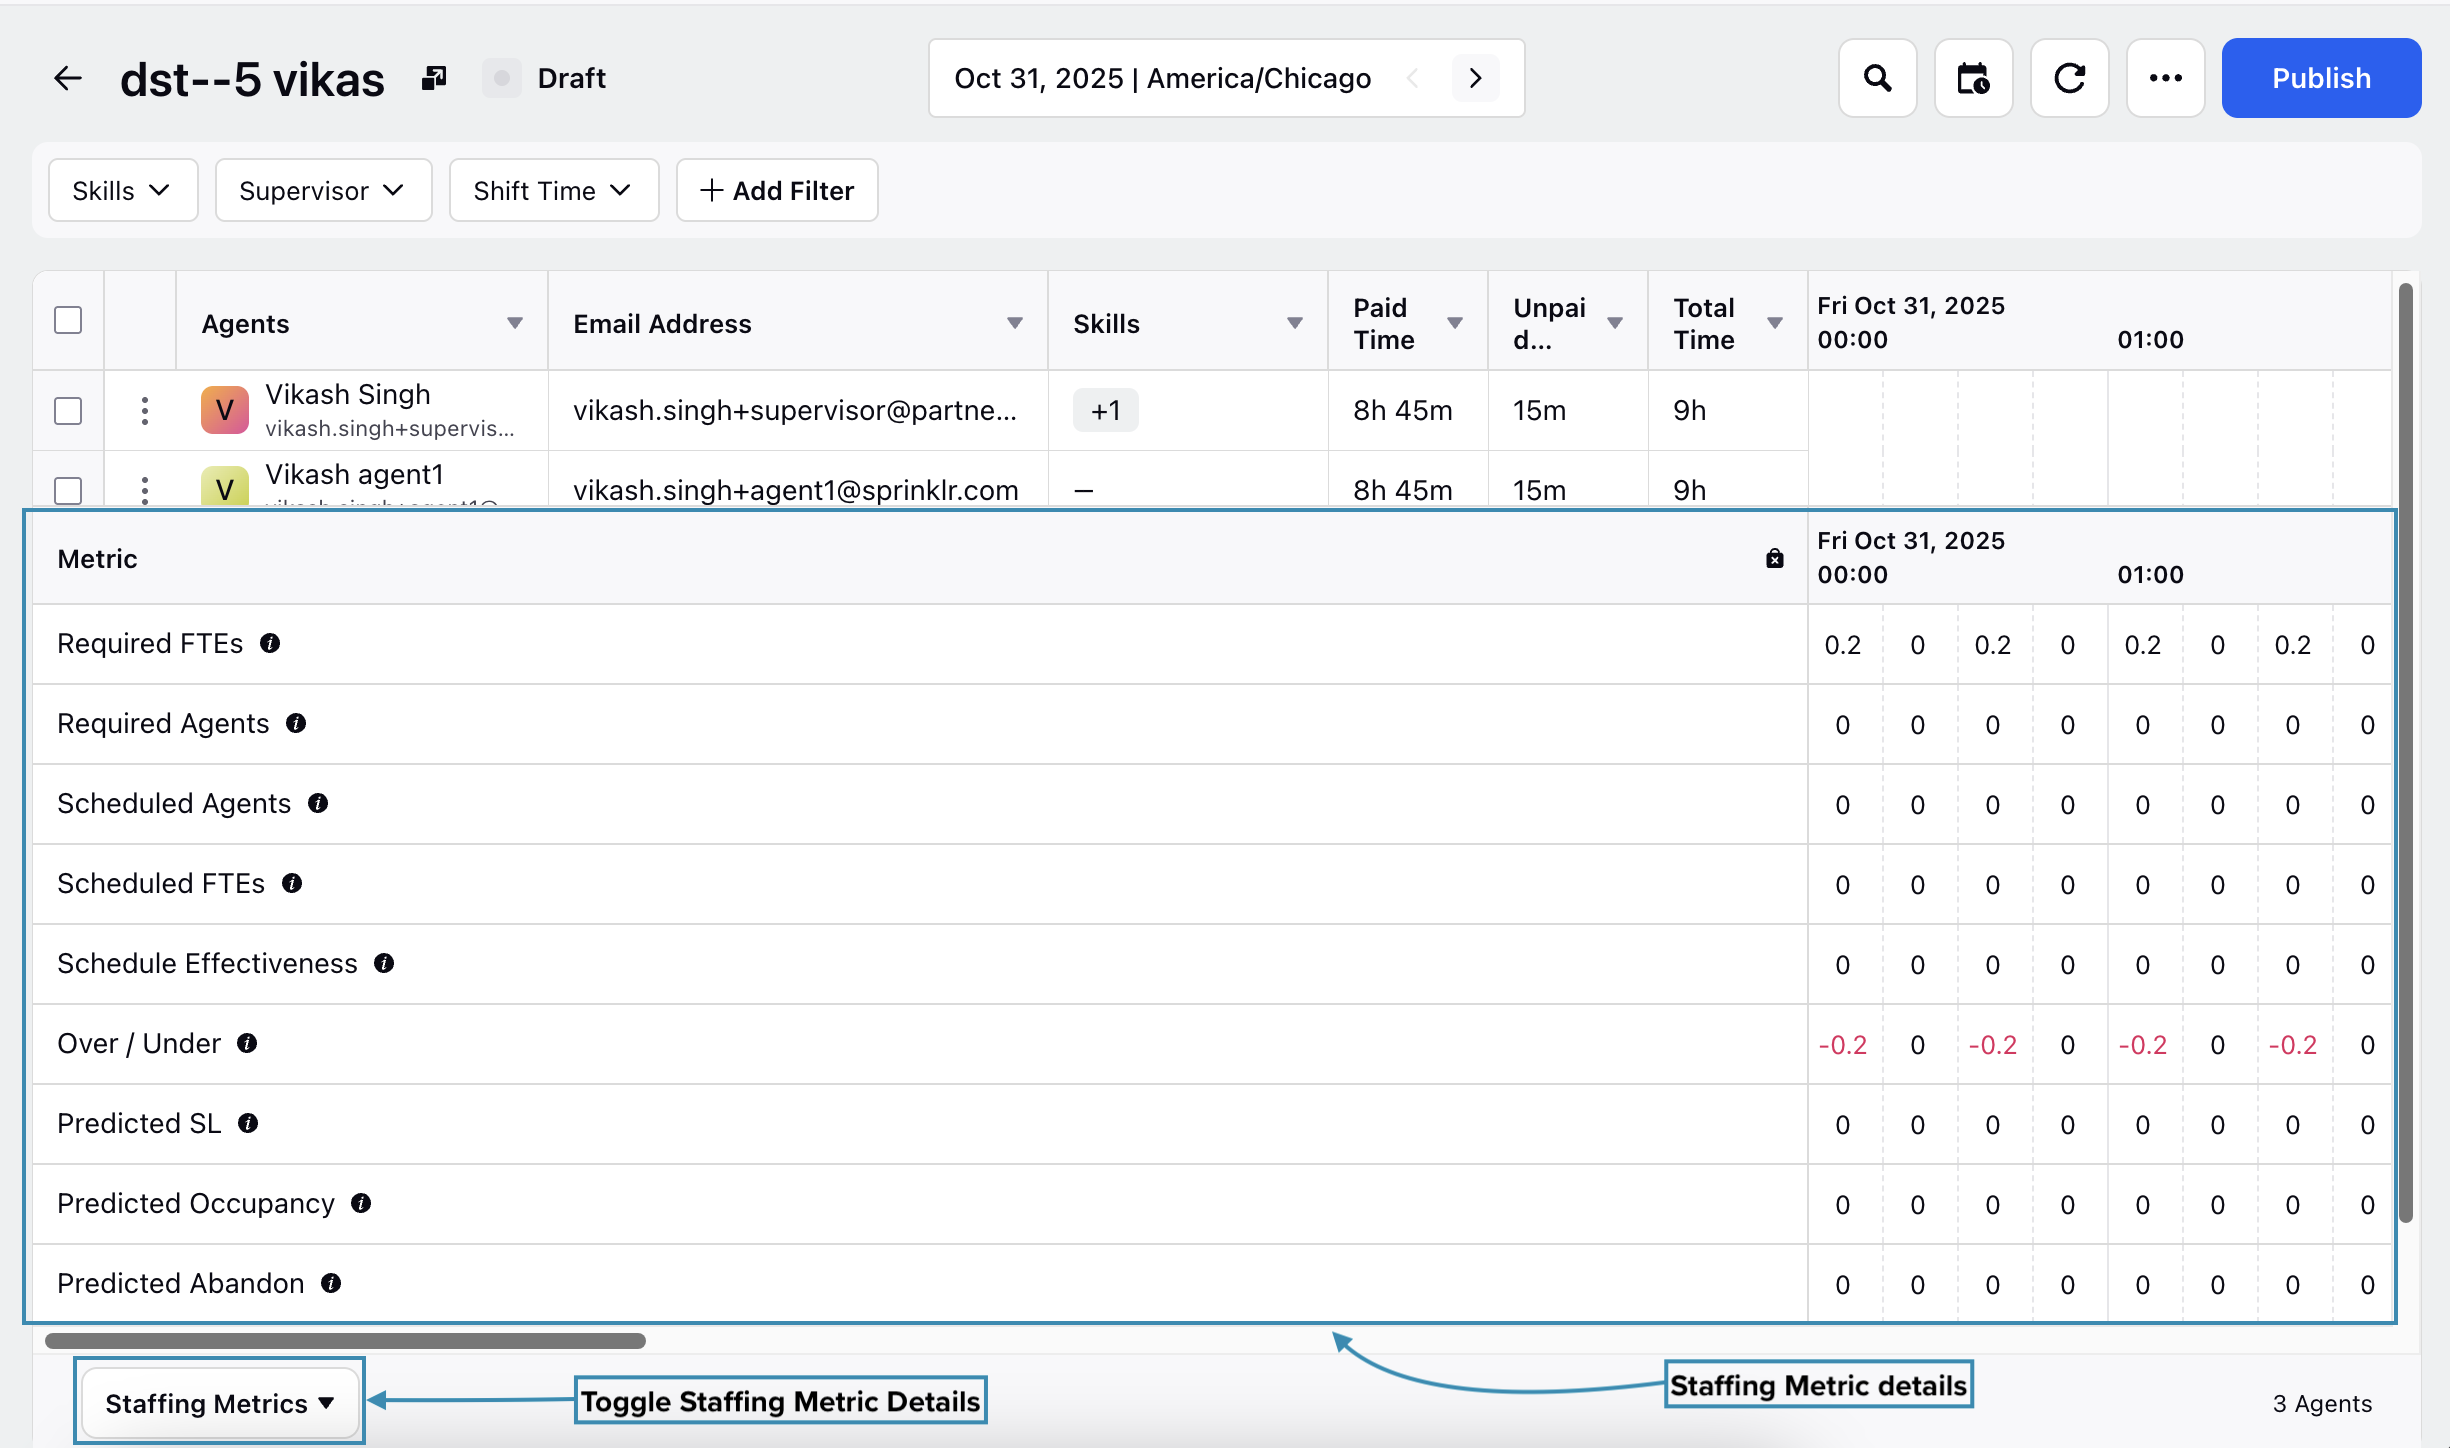
You can also view the statistics on the number of agents for the day using the Staffing Metric option. Clicking the Staffing Metrics button will open a table that displays various schedule-related details at the interval of the Forecast Scenario granularity (15 or 30 minutes). It is available in both Intraday View and Multiday View.
The following data is available in the Staffing Metric section:
Required FTEs: It is the number of Full-Time Equivalents (FTEs) needed to handle the volume.
Required Agents: It is the number of agents needed to handle the volume, factoring in shrinkage.
Scheduled Agents: It is the number of agents scheduled for the interval.
Scheduled FTEs: Shows the total number of agents who are engaged in Productive Activity in that specific interval.
Note: Schedule FTEs are calculated based on the Proficiency of each agent. Proficiency is defined while configuring Schedule Policies.
Schedule Effectiveness: It is the difference between Scheduled Agents and Required Agents.
Over/Under: It is the difference between Scheduled FTEs and Required FTEs.
Predicted SL: It is the predicted service level calculated based on Scheduled FTEs.
Predicted Occupancy: It is the predicted occupancy calculated based on Scheduled FTEs.
Predicted Abandon: It is the predicted abandonment rate calculated based on Scheduled FTEs.
Note: The Work Type filter allows you to display data only for agents associated with the selected Work Type(s). Staffing Metrics will update dynamically to reflect the filtered agents' FTE contributions across intervals, based on their assigned Work Types and Proficiency levels.
To improve the accuracy of Staffing Metrics calculations, you can set the daily Working Period in hours and minutes. By default, the Working Period is set to 8 hours.

Note: The Working Period must be more than 0 minutes and less than 24 hours.
Activity Metrics
The Activity Metrics drawer helps you quickly identify agents scheduled for specific Activities and compare required versus scheduled staffing levels. While viewing a Schedule Scenario, clicking the Activity Metrics button will open a table that displays various Activity-related details at the interval of the Forecast Scenario granularity (15 or 30 minutes).

Note: Activity Metrics is available in Intraday View only.
You can filter agents by their assigned Activities and view real-time metrics such as Required FTEs and Required Agents throughout the day. To filter, click the Eye icon next to the Activity you want to focus on. You can also filter by multiple Activities at once.
Seat Utilisation
The Seat Utilisation drawer displays details of agent work modes (Work from Home and Work from Office) assigned to agents for each interval. It is available in both Intra-Day and Multi-Day views.
Note: The Seat Utilisation drawer is available only if the Consider Agent Work Mode toggle is enabled while creating the Schedule Scenario.
The following data is available in the Seat Utilisation drawer:
Field | Description |
Max. Seating Capacity | Shows the maximum number of agents who can be assigned to Work from Office in any given interval. This is specified while creating the Schedule Scenario. |
Work from Office | Shows the number of agents assigned Work from Office for the interval. |
Work from Home | Shows the number of agents assigned Work from Home for the interval. |
Seat Over/Under | Shows the number of agents assigned to Work from Office versus those assigned to Work from Home (Work from Office - Work from Home). |
Seat Utilization | Shows the percentage of Work from Office seats assigned to agents. For example, 100% seat utilization means all Work from Office seats have been assigned to agents. |
View Agent Preference Accommodation Status
You can verify whether approved Agent Preferences have been accommodated in the Schedule Scenario. This section explains how to view this in both Intraday and Multiday views.

In Intraday View, the Preference column shows the status as either Accommodated or Not Accommodated for each agent.
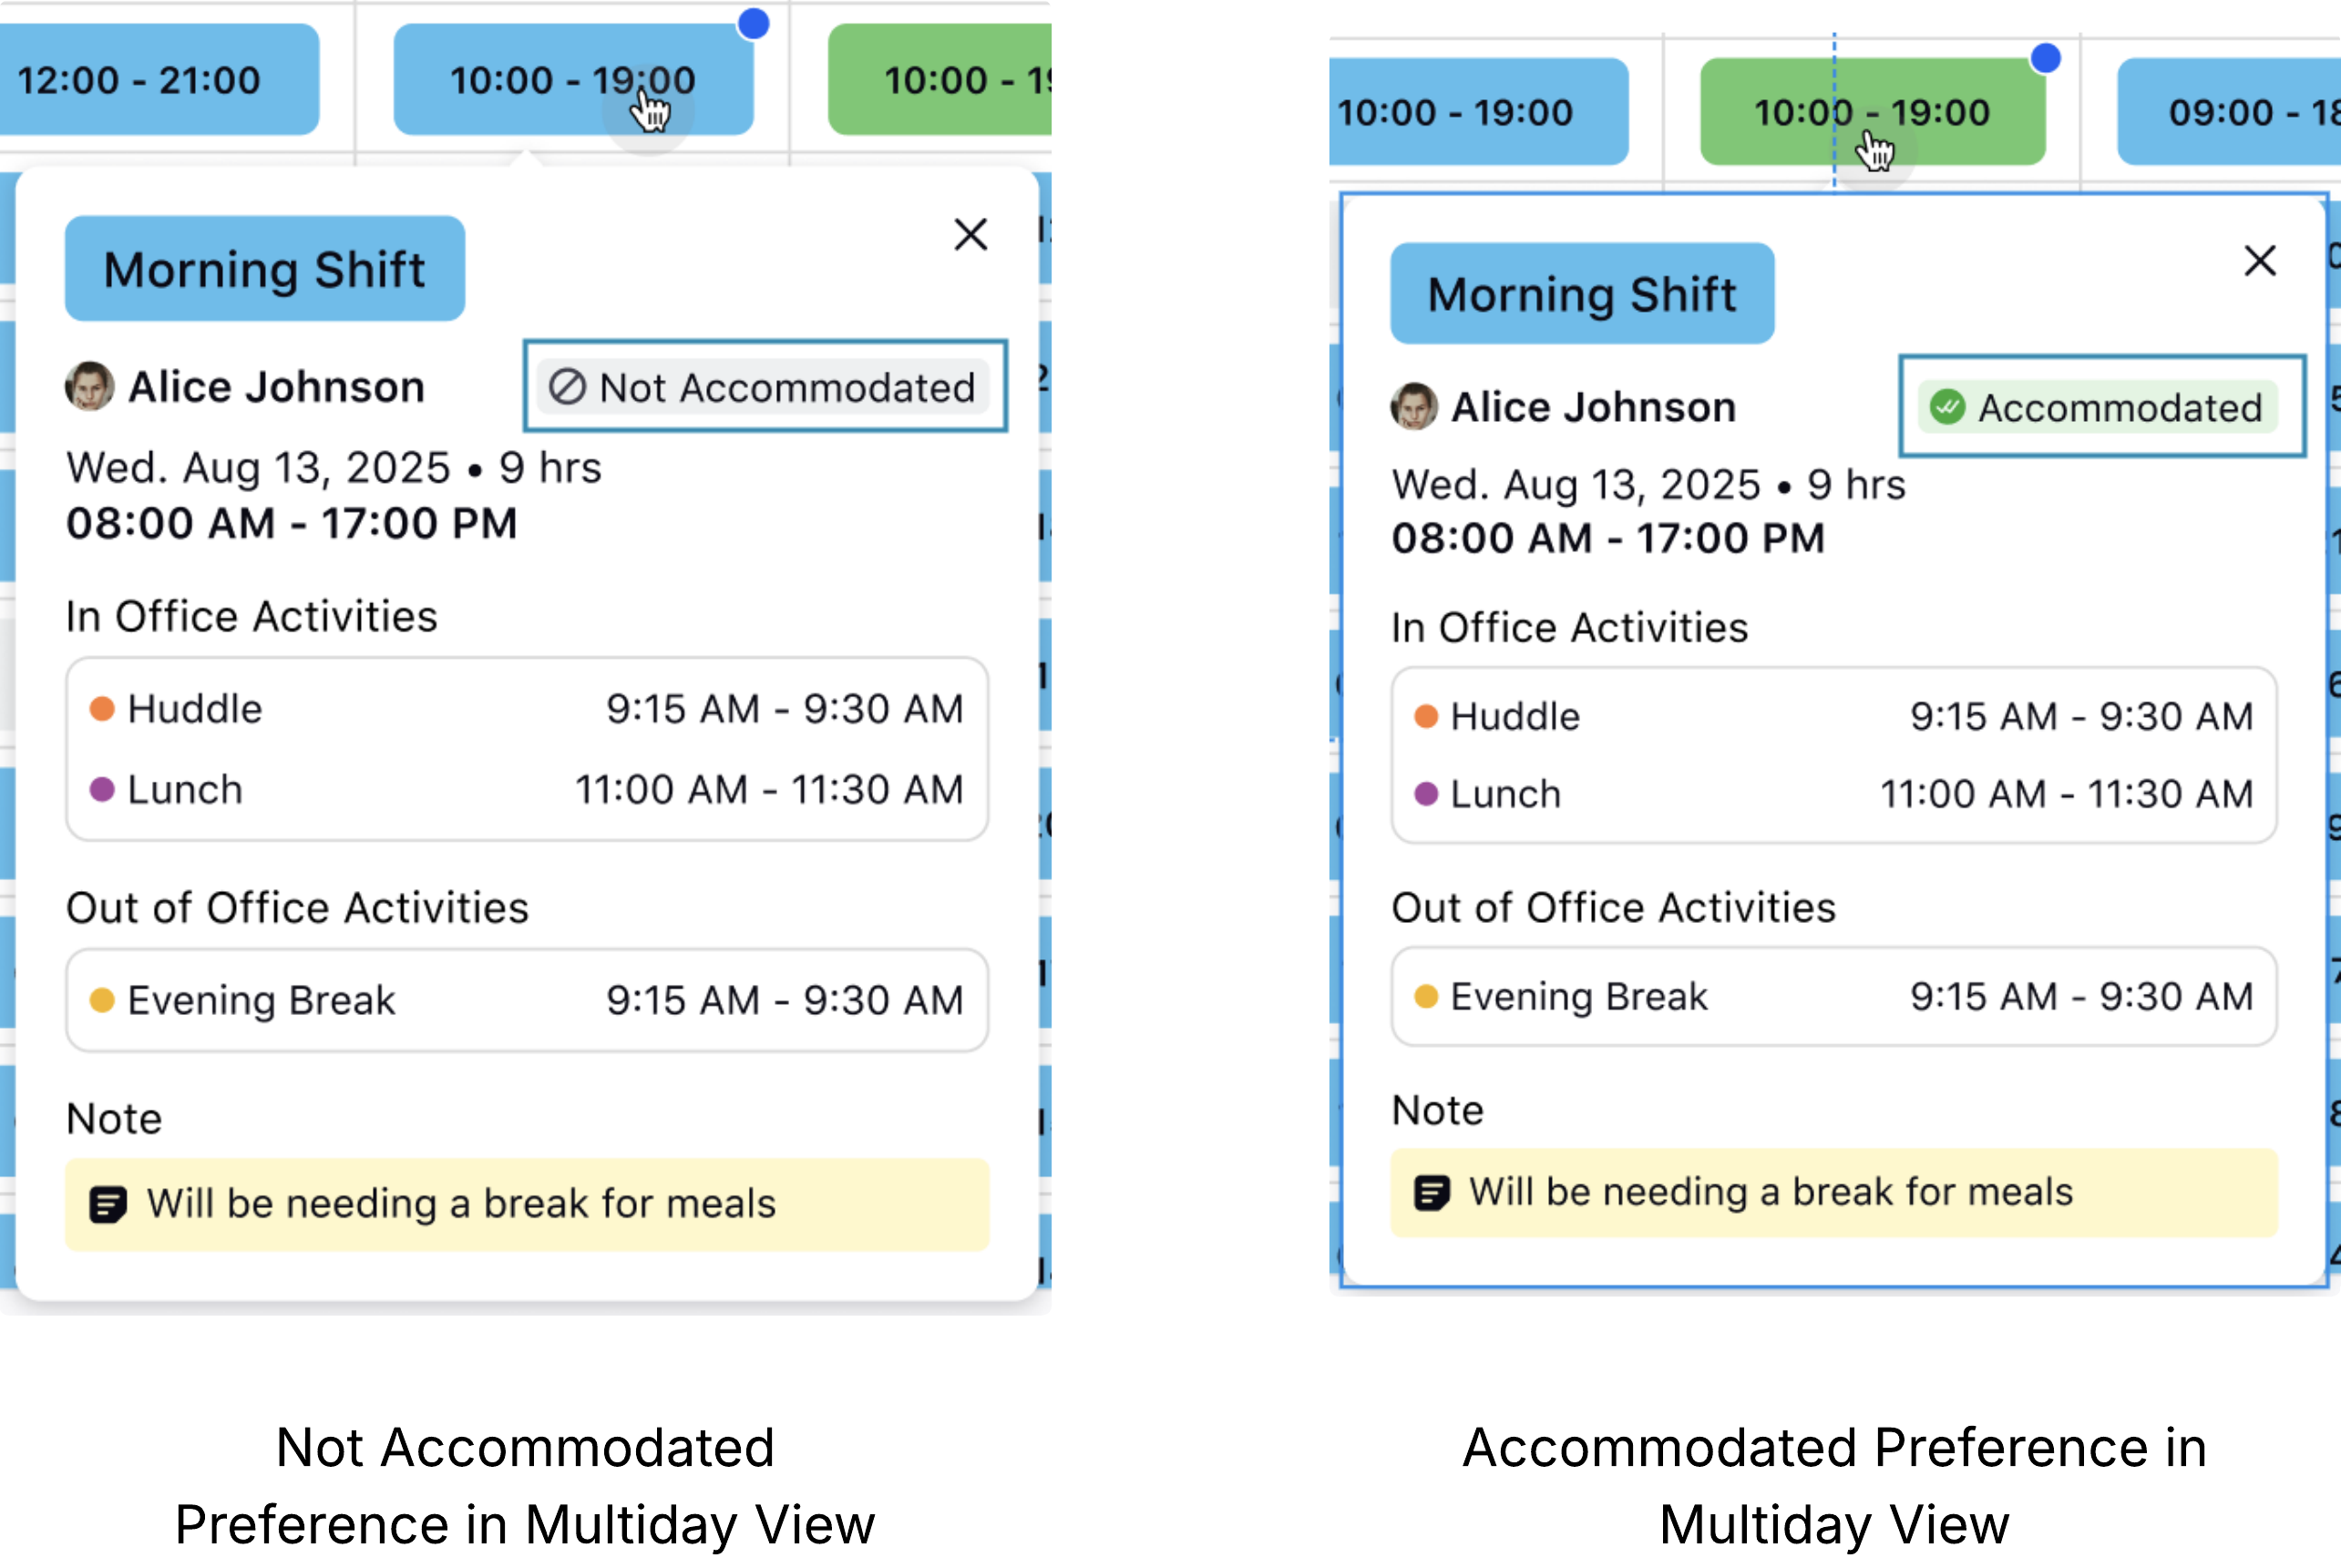
In Multiday View, hover over an agent’s schedule to see a details card. It will display a tag indicating whether the agent’s Preference for that day was accommodated.
View Schedule Audit of Agents
You can view the audit of the changes made to each agent’s schedule from the Schedule Scenario. Access the schedule audit of agents by clicking the vertical ellipsis (⋮) icon next to the agent and selecting Schedule Audit from the list. Do not confuse this section with the activity log of Schedule Scenarios, which displays previous versions of the entire schedule scenario.
Note: You can view the schedule audit of agents in the Intra-Day View only.

This opens a drawer at the bottom of the page, displaying the following columns with details for the selected date:
Modified By: Shows the user who made the particular modification.
Modified On: Shows the date and time at which the modification was made.
Source: Shows the source of the change to the agent’s schedule. The source can be Schedule Publish, Shift Trade, Shift Change, Time Off, or Overtime.

Any of the previous schedules of the agent can be restored by clicking the Restore button corresponding to the required row in the schedule audit drawer.
You can export an agent’s schedule audit for external use by clicking the Export button at the top right of the drawer. A notification will confirm when the export is successful. The exported file includes details of all previous schedules for the agent and contains the following columns:
Column | Description |
Agent Name | Shows the name of the agent. |
Modified By | Shows the user who made the particular modification. |
Modified On | Shows the date and time at which the modification was made. |
Source | Shows the source of the change to the agent’s schedule. The source can be Schedule Publish, Shift Trade, Shift Change, Time Off, or Overtime. |
Shift Start Date | Shows the date on which the Shift will start. |
Shift / Day Off | Indicates whether the agent was assigned a shift or had a Day Off on that date. |
Shift Timings | Shows the start and end time of the Shift. In case of a Day Off, it will show no data (NA). |
Shift Duration | Shows the duration of the Shift. In case of a Day Off, it will show no data (NA). |
Activity Details | Shows the details of all Activities assigned in that Shift, such as the Activity start time and duration. In case of a Day Off, it will show no data (NA). |
Note: If an agent has a night shift in any previously published version, the audit trail drawer extends into the next day until the shift’s end time.
Note: While the schedule audit of an agent is open, you cannot view the Schedule Scenario in Custom View.
Night Shift Handling
This section explains how night shifts are handled in scheduling. Night shifts are Shifts that begin on one day and end on the next. For example, a Shift starting at 9:00 PM on October 1 and ending at 3:00 AM on October 2.
Night shifts will be associated with the date on which the Shift started.
Night shifts cannot be dragged and dropped to start on the next day. For example, a Shift starting at 9:00 PM on October 1 with a duration of 6 hours can only be moved within October 1, up to 11:59 PM.
Intra-day and Multi-day metrics will show data of the entire duration of the night shift on the Shift start date, even the duration that falls on the next date.
If a night shift starts on the last day of a Schedule Scenario’s publish period, the entire shift duration will be published, including the hours that extend into the next day, even if that day falls outside the publish period.
Time Off Request Logic
Time Off Alerts help identify issues related to agents’ approved Time Off requests within a Schedule Scenario. These alerts highlight situations such as conflicts between scheduled shifts and approved Time Off, or cases where Time Off cannot be automatically assigned.
Note: Time Off alerts are hard alerts, meaning they must be resolved before the Schedule Scenario can be published.
Time Off Conflict
The Time Off Conflict alert is triggered when an approved Time Off request does not align with the agent’s currently assigned shift duration. This alert can be triggered when the approved Time Off request falls partially or entirely outside the agent’s scheduled Shift. For example, an agent may have a shift from 9:00 AM to 3:00 PM, but their approved Time Off request is for 2:00 PM to 5:00 PM.

To resolve this alert, you must adjust the shift’s start and/or end time so it matches the approved Time Off. You can do this by using the Revise Shift option or by dragging the shift boundaries directly in the graphical schedule view.
Note: Rejecting Time Off Conflict alerts will reject the agents' already approved Time Offs.

Once the Time Off request duration fully fits within the updated shift, the alert transitions to the Time Off Unassigned alert type. In this section, click the Add button associated with the alert to apply the Time Off to the agent’s schedule.
The Add All button becomes available when multiple alerts of the same type are present and all of them have been resolved.
Time Off Unassigned
The Time Off Unassigned alert is triggered when the Time Off request is created or approved after the Schedule Scenario has been created but not yet published.

To resolve this alert, click the Add button associated with the alert to apply the Time Off to the agent’s schedule.
If the Add button is disabled (greyed out), it may be because the agent has a Day Off or does not have a Shift assigned on the requested date. In this case, first assign a Shift to the agent for the relevant date. Refer to this section on revising Shifts and assigning Shifts and Activities. Once a Shift has been assigned for that date, the Add button becomes active. Click Add to apply the Time Off to the agent’s schedule.
The Add All button becomes available when multiple alerts of the same type are present and all of them have been resolved.
Synchronization Between Schedule Scenarios and Master Schedule
When changes are made to an agent’s schedule through Time Off, Shift Trade, Shift Change Request, or Overtime Request, these changes are instantly reflected in the Master Schedule and the Agent’s My Schedule view. However, whether these changes will appear automatically in the relevant Schedule Scenario depends on the following publication status:
If there are no unpublished changes (all updates are published), the changes will reflect automatically.
If the scenario has contradicting, unpublished changes (updates you made but haven’t published), the changes will not reflect automatically.
Schedule Scenario with No Unpublished Changes
For Schedule Scenarios with no unpublished changes, the system automatically syncs any updates in the Master Schedule, such as Time Off, Shift Trade, Shift Change Request, or Overtime Request, to the relevant Schedule Scenario. They are merged with the latest version of the scenario, and the status of the Schedule Scenario remains as Published.
Schedule Scenario with Unpublished Changes
For Schedule Scenarios with unpublished changes, the synchronization process must be done manually from the Alerts pane. In this situation, the Alerts pane will show the changes that require synchronization with the Master Schedule data under the Master Schedule Synchronization alert type.

Note: The Schedule Scenario will be automatically synced with the Master Schedule data if there are some non-conflicting unpublished changes in the Schedule Scenario.
Click the Sync button corresponding to these Alerts to manually synchronize the Schedule Scenario and Master Schedule data. This action makes the Master Schedule overwrite only the part of the Schedule Scenario where out-of-sync data was detected for the agents. All other details of the Schedule Scenario will remain unchanged.
Note: You cannot publish the Schedule Scenario without syncing with the Master Schedule data.
Note: You cannot undo or redo changes made before syncing the Schedule Scenario with the Master Schedule. After syncing, you can undo or redo any new changes.
After syncing the Schedule Scenario with the Master Schedule, reverting to a previous version will also undo any Shift Trades, Shift Changes, Time Off, or Overtime updates. The affected agents will be notified.