React Native - v11.1.1
Updated
You can integrate Live Chat into your brand’s React Native mobile application to provide real-time chat support for your customers. Sprinklr offers a comprehensive Live Chat Mobile SDK to enable this functionality.
Live Chat SDK Version
Live Chat Release: 11.1.1
Supported Versions: Starting August 2025, Live Chat SDK versions 7.0.0 and above are supported.
![]() Note: Starting August 2025, Live Chat SDK 6.2.0 and lower versions will be deprecated. We recommended upgrading to versions 7.0.0 or higher for continued support.
Note: Starting August 2025, Live Chat SDK 6.2.0 and lower versions will be deprecated. We recommended upgrading to versions 7.0.0 or higher for continued support.
Compatibility
The following table lists the compatible framework and platform versions:
Framework or Platform | Version |
React Native | Version ≥ 0.70.0 |
Android | Minimum SDK version ≥ 24 |
iOS | Minimum iOS version ≥ 15.1 |
Gradle | No restrictions (depends on the React Native version used) |
Xcode | No restrictions (depends on the React Native version used) |
App Size Impact
The increase in app size after integrating the Live Chat SDK depends on the platform and framework. Integrating the Live Chat SDK will increase your app size approximately by:
iOS: ~7MB
Android: ~6MB
![]() Note: The final size may vary based on customizations of peer dependencies.
Note: The final size may vary based on customizations of peer dependencies.
Integration Steps
The Live Chat SDK integration for React Native involves the following key steps:
1. Install Live Chat SDK and Peer Dependencies: Add the Live Chat SDK package and any required peer dependencies to your project. If you're already using a library similar to a peer dependency, you can inject your own custom implementation. For details, see Customizing Peer Dependencies.
2. Set Up Live Chat Messenger: Link the Sprinklr Messenger module to your React Native project. Configure necessary permissions such as media sharing, video calling, location access, and push notifications.
3. Initialize Sprinklr Live Chat: The takeOff method is used to initialize the Sprinklr Live Chat in your React Native app. This step prepares Live Chat to work based on the type of user using your app.
4. Launch Live Chat Messenger: Define when and how the Messenger interface appears within your app’s UI.
5. Configure Live Chat : Customize the chat experience using available methods to align the Messenger with your brand and optimize customer interactions.
Advanced Configuration
Now that Live Chat is integrated, you can enhance the user experience further by enabling advanced features:
Enable Live Chat Logger: Set up logging and event monitoring to improve debugging, observability, and real-time tracking of chat activities.
Enable Push Notifications: Configure push notifications to ensure users receive real-time updates even when the app is in the background or closed.
Enable In-App Notifications: Display real-time message alerts as banners within the app while it is in the foreground.
Troubleshooting
Refer to the Troubleshooting section to resolve common challenges when integrating and running the Live Chat SDK effectively.
Install Live Chat Messenger and Peer Dependencies
To integrate Sprinklr Live Chat Messenger into your project, you must install the Live Chat SDK along with its necessary peer dependencies. This section provides a step-by-step guide to install Live Chat Messenger and its necessary dependencies.
Prerequisite
Before you begin with the installation, ensure that the following prerequisite is met:
Configure Sprinklr Messenger Registry
Sprinklr Live Chat Messenger is a restricted package. Therefore, you need to configure the following registry in .npmrc for Sprinklr scoped packages:
@sprinklrjs:registry=https://prod-nexus-external.sprinklr.com/nexus/repository/npm/
always-auth=true
_auth=<SPR_REGISTRY_AUTH_TOKEN>
![]() Note: <SPR_REGISTRY_AUTH_TOKEN> is the registry token provided by Sprinklr. To get the registry token, raise a support ticket at tickets@sprinklr.com.
Note: <SPR_REGISTRY_AUTH_TOKEN> is the registry token provided by Sprinklr. To get the registry token, raise a support ticket at tickets@sprinklr.com.
Install Sprinklr Messenger
![]() Note: The Live Chat package name has been updated from @sprinklr/chat-native-client to @sprinklrjs/chat-native-client.
Note: The Live Chat package name has been updated from @sprinklr/chat-native-client to @sprinklrjs/chat-native-client.
Install the Sprinklr Messenger in your project using your preferred package manager, as shown in the following commands:
Using yarn
yarn add @sprinklrjs/chat-native-client@11.1.1 Using npm
npm install --save @sprinklrjs/chat-native-client@11.1.1
Install Sprinklr Messenger Peer Dependencies
Sprinklr Live Chat Messenger supports the peer dependencies listed in the Supported Peer Dependencies table. You can install these dependencies as part of the Sprinklr Messenger installation.
In addition to installing these dependencies, they also need to be linked natively. To properly link them, refer to their official documentation. Additionally, verify that you have all the required dependencies and that their versions meet the specified threshold in the Supported Versions column of the Supported Peer Dependencies table.
If you need to use an alternative to a specific dependency or implement a custom solution, refer to the Customize Peer Dependencies section for guidance.
Supported Peer Dependencies
The following sections provide an overview of the supported peer dependencies and their respective details:
State Management
Peer Dependency | Description | Supported Versions |
JavaScript library for predictable and maintainable global state management | 4.0.0 or later | |
Facilitates the connection between React components and the Redux store | 8.0.0 or later | |
Handles side effects in Redux applications, such as data data fetching and impure things like accessing the browser cache | 1.0.1 or later | |
A library for creating memorized "selector" functions |
React Native UI Components
Peer Dependency | Description | Supported Versions |
Core library for building cross-platform mobile applications using React | 0.70.0 or later | |
JavaScript library for building UIs, base for React Native | 18.2.0 or later | |
A customizable chat UI library for React Native | ||
Allows rendering of HTML content within a React Native app | ||
Provides SVG support in React Native applications | ||
A library for using vector icons in React Native apps | ||
Enables video playback within React Native applications | ||
A component to render web content in a React Native app |
Utility Libraries
Peer Dependency | Description |
A library for JavaScript functional programming | |
A modern JavaScript utility library delivering modularity, performance & extras | |
A helper library for creating immutable data structures | |
A date library that parses, validates, manipulates, and displays dates/times | |
Handles binary data within the app | |
Immutable color conversion and manipulation | |
JavaScript library of crypto standards | |
JavaScript library for RSA encryption | |
MQTT client library for Node.js and browser | |
Provides information about and control over the current node.js process | |
Used for type checking React props | |
An implementation of the Node.js EventEmitter class |
React Native Community Libraries
Peer Dependency | Description |
An asynchronous, unencrypted, persistent, key-value storage system for React Native | |
It provides access to the local camera roll or photo library | |
Allows access to the device's clipboard | |
It allows you to get information on Connection type and Connection quality | |
Handles push notifications on iOS |
Additional React Native Features
Peer Dependency | Description | Required/Optional | Supported Versions |
Handles data transfer and file system access | |||
This plugin provides client-side integration for the CodePush service, allowing you to easily add a dynamic update experience | |||
A React Native module that allows you to select a photo/video from the device library or camera | |||
This React Native package allows you to prevent the screen from going to sleep while your app is active | |||
A unified permissions API for React Native on iOS, Android | 3.6.0 or later | ||
Manages local and remote notifications | |||
React Native Reanimated is a powerful animation library built. With Reanimated, you can easily create smooth animations and interactions that run on the UI thread. Install only if you want to support animations and transitions for messages in Live Chat. | Optional | ||
This library includes Map components for iOS and Android. Install only if you want to support the location sharing feature in Live Chat. | Optional |
Install Peer Dependencies
You can use the following yarn or npm command to install the peer dependencies:
Using yarn
yarn add <package-name> Example
yarn add react-native-vector-icons react-native-blob-util react-native-image-picker react-native-video @react-native-community/netinfo react-native-webview react-native-permissions @react-native-camera-roll/camera-roll @react-native-async-storage/async-storage @react-native-clipboard/clipboard react-native-svg react-native-reanimated Using npm
npm install <package-name> Example
npm install --save react-native-vector-icons react-native-blob-util react-native-image-picker react-native-video @react-native-community/netinfo react-native-webview react-native-permissions @react-native-camera-roll/camera-roll @react-native-async-storage/async-storage @react-native-clipboard/clipboard react-native-svg react-native-reanimated
Set Up Live Chat Messenger
To set up Sprinklr Messenger, you need to link the Sprinklr Messenger in your project and add the necessary permissions.
Setup for Android
To setup Sprinklr Messenger, follow these steps:
Link Sprinklr Messenger in Your Project
You can link Sprinklr Messenger in your project with autolinking or without autolinking. Autolinking automatically links the peer dependencies in your project with Sprinklr Messenger.
![]() Note: Sprinklr Messenger supports the React Native New Architecture. If you are using the new architecture, it is recommended to use autolinking to link Sprinklr Messenger in your project.
Note: Sprinklr Messenger supports the React Native New Architecture. If you are using the new architecture, it is recommended to use autolinking to link Sprinklr Messenger in your project.
See the relevant section for steps:
Autolinking is enabled (recommended)
Autolinking is disabled
Autolinking Enabled
1. In android/settings.gradle, add the following lines. This will add Sprinklr Messenger and related dependencies to your app.
include ':spr-native-kit'project(':spr-native-kit').projectDir = new File(rootProject.projectDir, '../node_modules/@sprinklrjs/native-kit/android')
2. In MainApplication.java, add the following lines to make Sprinklr Messenger related packages a part of React Native package:
To enable autolinking, pass true as value to the getPackages method.
import com.sprinklr.messenger.SPRMessengerPackagesProvider@Overrideprotected List<ReactPackage> getPackages() {List<ReactPackage> packages = new ArrayList<>(Arrays.asList(...{YOUR_NATIVE_PACKAGES}));packages.addAll(SPRMessengerPackagesProvider.getPackages(true)); // send false to disable automatic linking, send true or nothing to enable autolinkingreturn packages;}
Autolinking Disabled
1. In android/settings.gradle, add following lines. This will add Sprinklr Messenger and related dependencies to your app.
include ':@sprinklr-chat-native-client'project(':@sprinklr-chat-native-client').projectDir = new File(rootProject.projectDir, '../node_modules/@sprinklrjs/chat-native-client/android')include ':spr-native-kit'project(':spr-native-kit').projectDir = new File(rootProject.projectDir, '../node_modules/@sprinklrjs/native-kit/android')
2. In android/app/build.gradle, add the following line:
dependencies {implementation project(':@sprinklr-chat-native-client')}
3. Add these lines to MainApplication.java. This will make Sprinklr Messenger’s related packages a part of the React Native package:
import com.sprinklr.messenger.SPRMessengerPackagesProvider..@Overrideprotected List<ReactPackage> getPackages() {List<ReactPackage> packages = new ArrayList<>(Arrays.asList(...{YOUR_NATIVE_PACKAGES}));packages.addAll(SPRMessengerPackagesProvider.getPackages());return packages;}
Add Permissions to Your Project
If you are supporting media upload/download and location sharing features in messenger, include the following permissions in AndroidManifest.xml:
Permission | Description | Required/Optional | Android API Level | Scope |
android.permission.READ_EXTERNAL_STORAGE | Allows an app to read from external storage. | Required | API Level < 29 | Media Download |
android.permission.WRITE_EXTERNAL_STORAGE | Allows an app to write to external storage. | Required | API Level < 29 | Media Download |
android.permission.CAMERA | Allows an app to access the device camera. | Optional Only required if video call feature is being used. | All supported API Level | Video Calling |
android.permission.RECORD_AUDIO | Allows an app to record audio. | Optional Only required if video call feature is being used. | All supported API Level
| Video Calling |
android.permission.POST_NOTIFICATIONS | Allows an app to send notifications to the user. | Optional Only required if messenger push notifications are to be shown | All supported API Level
| Push Notifications |
android.permission.ACCESS_FINE_LOCATION | Allows an app to access the location of the user. | Optional Only required if location sharing feature of Live Chat is used. | All supported API Level
| Location Sharing |
android.permission.ACCESS_COARSE_LOCATION | Allows an app to access the approximate location of the user. | Optional Only required if location sharing feature of Live Chat is used.
| All supported API Level
| Location Sharing |
Example
<uses-permission android:name="android.permission.READ_EXTERNAL_STORAGE" /><uses-permission android:name="android.permission.WRITE_EXTERNAL_STORAGE" /><uses-permission android:name="android.permission.DOWNLOAD_WITHOUT_NOTIFICATION" /><uses-permission android:name="android.permission.CAMERA" /><uses-permission android:name="android.permission.RECORD_AUDIO" /><uses-permission android:name="android.permission.POST_NOTIFICATIONS"/>
Setup for iOS
To setup Sprinklr Messenger in iOS, follow these steps:
Link Sprinklr Messenger in Your Project
In Podfile, add the following lines. This will add Sprinklr Messenger and related dependencies to your app:
pod 'SPRMessenger', :path => '../node_modules/@sprinklrjs/chat-native-client/SPRMessenger.podspec'pod 'SPRNativeKit', :path => '../node_modules/@sprinklrjs/native-kit/SPRNativeKit.podspec' # Add this pod manually if not linked automatically via react native auto linking
Add Permissions to Your Project
If you are supporting upload and download media functionality in messenger, include the following permissions in the info.plist file:
![]() Note: These permissions are required by Apple for all apps that access the photo library or use the camera/microphone.
Note: These permissions are required by Apple for all apps that access the photo library or use the camera/microphone.
Permission | Description | Required/Optional | IOS version | Scope |
NSCameraUsageDescription | Allows an app to access the device camera. | Optional Only required if video call or media (videos/images) sharing feature is being used in Live Chat. | All iOS versions | Video Call Media Upload |
NSMicrophoneUsageDescription | Allows an app to access the microphone. | Optional Only required if video call or video sharing feature is being used in Live Chat. | All iOS versions
| Video Call Media Upload |
NSPhotoLibraryUsageDescription | Allows an app to access the photo library. | Optional Only required if media from gallery sharing feature is being used in Live Chat. | All iOS versions
| Media Upload |
NSLocationWhenInUseUsageDescription | Allows an app to access location of the user.
| Optional Only required if location sharing is being used in Live Chat. | All iOS versions
| Location Sharing |
Example
<key>NSCameraUsageDescription</key><string>Messenger app requires access to the camera to capture the photos.</string><key>NSMicrophoneUsageDescription</key><string>Messenger app requires access to the microphone to record video.</string><key>NSPhotoLibraryUsageDescription</key><string>Messenger app requires access to the photos library.</string><key>NSLocationWhenInUseUsageDescription</key><string>We need your location to display it on the map.</string>
Initialize Sprinklr Live Chat
The takeOff method initializes the Sprinklr Messenger Client SDK. This step prepares Live Chat to work based on the type of user using your app. It can be used to initialize the SDK for the following type of users:
This diagram illustrates how to initialize and present Sprinklr Live Chat:
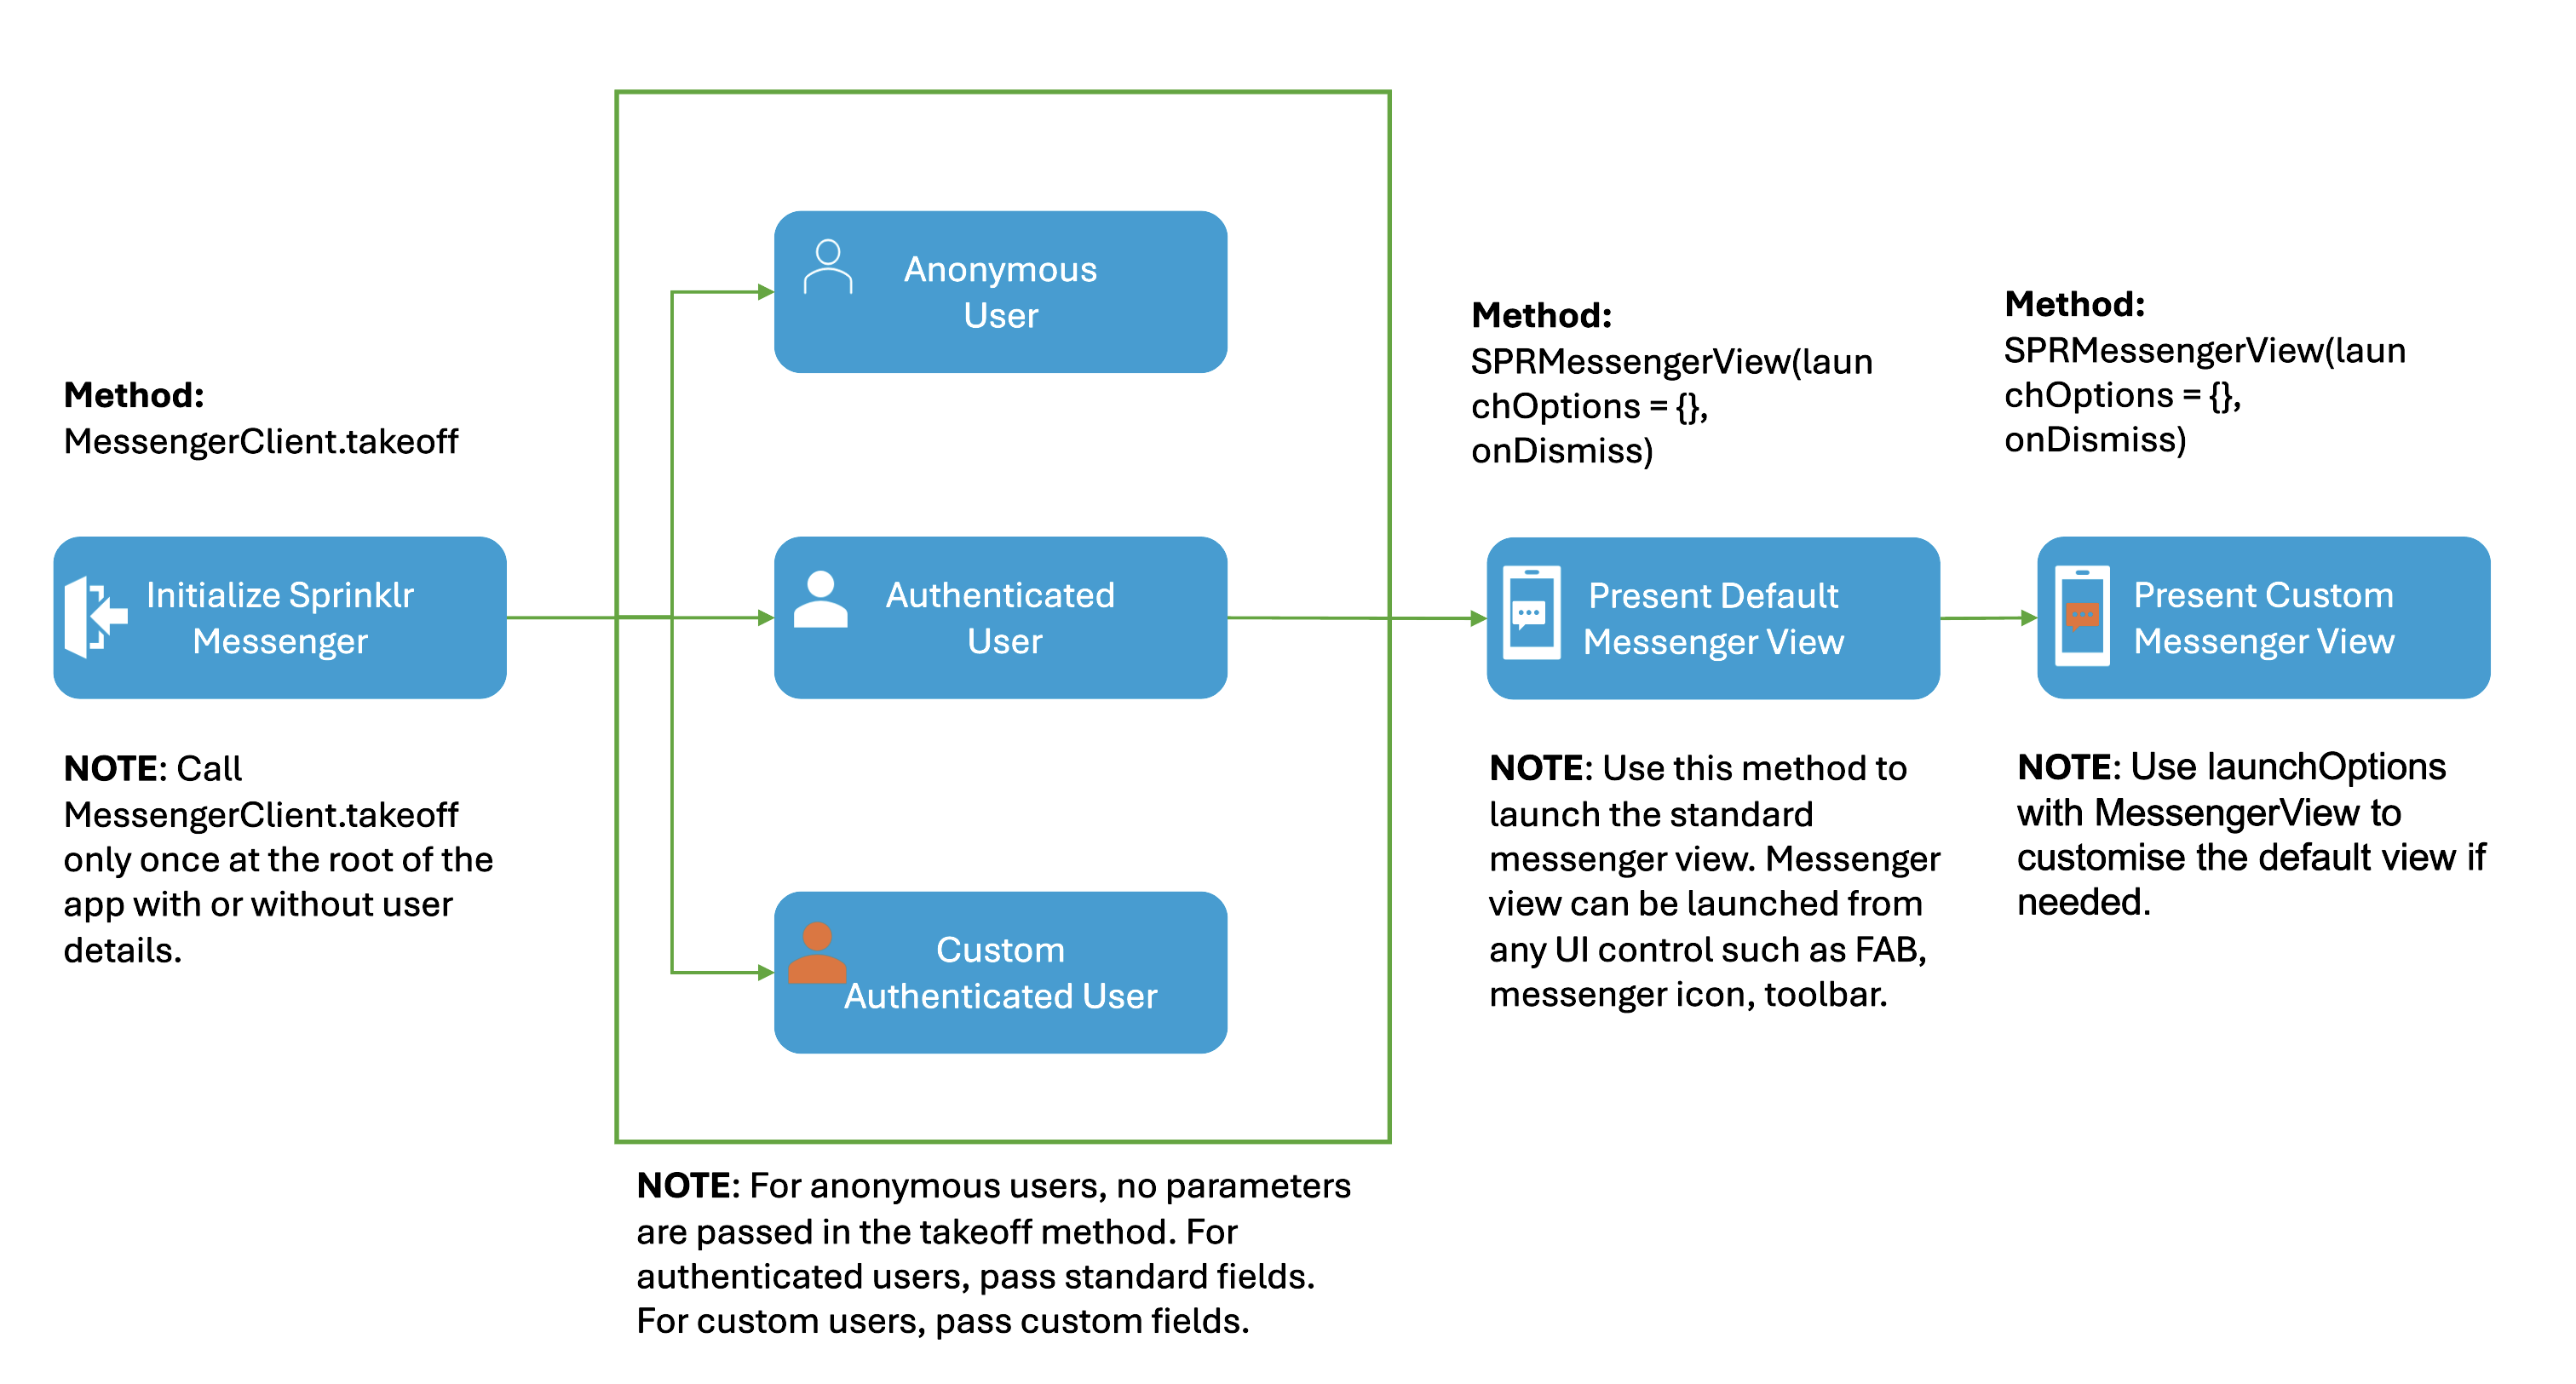
Initialize for Anonymous Users
For anonymous users (unauthenticated users), you can initialize the messenger using the takeOff method without specifying any user details. Behind the scenes, an anonymous user is automatically created for the messenger and the flow for anonymous user is initialized.
![]() Note:
Note:
The takeOff method must be called only once in the application lifecycle.
For optimal performance, call the takeOff method at the root of the application or as early as possible in your application flow.
Syntax
import MessengerClient from '@sprinklrjs/chat-native-client'MessengerClient.takeOff({appId: '<SPR_APP_ID>', // This will be provided by Sprinklrenvironment: '<SPR_ENVIRONMENT>', // This will be provided by SprinklrpushAppId: '<SPR_PUSH_APP_ID>', // Should be Unique id, if not sure pass same as device IDdeviceId: '<UNIQUE_DEVICE_ID>',skin: 'MODERN', // default value is MODERN, options: CLASSIC | MODERNlocale: '<SPR_LOCALE>', // default value is enthemeMode: 'DEFAULT' // default value is DEFAULT, options DEFAULT | DARK})
Parameters
Parameter | Description | Required/Optional |
appId | Unique identifier of the Live Chat app. This will be provided by Sprinklr. | Required |
environment | This will be provided by Sprinklr. | Required |
pushAppId | Unique identifier for push notifications. If unsure, use the same value as deviceId. | Optional |
deviceId | Unique identifier for the device. | Optional |
skin | Defines the messenger UI skin. Supported Values: CLASSIC, MODERN Default Value: MODERN | Optional |
locale | Sets the language/locale for the messenger. Default Value: en | Required |
themeMode | Defines the theme mode. Supported Values: DEFAULT, DARK Default Value: DEFAULT | Optional |
Initialize for Authenticated Users
For authenticated users, initialize the messenger using the takeOff method with user details. The takeOff method will consider the provided user details for the messenger and initialize the flow accordingly.
![]() Note:
Note:
The takeOff method must be called only once in the application lifecycle. For updating the user details or other information in the messenger, you can use the dedicated methods explained in the Configure Live Chat section.
For optimal performance, call the takeOff method at the root of the application or as early as possible in your application flow.
Syntax
import MessengerClient from '@sprinklrjs/chat-native-client'
MessengerClient.takeOff({
appId: '<SPR_APP_ID>', // This will be provided by sprinklr
environment: '<SPR_ENVIRONMENT>', // This will be provided by sprinklr
pushAppId: '<SPR_PUSH_APP_ID>', // Should be Unique id, if not sure pass same as device ID
deviceId: '<UNIQUE_DEVICE_ID>',
locale: '<SPR_LOCALE>', // default value is en
skin: 'MODERN', // default value is MODERN, options: CLASSIC | MODERN
themeMode: 'DEFAULT', // default value is DEFAULT, options: DEFAULT | DARK
user: {
userId: '12345',
firstName: 'John',
lastName: 'Doe',
phoneNo: '9876543210',
email: 'John.Doe@example.com',
profileImageUrl: 'https://example.com/profilePic.jpg',
hash: 'f30c3b0835ecd378a134c74bce8cea866df8c5b6e12a8c219c9bb288f7270e22'
}
})
Parameters
Parameter | Description | Required/Optional |
appId | Unique identifier of the Live Chat app. This will be provided by Sprinklr. | Required |
environment | This will be provided by Sprinklr. | Required |
pushAppId | Unique identifier for push notifications. If unsure, use the same value as deviceId | Optional |
deviceId | Unique identifier for the device. | Optional |
skin | Defines the messenger UI skin. Supported Values: CLASSIC, MODERN Default Value: MODERN | Optional |
locale | Sets the language/locale for the messenger. Default Value: en | Required |
themeMode | Defines the theme mode. Supported Values: DEFAULT, DARK Default Value: DEFAULT | Optional |
user | Specifies user details. For more details, see the User Object table. | Required (for authenticated chats) |
User Object
Parameter | Description | Required/Optional |
userId | Unique identifier of the user. | Required |
firstName | First name of the user. | Optional |
lastName | Last name of the user. | Optional |
phoneNo | Phone number of the user. | Optional |
Email ID of the user. | Optional | |
profileImageUrl | URL to the profile image of the user. | Optional |
hash | To know the steps to generate a hash, see How to generate Hash?
| Required |
Initialize for Custom Authenticated Users
You can create a custom user with custom parameters and pass them to the takeOff method.
![]() Note:
Note:
The takeOff method must be called only once in the application lifecycle. For updating the user details or other information in the messenger, you can use the dedicated methods explained in other sections.
For optimal performance, call the takeOff method at the root of the application or as early as possible in your application flow.
If you want to implement a custom user authentication flow, contact the Sprinklr Support team at tickets@sprinklr.com to discuss the implementation process.
Syntax
import MessengerClient from '@sprinklrjs/chat-native-client'MessengerClient.takeOff({appId: '<SPR_APP_ID>', // This will be provided by sprinklrenvironment: '<SPR_ENVIRONMENT>', // This will be provided by sprinklrpushAppId: '<SPR_PUSH_APP_ID>', // Should be Unique id, if not sure pass same as device IDdeviceId: '<UNIQUE_DEVICE_ID>',locale: '<SPR_LOCALE>', // default value is enskin: 'MODERN', // default value is MODERN, options: CLASSIC | MODERNthemeMode: 'DEFAULT', // default value is DEFAULT, options: DEFAULT | DARKcustomUser: {customAttribute1: 'value1', //Add your custom attributecustomAttribute2: ‘value2’, //Add your custom attributehash: 'f30c3b0835ecd378a134c74bce8cea866df8c5b6e12a8c219c9bb288f7270e22'}})
Parameters
Parameter | Description | Required/Optional |
appId | Unique identifier of the Live Chat app. This will be provided by Sprinklr. | Required |
environment | This will be provided by Sprinklr. | Required |
pushAppId | Unique identifier for push notifications. If unsure, use the same value as deviceId | Optional |
deviceId | Unique identifier for the device. | Optional |
skin | Defines the messenger UI skin. Supported Values: CLASSIC, MODERN Default Value: MODERN | Optional |
locale | Sets the language/locale for the messenger. Default Value: en | Required |
themeMode | Defines the theme mode. Supported Values: DEFAULT, DARK Default Value: DEFAULT | Optional |
customUser | User details containing custom parameters and hash. For more details, see the Custom User Object table. | Required (for custom users) |
Custom User Object
Parameter | Description | Required/Optional |
Custom Attribute | This is a custom attribute that could be defined by you. You can define multiple custom attributes. | Required |
hash | To know the steps to generate a hash, see How to generate Hash? | Required |
How to Generate Hash
The hash is a Hash-based Message Authentication Code (HMAC). Sprinklr uses the SHA 256 hash function to generate HMAC.
Let’s take an example of the following user:
user: {userId: '12345',firstName: 'John',lastName: 'Doe',phoneNo: '9876543210',email: 'John.Doe@example.com',profileImageUrl: 'https://example.com/profilePic.jpg',hash: 'f30c3b0835ecd378a134c74bce8cea866df8c5b6e12a8c219c9bb288f7270e22'}
Follow these steps to generate a hash for the example user:
1. Concatenate specific user details in the following order, separating each with an underscore (_) to create a string:
userId_firstName_lastName_profileImageUrl_phoneNo_email For example, the resulting string to generate the hash would be:
12345_John_Doe_https://example.com/profilePic.jpg_9876543210_John.Doe@example.com 2. Pass the string and API key provided by Sprinklr to the following JavaScript function:
import crypto from 'crypto-js';const getHMACHash = (message, key) => crypto.HmacSHA256(message, key).toString(); //API Key will be provided by Sprinklr
Sample code to generate HMAC is mentioned in Sample code for hash generation.
![]() Note: Ensure you have the required dependency installed, and the version must be within the specified range:
Note: Ensure you have the required dependency installed, and the version must be within the specified range:
"crypto-js": "<= 3.3.0"
For more information, refer to crypto-js documentation.
Launch Live Chat Application
After you install and setup Live Chat messenger, the next step is to define how the messenger is launched and displayed.
Present Messenger View
The messenger view can be displayed using any of the UI controls such as Floating Action Button (FAB), Messenger Icon, Tab Bar Icon according to your application requirements.
To present the messenger view, create a full-page messenger view as shown in the following example. You can define the full-page messenger view as a scene in your navigator and present as per your use case:
import { MessengerView } from '@sprinklrjs/chat-native-client';function SPRMessengerView(launchOptions = {}, onDismiss) {return (<MessengerView launchOptions={launchOptions} onDismiss={onDismiss} /> // onDismiss should be provided to dismiss the messenger when user close the messenger. For e.g. onDismiss: navigation.pop);}
Parameters
Parameter | Description |
onDismiss | A callback function that handles closing of the messenger. |
launchOptions | Defines how the messenger should be launched. You can use launchOptions to open the messenger in response to events like notifications. |
Customize Live Chat Messenger View
Sprinklr Live Chat comprises of two screens: Home and Conversation screen. By default, Live Chat opens with a home page that displays all conversations. However, you can customize this behavior and launch MessengerView with a single conversation view.
You can customize the following Live Chat views:
Default View
Single Conversation View
Default View
The default view opens with a home page that displays all conversations. The following are the various ways you can configure the default view based on your use case:
Single Conversation View
You can choose to display only the conversation screen and hide the home screen completely.
The following are the various ways you can configure the single conversation view based on your use case:
Close Live Chat Messenger
To close the Live Chat messenger, use the MessengerClient.closeMessenger() function.
import MessengerClient from '@sprinklrjs/chat-native-client';MessengerClient.closeMessenger();
Configure Live Chat Messenger
Sprinklr Live Chat Messenger provides various methods to help you update user details, capture conversation context, customize the chat experience, and more.
The following sections describe these methods in detail, along with their syntax and required parameters:
Update User
Use the updateUser method to authenticate the user and update their details such as user Id, first name, last name, and more.
Syntax
import MessengerClient from '@sprinklrjs/chat-native-client'MessengerClient.updateUser({userId: '12345',firstName: 'John',lastName: 'Doe',phoneNo: '9876543210',email: 'John.Doe@example.com',profileImageUrl: 'https://example.com/profilePic.jpg',hash: 'f30c3b0835ecd378a134c74bce8cea866df8c5b6e12a8c219c9bb288f7270e22'})
Parameters
Parameter | Description | Required/Optional |
userId | Unique identifier of the user. | Required |
firstName | First name of the user. | Optional |
lastName | Last name of the user. | Optional |
phoneNo | Phone number of the user. | Optional |
Email ID of the user. | Optional | |
profileImageUrl | URL to the profile image of the user. | Optional |
hash | Hash should be generated for every change in user object. For the steps to generate hash, see How to Generate User Hash?
| Required |
Update Custom User
Use the updateCustomUser method to authenticate the user and update details of a custom user.
![]() Note: If you want to implement a custom user authentication flow, contact the Sprinklr Support team at tickets@sprinklr.com.
Note: If you want to implement a custom user authentication flow, contact the Sprinklr Support team at tickets@sprinklr.com.
Syntax
import MessengerClient from '@sprinklrjs/chat-native-client'MessengerClient.updateCustomUser({customAttribute1: ‘value1',customAttribute2: ‘value2’,hash: 'f30c3b0835ecd378a134c74bce8cea866df8c5b6e12a8c219c9bb288f7270e22'})
Parameters
Parameter | Description | Required/Optional |
Custom Attribute | This is a custom attribute that could be defined by you. You can define multiple custom attributes. | Required |
hash | A new hash should be generated whenever the user object is modified. For the steps to generate hash, see How to Generate User Hash? | Required |
Update Locale
Use the updateLocale method to update the language in which Live Chat will be displayed.
Syntax
import MessengerClient from '@sprinklrjs/chat-native-client'MessengerClient.updateLocale(locale)
Capture Customer Context when Starting a New Conversation from Custom View
When a user opens Live Chat with a custom view, you might want to capture additional context on the conversation/case.
For example, consider a button called Know More about this laptop next to a laptop product. When this button is clicked, you want to open a chat with a predefined contextual welcome message: Hi there! It looks like you are interested in buying a laptop. Also, you want to set the case custom fields “product category: laptop” and “case type: inquiry”.
To achieve this, follow these steps:
1. Create case custom fields. For steps to create a custom field, see Add a Custom Field.
2. Copy the field names of the custom fields you created.
You can copy the field names from the Sprinklr UI by navigating to Custom Fields. Then, locate the desired custom field and click the three-dot menu icon. On the menu, click Copy Field Name.
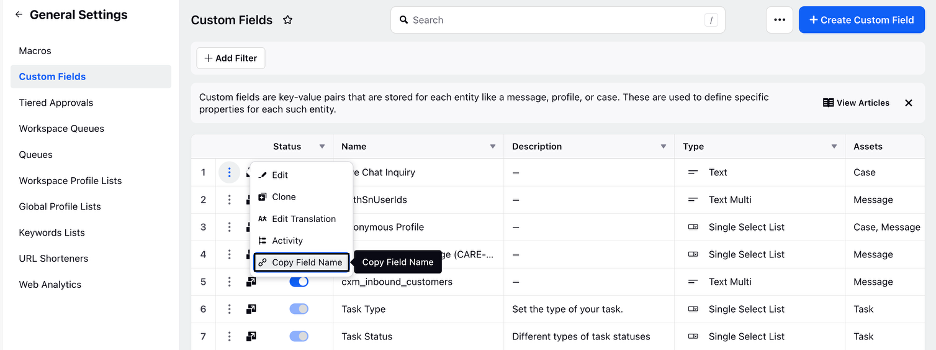
In this example, these are the custom field names: 5ea7fa9e87651f356209878f and 5eb7fa9e87651f356219348e.
3. Pass the conversationContext object with these custom fields to chatInitialisationContext when a new conversation is opened directly.
const chatInitialisationContext = {...restFieldsconversationContext: {"5ea7fa9e87651f356209878f": ['laptop'],"5eb7fa9e87651f356219348e": ['inquiry']}}
Parameters
Parameter | Description | Required/Optional |
conversationContext | Object containing the key-value pairs of custom field names and their values. You can copy the custom field from the Sprinklr UI. | Required |
Capture Customer Context on All Cases of the User
When a user starts a new conversation, you might want to pass some contextual information in case custom fields.
To achieve this, follow these steps:
1. Create case custom fields. For steps to create a custom field, see Add a Custom Field.
2. Copy the field names of the custom fields you created.
You can copy the field names from the Sprinklr UI by navigating to Custom Fields. Then, locate the desired custom field and click the three-dot menu icon. On the menu, click Copy Field Name.
3. Pass or update context. You can pass context in two ways:
Pass Context When the Chat Is Initiated
You can pass these values in clientContext in the takeOff method. In this example, the custom field name is 5e281d040844e435b.
import MessengerClient from '@sprinklrjs/chat-native-client'MessengerClient.takeOff({...restSettings,clientContext: {"5e281d040844e435b": ["Custom Field Value"]}})
Parameters
Parameter | Description | Required/Optional |
clientContext | Object containing the key-value pairs of custom field names and their values. You can copy the custom field from the Sprinklr UI. | Required |
Update Context at Runtime
You can update the client context in runtime by calling the following method:
import MessengerClient from '@sprinklrjs/chat-native-client'MessengerClient.updateClientContext({"5e281d040844e435b": ["Custom Field Value"]})
Parameters
Parameter | Description | Required/Optional |
Custom Field Name with its values | Object containing the key-value pairs of custom field names and their values. You can copy the custom field from the Sprinklr UI. | Required |
Update Conversation Context on Demand
You might want to update case custom fields for an active conversation. For example, after a customer completes a purchase on the website, you can add the transaction amount or Id to the case for reporting purposes. This allows you to attribute sales to specific conversations or cases.
To achieve this, follow these steps:
1. Create case custom fields. For steps to create a custom field, see Add a Custom Field.
2. Copy the field names of the custom fields you created.
You can copy the field names from the Sprinklr UI by navigating to Custom Fields. Then, locate the desired custom field and click the three-dot menu icon. On the menu, click Copy Field Name.
In this example, the custom field name is 5e291d040844e435b.
3. Update conversation context.
Based on Latest and Active Case
If you want to update the custom fields for the latest and active case, use the following code:
MessengerClient.updateConversationContext({context: { '5e291d040844e435b': ['Custom Field Value'] },});
Parameters
Parameter | Description | Required/Optional |
context | Object containing the key-value pairs of custom field names and their values. You can copy the custom field from the Sprinklr UI. | Required |
Based on Conversation ID
If you want to update case custom fields by the conversation Id, use the following code:
MessengerClient.updateConversationContext({conversationId: 'CONVERSATION_ID',context: { '5e291d040844e435b': ['Custom Field Value'] },});
Parameters
Parameter | Description | Required/Optional |
conversationId | Id of the conversation. | Required |
context | Object containing the key-value pairs of custom field names and their values. You can copy the custom field from the Sprinklr UI. | Required |
Update the Profile Context within Profile Custom Fields
When opening a chat from a custom button or hyperlink, you may want to capture relevant context about the user or profile for an active conversation.
To achieve this, follow these steps:
1. Create case custom fields. For steps to create a custom field, see Add a Custom Field.
2. Copy the field names of the custom fields you created.
You can copy the field names from the Sprinklr UI by navigating to Custom Fields. Then, locate the desired custom field and click the three-dot menu icon. On the menu, click Copy Field Name.
Whenever you want to update the profile custom field, call the following JavaScript function and pass the information for profile level custom fields.
This can be done via SDK for updating it on-demand.
import MessengerClient from '@sprinklrjs/chat-native-client'MessengerClient.updateUserContext({"5e281d040844e435b": ["Custom Field Value"]})
Parameters
Parameter | Description | Required/Optional |
Custom Field Name and its values | Object containing the key-value pairs of custom field names and their values. You can copy the custom field from the Sprinklr UI. | Required |
Get Number of Open Conversations
You might want to get the number of open conversations. You can use this information to hide the Live Chat widget based on the number of open conversations to prevent customers from starting more conversations unnecessarily.
To get the number of open conversations, follow these steps:
1. Call the following function to get the number of open conversations.
import MessengerClient from '@sprinklrjs/chat-native-client'// Call this function to fetch the number of open conversationsMessengerClient.getNumberOfOpenConversations()
2. Listen to the output of the above function to get the number of open conversations.
import MessengerClient from '@sprinklrjs/chat-native-client'// Register this callback to listen for the output of above functionMessengerClient.onNumberOfOpenConversations((count) => {// Write your implementation here})
3. If you want to stop listening to the function for number of open conversations, call the following function:
import MessengerClient from '@sprinklrjs/chat-native-client'// Call this function to stop listening for number of open conversations// This should mostly be called in componentWillUnmount function of your main appMessengerClient.offNumberOfOpenConversations()
Get Number of Unread Messages
You might want to be notified whenever there’s a change in the unread message count. This helps track the number of unread messages in real-time.
![]() Note: If the app is killed (which means, the user has completely closed the app and it is no longer running on their mobile device), you cannot fetch the number of unread messages.
Note: If the app is killed (which means, the user has completely closed the app and it is no longer running on their mobile device), you cannot fetch the number of unread messages.
If you want the unread message count to appear in the push notification payload, reach out to Sprinklr Support at tickets@sprinklr.com.
Syntax
Implement the following code to register a count handler:
import MessengerClient from '@sprinklrjs/chat-native-client';MessengerClient.registerUnreadMessagesCountHandler(this.unreadMessagesCountHandler);unreadMessagesCountHandler = (payload) => {// Success Payload:// success: true,// unreadMessagesCount// Failure Payload:// success: false,// error,};
Unregister unread messages count handler
To unregister unread messages count handler, use the following code:
// Call unregister to stop listening for unread countMessengerClient.unregisterUnreadMessagesCountHandler();
Add Delegate to Listen to External Events from Messenger
You can register a delegate to listen for external events emitted by the Live Chat SDK. These events act as a bridge between the chat interface and your mobile app, enabling your app to perform specific actions in response. This functionality allows for tighter integration between chat and app experiences. This helps brands deliver contextual interactions, streamline user flows, and drive deeper user engagement.
Common use cases include:
App Deeplinking: Trigger in-app navigation based on deep link instructions received via chat. For example, direct users to a payment screen when an agent shares a prompt.
Custom Brand Workflows: Configure external events within Sprinklr (for example, CUSTOM_REDIRECT, SHOW_PROMO_BANNER). This allows your mobile app to listen for these events and respond with tailored actions such as redirecting to a specific feature, displaying a modal, or logging analytics events.
Syntax
Implement the following function to register a delegate to listen to external events:
import MessengerClient from '@sprinklrjs/chat-native-client';MessengerClient.setMessengerActionHandler(this.messengerActionsHandler);messengerActionsHandler = (type, payload) => {};
Add Messenger Analytics Handler to Listen to Tracking Events and Screen
You can register a Messenger Analytics handler to connect your analytics system with the Live Chat SDK. This handler tracks user interactions and screen transitions within the chat interface.
Using this handler, brands can capture real-time insights such as screen views, conversation lifecycle events, call actions, and button clicks. These insights can then be forwarded to platforms like Firebase, Adobe Analytics, or internal dashboards.
By listening to both trackEvent and trackScreen callbacks, brands gain visibility into how users interact with the Live Chat experience and can measure engagement, optimize flows, or trigger follow-up actions based on in-app events.
Syntax
import MessengerClient from '@sprinklrjs/chat-native-client';MessengerClient.registerAnalyticsTracker({trackScreen: this.trackScreen,trackEvent: this.trackEvent,});trackScreen = (screenName) => {};trackEvent = ({ eventType, ...restPayload }) => {};
Configure Status Card
Status cards are used to indicate the health of a key resource to your customers. The key resource can be a tool or service that they interact with frequently.
By showing the status of this resource upfront, customers can stay informed without repeatedly contacting support. This enhances the customer experience while reducing agent workload.
![]() Note: To enable this capability, contact our support team at tickets@sprinklr.com and provide your Live Chat application ID. Status cards are available only for the modern skin version of the Live Chat widget.
Note: To enable this capability, contact our support team at tickets@sprinklr.com and provide your Live Chat application ID. Status cards are available only for the modern skin version of the Live Chat widget.
Syntax
Once the status card feature is enabled for your Live Chat widget, you can update the status card by using the following code:
import MessengerClient from '@sprinklrjs/chat-native-client’;MessengerClient.updateWidget({id: ‘WIDGET_ID’, // Same ID configured in the Live Chat builder must also be utilized heredetails: {title: ‘Your title, %%[status]’,description: ‘Your description, %%[updatedAt]’,status: ‘ALL_SYSTEMS_OPERATIONAL’,updatedAt: Date.now(),},})
Parameters
Parameter | Required/Optional | Description |
id | Required | The widget ID, which must match the ID configured in the Live Chat builder. |
details | Required | An object containing metadata about the status card displayed in the Live Chat widget. It allows customization of the widget’s title, description, status, and last updated timestamp. For more information, see the Details Object table below. |
Details Object Parameters
Parameters | Required/Optional | Description |
title | Required | The title displayed on the status card. |
description | Required | A brief description of the status update. |
status | Required | Indicates the current state of the resource. You can use the %%[status]placeholder for status. The supported statuses are mentioned in status table below. |
updatedAt | Required | Timestamp of the last status update. You can use the %%[updatedAt] placeholder to show when the status was last updated. |
On the status card, you can display the following status along with the following icons and values:
Disable Attachments for Customers
By default, users can attach files in chat. You can disable attachments in the chat widget to prevent customers from adding files such as images, videos, or documents. To do this, hide the attachment icon by passing disableAttachment: true to the takeOff() method.
Syntax
import MessengerClient from '@sprinklrjs/chat-native-client’;MessengerClient.takeOff({...restSettings,disableAttachment: true, // by default, attachments are enabled});
Parameters
Parameters | Description | Values |
disableAttachment | Enables or disables the attachment feature in Live Chat. | true | false Default value: false |
Integrate Your Brand's Custom Header in Live Chat
Instead of using Sprinklr’s default chat header, you can replace it with a custom header that aligns with your brand identity. This will help create a consistent and seamless experience for your customers.
Syntax
import { MessengerView } from '@sprinklrjs/chat-native-client';function SPRMessenger(launchOptions = {}, onDismiss) {const chatInitialisationContext = {disableHeader: false, // Default: false. To disable Sprinklr's header, set to trueisRenderedAsFullView: true // Default: true. If set to false, the brand must manage device top insets};return (<MessengerViewlaunchOptions={launchOptions}onDismiss={onDismiss}chatInitialisationContext={chatInitialisationContext}/>);}
Parameters
Parameter | Description | Values |
disableHeader | Enables or disables the Sprinklr default header. | true | false Default: false |
isRenderedAsFullView | Determines whether the Live Chat window is rendered in full view. | true | false Default: false |
Implement Back Button Handling to Control Hardware Back Button
You can use the MessengerClient.goBack() function to manage the hardware back button behavior in your Live Chat application. This allows users to seamlessly navigate back to the previous screen when they press the back button on their device, enhancing the overall user experience with intuitive and efficient navigation.
import MessengerClient from '@sprinklrjs/chat-native-client';MessengerClient.goBack();
Close Conversation
You can use the MessengerClient.closeConversation() method to close an active conversation in Live Chat. This helps brands manage conversation endings efficiently, ensuring control over when and how interactions end. For a seamless user experience, apply this method only on the conversation screen when the case is open.
import MessengerClient from '@sprinklrjs/chat-native-client';MessengerClient.closeConversation();
Close All Conversations
You can use the MessengerClient.closeAllConversations() method to close all conversations in Live Chat at once. The option to close all conversations is only visible to users with open cases. If there are no open cases or if all existing cases are already closed, this option will not be available to the user.
import MessengerClient from '@sprinklrjs/chat-native-client'; MessengerClient.closeAllConversations();Delete Conversation
You can use the MessengerClient.deleteConversation() method to permanently delete a conversation in Live Chat. This feature gives brands control over removing interactions when necessary. To ensure proper management, apply this method only on the conversation screen.
import MessengerClient from '@sprinklrjs/chat-native-client'; MessengerClient.deleteConversation();Delete All Conversations
You can use the MessengerClient.deleteAllConversations() method to delete all the conversations in Live Chat. This feature allows brands to efficiently remove interactions as needed, providing control over conversation deletions. Apply this method only on the home screen to manage deletions effectively.
import MessengerClient from '@sprinklrjs/chat-native-client'; MessengerClient.deleteAllConversations();Clear User Session
You can use the MessengerClient.clearSession() method to enable users to clear their session details. Once a user clears their session, any new conversation is treated as if it’s from a new user. This method is particularly useful for users interacting with your brand in public spaces or over a public network.
import MessengerClient from '@sprinklrjs/chat-native-client';MessengerClient.clearSession();
Use a Custom Font
You can use a custom font in your Live Chat app to ensure consistent branding across your applications.
To use a custom font in Live Chat, follow these steps:
1. Link your custom font files in your iOS and Android projects natively, such that the fonts are available throughout the project. For steps, see iOS and Android documentation.
2. Open a Sprinklr support ticket at tickets@sprinklr.com. In the support ticket, mention the font file names and the supported font weights for the texts. Refer to the following table for the supported font weights.
![]() Note: Ensure you provide at least one of the supported font weights in the support ticket.
Note: Ensure you provide at least one of the supported font weights in the support ticket.
If you provide a single font weight, it will be applied throughout the app, overriding all the other font weights. Similarly, if any of the font weights are not mentioned in the support ticket, the font weight closest to the non-mentioned font weight will be applied in the app.
Supported Font Weights
The following table lists the supported font weights:
Font Weight | Description |
Light | The light font weight is for subtle accents, secondary text, and areas where minimal emphasis is required. |
Regular | The standard font weight for most text elements. |
Medium | Medium is used for subheadings, labels, or emphasis on certain text sections without the bold impact. |
Semibold | Works well for headings, button labels, or any text that needs more attention but doesn’t require bold styling. |
Bold | Bold is designed for titles, primary headings, and call-to-action elements. |
Enabling Sentry for Crash Monitoring
You can enable Sentry in your application to monitor crash logs in mobile apps.
![]() Note: To enable Sentry, raise a support ticket at tickets@sprinklr.com with the following information:
Note: To enable Sentry, raise a support ticket at tickets@sprinklr.com with the following information:
Live Chat App Id: ID of the Live Chat app. You can get this from the Sprinklr UI. For more information, see Manage your Live Chat application.
Partner Id
Environment: Sprinklr environment (for example, prod1, prod2)
Live Chat Messenger Events & Logger
The Live Chat Logger in the Live Chat SDK provides a structured mechanism for capturing and managing real-time SDK events and system logs. It enables developers to monitor chat interactions, track user actions, and diagnose issues efficiently by logging critical events and system statuses.
Add Events Logger to SDK Events
To track and manage various events efficiently, the SDK provides a logging system that can be configured according to your requirements. The logging system supports different log levels to help debug issues effectively.
Configure the Logger
Use the following snippet to enable logging and define custom log transports:
import MessengerClient from '@sprinklrjs/chat-native-client';
MessengerClient.setLoggerConfig({
enableLogs: true, // Required to enable logs
logLevel: 4, // Optional, default is INFO (4)
transports: [
{
write(level, ...logs) {
// Implement your custom logger transport here
},
},
], // Optional, default transport is console
});
Parameters
Parameter | Required/Optional
| Value | Description
|
enableLogs | Required | Boolean (true/false) | This parameter is required to enable or disable logging. When set to true, logging is enabled, allowing the application to record log messages. If set to false, logging is disabled. |
logLevel | Optional | Integer (0 to 7) | This parameter sets the level of logging detail. The default value is 4, which corresponds to the INFO level. Refer to the table below for more details on Log Level |
Available Log Levels
The SDK supports the following log levels:
Log Level | Value | Description |
OFF | 0 | Disables all logging. No log messages will be recorded. |
FATAL | 1 | Logs only the most severe error events that will presumably lead the application to abort. |
ERROR | 2 | Logs things that went wrong so that either something failed or the system had to resort to a fallback that the user may have noticed. |
WARN | 3 | Logs things that went wrong, but were recoverable so that a user should not have noticed. |
INFO | 4 | Logs primarily large business-logic steps as the SDK connects, sends, and receives messages. |
DEBUG | 5 | Logs details of the inner workings of the SDK logic and network stack. |
TRACE | 6 | Logs high-traffic logs; tracks many objects as they move through the SDK. |
ALL | 7 | Enables all logging levels, capturing every log message. |
As is standard with most logging systems, each of these settings also includes all levels below it. Setting the SDK Logging Level to OFF disables SDK logging entirely.
Add Messenger Events Listener to SDK Events
To track various SDK-related events, register an event listener using the registerEventsListener method.
Register an Events Listener
import MessengerClient from '@sprinklrjs/chat-native-client';
MessengerClient.registerEventsListener(this.eventsListener);
eventsListener = (eventGroup, eventType, payload) => {
// Handle events here
};
Supported Events
The SDK emits events under different event groups. Below is the list of supported event groups and their event types:
MESSENGER Events
Event Type | Description | SDK Method |
BOOT_FAILED | Messenger boot process failed. | takeOff |
BOOT_STARTING | Messenger boot process started. | takeOff |
BOOT_COMPLETE | Messenger boot process completed successfully. | takeOff |
USER_LOGOUT | User logged out. | cleanup |
UPDATE_USER_STARTING | Updating user information started. | updateUser/ updateCustomUser |
UPDATE_USER_FAILED | Updating user information failed. | updateUser/ updateCustomUser |
UPDATE_USER_SUCCESS | User information updated successfully. | updateUser/ updateCustomUser |
UPDATE_USER_CONTEXT_FAILED | Updating user context failed. | updateUserContext |
UPDATE_CLIENT_CONTEXT_FAILED | Updating client context failed. | updateClientContext |
ANONYMOUS_SESSION_CREATION_STARTING | Anonymous session creation started. | cleanup |
ANONYMOUS_SESSION_CREATION_SUCCESS | Anonymous session created successfully. | cleanup |
ANONYMOUS_SESSION_CREATION_FAILED | Anonymous session creation failed. | cleanup |
NETWORK Events
Event Type | Description |
INTERNET_CONNECTION_STATUS_CHANGED | Internet connection status changed. |
PUSH_NOTIFICATION Events
Event Type | Description | SDK Method |
PUSH_NOTIFICATION_REGISTRATION_EXISTS | Push notification registration already exists. | updatePushToken |
PUSH_NOTIFICATION_REGISTRATION_SUCCESS | Push notification registration successful. | updatePushToken |
PUSH_NOTIFICATION_REGISTRATION_FAILED | Push notification registration failed. | updatePushToken |
PUSH_NOTIFICATION_UNREGISTRATION_SUCCESS | Push notification unregistered successfully. | updatePushToken |
PUSH_NOTIFICATION_UNREGISTRATION_FAILED | Push notification unregistration failed. | updatePushToken |
CONVERSATION Events
Event Type | Description |
NEW_CONVERSATION_INITIATION_FAILED | Failed to initiate a new conversation. |
CONVERSATION_CLOSED | Conversation closed. |
CONVERSATION_DELETED | Conversation deleted. |
CONVERSATION_CLOSE_FAILED | Failed to close the conversation. |
CONVERSATION_DELETE_FAILED | Failed to delete the conversation. |
CONVERSATION_CLOSED_BY_AGENT | Conversation was closed by an agent. |
Customizing Peer Dependencies
This section explains which dependencies are mandatory, which can be customized, and how to register or unregister custom implementations for seamless integration.
Why is Customization required?
In some cases, your existing codebase may already include specific libraries for functionalities such as SVG rendering, web views, and network information. If the Sprinklr SDK enforces its own versions of these dependencies, it could lead to conflicts and compatibility issues with your setup.
To maintain consistency and avoid disruptions, the Sprinklr SDK allows you to inject custom implementations for certain dependencies. This ensures a seamless integration process, allowing you to:
Use your preferred libraries.
Avoid breaking existing functionality.
Leverage the full capabilities of the Sprinklr SDK without replacing core dependencies.
Types of Peer Dependencies
The peer dependencies in the Sprinklr SDK are classified into mandatory and customizable dependencies.
1. Mandatory Peer Dependencies
These dependencies are required for the Sprinklr SDK to function properly. They cannot be replaced, and their versions must be greater than or equal to the specified ones:
Dependency | Required Version |
>= 4.0.0 | |
>= 0.70.0 | |
>= 8.0.0 | |
>= 18.2.0 | |
>= 1.0.1 |
2. Customizable Dependencies
The following dependencies can be overridden with your own implementations. Each dependency is identified by a dependency key and an implementation type provided by Sprinklr.
Dependency | Implementation Type | Dependency Key |
SPRSvg | SVG | |
SPRWebview | WEBVIEW | |
SPRNetInfo | NET_INFO | |
SPRClipboard | CLIPBOARD | |
SPRStatusBar | STATUS_BAR | |
SPRCameraRoll | CAMERA_ROLL | |
SPRPermissions | PERMISSIONS | |
SPRVectorIcons | VECTOR_ICONS | |
SPRVideoPlayer | VIDEO_PLAYER | |
SPRMediaPicker | MEDIA_PICKER | |
SPRFileManager | FILE_MANAGER | |
SPRCustomStorage | ASYNC_STORAGE |
Registering Custom Implementations
To provide a custom implementation, follow these steps:
1. Identify the Dependency Key
Each dependency corresponds to a dependency key that you will use for registration.
2. Import the Required Modules
Import the necessary implementation type and MessengerDependenciesManager from the Sprinklr SDK.
Example: Importing an Implementation Type
import { SPRCustomStorage, EXTERNAL_DEPENDENCY } from '@sprinklrjs/chat-native-client'; Note: The above import is just an example for SPRCustomStorage and does not represent an actual implementation.
3. Register Multiple Dependencies
You can register multiple dependencies at once using registerDependencies().
Example: Registering Custom Implementations
import { EXTERNAL_DEPENDENCY, MessengerDependenciesManager } from '@sprinklrjs/chat-native-client';MessengerDependenciesManager.getInstance().registerDependencies({[EXTERNAL_DEPENDENCY.ASYNC_STORAGE]: {getItem: (key) => Promise.resolve(''),setItem: (key, value) => Promise.resolve(),removeItem: (key) => Promise.resolve(),},});
4. Register a Single Dependency
If you only need to override a specific dependency, use registerDependency().
Example: Registering a Single Dependency
import { EXTERNAL_DEPENDENCY, MessengerDependenciesManager } from '@sprinklrjs/chat-native-client';MessengerDependenciesManager.getInstance().registerDependency(EXTERNAL_DEPENDENCY.ASYNC_STORAGE, {getItem: (key) => Promise.resolve(''),setItem: (key, value) => Promise.resolve(),removeItem: (key) => Promise.resolve(),});
Unregistering Custom Implementations
If you need to remove a custom implementation, you can unregister a specific dependency or all custom dependencies at once.
1. Unregister a Single Dependency
import { EXTERNAL_DEPENDENCY, MessengerDependenciesManager } from '@sprinklrjs/chat-native-client';MessengerDependenciesManager.getInstance().unregisterDependency(EXTERNAL_DEPENDENCY.ASYNC_STORAGE);
2. Unregister All Custom Dependencies
MessengerDependenciesManager.getInstance().unregisterDependencies();
Customizing peer dependencies in the Sprinklr SDK helps avoid conflicts, maintain consistency, and enhance flexibility in your integration. By registering or unregistering dependencies as needed, you can ensure a seamless and efficient implementation of the SDK while retaining control over your app’s existing libraries.
In App Notification
In-app notifications allow users to receive real-time updates when a message or reply is received from a support agent while the app is in the foreground. These notifications appear as banners at the top of the app, ensuring users do not miss important updates.
You can either use the:
1. Sprinklr-provided Messenger Notification Banner
2. Customize the notification view to match your app's design.
1) Enable/Disable In-App Notifications
Using Sprinklr’s Default Notification Banner
To enable Sprinklr's in-app notification banner, add MessengerNotificationBanner parallel to the root view of your application.
Implementation
import { MessengerNotificationBanner } from '@sprinklrjs/chat-native-client';function onTapNotificationBanner(notification) {// open sprinklr messenger view with launch optionsconst launchOptions = { type: 'NOTIFICATION', data: notification };presentMessengerView(launchOptions); // provide your presentMessengerView.. we need to open conversation in messenger corresponding to the notification}function MainApp () {return (<><RootView /><MessengerNotificationBanner onTapBanner={onTapNotificationBanner} /></>)}
Disabling In-App Notifications
If you want to disable in-app notifications, avoid adding MessengerNotificationBanner to your UI or handle notifications through custom logic (explained in the next section).
2) Customizing In App Notification as per Preference
If you prefer a custom notification banner instead of Sprinklr’s default banner, follow these additional steps:
Register a Custom Notification Handler
You need to register your own notification handler to process received notifications and display them in your custom banner.
Implementation
import MessengerClient from '@sprinklrjs/chat-native-client'// Custom notification handlerfunction notificationHandler(notification) {// Implement your custom logic to display notification in your custom banner}MessengerClient.registerNotificationHandler(notificationHandler)
Notification Object Structure
The notification object follows this format:
{"data": {"messageId": "<MESSAGE_ID>","title": "<NOTIFICATION_TITLE>", //live chat account display name"description": "<NOTIFICATION_DESCRIPTION>", //notification message"cId": "<CONVERSATION_ID>", // Conversation Id"imageURI": "<IMAGE_URI>" // Image to display inside the notification banner}}
Field | Type | Description |
messageId | String | Unique identifier of the message associated with the notification. |
title | String | Title of the notification. Typically, this is the live chat account display name. |
description | String | Main content or message of the notification. |
cId | String | Unique identifier of the conversation related to the notification. |
imageURI | String | URI of the image to be displayed in the notification banner. |
Push Notifications
Push notifications allow users to receive real-time updates from the Live Chat Messenger, ensuring seamless communication even when the app is running in the background or closed.
Prerequisites
Before configuring push notifications, ensure you have the following:
Android
Google service.json file (specific to each environment - staging/production).
Refer to the document below to know how to set up the service.json file
 Note: Service.json file can or cannot be environment specific depending on your organization.
iOS
APNS certificate (P12 format) and its credentials (specific to each environment - staging/production)
OR
P8 Certificate and BundleId, Key, Team Id.
![]() Important Notes:
Important Notes:
The Google service.json file must match the respective environment (staging/production).
The APNS certificate (P12 Certificate or P8 Key) and its credentials must be different for staging and production environments.
If testing push notifications on a production iOS application, use TestFlight build.
If the Google service.json file is different sandbox/production environment and you are testing the push notification setup on a production mobile application, please ensure to use Android release build.
If using a different Google service.json file for sandbox/production, ensure TestFlight is used when testing on production (Android).
Configuration
To enable push notifications, please raise a support ticket to tickets@sprinklr.com with the following information:
Google service.json file (for Android).
APNS certificate (P12) and credentials (for iOS) OR P8 Certificate with Key, BundleId, TeamId
Live Chat App ID.
Partner ID.
Target Environment.
1) Register/Unregister for Push Notifications
You must register the Live Chat Messenger to send and receive push notifications. This requires updating the push token received from APNS (iOS) or FCM (Android).
![]() Note: It should be called only after takeOff is completed or livechat is initialized.
Note: It should be called only after takeOff is completed or livechat is initialized.
Register for Push Notifications
import MessengerClient from '@sprinklrjs/chat-native-client'MessengerClient.updatePushToken('f30c3b0835ecd378a134c74bce8cea866df8c5b6e12a8c219c9bb288f7270e22')
Unregister from Push Notifications
To stop receiving push notifications, unregister by sending an empty token:
import MessengerClient from '@sprinklrjs/chat-native-client'MessengerClient.updatePushToken('');
2) Handle Messenger Push Notifications
Once registered, push notifications may be received from both the Messenger and from your application. It is important to distinguish and handle Messenger notifications correctly.
Identify Messenger Notifications
To check if a received notification is from Messenger:
import MessengerClient from '@sprinklrjs/chat-native-client'let isMessengerNotification = MessengerClient.canHandlePushNotification(notification);// Returns true if it's a Messenger notification, otherwise false.
Displaying Messenger Notifications
When a push notification is received and identified as Messenger Push Notification, follow these steps to display it:
import MessengerClient from '@sprinklrjs/chat-native-client';// Handle incoming push notificationsfunction onNotificationReceived(notification) {if (MessengerClient.canHandlePushNotification(notification)) {if (!notification.foreground) {// If the app was in the background or killed, navigate to the corresponding conversationhandleMessengerPushNotification(notification);}return;}// Handle other platform notifications}
Open Messenger on Click of Push Notification
Call the below method once the user clicks on push notification. It will redirect you to the conversation screen of Live Chat.
// Open Messenger conversation for the received Messenger push notificationfunction handleMessengerPushNotification(notification) {if (MessengerClient.isMessengerMounted()) {MessengerClient.handlePushNotification(notification);} else {// Open Messenger view with launch optionsconst launchOptions = { type: 'NOTIFICATION', data: notification };presentMessengerView(launchOptions);}}// provide your configured presentMessengerView function to open conversation in messenger corresponding to the notification
By correctly registering for push notifications and distinguishing Messenger notifications, you can enhance the user experience within your mobile app.
Sample Push Notification Payloads
Android
{"notification": {"title":"NOTIFICATION_TITLE","body":"NOTIFICATION_BODY"},"data": {"sender": "SENDER_ID","nid": "N_ID","mId": "M_ID","type": "NEW_MESSAGE","et": "LIVE_CHAT_MOBILE_NOTIFICATION","cId": "C_ID","badge": 1,"sound": "default","title": "NOTIFICATION_TITLE","message": "NOTIFICATION_BODY"}}
![]() Note: notification key and badge key inside data is DP controlled. Kindly raise a support ticket at tickets@sprinklr.com to enable these.
Note: notification key and badge key inside data is DP controlled. Kindly raise a support ticket at tickets@sprinklr.com to enable these.
Parameter | Sub-parameter | Type | Description |
notification | Object | Object containing notification details. | |
title | String | Title of the notification (displayed in the system tray). | |
body | String | Body/message of the notification. | |
data | Object | Object containing other details. | |
sender | String | Unique identifier of the message sender. | |
nid | String | Notification ID used to uniquely identify the notification. | |
mId | String | Message ID associated with the notification. | |
type | String | Type of the event, e.g., NEW_MESSAGE. | |
et | String | Event type source, e.g., LIVE_CHAT_MOBILE_NOTIFICATION. | |
cId | String | Conversation ID the message is associated with. | |
badge | Integer | Badge count to display on the app icon. | |
sound | String | Notification sound setting (e.g., default). | |
title | String | Title displayed in the app-specific notification context. | |
message | String | Message body shown in the app-specific notification view. |
iOS
{"aps": {"alert": {"title": "NOTIFICATION_TITLE","body": "NOTIFICATION_BODY"},"sound": "default","badge": 1},"sender": "SENDER_ID","nid": "N_ID","mId": "M_ID","type": "NEW_MESSAGE","et": "LIVE_CHAT_MOBILE_NOTIFICATION","cId": "C_ID"}
![]() Note: badge key inside aps is DP controlled. Kindly raise a support ticket at tickets@sprinklr.com to enable these.
Note: badge key inside aps is DP controlled. Kindly raise a support ticket at tickets@sprinklr.com to enable these.
Parameter | Sub-parameter | Type | Description |
aps | alert.title | String | Title of the notification (displayed in system tray). |
alert.body | String | Body of the notification message. | |
sound | String | Sound to play for the notification (e.g., default). | |
badge | Integer | Badge count to be displayed on the app icon. | |
sender | String | Unique identifier of the sender. | |
nid | String | Notification ID used to uniquely identify the notification. | |
mid | String | Message ID associated with the notification. | |
type | String | Type of the event (e.g., NEW_MESSAGE.). | |
et | String | Event type source (e.g., LIVE_CHAT_MOBILE_NOTIFICATION). | |
cId | String | Conversation ID the message is associated with. |
Troubleshooting
This document provides solutions to common issues you might encounter while integrating the Sprinklr Live Chat React Native SDK.
1. Live Chat Not Showing Up for Authenticated Users
If the Live Chat widget is not appearing after passing authenticated user details, follow these steps to verify the user hash:
1. Navigate to your Live Chat Application in Sprinklr.
2. Click the Options icon next to your application and select Validate User Hash.

3. In the Validate User Hash window, enter the following details:
User ID
Profile Image URL
First Name
Last Name
Phone Number
Email
4. Click Copy Generated Hash and compare it with the hash generated in your implementation.

5. If the hashes don’t match, ensure your hash generation logic aligns with Sprinklr’s authentication mechanism.
2. App Crashes While Rendering MessengerView
If your app crashes due to UIViewControllerBasedStatusBarAppearance being set to false in Info.plist, follow these steps to overwrite the status bar behavior without modifying the global setting:
Solution: Wrap MessengerView inside MessengerUIManagersProvider
import { MessengerUIManagers } from '@sprinklrjs/chat-native-client';import { useMemo } from 'react';const { Provider: MessengerUIManagersProvider, UI_MANAGER_TYPES: MESSENGER_UI_MANAGER_TYPES } = MessengerUIManagers;const statusBarManager = useMemo(() => ({pushStackEntry: props => { /* Custom implementation */ },popStackEntry: props => { /* Custom implementation */ },replaceStackEntry: (propsToReplace, props) => { /* Custom implementation */ },setHidden: (hidden, animation) => { /* Custom implementation */ },setBarStyle: (barStyle, animated) => { /* Custom implementation */ },setBackgroundColor: (backgroundColor, animation) => { /* Custom implementation */ },setTranslucent: translucent => { /* Custom implementation */ },}), []);const uiManagers = useMemo(() => ({[MESSENGER_UI_MANAGER_TYPES.STATUS_BAR]: statusBarManager,}), [statusBarManager]);return (<MessengerUIManagersProvider value={uiManagers}><MessengerViewonDismiss={navigation?.pop}launchOptions={route?.params?.launchOptions}chatInitialisationContext={route?.params?.chatInitialisationContext}/></MessengerUIManagersProvider>);
This ensures the MessengerView does not crash while preserving your app’s existing status bar settings.
3. Disabling Autolinking for Peer Dependencies (Android)
If your app faces compatibility issues due to autolinking, disable autolinking for @sprinklrjs/chat-native-client on Android.
Solution: Modify react-native.config.js
1. Create a react-native.config.js file in your project’s root directory (if it doesn’t exist).
2. Add the following configuration:
module.exports = {dependencies: {'@sprinklrjs/chat-native-client': {platforms: {android: null, // Disable Android autolinking; other platforms remain unaffected},},},};
3. Run a clean installation using Yarn:
yarn install
4. Rebuild your app:
cd android && ./gradlew clean && cd ..yarn android
This prevents conflicts and ensures smooth integration with your project.
4. Declaration File Not Found
You may encounter the following TypeScript error when importing the @sprinklr/chat-native-client module:
Could not find a declaration file for module '@sprinklr/chat-native-client'. '/Users/dhaval.patel/gopuff_ws/theseus/node_modules/@sprinklr/chat-native-client/lib/index.js' implicitly has an 'any' type. Solution:
To resolve this issue, you have two options:
Install Type Definitions (if available):
npm i --save-dev @types/sprinklr__chat-native-client2. Manually Declare the Module: If type definitions are not available, create a declaration file in your project root:
Create a file named index.d.ts (or any .d.ts file) in the root directory.
Add the following declaration:
declare module '@sprinklr/chat-native-client';
5. Build Failed with an Exception
You may see a build failure during the Android build process with an error similar to:
> Task :sprinklrjs_chat-native-client:packageDebugResources FAILED[Incubating] Problems report is available at: file:///Users/user/Desktop/untitled%20folder/MSIL_ICP_FE/android/build/reports/problems/problems-report.htmlDeprecated Gradle features were used in this build, making it incompatible with Gradle 9.0.You can use '--warning-mode all' to show the individual deprecation warnings and determine if they come from your own scripts or plugins.For more on this, please refer to https://docs.gradle.org/8.11.1/userguide/command_line_interface.html#sec:command_line_warnings in the Gradle documentation.251 actionable tasks: 1 executed, 250 up-to-dateFAILURE: Build failed with an exception.* What went wrong:A problem was found with the configuration of task ':sprinklrjs_chat-native-client:packageDebugResources' (type 'MergeResources').- Gradle detected a problem with the following location: '/Users/user/Desktop/untitled folder/MSIL_ICP_FE/node_modules/@sprinklrjs/chat-native-client/android/build/generated/res/resValues/debug'.Reason: Task ':sprinklrjs_chat-native-client:packageDebugResources' uses this output of task ':@sprinklr-chat-native-client:generateDebugResValues' without declaring an explicit or implicit dependency. This can lead to incorrect results being produced, depending on what order the tasks are executed.Possible solutions:1. Declare task ':@sprinklr-chat-native-client:generateDebugResValues' as an input of ':sprinklrjs_chat-native-client:packageDebugResources'.2. Declare an explicit dependency on ':@sprinklr-chat-native-client:generateDebugResValues' from ':sprinklrjs_chat-native-client:packageDebugResources' using Task#dependsOn.3. Declare an explicit dependency on ':@sprinklr-chat-native-client:generateDebugResValues' from ':sprinklrjs_chat-native-client:packageDebugResources' using Task#mustRunAfter.For more information, please refer to https://docs.gradle.org/8.11.1/userguide/validation_problems.html#implicit_dependency in the Gradle documentation.
Solution:
To bypass this issue, explicitly disable the Android platform for the @sprinklrjs/chat-native-client module in your react-native.config.js file:
'@sprinklrjs/chat-native-client': {platforms: {android: null,},},
6. Android Build Failure When minifyEnabled is Set to True
You are encountering an Android build failure when minifyEnabled is set to true.
Solution:
Add the following rule to your proguard-rules.pro file.
-keep class com.facebook.react.devsupport.** { *; }